

Go to modelshipwrights.com for the current dynamic site!


River-boat Scratch Build
4
Comments
Grzegorz Ziecina (Pedro) recently treated us with forum post with an impressive looking riverboat scratch-build being the focus, and here, Greg shares the build story with us (and more images)!
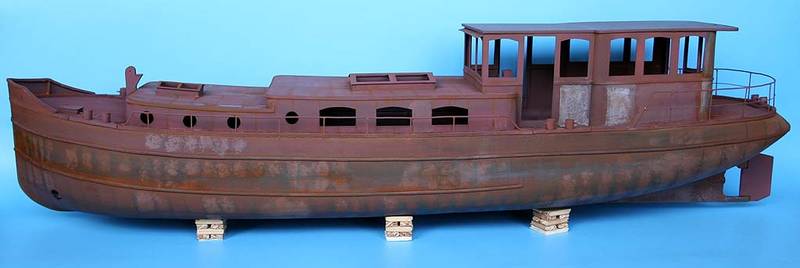
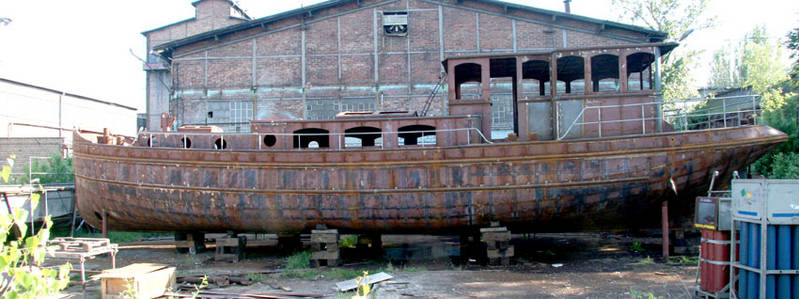
I have started the build with a set of plans and few pictures of the real boat given to me by the customer. Pictures became the source for detailing the interior of the wheelhouse as well as paint guide for the exterior. Plans were scaled in my pc to give the overall length of the model at 60 cm. This was the size that customer wanted and with the original length of the boat at about 20 meters it gave almost exactly 1:33 scale. Of course you can scale the plans you have to whatever size you need or find most suitable for your build.
First thing was to print out the deck outline and the profile. I made a cutout in both the profile rib and matching cutout in the deck to accommodate the lower cabin tub. This was done just to give model the depth behind the lower cabin windows. Sides of the tub were drawn from the cutout taken from the profile rib; front and the back were measured accordingly. All the aforementioned parts were cut from 3mm thick card. Firstly I have put together the tub using polymer glue. When glue cured I have drawn two central lines on the lower side of the deck and the tub to ensure proper lining of the tub, profile and deck. Firstly I matched the tub to the deck and when those cured I glued the profile rib onto construction. At that time I had only the drawing of the 'maximal' rib and starting from this I have drawn two 4 half ribs to go on the front and the back of the tub on both sides of the profile rib.
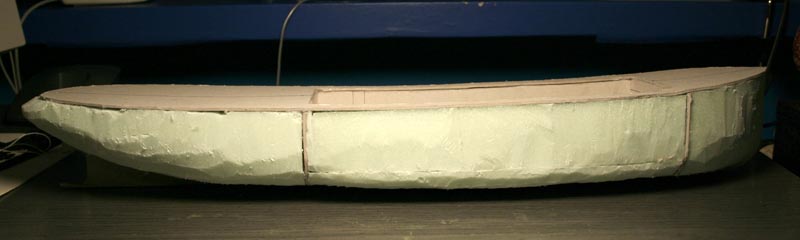
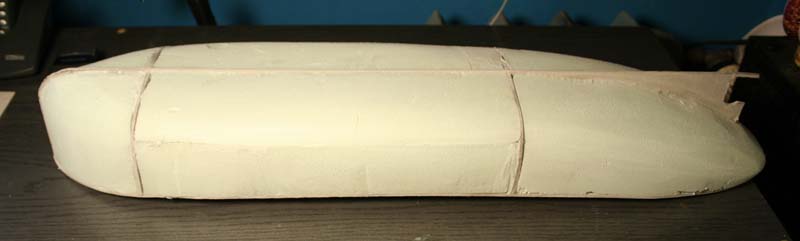
Next thing was to fill the spaces in the construction with Styrofoam. I have cut the appropriate chunks of the Styrofoam and fitted them and cut down accordingly to the spaces in the framework. I drew the deck and the ribs outline on the Styrofoam pieces and trimmed the parts to match the drawn lines.
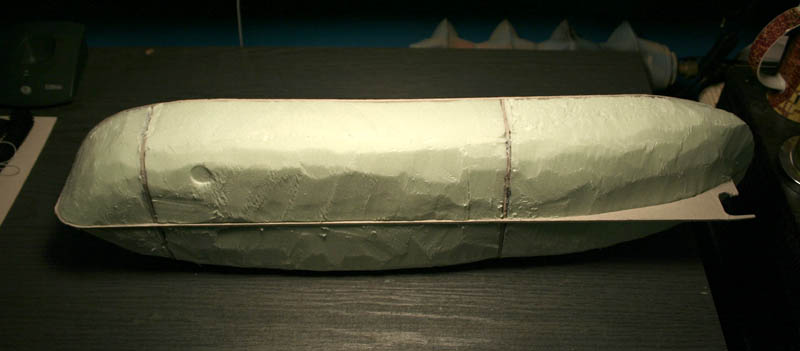
Then I glued the prepared parts into the framework, trimmed them closer and finer and lastly sanded everything smooth.
Scratchbuilding the river boat. . .
The incentive to scratch built this build came rather unexpected in person of a friend from my Academy who wanted a model of a rusty boat to use as a background in a video, which he and his friends wanted to shoot.I have started the build with a set of plans and few pictures of the real boat given to me by the customer. Pictures became the source for detailing the interior of the wheelhouse as well as paint guide for the exterior. Plans were scaled in my pc to give the overall length of the model at 60 cm. This was the size that customer wanted and with the original length of the boat at about 20 meters it gave almost exactly 1:33 scale. Of course you can scale the plans you have to whatever size you need or find most suitable for your build.
The Hull
First thing was to print out the deck outline and the profile. I made a cutout in both the profile rib and matching cutout in the deck to accommodate the lower cabin tub. This was done just to give model the depth behind the lower cabin windows. Sides of the tub were drawn from the cutout taken from the profile rib; front and the back were measured accordingly. All the aforementioned parts were cut from 3mm thick card. Firstly I have put together the tub using polymer glue. When glue cured I have drawn two central lines on the lower side of the deck and the tub to ensure proper lining of the tub, profile and deck. Firstly I matched the tub to the deck and when those cured I glued the profile rib onto construction. At that time I had only the drawing of the 'maximal' rib and starting from this I have drawn two 4 half ribs to go on the front and the back of the tub on both sides of the profile rib.
Next thing was to fill the spaces in the construction with Styrofoam. I have cut the appropriate chunks of the Styrofoam and fitted them and cut down accordingly to the spaces in the framework. I drew the deck and the ribs outline on the Styrofoam pieces and trimmed the parts to match the drawn lines.
Then I glued the prepared parts into the framework, trimmed them closer and finer and lastly sanded everything smooth.
About the Author


FROM: WOJEWODZTWO POMORSKIE, POLAND
I was born in 1982. Since then I live in my beloved city, Gdynia. I got my first model when I was six. I mostly build 1:35 aromor and softskins and 1:24/25 cars. Although thats not a rule...:) I studied Industrial Design at the Academy of Fine Arts in Gdańsk, and received a Master Degree ...
Comments

Excellent work here. I love the very realistic build and the finish is great. It is a refreshing change for me to see this one. Thanks a million for posting it. Bravo and three cheers
SEP 17, 2007 - 12:28 PM


Great job even tho I don't mess with boats looks the part.
Very good.
NOV 19, 2007 - 01:46 PM

I am a railway modeller but with an interest in WW! British destroyers. I found this article by accident, and I am really impressed!
Well done Grzegorz (Pedro) - you have done a superb job.
JAN 02, 2011 - 05:20 AM
Copyright ©2021 by Grzegorz Ziecina. _OPINIONS Model Shipwrights, KitMaker Network, or Silver Star Enterrpises. Images also by copyright holder unless otherwise noted. Opinions expressed are those of the author(s) and not necessarily those of Model Shipwrights. All rights reserved. Originally published on: 2007-08-20 00:00:00. Unique Reads: 34735

WEB HOSTING BY


Copyright ©2021 Model Shipwrights and Kitmaker Network, a subsidiary of Silver Star Enterprises
All Rights Reserved. Please read our Conditions of Use and Privacy Policy.
All Rights Reserved. Please read our Conditions of Use and Privacy Policy.