

Go to modelshipwrights.com for the current dynamic site!


1⁄350Water-line Conversion of Injection Molded Full Hulls
6
Comments

"MSW crew-mate Kym Knight (Rab) shares a treatise on his technique of converting full hull model kits to water-line style, in this step-by-step tutorial feature!"
So after some thought, I think I've come up with a process that, (though may take a little longer - the Yahagi hull took me 1.5 hours, not including glue drying time) adequately solves the straight cut problem and the constant danger of using a X-acto blade scalpel knife to repeatedly score a line. So here is a basic step by step on what I did to cut down the Hasegawa's Yahagi hull.
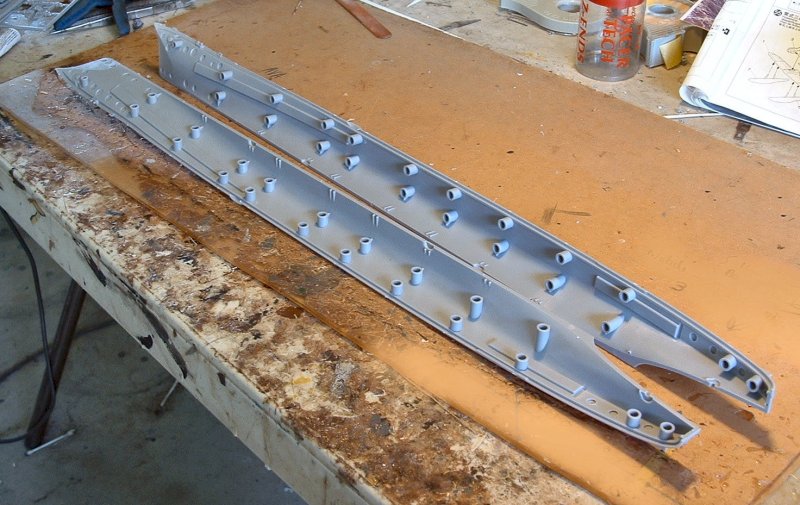
The two hull halves fresh off the sprues. Notice the internal hull bracing locator holes. The water-line is located somewhere between the two upper and lower points and as I have to know where to cut the bracing pieces, I will have to mark the line.
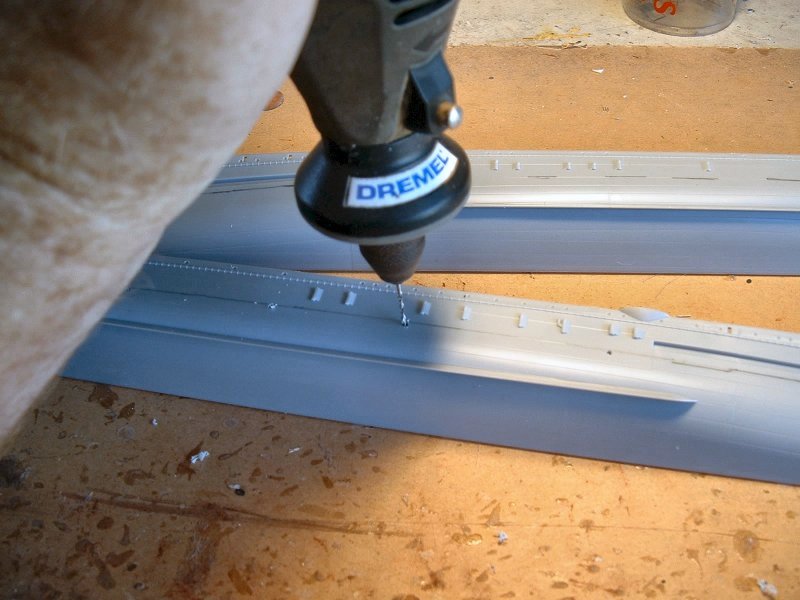

On this hull and many of the Japanese kits, there is a very faint but raised water-line and using a sharpened pencil, carefully run it along this rib. On other kits without a discernable line, I use the 1:350 scale colour chart supplied to measure and mark it onto the hull, then lay Tamiya tape along the upper side of the line. Once I am happy with the finished result, I'll drill a 1mm hole at each bracing point, thereby able to see where the internal braces must be cut.
Introduction
Many of the recently produced kits are released as full hull only, leaving the water-line/ diorama builders in a bit of a bind as how to show them 'at sea'. I've used a couple of different methods, including the little rotary saw on my Dremel, but the completed cut line always ended with unsatisfactory results.So after some thought, I think I've come up with a process that, (though may take a little longer - the Yahagi hull took me 1.5 hours, not including glue drying time) adequately solves the straight cut problem and the constant danger of using a X-acto blade scalpel knife to repeatedly score a line. So here is a basic step by step on what I did to cut down the Hasegawa's Yahagi hull.
...shoving off!
The two hull halves fresh off the sprues. Notice the internal hull bracing locator holes. The water-line is located somewhere between the two upper and lower points and as I have to know where to cut the bracing pieces, I will have to mark the line.
On this hull and many of the Japanese kits, there is a very faint but raised water-line and using a sharpened pencil, carefully run it along this rib. On other kits without a discernable line, I use the 1:350 scale colour chart supplied to measure and mark it onto the hull, then lay Tamiya tape along the upper side of the line. Once I am happy with the finished result, I'll drill a 1mm hole at each bracing point, thereby able to see where the internal braces must be cut.
About the Author


FROM: QUEENSLAND, AUSTRALIA
I just love modelling stuff with big guns!
Comments


Very interesting Kym.....will try it out on my next project which will probably be the Trump Richelieu.....
Take care
Louis
Malta
FEB 03, 2010 - 05:34 AM

Very nice feature. I have a ship in my stash that is a full hull in 1/700 scale that I want to make into a waterline. This will be of great help.
Sam
FEB 03, 2010 - 05:58 AM


Kym
Superb work on a clear & concise tutorial.
A lot of work and its greatly appreciated.
Cheeers
Sean
FEB 10, 2010 - 12:18 PM

Kym - thanks for taking the ime and effort to put this together; instant bookmark for me! Cheers
FEB 13, 2010 - 07:40 AM
Copyright ©2021 by Kym Knight. _OPINIONS Model Shipwrights, KitMaker Network, or Silver Star Enterrpises. Images also by copyright holder unless otherwise noted. Opinions expressed are those of the author(s) and not necessarily those of Model Shipwrights. All rights reserved. Originally published on: 2010-02-03 00:00:00. Unique Reads: 13001

WEB HOSTING BY


Copyright ©2021 Model Shipwrights and Kitmaker Network, a subsidiary of Silver Star Enterprises
All Rights Reserved. Please read our Conditions of Use and Privacy Policy.
All Rights Reserved. Please read our Conditions of Use and Privacy Policy.