


Go to modelshipwrights.com for the current dynamic site!
Hosted by Steve Joyce
Waterline 350th Nagato

wildspear

Joined: April 03, 2007
KitMaker: 960 posts
Model Shipwrights: 901 posts

Posted: Monday, January 28, 2008 - 01:43 AM UTC
great looking build so far. can't wait to see it in your dio.

skipper

Joined: February 28, 2002
KitMaker: 5,182 posts
Model Shipwrights: 4,070 posts

Posted: Monday, January 28, 2008 - 03:43 AM UTC
IMPRESSIVE!
As for the cable reels, you can opt to have a couple of them with cable... I have made my 1/700 with thin copper wire, at this scale perhaps you can twine to wires together so that have a look like cable and give some turns on the drum so that they are not nude. Not all the drums are always filled with cable, so, you can have an artistic license on which ones you're going to fill with cable/rope.
Skipper


Clanky44

Joined: September 15, 2005
KitMaker: 1,901 posts
Model Shipwrights: 934 posts

Posted: Saturday, February 16, 2008 - 01:08 AM UTC
I'm nearing the painting stage and need a few questions answered before I start.
1. The 25mm AA guns, whether they be single, double or triple mounts, are they connected to directors, or are they free to be positioned ramdomly?
2. Considering the Nagato I'm building would of been at sea from 1936 to 1941-2, would she have shown much in the way of weathering? Would the weathering be more acute closer to the water? Keep in mind that I am showing her waterline and not as a full hull display.
3. Some of the clearest photos I have of the searchlights, show them to be a dark tint glass, where these lights clear, or where they tinted? I have an assortment of MV black lenses that might be of use.
thanks,
Frank
Removed by original poster on 03/08/08 - 04:05:16 (GMT).
Clanky44
Joined: September 15, 2005
KitMaker: 1,901 posts
Model Shipwrights: 934 posts
Posted: Friday, March 07, 2008 - 04:12 PM UTC
Sorry folks, lets see if I can get this to work...


gator
Vendor

#027
Joined: April 13, 2005
KitMaker: 5,422 posts
Model Shipwrights: 5,079 posts

Posted: Friday, March 07, 2008 - 04:22 PM UTC
Truly awesome work Frank. I'm in awe.
later...Gator
later...Gator


JMartine
Joined: October 18, 2007
KitMaker: 1,698 posts
Model Shipwrights: 1,514 posts

Posted: Saturday, March 08, 2008 - 05:55 AM UTC
I just found this thread... amazing work! The Pe looks gorgeous, and just flawless construction... thanks for sharing!

Gunny
Joined: July 13, 2004
KitMaker: 6,705 posts
Model Shipwrights: 4,704 posts
Posted: Sunday, March 09, 2008 - 10:35 PM UTC
Frank, your PE enhancements are absolutely amazing, mate...no flaws from where I'm sitting!
This build is going to be a true showpiece, when complete...we definitely have a spot reserved for her in our "Features" department...
This build is going to be a true showpiece, when complete...we definitely have a spot reserved for her in our "Features" department...

modelmanuk

Joined: March 23, 2008
KitMaker: 2 posts
Model Shipwrights: 1 posts

Posted: Friday, April 25, 2008 - 09:47 AM UTC
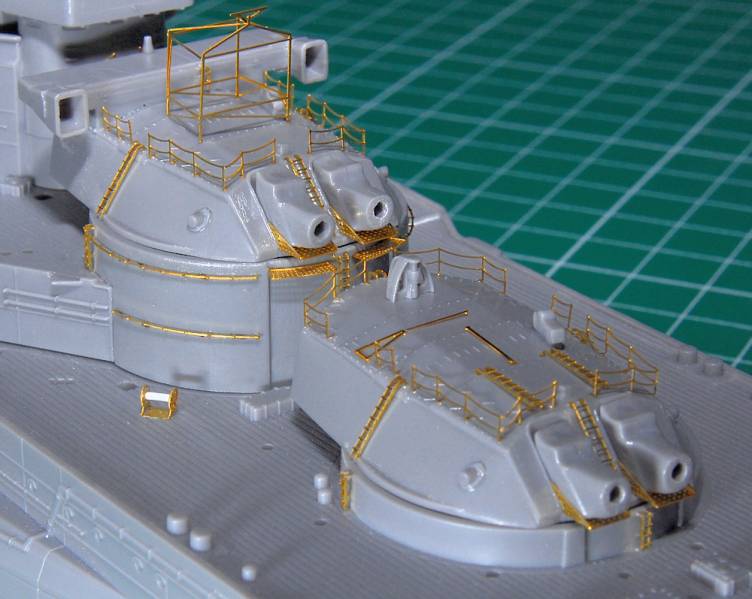
I have just got the WEM PE and they have the frame work around the funnel in their PE set instead of using the included plastic

blaster76
Joined: September 15, 2002
KitMaker: 8,985 posts
Model Shipwrights: 3,509 posts

Posted: Saturday, April 26, 2008 - 08:35 AM UTC
Iam going to hold off on my kit for a while, though my fingers are itching to get at her. I want to awit and see what other PE sets show up. I have to admit, those Hasegawa ones definitly are unbelievable. Might end up getting the #1 and #2 set, but will wait and see what GMM puts out. Loren says it will be pretty inclusive and plans for his normal $42 price tag. I didn't know WEm had released a set for her, so I am going to have to check that out as well.
Keep posting Frank, I hope you don't mind if I copy a lot of the pictures to use as my reference when I get around to building mine.
Keep posting Frank, I hope you don't mind if I copy a lot of the pictures to use as my reference when I get around to building mine.


Karybdis
Joined: December 27, 2006
KitMaker: 846 posts
Model Shipwrights: 740 posts

Posted: Saturday, April 26, 2008 - 11:00 AM UTC
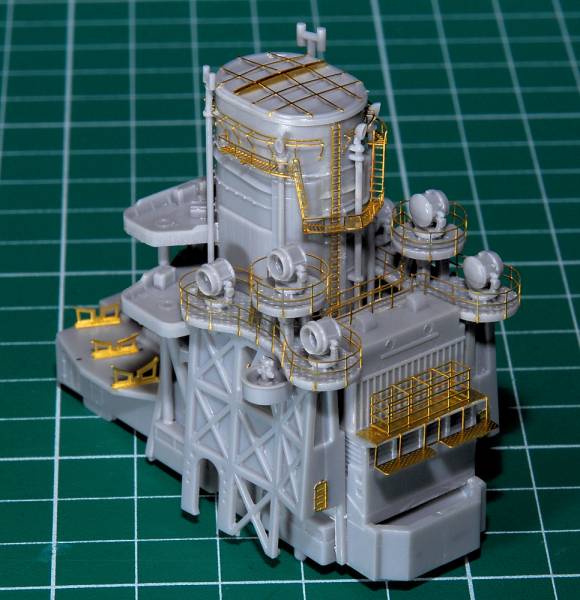
Lookin' good, man! That funnel's really bringing it all together!


Murdo

Joined: May 25, 2005
KitMaker: 2,218 posts
Model Shipwrights: 214 posts

Posted: Saturday, April 26, 2008 - 12:00 PM UTC
Frank, that's a fascinating build that would have driven me demented long ago! 
I really look forward to seeing the finished ship.
I really look forward to seeing the finished ship.
Clanky44
Joined: September 15, 2005
KitMaker: 1,901 posts
Model Shipwrights: 934 posts
Posted: Saturday, April 26, 2008 - 11:51 PM UTC
Thanks for the compliments... I promise I'll have some real updates this week. I have a coat of black primer on the model and I'll soon start painting. Steve, feel free to use the photos and e-mail me before you start the funnel section, there's some do's and dont's you should be aware of!
Frank
Frank
skipper
Joined: February 28, 2002
KitMaker: 5,182 posts
Model Shipwrights: 4,070 posts
Posted: Sunday, April 27, 2008 - 03:04 AM UTC
Very good work on the PE, Frank!
Although late, I must ask, have you considered hollowing the funnel and make the deflectors in plastic card?
It just looks "funny" all those detailed parts and although it's going to be painted black, the inner part of the funnel looks "heavy".

Rui
Although late, I must ask, have you considered hollowing the funnel and make the deflectors in plastic card?
It just looks "funny" all those detailed parts and although it's going to be painted black, the inner part of the funnel looks "heavy".
Rui
Clanky44
Joined: September 15, 2005
KitMaker: 1,901 posts
Model Shipwrights: 934 posts
Posted: Sunday, April 27, 2008 - 10:16 AM UTC
Hi Rui,
You're right about the funnel, but for me it's all a matter of balance. If I start to super detail sections of the ship, I'm going to bog down and delay the completion even more than what I'm doing now! I need to find a good balance between detail and buildability (if that makes any sense) so I can officially complete my first MSW ship model and my first in over 5 years.
Frank
You're right about the funnel, but for me it's all a matter of balance. If I start to super detail sections of the ship, I'm going to bog down and delay the completion even more than what I'm doing now!
I need to find a good balance between detail and buildability (if that makes any sense) so I can officially complete my first MSW ship model and my first in over 5 years.Frank
skipper
Joined: February 28, 2002
KitMaker: 5,182 posts
Model Shipwrights: 4,070 posts
Posted: Sunday, April 27, 2008 - 12:36 PM UTC
Hi Frank
I understand your point - but I thought I should tell you my feelings about it. That's why we ask for comments
Keep up the excellent work
Rui
I understand your point - but I thought I should tell you my feelings about it. That's why we ask for comments
Keep up the excellent work
Rui

JimMrr
Joined: January 03, 2007
KitMaker: 1,505 posts
Model Shipwrights: 409 posts
Posted: Sunday, May 04, 2008 - 01:42 PM UTC
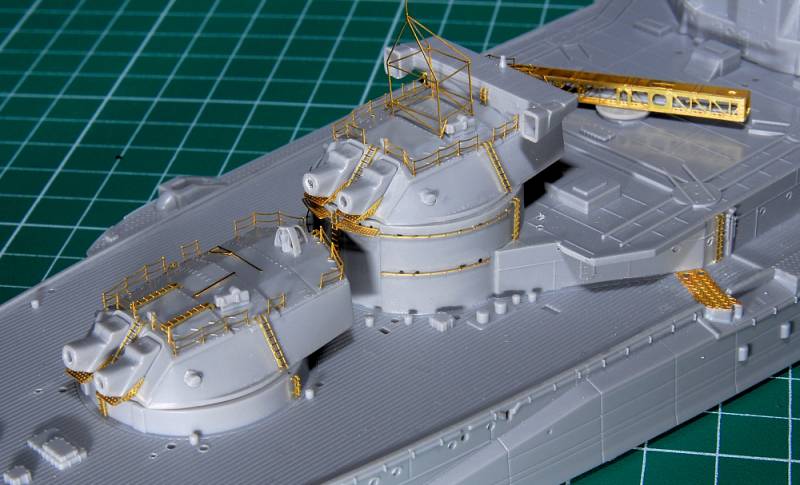
Im very impressed by your application of the photo etch....especially on the main guns.
Im a total newbie to building ships and your work is highly inspirational.Now I just need a higher paying job to buy these bloody expensive kits!
Im a total newbie to building ships and your work is highly inspirational.Now I just need a higher paying job to buy these bloody expensive kits!


quozila_zeem
Joined: November 05, 2006
KitMaker: 3 posts
Model Shipwrights: 1 posts
KitMaker: 3 posts
Model Shipwrights: 1 posts
Posted: Sunday, May 04, 2008 - 10:50 PM UTC
Nice build, Frank.
Keep up the good job
Keep up the good job
Clanky44
Joined: September 15, 2005
KitMaker: 1,901 posts
Model Shipwrights: 934 posts
Posted: Tuesday, May 06, 2008 - 05:35 PM UTC
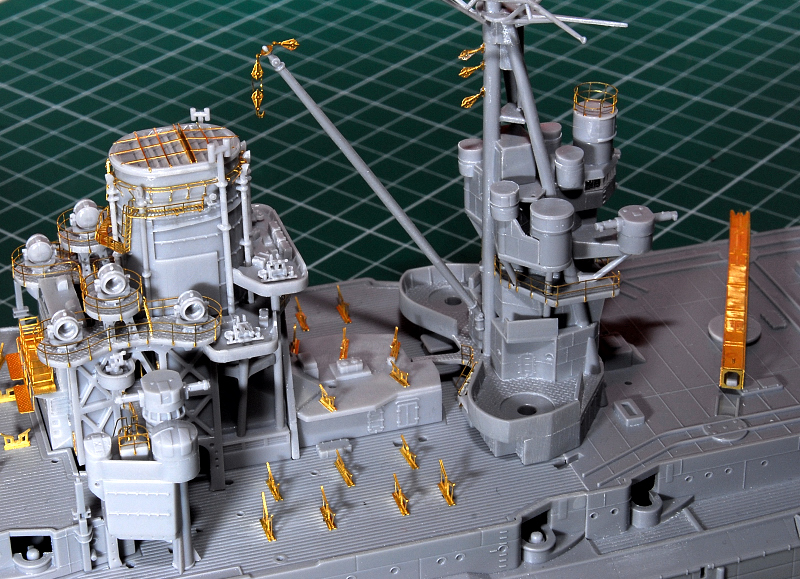
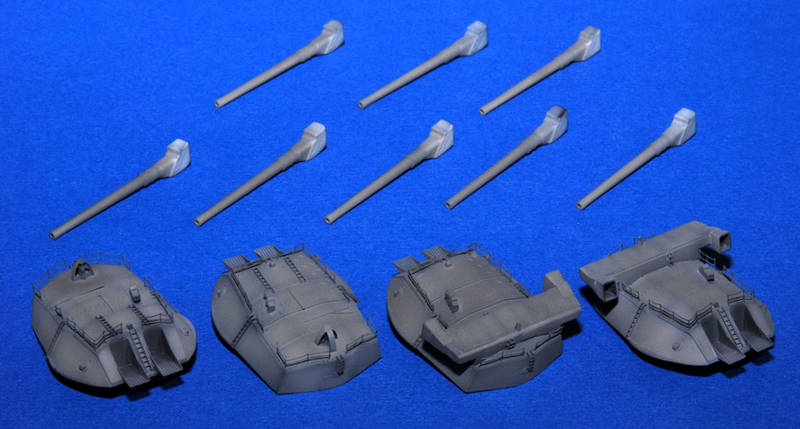
Finally got motivated to hit the airbrush booth. I have about half of my P.E. in place, but need to paint and mask before any additional P.E. can be added. I decided to start with the simplest of built up components, the turrets.
I've decided to paint the Nagato in a mid-gray.... now before anyone asks what paint I've choosen, please keep in mind that I'm painting with a mix of pre-shading and post-shading, which will blend the paints used. At this scale, it really needs to be very muted shading to avoid too stark a colour differential. I'm using a line of water based model railroad colours from Polly Scale. I've had great luck with these paints on armour and aircraft, so why not use them for ships. I thin my paints with Tamiya thinner, IMHO the best in the market.
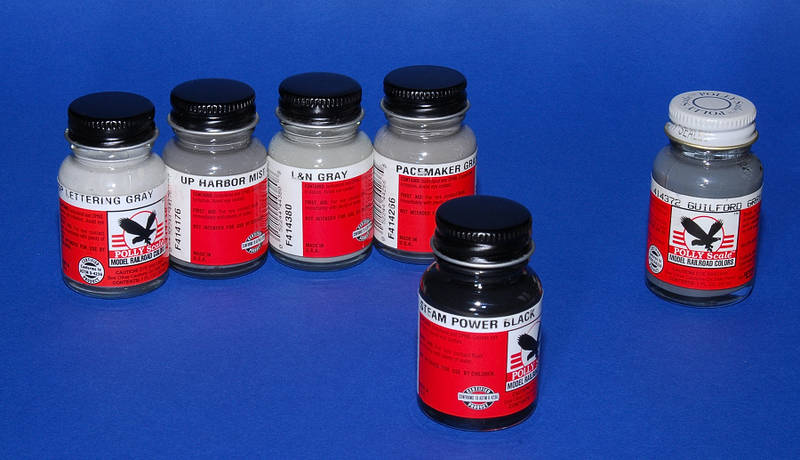
First the turrets get a primer coat of Steam Power Black. This coat will highlight any flaws in the construction allowing me to make amends prior to further painting.
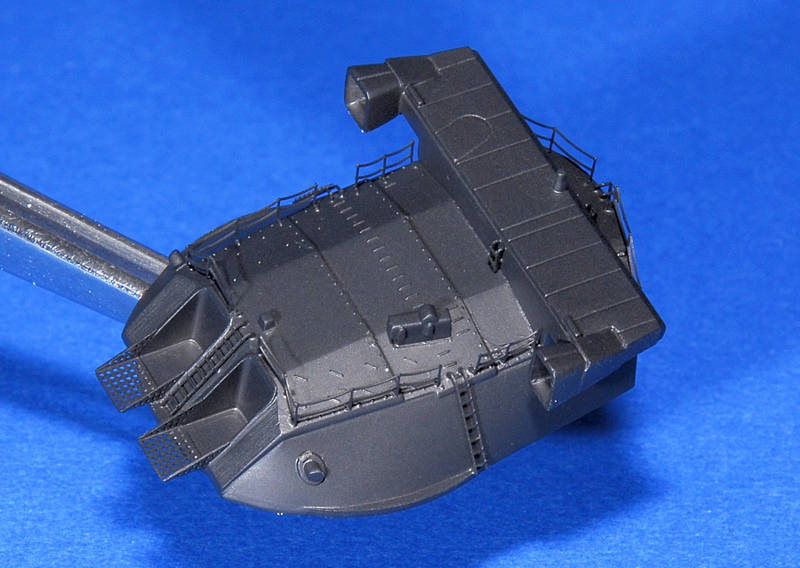
I've chosen a light gray (SP Lettering Gray) as my pre-shade colour, this was thinned out by about 60% with Tamiya thinner and airbrushed in multiple passes, leaving the underlying black to just peak through.
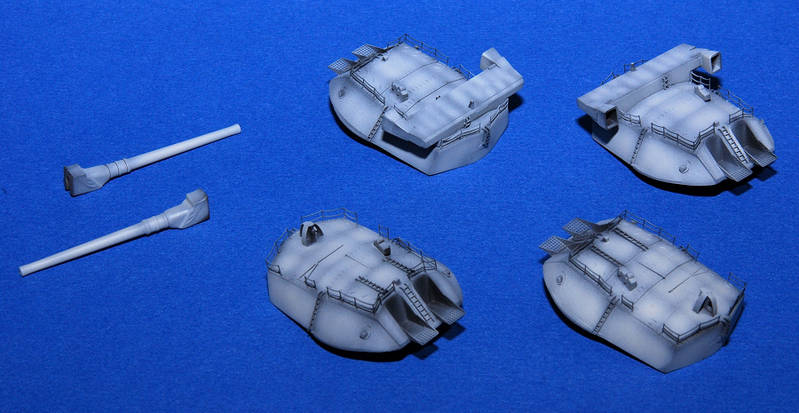
Next is the blending post-shade. I'm using Guilford Gray, it's a nice grimy gray with a hint of green. Having browsed the web and seen other modellers choice of gray for the Nagato, I'm pretty confident that this gray is in the ball park. The paint was thinned out by about 80% thinner and again sprayed in thin coats over the pre-shaded turrets and barrels.
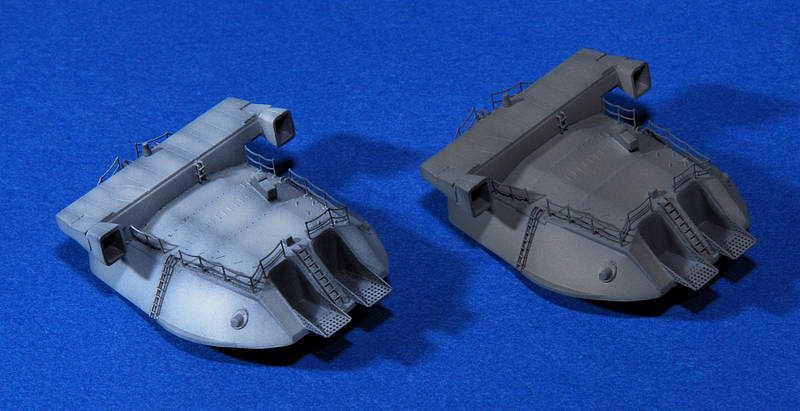
This is where I hit my first hurdle When spray painting in a booth I tend to have too bright a set of lights, and unfortunately the model gets painted based on those lights. When completed, the model gets taken out of the flood lights and into normal lighting which gives the paint an entire different look. This is what happened on the first turret, my post-shading under the flood lights looked good, but back in 'real' lighting, it removed the whole pre-shading effect I was looking for. I adjusted the amount of paint for the other three turrets so the pre-shading would poke through.
Left turret, too much post-shading. Right turret, more of the effect I was looking for.
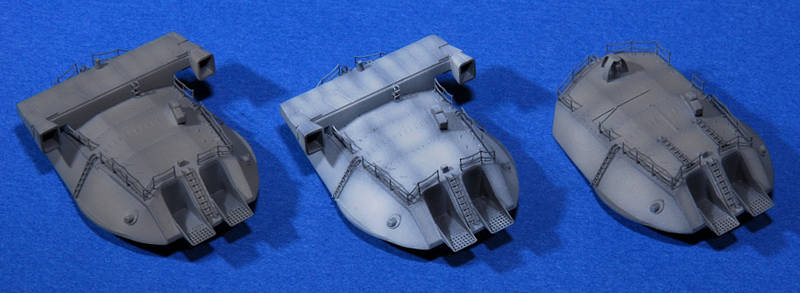
That's it for now, next I'll mask the barrels and paint the blast bags, followed by a wash followed by hand painting of details and railings.
All comments are welcome.
Frank
I've decided to paint the Nagato in a mid-gray.... now before anyone asks what paint I've choosen, please keep in mind that I'm painting with a mix of pre-shading and post-shading, which will blend the paints used. At this scale, it really needs to be very muted shading to avoid too stark a colour differential. I'm using a line of water based model railroad colours from Polly Scale. I've had great luck with these paints on armour and aircraft, so why not use them for ships. I thin my paints with Tamiya thinner, IMHO the best in the market.
First the turrets get a primer coat of Steam Power Black. This coat will highlight any flaws in the construction allowing me to make amends prior to further painting.
I've chosen a light gray (SP Lettering Gray) as my pre-shade colour, this was thinned out by about 60% with Tamiya thinner and airbrushed in multiple passes, leaving the underlying black to just peak through.
Next is the blending post-shade. I'm using Guilford Gray, it's a nice grimy gray with a hint of green. Having browsed the web and seen other modellers choice of gray for the Nagato, I'm pretty confident that this gray is in the ball park. The paint was thinned out by about 80% thinner and again sprayed in thin coats over the pre-shaded turrets and barrels.
This is where I hit my first hurdle
When spray painting in a booth I tend to have too bright a set of lights, and unfortunately the model gets painted based on those lights. When completed, the model gets taken out of the flood lights and into normal lighting which gives the paint an entire different look. This is what happened on the first turret, my post-shading under the flood lights looked good, but back in 'real' lighting, it removed the whole pre-shading effect I was looking for. I adjusted the amount of paint for the other three turrets so the pre-shading would poke through.Left turret, too much post-shading. Right turret, more of the effect I was looking for.
That's it for now, next I'll mask the barrels and paint the blast bags, followed by a wash followed by hand painting of details and railings.
All comments are welcome.
Frank
skipper
Joined: February 28, 2002
KitMaker: 5,182 posts
Model Shipwrights: 4,070 posts
Posted: Wednesday, May 07, 2008 - 01:47 AM UTC
Well Frank
For someone who was afraid to do some airbrushing, I should say that there's nothing to be afraid of!!
I really like the effects that you accomplished, since they are a good base for the next step. They shading is subtle and that will pay off!
Excellent
Cheers (and keep that spirit high!)
Rui
For someone who was afraid to do some airbrushing, I should say that there's nothing to be afraid of!!
I really like the effects that you accomplished, since they are a good base for the next step. They shading is subtle and that will pay off!
Excellent
Cheers (and keep that spirit high!)
Rui
Clanky44
Joined: September 15, 2005
KitMaker: 1,901 posts
Model Shipwrights: 934 posts
Posted: Wednesday, May 07, 2008 - 01:58 AM UTC
Thanks Rui,... it felt really good to be airbrushing again. The pre-post shading is a real challenge on a model like this. Since there is no way you can paint the whole model at the same time, you must really take notes on which paints where used and thinning ratios to keep the (eventual) completed model looking uniform.
Frank
Frank
skipper
Joined: February 28, 2002
KitMaker: 5,182 posts
Model Shipwrights: 4,070 posts
Posted: Wednesday, May 07, 2008 - 02:26 AM UTC
You're doing VERY GOOD!
And I might add that no ship is all of the same hue of colour
Even in peace time like now... so think about it during WW2!!!
Keep up
Rui
And I might add that no ship is all of the same hue of colour
Even in peace time like now... so think about it during WW2!!!
Keep up
Rui

MartinJQuinn
Joined: January 19, 2005
KitMaker: 574 posts
Model Shipwrights: 530 posts
Posted: Wednesday, May 07, 2008 - 03:03 AM UTC
Super work, Frank. Looking forward to more pictures.
blaster76
Joined: September 15, 2002
KitMaker: 8,985 posts
Model Shipwrights: 3,509 posts
Posted: Wednesday, May 07, 2008 - 09:32 AM UTC
I like the way your turrets came out. They have a nice weathered look about them. As you are dioramaing this kit, I think you will quite pleased in the end the way the stuff is going. This so far to me is shaping up to be a best in show for an IPMS convention. The build looks flawless and the painting exquisite. Me, When I eventually get around to my kit will probably go down the slip with a red hull, lighttan deck and dark gray paint job with detail painting where called for.
gator
Vendor
#027
Joined: April 13, 2005
KitMaker: 5,422 posts
Model Shipwrights: 5,079 posts
Posted: Wednesday, May 07, 2008 - 01:59 PM UTC
Awesome paint Frank!
Gator
Gator
 |

WEB HOSTING BY


Copyright ©2021 Model Shipwrights and Kitmaker Network, a subsidiary of Silver Star Enterprises
All Rights Reserved. Please read our Conditions of Use and Privacy Policy.
All Rights Reserved. Please read our Conditions of Use and Privacy Policy.