_GOTOBOTTOM
Ships by Class/Type: Submarines
Topics on submarines of all types and eras.
Special Navy Type II A in 1:72
MrMox
Visit this Community
Aarhus, Denmark
Joined: July 18, 2003
KitMaker: 3,377 posts
Model Shipwrights: 985 posts
Posted: Thursday, October 09, 2008 - 05:06 AM UTC
Ok, I have this:


And this:


And the time to build (unless you ask my wife ... ) - so let the party begin
skipper
Visit this Community
Lisboa, Portugal
Joined: February 28, 2002
KitMaker: 5,182 posts
Model Shipwrights: 4,070 posts
Posted: Thursday, October 09, 2008 - 06:32 AM UTC
Hi Jan!

I will be following it with interest

If you can find this book, it may help you:

Vom Original zum Modell: Uboottyp II - Die "Einbãume"
By Eberhard Rõssler
Bernard & Graefe Verlag
ISBN: 3-7637-6023-7

Front cover


Back cover


Photo Gallery example


Plan page sample


Hope this helps


Rui
MrMox
Visit this Community
Aarhus, Denmark
Joined: July 18, 2003
KitMaker: 3,377 posts
Model Shipwrights: 985 posts
Posted: Thursday, October 09, 2008 - 07:07 AM UTC
Hi Rui,

Thanks for the tip, I have that book allready and I must say that the "Vom Original zum Modell" series is a great concept with a perfect balance between history, pictures and drawings, just perfect for modelling use.

Actually I have a extra sample of the book i anybody needs it ?

I have begun the task of opening floodholes and thin out the hull, and close other holes that are only appropiate for the Vesikko - the kit design with indentions on the inside of the hull around the flood holes makes it relatively easy.

I drill trough the holes in both end first so I can see the area I have to work on on the reverse side - then I use a dremmel and carefully removes material around the holes - onece in a while I lift the piece against the light - it makes it easy to judge the thickness of the material - and how much more to remove.


Cheers/Jan

skipper
Visit this Community
Lisboa, Portugal
Joined: February 28, 2002
KitMaker: 5,182 posts
Model Shipwrights: 4,070 posts
Posted: Thursday, October 09, 2008 - 07:25 AM UTC
Hi Jan

Looking good - a small task, but an important one!
Glad you already have the book, and I have to agree on the quality of the series! I have all the uboot related ones
For future projects, of course

Keep us posted and keep up the good work!


Rui
MrMox
Visit this Community
Aarhus, Denmark
Joined: July 18, 2003
KitMaker: 3,377 posts
Model Shipwrights: 985 posts
Posted: Friday, October 10, 2008 - 06:19 AM UTC
Some progress, I have begone making the cutouts in the keel, thay are missing so ...


And I am working on the inner hull, in this picture you can see the aft section, where I have made a bulkhead that will support the hull sides and the upper casing. I plan on opening the slits running in both sides over the ballasttanks - so I have to du some sort of inner hull, and the "ribs" holding the upper casing.


Cheers/Jan
MrMox
Visit this Community
Aarhus, Denmark
Joined: July 18, 2003
KitMaker: 3,377 posts
Model Shipwrights: 985 posts
Posted: Saturday, October 18, 2008 - 12:15 AM UTC
Well, quite around here - have been on a weeks vacation without any modelworking, wery relaxing.

Here is some progress on the cutouts in the keel for the bottom vents:


Overview of the hull - some putty is needed since the fit aint perfect.


Building up the inner hull, and cutting open the long free flooding vent over the saddletanks - cut disc´s fitting inside the hull to support the inner hull wich will to some extend be visible trough the side vents and the holes in the deck.


Cheers/Jan
skipper
Visit this Community
Lisboa, Portugal
Joined: February 28, 2002
KitMaker: 5,182 posts
Model Shipwrights: 4,070 posts
Posted: Saturday, October 18, 2008 - 05:50 AM UTC
Hi Jan

We need to take a break every now and then, right?
I hope you had a good vacation!

Back to the Typ II:
It looks good, I always like your "fake" pressure hull, and it will pay all your work, because as you say, it will be seen trough the vent/flooding holes

Keep up the good work!


Rui
MrMox
Visit this Community
Aarhus, Denmark
Joined: July 18, 2003
KitMaker: 3,377 posts
Model Shipwrights: 985 posts
Posted: Wednesday, November 05, 2008 - 08:45 AM UTC
Ok, breaks over - back to work, here a shot of the finished innerhull, added weldseams (hard to see i know) front hatch for loeading torpedoes and rear hatch - thinking about letting the deckhatch be open so you can see the inner hatch - gonna work on that.

Some ribs added to give the proper spacing for the deck, next will be adding the ribs in the side binding the upper casing to the inner hull.

In hindsight I should have cut off the strips of upper casing running over the large side vents - it would have been much easier to do the inner hull, and they would have been easy to reinstall later - well, live and learn

Much of the work I do will be hard to see, but those early A´s were painted light gray on the top of the sides, and on a small strip under the sidevents, so I figure I can get away with painting the inner hull relatively light gray, so it will be easier to see...


I think I am going to do U6 - as I later want to do U201 for the camouflage campain - it will bind the 2 builds nicely together as A. Schnee served on both boats.

Cheers/Jan
MrMox
Visit this Community
Aarhus, Denmark
Joined: July 18, 2003
KitMaker: 3,377 posts
Model Shipwrights: 985 posts
Posted: Thursday, November 06, 2008 - 07:29 AM UTC
Small update, scratched a hatch for the aft accesshatch.

skipper
Visit this Community
Lisboa, Portugal
Joined: February 28, 2002
KitMaker: 5,182 posts
Model Shipwrights: 4,070 posts
Posted: Thursday, November 06, 2008 - 07:32 AM UTC
Great Jan!
Now you will need a crew member looking down
Excellent job so far! Keep up!


Rui

PS: I like the Adalbert Schnee "collection"
MrMox
Visit this Community
Aarhus, Denmark
Joined: July 18, 2003
KitMaker: 3,377 posts
Model Shipwrights: 985 posts
Posted: Saturday, November 08, 2008 - 08:50 AM UTC
Rui, I have a bunch of Preiser, CMK and other figures, there might be one that fits, otherwise it can be made to fit.

Inner hull is getting close to painting - added some of the detailing, Air inlet, exhaust, cunningtower etc.


MrMox
Visit this Community
Aarhus, Denmark
Joined: July 18, 2003
KitMaker: 3,377 posts
Model Shipwrights: 985 posts
Posted: Monday, November 10, 2008 - 08:21 AM UTC
Aft there are a number of small raised squares on the side, they are for mounting the rigs over the propellers - don´t know what they are called, but its a Vesikko feature you dont see on the german boats.

I sanded them down as thay are of no use:


Along the side is a number of limberholes - on the Type A they are generally grouped in 4 and are placed where the deck is massive and are to help air escape from the casing when diving.

Allso there a a number of holes front and aft of the pressurehull.

All in all a insane amount of holes...


skipper
Visit this Community
Lisboa, Portugal
Joined: February 28, 2002
KitMaker: 5,182 posts
Model Shipwrights: 4,070 posts
Posted: Monday, November 10, 2008 - 10:18 AM UTC
Hi Jan

I like the inner hull details you have added! It will make seeing through limber/flood holes interesting
The name of the guards you removed is: Propeller Guards
Looking good and you are working at a good pace! Keep up


Rui

PS: Still on the Adalbert Schnee 1/72 sub collection and I am not trying to jam this post...
You will be missing a 1/72 Typ XXI U-boot

scratch built Typ XXI u-boot
enjoy
MrMox
Visit this Community
Aarhus, Denmark
Joined: July 18, 2003
KitMaker: 3,377 posts
Model Shipwrights: 985 posts
Posted: Monday, November 10, 2008 - 07:30 PM UTC
Propellerguards - now, aint that ingeinous

Well, the inner hull and detailing is rather plain, but I don´t think that fine details will be visible trough the reletively small openings, but the basic shapes will give a sense of "theres something in there" which is what I aim for.


Quoted Text

You will be missing a 1/72 Typ XXI U-boot


I know - actually I need another Type II as well, as he commanded U-60 allso, which I believe was a "C" version.

I have heard rumours that Revell is working on a 1:72 XXI - but its only rumours so don´t get your hopes too high. But its a beautiful boat and one can only hope....

Before painting, I have begun adding rudders, diveplanes and propeller axels - there is a lot of cleaning and sanding to do, as the moulding is rather soft, at the same time the plastic used is allso quite soft, so care is needed with the knife as not to remove too much material - it is highly recommended to rely on a file and a sandingstick in the process.

Fit is a bit troublesome, so care is needed.

I´ll update with pictures later when I get a bit further - thanks for looking and commenting.

Cheers/Jan
Gunny
Visit this Community
Pennsylvania, United States
Joined: July 13, 2004
KitMaker: 6,705 posts
Model Shipwrights: 4,704 posts
Posted: Monday, November 10, 2008 - 11:32 PM UTC
Very nice, Jan, I too appreciate the "inner workings" building that you're doing here, mate, great details, reat modeling!
jba
Visit this Community
Rhone, France
Joined: November 04, 2005
KitMaker: 1,845 posts
Model Shipwrights: 502 posts
Posted: Monday, November 10, 2008 - 11:38 PM UTC


thanks for the link Rui, I can't believe how the modeller looks handsome, I thought the good ones at model making all tend to loose their hair etc

Jan i stay tuned as always
MrMox
Visit this Community
Aarhus, Denmark
Joined: July 18, 2003
KitMaker: 3,377 posts
Model Shipwrights: 985 posts
Posted: Tuesday, November 11, 2008 - 10:11 AM UTC
Thanks guys!

Bet of progress, first all the sonars and stuff in front, they were not present on the Vesikko, so thay are missing on this kit too, to bad, ought to have been on the photo etch sheet provided with the kit.


Heres the bottom wents for the main divetank. I didn´t have much in terms of referance, so its a bit educated guesswork.


And the surprise of the evening - the mounts for the axel on the rear planes is way off, both compared to the size of the propellers but allso compared with the support/guard i hold in my tweezer - well, that can be fixed, whats worse, is that the propellers looks wierd with a way off pitch - I would gladly have accepted them in styrene instead of resin, had they just looked right..... - well, maybe I can cut the blades of and repostion them - or does anybody know where to find replacements with a diameter of aprox 17-18 mm ???


Cheers/Jan
MrMox
Visit this Community
Aarhus, Denmark
Joined: July 18, 2003
KitMaker: 3,377 posts
Model Shipwrights: 985 posts
Posted: Wednesday, November 12, 2008 - 09:12 AM UTC
The good old Mk. II "weldseam thingie" in action - getting close to primer


Comments and questions welcome as allways.

Cheers/Jan
MrMox
Visit this Community
Aarhus, Denmark
Joined: July 18, 2003
KitMaker: 3,377 posts
Model Shipwrights: 985 posts
Posted: Friday, November 14, 2008 - 09:22 AM UTC
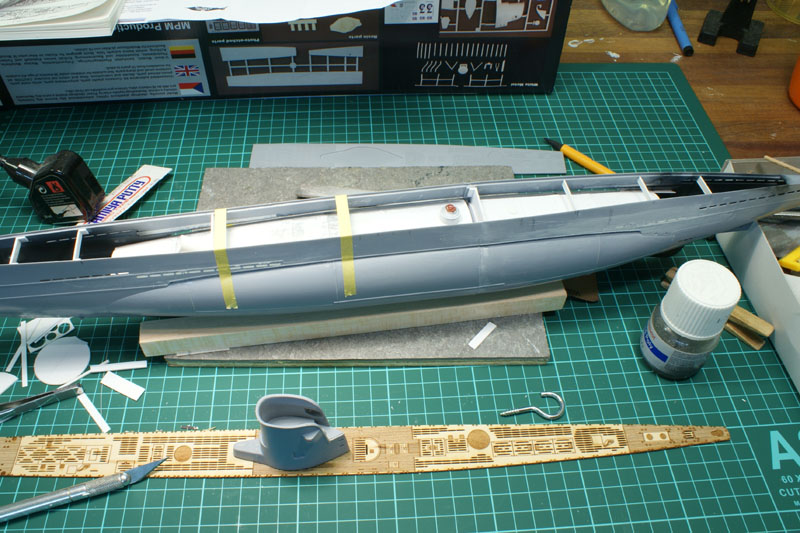
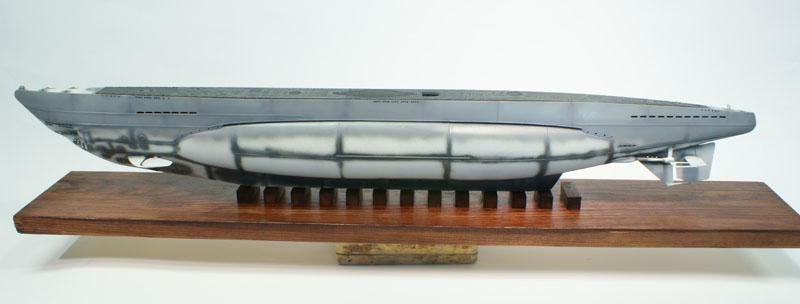
I think the hull is more or less ready for paint, unless if any of You can point out something I ought to do - I´m all ears.

At this point I would like to make a small status on the build, allso compared to the review I did here, which was a inbox review with the shortcommings of such a review - would I still rate it a 85 % - propably not!

I have done a number of alterations, some has been done in a effort to highten the detail level, like the innerhull and the new Nautilus deck, others have been done to get a more true representation of the German type II A.

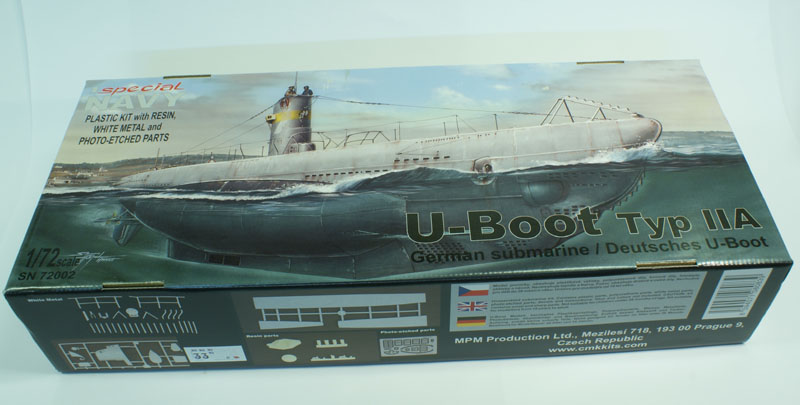
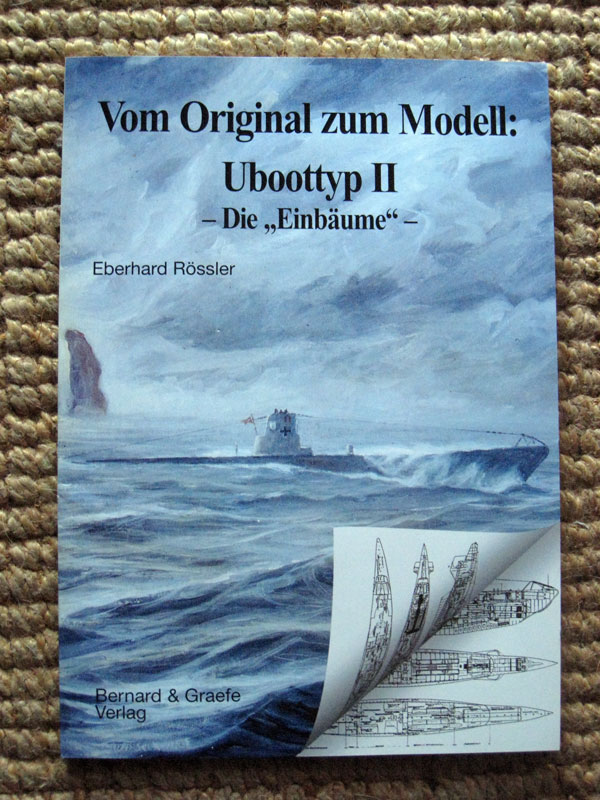
The extra work is a mix of my own ambitions and the shortcommings of the Special Navy kit and is generally based on, that the kit is a fair CV909 Vesikko but a poor Type IIA

It has along the way become more and more clear to Me, how much the kit is based on the Vesikko and it will be fair to say, that you can build a good representation of the Vesikko strait from the box, but doing a good II A requires a extra effort. It is within avarage modellingskill but care is needed.

A out of the box build is allso possible for most modellers, but there are some design errors on the way, that requires some work. First of all the misplaced axelmount for the aft diveplanes which have to be repositioned, and second the missing locator tabs and holes on the hull which requires a lot of care to get a strait an true fit.

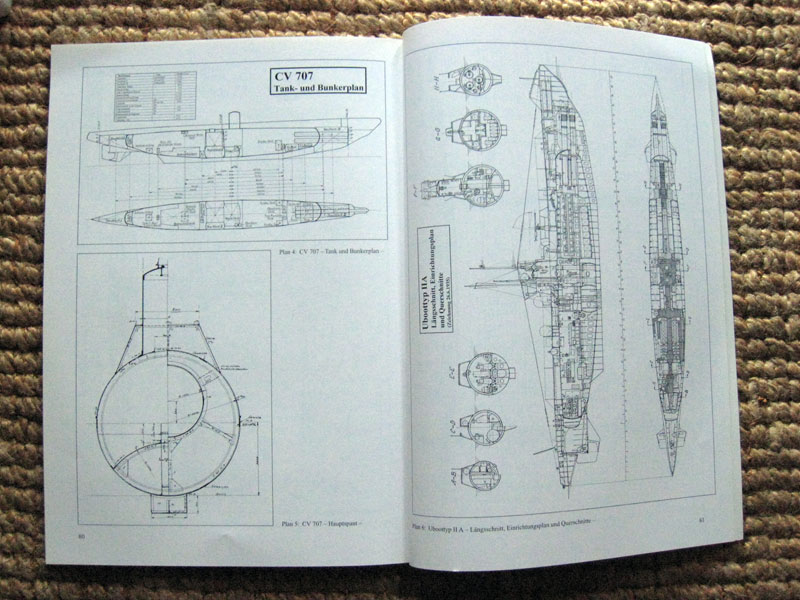
I have so far done a lot of work on the hull in a attemt to upgrade the kit to a German Type II A, I aim for the 1941 configuration of the U6, but I have undoubtly missed a lot in the process…

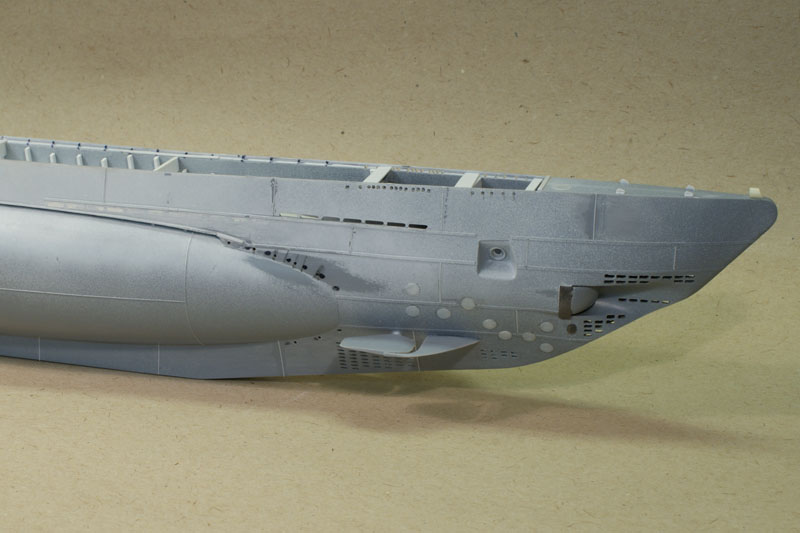
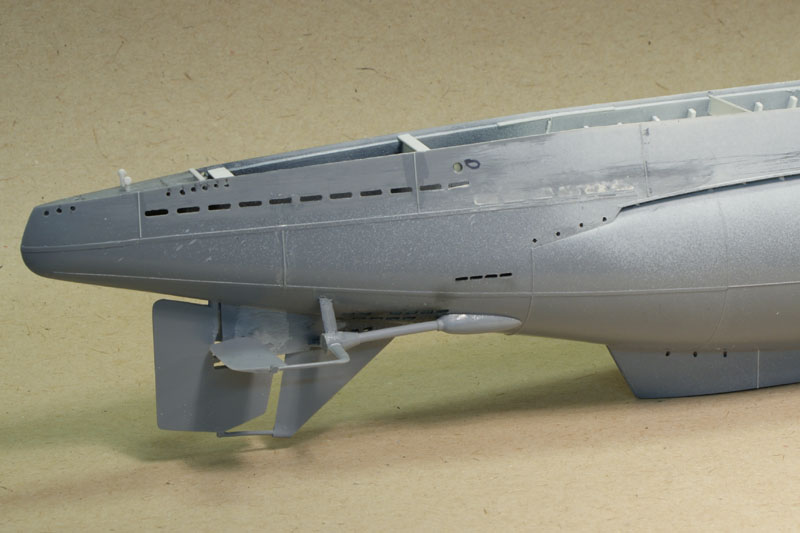
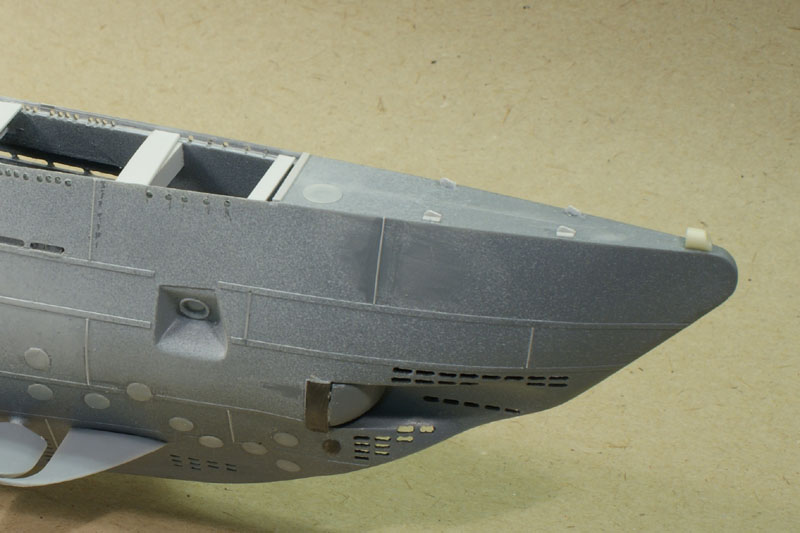
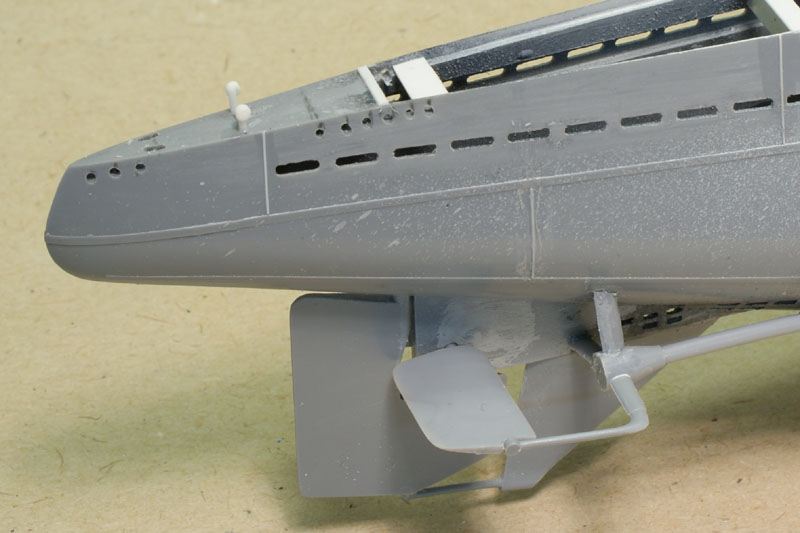
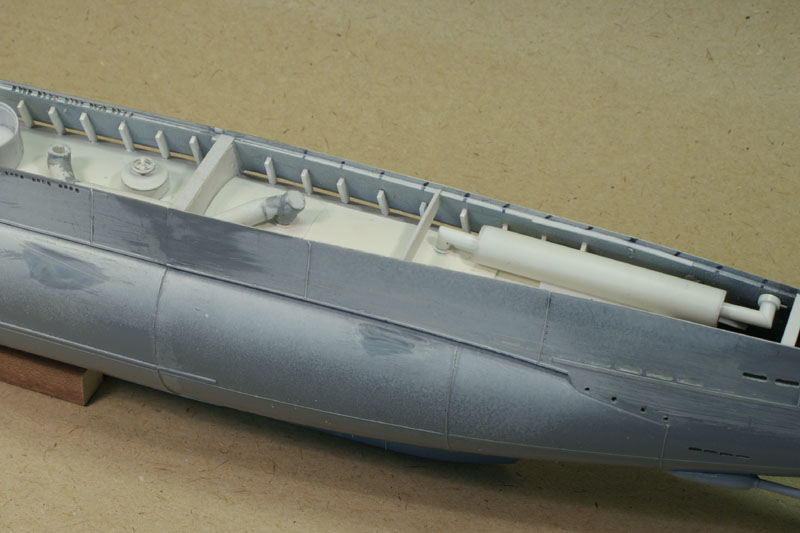
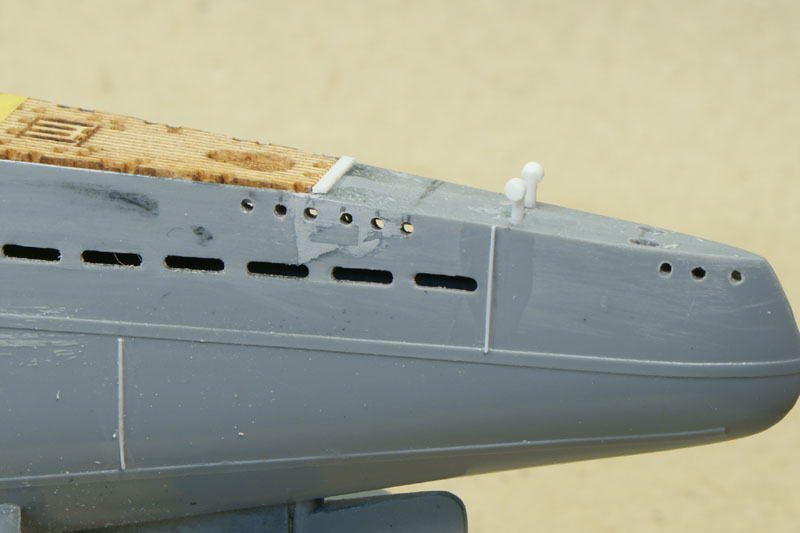
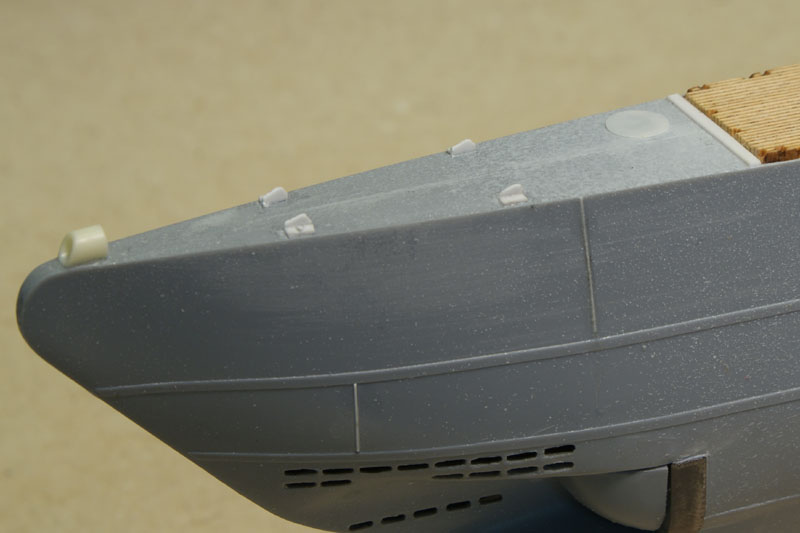
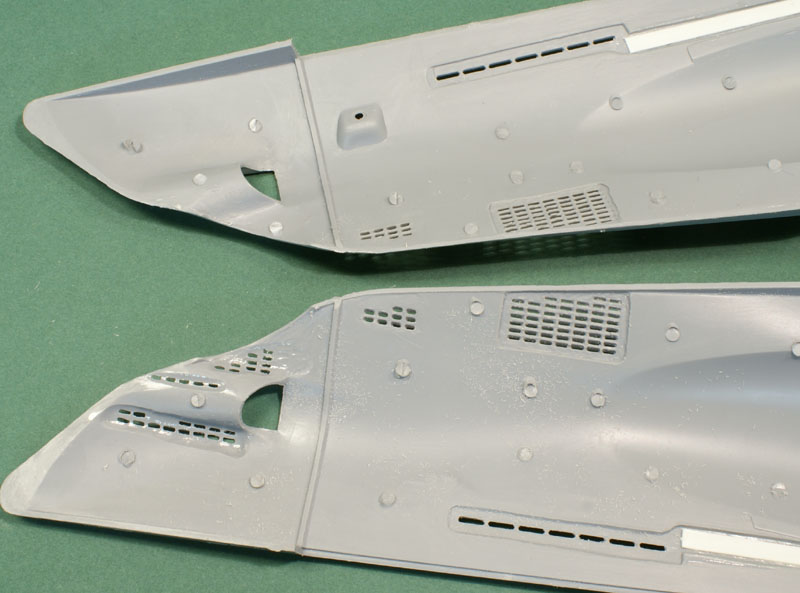
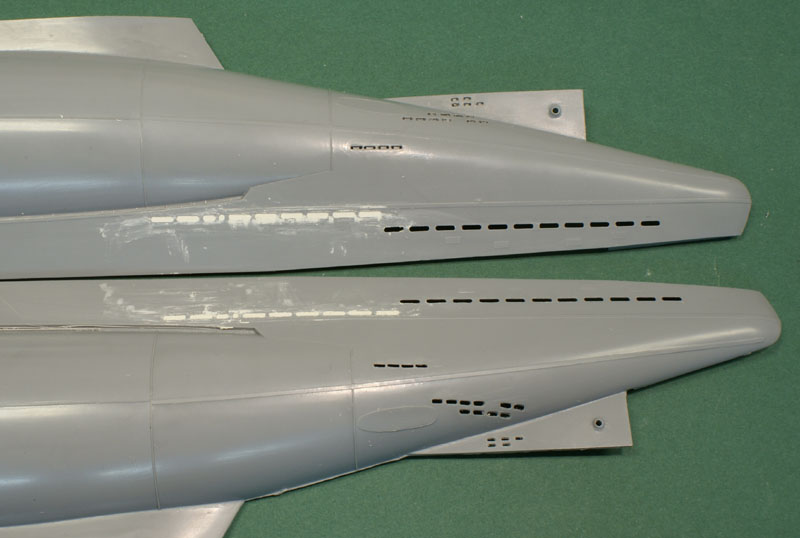
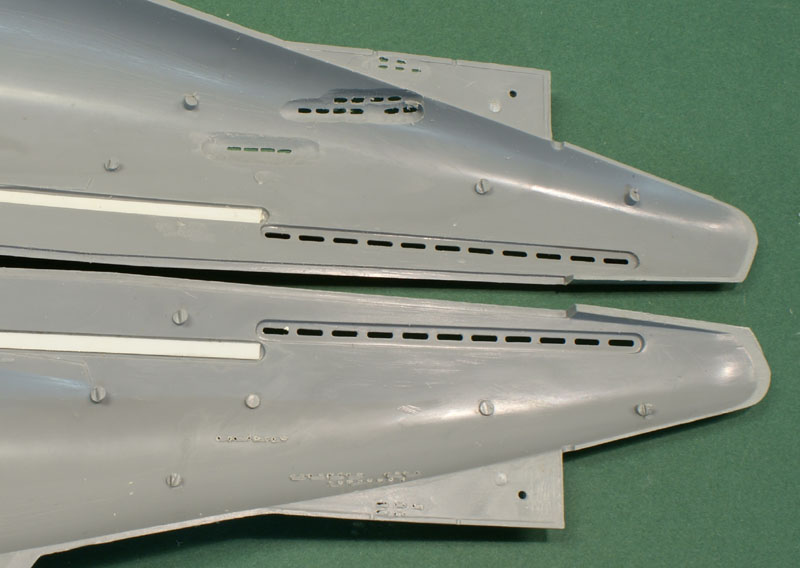
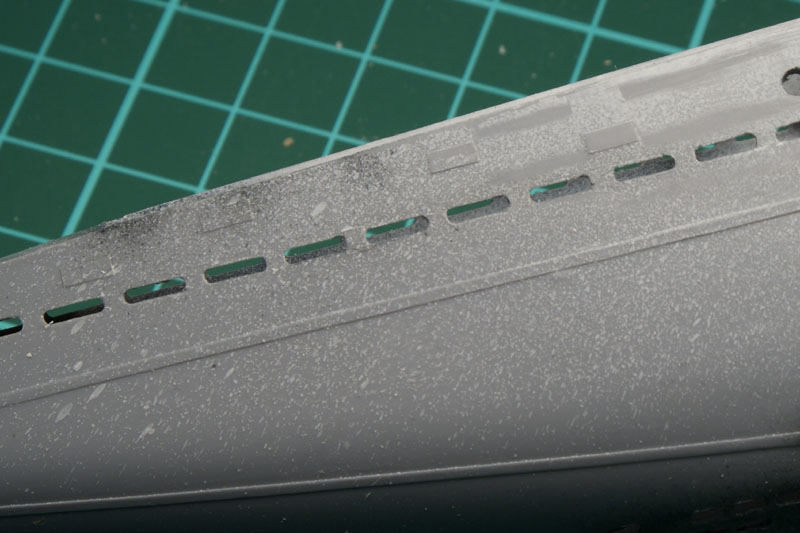
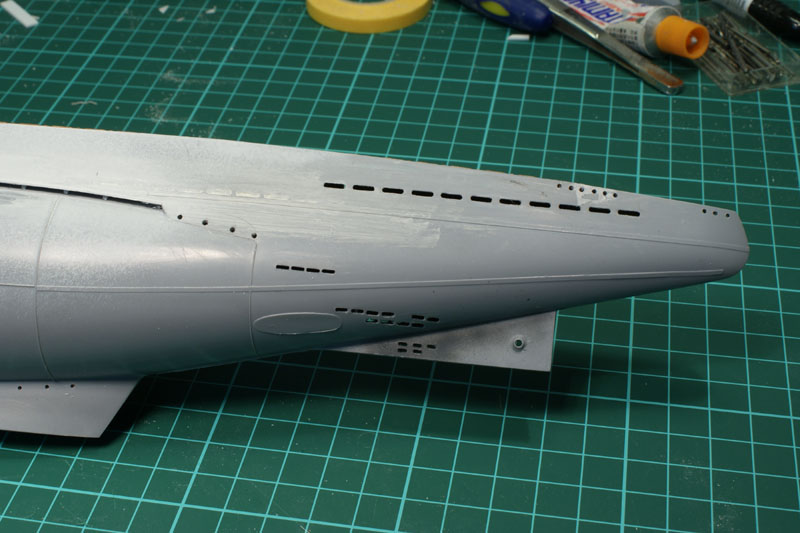
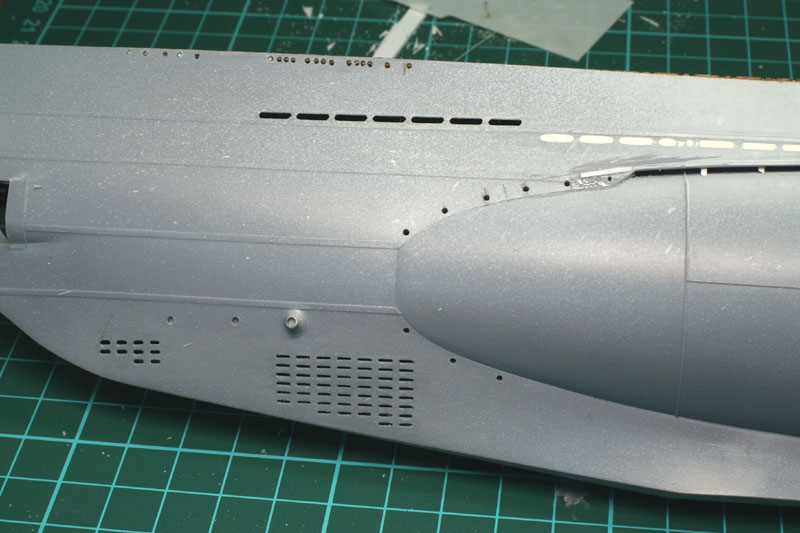
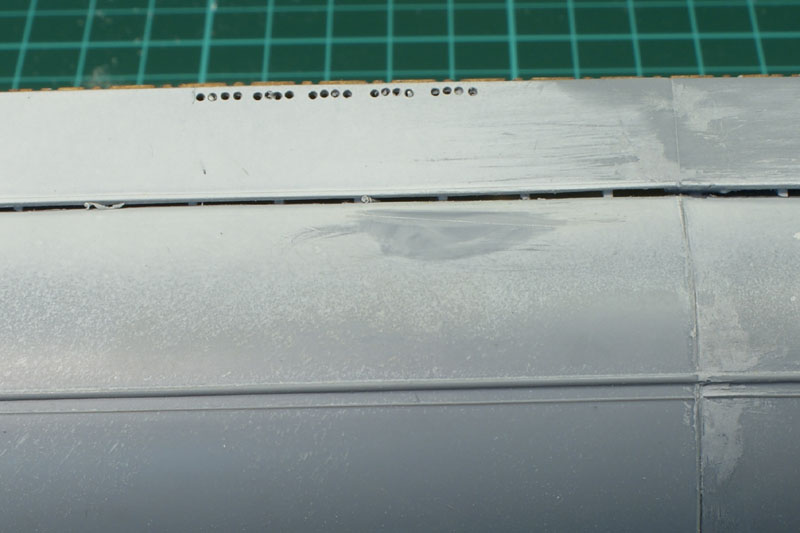
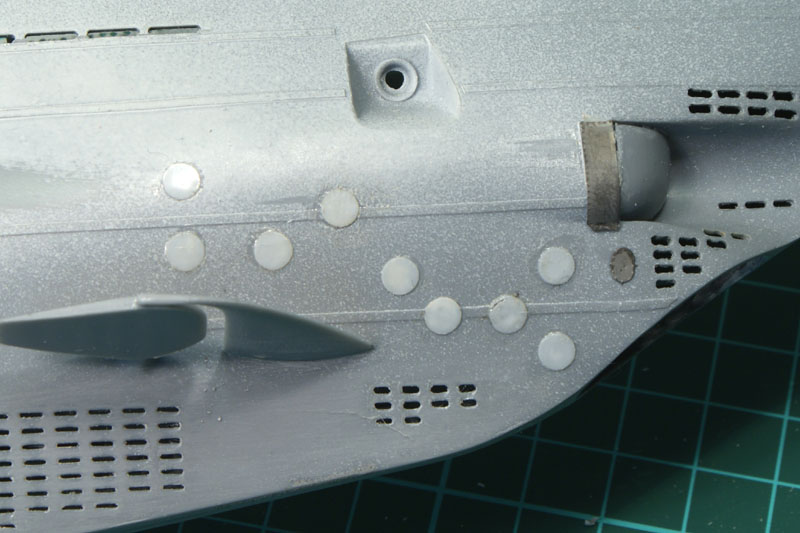
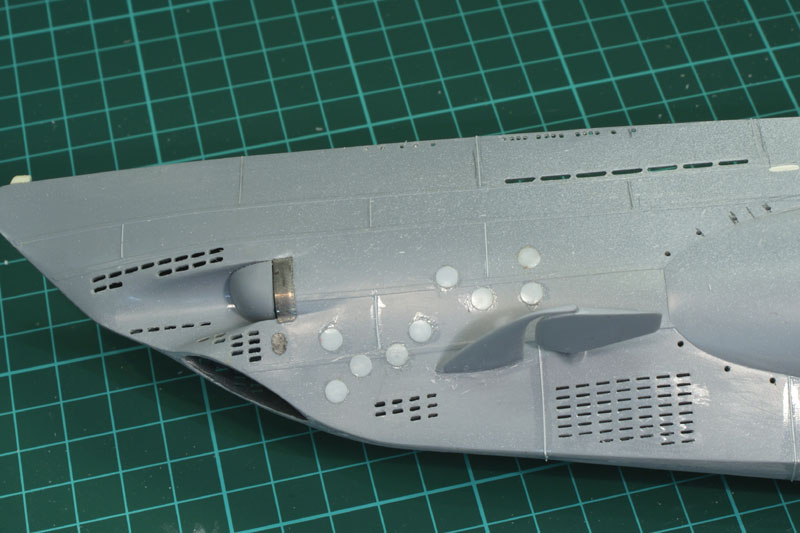
Floodholes: sealed off the ones speciffic to the Vesikko and drilled out those that where opened all the way and have drilled all the missing round holes in the casing and opened up the long floodhole under the uppercasing.

Keel: Added the cut-out and the 4 bottomvents

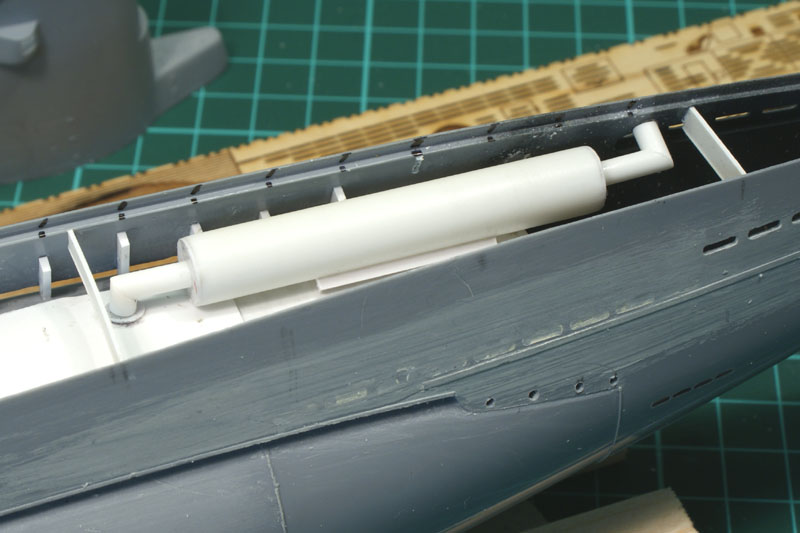
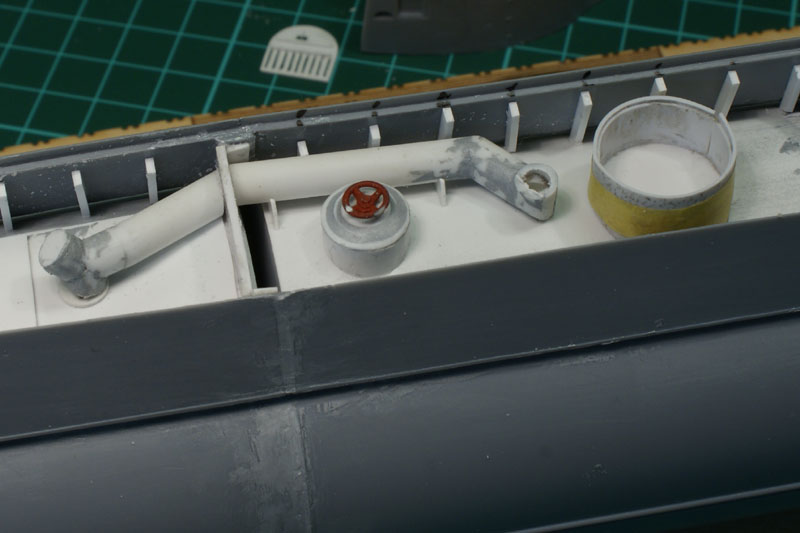
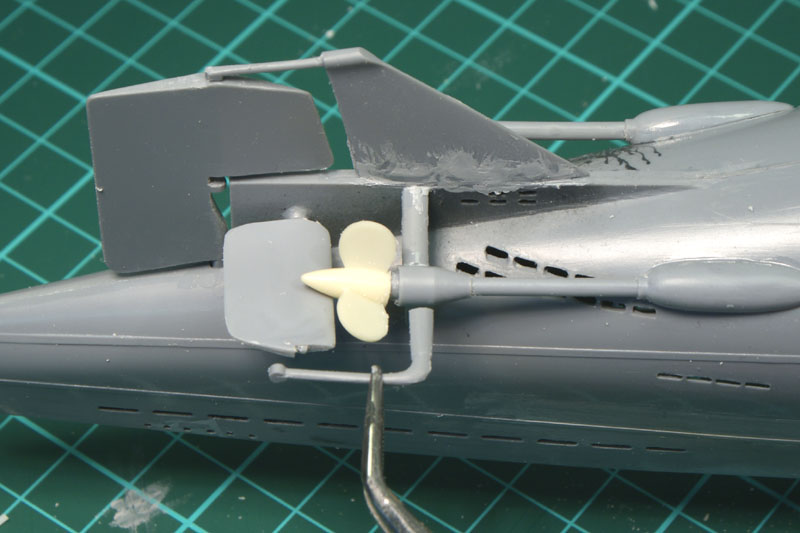
Stern: Added the audiosensors and other stuff, added attachments for the wirecutter, these were left on after the cutter itself was removed

Aft: repositioned the diveplanes, added holes for the antennawire and the mounts for the wire to lift it off the hull.

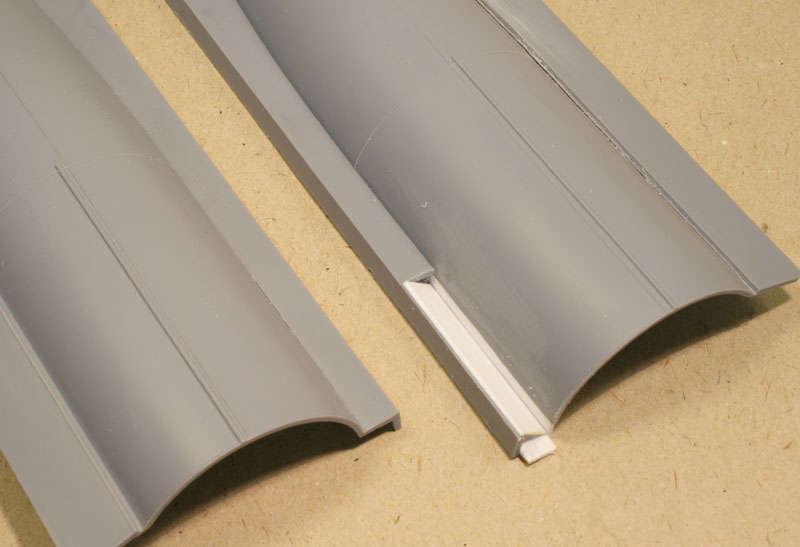
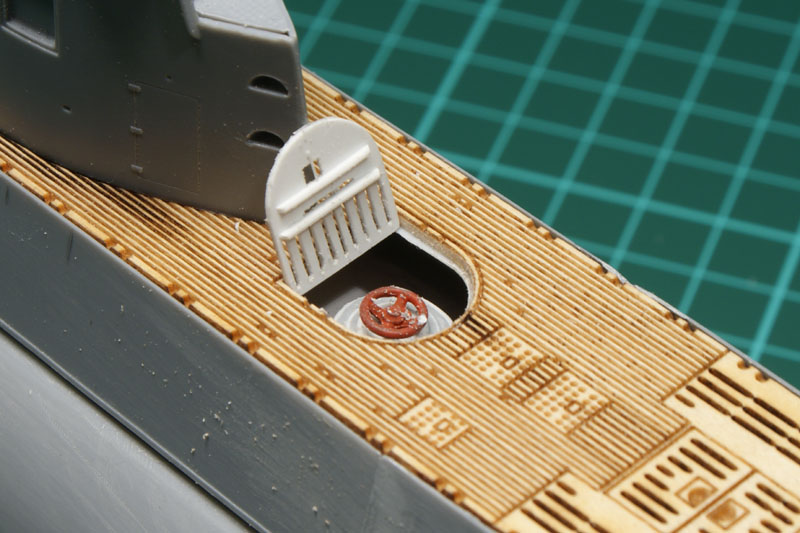
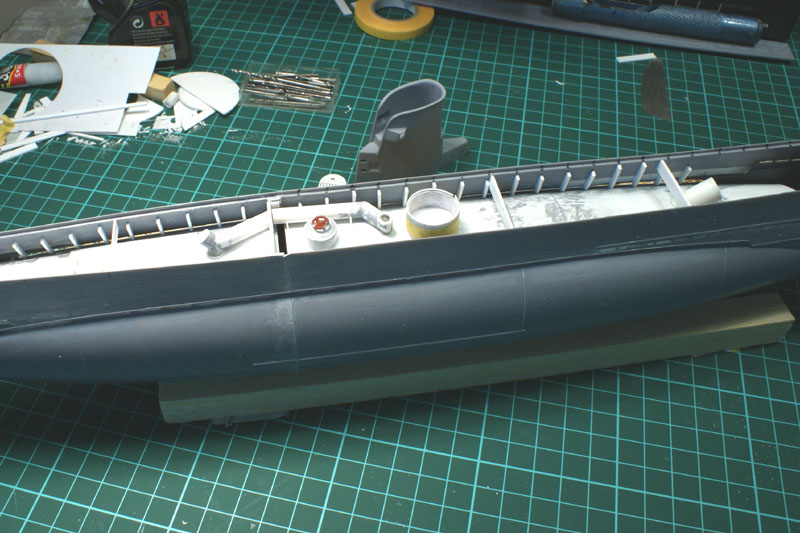
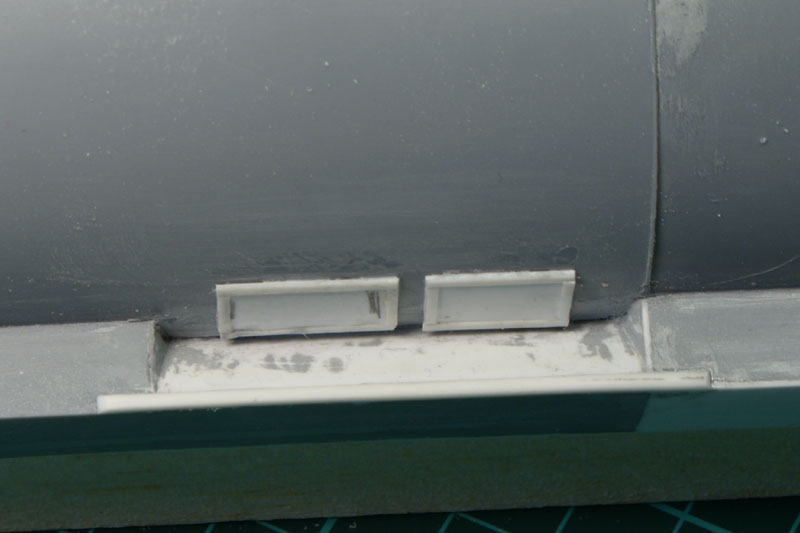
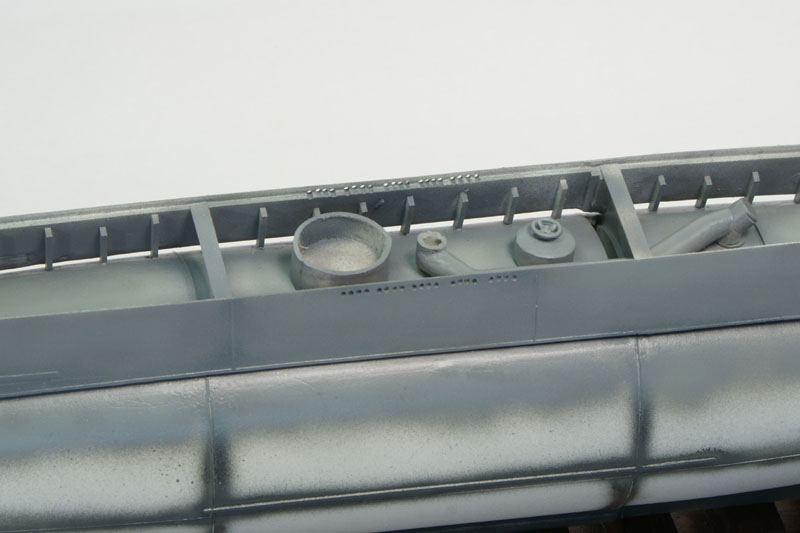
Deck: lifted the deck slightly and added the small steps front and aft - cut the deck straight in both ends instead of pointed. Opened the rear accesshatch and scratced a new hatch - still to do minor detailing like handles and hinges on the various hatches.

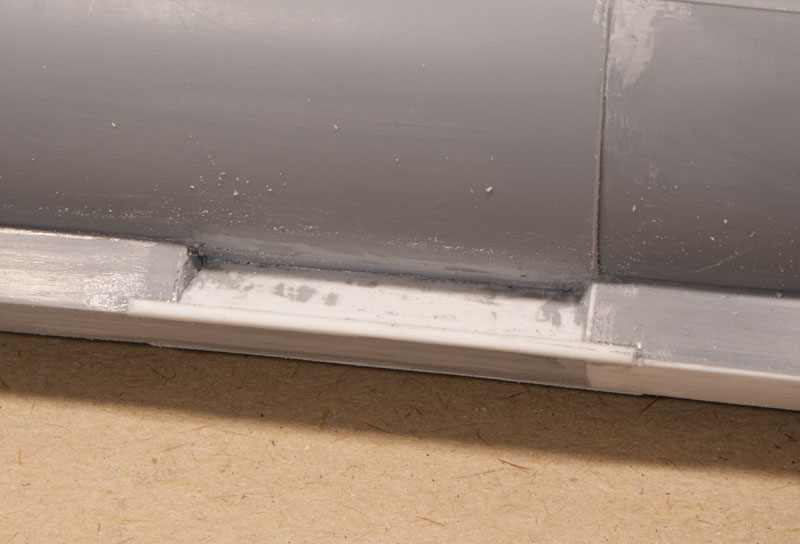
Overall: added weldseams .

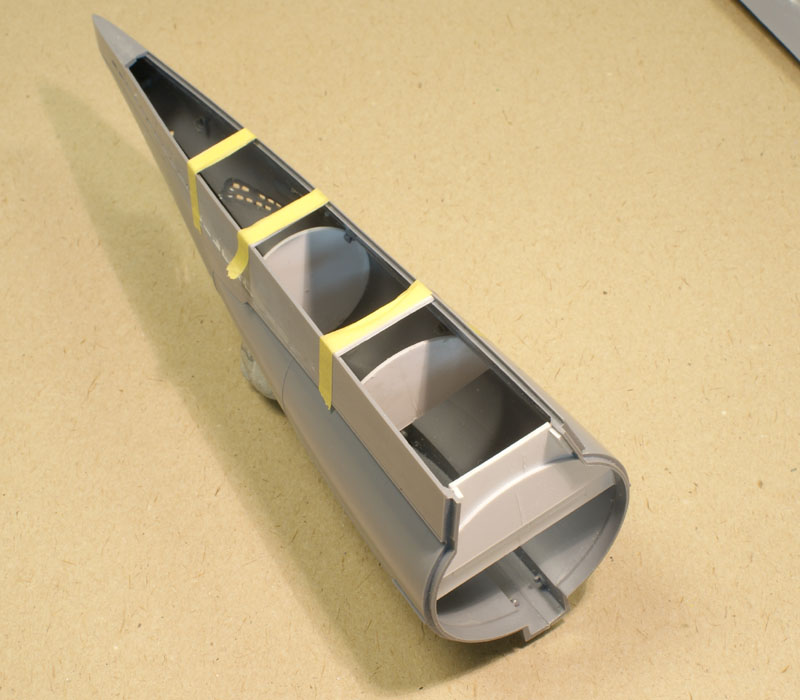
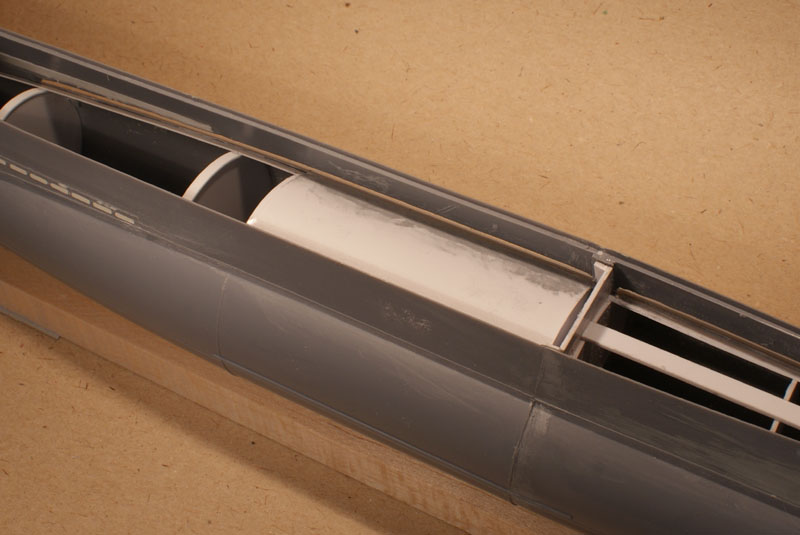
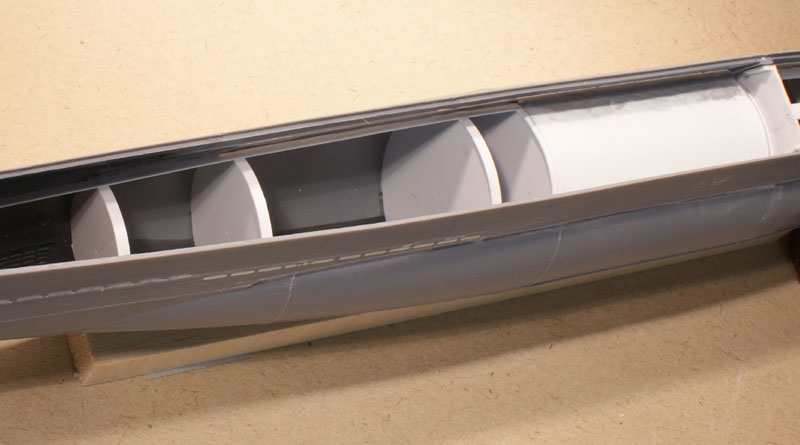
Innerhull: Scratched a innerhull with various details.

And here a bunch of pictures showing the present state.


#027
Visit this Community
Louisiana, United States
Joined: April 13, 2005
KitMaker: 5,422 posts
Model Shipwrights: 5,079 posts
Posted: Friday, November 14, 2008 - 10:00 AM UTC
Wonderful work Jan.

Kenny
Murdo
Visit this Community
Scotland, United Kingdom
Joined: May 25, 2005
KitMaker: 2,218 posts
Model Shipwrights: 214 posts
Posted: Friday, November 14, 2008 - 10:50 AM UTC
Great stuff Jan. Absolutely great work!!!
MrMox
Visit this Community
Aarhus, Denmark
Joined: July 18, 2003
KitMaker: 3,377 posts
Model Shipwrights: 985 posts
Posted: Tuesday, November 18, 2008 - 05:18 AM UTC
Thanks Mates, back to the return of the big white whale

Got a coat of white primer, some light repairs and a preshading in dark gray - and made a simple base for it.


Cheers/Jan
Gunny
Visit this Community
Pennsylvania, United States
Joined: July 13, 2004
KitMaker: 6,705 posts
Model Shipwrights: 4,704 posts
Posted: Tuesday, November 18, 2008 - 06:21 AM UTC
Moby Dick (big white whale!) is looking sweet, Mr. Klarbæk...
Please continue!!
~Gunny
MrMox
Visit this Community
Aarhus, Denmark
Joined: July 18, 2003
KitMaker: 3,377 posts
Model Shipwrights: 985 posts
Posted: Wednesday, November 19, 2008 - 08:37 AM UTC
Not so white anymore, done the light gray upper hull, and the inner hull, basepaint and some highlights.

Finished with some future to make it stronger for the masking.

The deck is still not glued on, have to remove it for washing the inner hull, drybrush and some additional highlights on some of the details.


Cheers/Jan
skipper
Visit this Community
Lisboa, Portugal
Joined: February 28, 2002
KitMaker: 5,182 posts
Model Shipwrights: 4,070 posts
Posted: Wednesday, November 19, 2008 - 08:44 AM UTC
Hi Jan!

Terribly great update while I was away!
All the work you had before is making a great difference (a positive one, of course!!) and making this Typ II another excellent model in your sub collection!

The wooden deck seems to be a little high... is it because it isn't glued?

Keep us posted, please


Rui
 _GOTOTOP