

Started this back in 2011, and slowly coming together.
It will be radio Controlled and powered by 3 400 brushed motors.
This is the first plastic model I have built for over 45 year, so this is a learning curve with regard to the detail and accessory items, that are available to the modern modeller.
I haven't any particular build sequence, as I like to feel free t assemble/modify/paint at any given time (I bore easily)
When I have figured out how to transfer my photo's from my album to the thread I will post them.
Gregg


Go to modelshipwrights.com for the current dynamic site!
Ships by Class/Type: Military Small Craft
For topics on PT boats, landing craft, Vietnam riverine, etc.
For topics on PT boats, landing craft, Vietnam riverine, etc.
Hosted by Jim Starkweather
Italeri Schnellboote

ojayspbody

Joined: July 09, 2012
KitMaker: 8 posts
Model Shipwrights: 8 posts

Posted: Friday, February 22, 2013 - 07:53 AM UTC

xrz100

Joined: May 28, 2010
KitMaker: 193 posts
Model Shipwrights: 186 posts

Posted: Friday, February 22, 2013 - 07:15 PM UTC
Hello Gregg,
welcome to the community of Italeri S100 builder. Mine was in the water in September/October 2011
http://www.youtube.com/watch?v=ZsjBgv2a5p0
since then I am rebuilding, new propshafts, operational torpedoshot with pressured air and some failsafe, smoke generator and Lürssen effect, etc. As I am only able to build on weekends, the progress is slow (but steady. There are also the 8th Schnellbootflotille which meats on a yearly basis in Amersford in The Netherlands. Here is their thread (around 203 pages)
http://www.modelbouwforum.nl/forums/bouwverslagen-schepen/72708-bouwverslag-8ste-schnellboot-flottille-italeri-1-35-a.html
with a new boat on the shipyard currently. Our dutch freind speack english mostly, so there is a good possibility of ecahnge and learning from the mistakes I made ( a few concepts I build up to 5 times)
 .
.
so the first question will be, what engines, diameter of the propshaft and props have you selected?
bis denne
Christian
welcome to the community of Italeri S100 builder. Mine was in the water in September/October 2011
http://www.youtube.com/watch?v=ZsjBgv2a5p0
since then I am rebuilding, new propshafts, operational torpedoshot with pressured air and some failsafe, smoke generator and Lürssen effect, etc. As I am only able to build on weekends, the progress is slow (but steady. There are also the 8th Schnellbootflotille which meats on a yearly basis in Amersford in The Netherlands. Here is their thread (around 203 pages)
http://www.modelbouwforum.nl/forums/bouwverslagen-schepen/72708-bouwverslag-8ste-schnellboot-flottille-italeri-1-35-a.html
with a new boat on the shipyard currently. Our dutch freind speack english mostly, so there is a good possibility of ecahnge and learning from the mistakes I made ( a few concepts I build up to 5 times)
.so the first question will be, what engines, diameter of the propshaft and props have you selected?
bis denne
Christian

DanielMoscatelli

Joined: August 22, 2011
KitMaker: 998 posts
Model Shipwrights: 941 posts

Posted: Saturday, February 23, 2013 - 04:45 AM UTC
Good my new friend Christian!! Jajaja really very good your work with these Schnellboote..... I time ago did some tests with my S-100. But in my country one does not find inputs and anybody who wants to help you this way that one learns to blows. Jejeje already inflate my first lipo!!!.... East is a project that this guarded in my rack waiting for an impulse of courage ....... he will enjoy your advices and very well the link!!Regards Daniel


xrz100
Joined: May 28, 2010
KitMaker: 193 posts
Model Shipwrights: 186 posts
Posted: Saturday, February 23, 2013 - 11:33 AM UTC
hello Daniel,
I think all together, we should be able to rock the "house". For all of you who would like to make the boat more relistic - than it exist in the mind of Italeri - I recommend some of the plans from Robert: http://rpalmacci.free.fr/
it took him quite a while until all plans wehere generated based on historic pictures and visits in the french naval museum.
I recommende the plan for the 2 cm bow flak and the 3,7 Flak shield, as a starter. I you want to make those guns to be turned, it deinitely needs some corrections. I have the plans myself, but for 4 EUR it it worthwhile to appreciate Roberts efforts.
Today I worked on the bow gun and made it turnable, including being able to put a crew memeber in the tub.
nest will be to complete the failsafe for the torpedoe tubes, the torpedo shot should go only when the doors are open.
http://www.youtube.com/watch?v=iPw4H8i96xk&list=UUaOGMSLQsMvW83ifA0Ln-aA
That is all for now my friends. let me know you next steps and we can discuss further......
kind regards
Christian
ojayspbody
Joined: July 09, 2012
KitMaker: 8 posts
Model Shipwrights: 8 posts
Posted: Friday, March 15, 2013 - 09:42 AM UTC
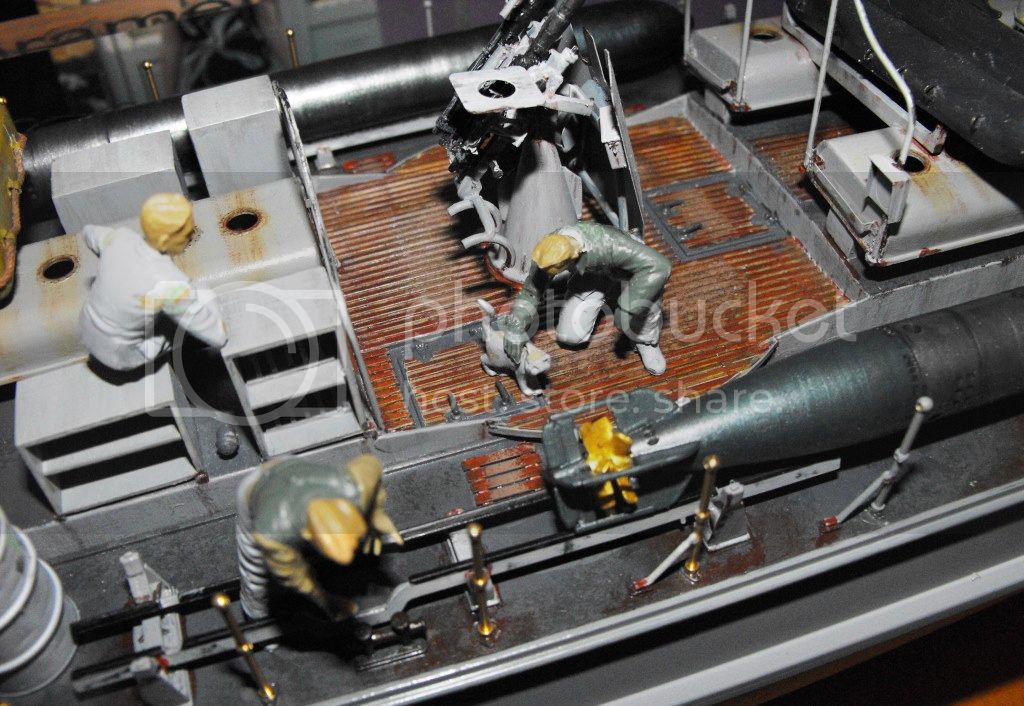
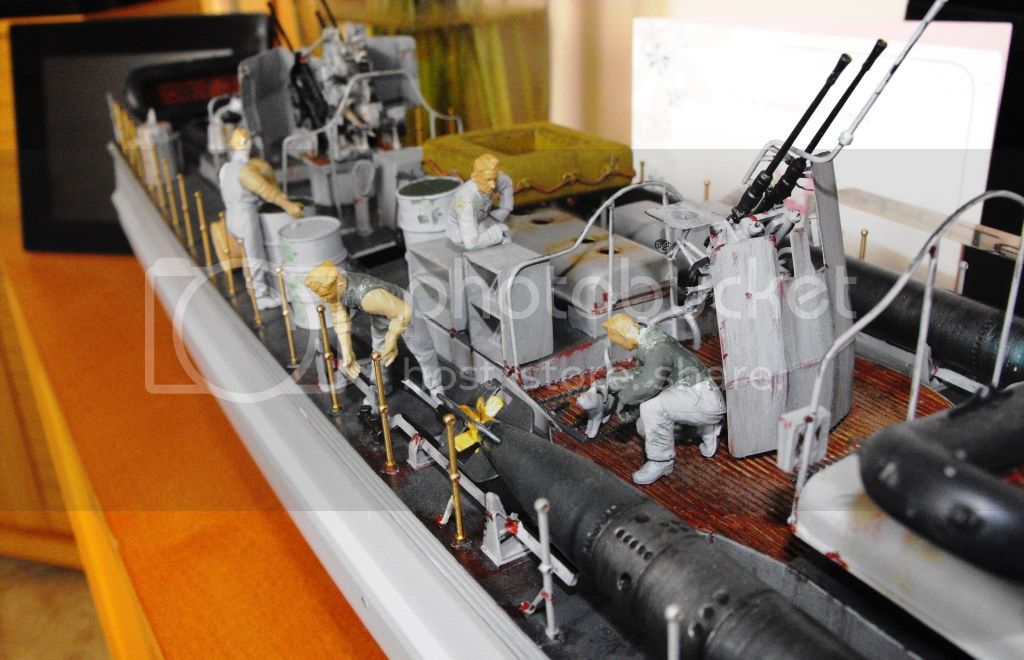
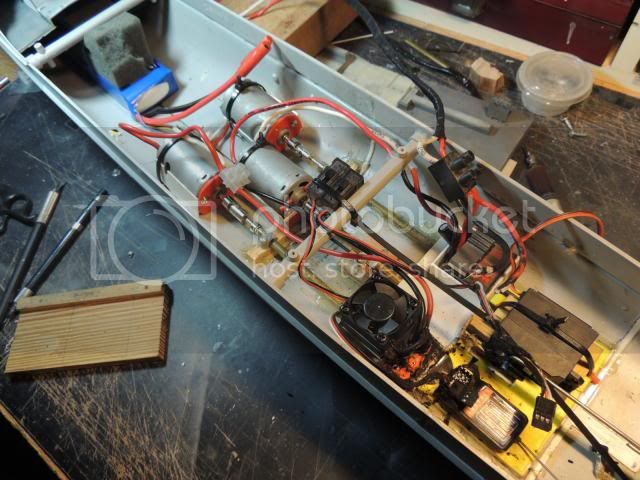
Thanks for the welcome guys. I have really enjoyed this build, and have used some of roberts excellent plans in my build.
However it isn't my intention to produce an exact replica of any particular Boote, rather to show a very busy working boat, warts & all!
There will be faults etc., however I am building it for my own benefit
IMG]http://i1041.photobucket.com/albums/b416/ojayspbody/Italeri%20Schnellboot%20For%20Web%20Pages/20mmQuadFlakVierling3.jpg[/IMG]
IMG]http://i1041.photobucket.com/albums/b416/ojayspbody/Italeri%20Schnellboot%20For%20Web%20Pages/FlakTubAndPedestalConversion.jpg[/IMG]
Some of my in progress build pics.
Gregg
xrz100
Joined: May 28, 2010
KitMaker: 193 posts
Model Shipwrights: 186 posts
Posted: Friday, March 15, 2013 - 09:23 PM UTC
Hello Gregg,
this is absolutly the right approach. Everyone applies the level of detail that he wants: For me, I apply most things that can be detected from about 3 m distance (when the boat is on the water), and most relevant functions, i.e. Torpedotube hatches, turning Flaks, Flak sound, etc.
Is you model coverted for RC or a model for presentation?
bis denne
Christian
ojayspbody
Joined: July 09, 2012
KitMaker: 8 posts
Model Shipwrights: 8 posts
Posted: Saturday, March 16, 2013 - 07:57 AM UTC
Hi Christian,
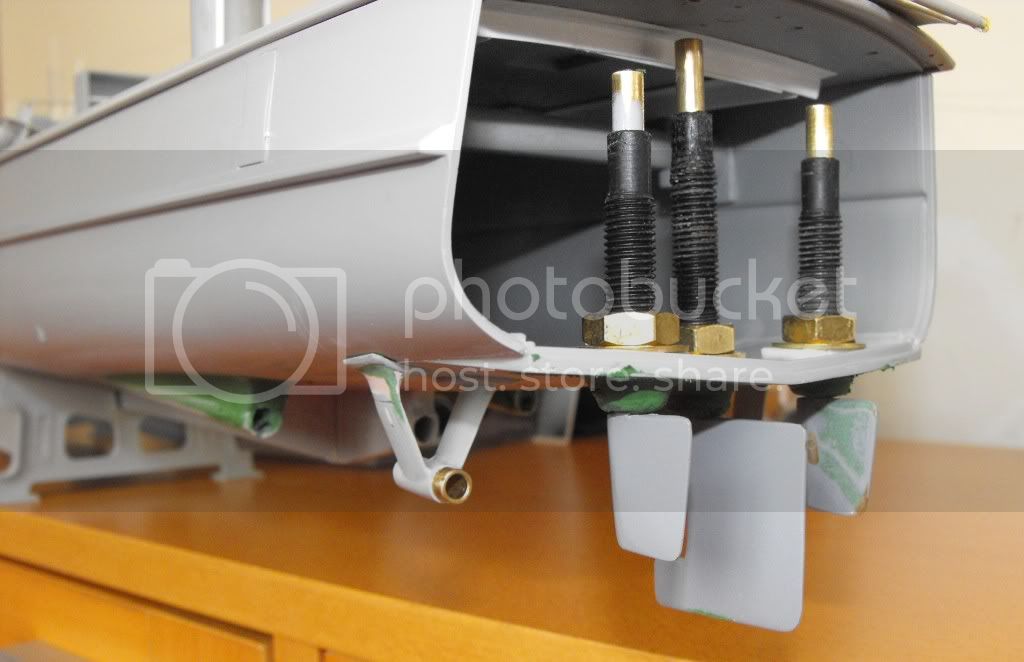
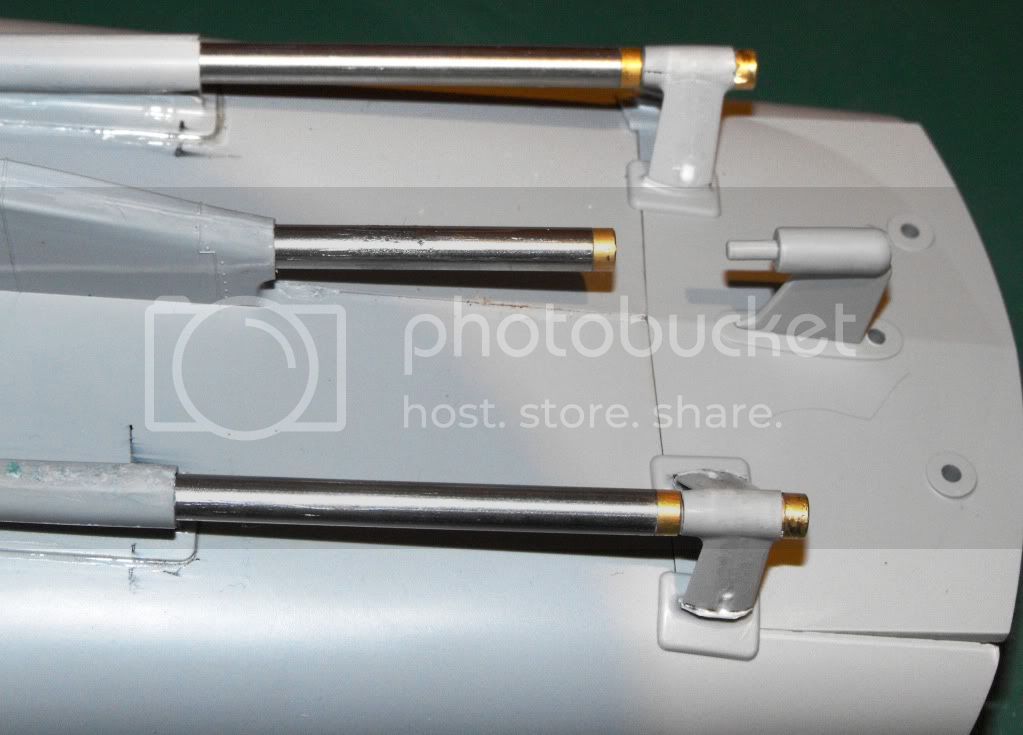
I am fitting 3x400 can motors with 4mm stainless shafts and 32mm scale brass props.R/C for speed control, rudders, Lursson Effekt etc..
Gregg
I am fitting 3x400 can motors with 4mm stainless shafts and 32mm scale brass props.R/C for speed control, rudders, Lursson Effekt etc..
Gregg
xrz100
Joined: May 28, 2010
KitMaker: 193 posts
Model Shipwrights: 186 posts
Posted: Monday, March 18, 2013 - 12:30 AM UTC
Hello Gregg,
very impressive, you building very clean.
I had the same problem: how to fix the shaft tubes to the A frames? I simply put the tube into a polysterol tube, saned the original a-frame until a nice saddle remained an glued my PS tube to that saddle.
How do you plan to realize the Lürssen Effect? Sliding Servo? This weekend my wheelhouse fell of the deck when moving it so I am back to square one wrt the wheelhouse.
kind regards
Christian
DanielMoscatelli
Joined: August 22, 2011
KitMaker: 998 posts
Model Shipwrights: 941 posts
Posted: Monday, March 18, 2013 - 07:56 AM UTC
 Good boys this one is mine.
And this happen in you try closely together the wharf jejejje

Regards Daniel
xrz100
Joined: May 28, 2010
KitMaker: 193 posts
Model Shipwrights: 186 posts
Posted: Monday, March 18, 2013 - 07:16 PM UTC
Hello Daniel,
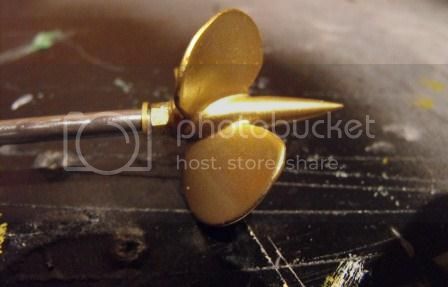
nice work, I see you must have access to a turning maschine. In case you want to shift from the kit propeller to real ones, you find "kriegsmarine" Style props from Raboesch: http://www.raboesch.com/CATALOGUS_2-2010_WEB.pdf Look at page 3, second propeller Kriegsmariene Style Old school.
bis denne
Christian
xrz100
Joined: May 28, 2010
KitMaker: 193 posts
Model Shipwrights: 186 posts
Posted: Sunday, March 24, 2013 - 07:42 PM UTC
Hello Gents,
I started my 2nd Schnellboot, this time it will be an S19 type boat. Bute before building anything serious the groundwork needs to be completed. To this end I gave the measures of the ruders, rudercross (for the servo) for milling in brass, a central engine rib and lipocase to the miller of my Trust. Further I started to enlarge one bossing to fit around the propshaft. I did not remeber how long it takes to get the diameter enlarged to 6 mm: Anyway this is now done for the port side.
bis denne
Christian
DanielMoscatelli
Joined: August 22, 2011
KitMaker: 998 posts
Model Shipwrights: 941 posts
Posted: Monday, March 25, 2013 - 04:06 AM UTC
Thank you very much friend Christian!! Yes. I think to change them. This one everything in period of tests. At any time re initiate the works in my S-100. While I continue learning here!!Daniel
xrz100
Joined: May 28, 2010
KitMaker: 193 posts
Model Shipwrights: 186 posts
Posted: Wednesday, April 10, 2013 - 05:31 PM UTC
Gentlemen,
I just started with the build of an S19 Type boat (the last oe that had the torpedo tubes on the frondeck uncovered). The building starts with the usual tasks in the hull, engineroom, opening the bossings for my propshafts.
One more thing to get access to the ruders is the opening of the rear hatch section (as displayed in the picture) it takes 2 hours and in this case 2 oneway scapels to cut through the deck. The scrtches left and right will go after airbrushing. Beneath the hatch is a frame which is holding the hatch.

Same is with the kitchenroof left to it. But here we have to get rid of some Italeri interpretations of Smoke boey rack. more to come.
bis denne
Christian
I just started with the build of an S19 Type boat (the last oe that had the torpedo tubes on the frondeck uncovered). The building starts with the usual tasks in the hull, engineroom, opening the bossings for my propshafts.
One more thing to get access to the ruders is the opening of the rear hatch section (as displayed in the picture) it takes 2 hours and in this case 2 oneway scapels to cut through the deck. The scrtches left and right will go after airbrushing. Beneath the hatch is a frame which is holding the hatch.
Same is with the kitchenroof left to it. But here we have to get rid of some Italeri interpretations of Smoke boey rack. more to come.
bis denne
Christian
xrz100
Joined: May 28, 2010
KitMaker: 193 posts
Model Shipwrights: 186 posts
Posted: Sunday, May 05, 2013 - 02:09 AM UTC
Gents,
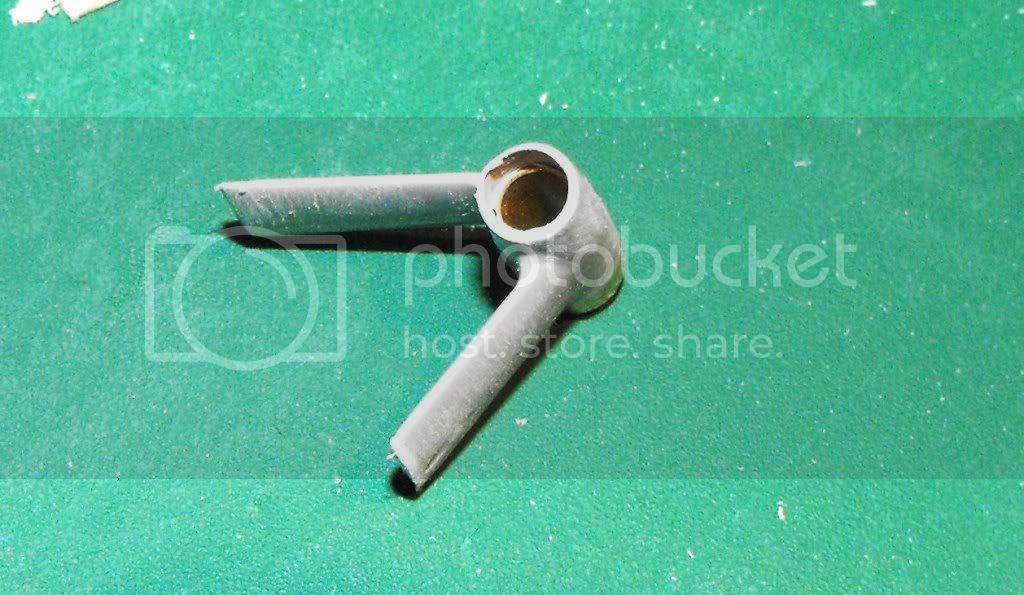
I completed the rudders, those are made of brass with aditional Polysterol on the sides to add some thickness. Further the muzzles are there to add from time to time some oil in the rudders. Otherwise the rudders cannot be accessed very easily.

I completed the rudders, those are made of brass with aditional Polysterol on the sides to add some thickness. Further the muzzles are there to add from time to time some oil in the rudders. Otherwise the rudders cannot be accessed very easily.
DanielMoscatelli
Joined: August 22, 2011
KitMaker: 998 posts
Model Shipwrights: 941 posts
Posted: Monday, June 10, 2013 - 10:31 AM UTC
Hello Chistian and Gregg ...... See that my photos an desapear!! 
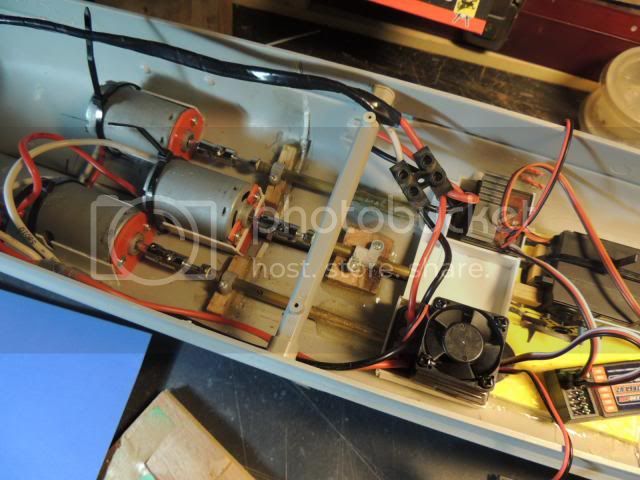
I tell them... My S-100 equips 3 engines 540 and 2 controls peed. central engine with a controller for common managing and the two external to full power. with another controller The battery lipo 3S 11.1 v 5000 mah ......
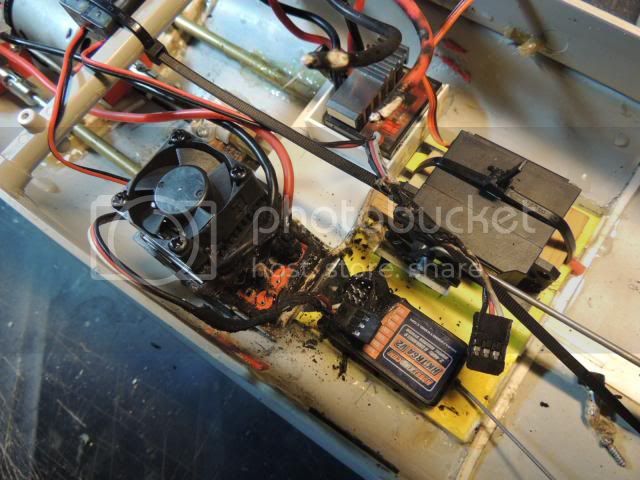
The tests of the weekend They were promising.... The managing with the central very good engine!!! Rapid enough and good maneuver..... But in straight line on having given him full accelerator with the day pupils the torpedera seemed to fly!! Great!!! But very little!!! The control speed of use shared in the external engines lit fire!!!!
|:(

 Daniel
 xrz100
Joined: May 28, 2010
KitMaker: 193 posts
Model Shipwrights: 186 posts
Posted: Tuesday, June 11, 2013 - 12:03 AM UTC
Hello Daniel,
I assume, that the power the two external engines generate (8 - 10 Amp each) exceeds in combination, what the controler is able to handle (just 10 Amphere single). I suggest to use also for the external engines 2 seperate controllers and combine their signal into one channel by using a Y-Cable.
3x 500engine, that is quite impressive, very fast but alos heavy, have you taken anvideo from the journey?
bis denne
Christian
DanielMoscatelli
Joined: August 22, 2011
KitMaker: 998 posts
Model Shipwrights: 941 posts
Posted: Tuesday, June 11, 2013 - 05:36 AM UTC
Hello Christian!!I did not have time to video!! inflame before!! Jajajaj But it ran very fast !!!
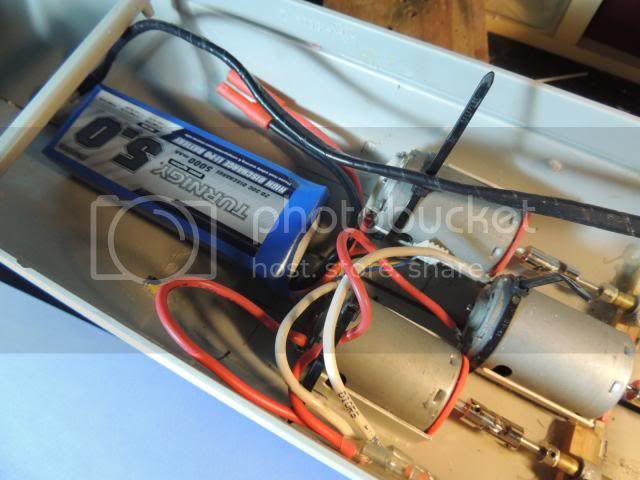
I m thinking 3 controllers and to join the exteriors in " Y " and to eliminate the red cable for the BEC. Also Im thinking about feeding with battery Ni-MH 7,2 v 5000 mAh. The lipo 3s 11,1v too much for the ESC. You who thinks?
I think of eliminating 1 cell of lipo and of turning her in 2s and of adding an alarm of low voltage not to damage and to use her as refill of the NI-MH.
But I not. Probably be better to buy neither other one NI- Mh of supply. Jejeje
Much to learn!! Jejejej

Daniel
xrz100
Joined: May 28, 2010
KitMaker: 193 posts
Model Shipwrights: 186 posts
Posted: Thursday, June 13, 2013 - 12:25 AM UTC
Hi Daniel,
when when the controler of the central engine was able to cope with the 11,4 V, then certainly the others wil be able to do too.
But the controler has a Voltage nad from which to which they will work. Mine operate from 3,5 to 14 V, so take a look at the spects the controler have and ready to go you are.
The powercells you have should be sufficient; I would try the lipo first as his NiMh pendant is heavier than the lipo one.
Well impressive build, can't wait to see it on the water, scaring eveyone else
Bis denne
Christian
xrz100
Joined: May 28, 2010
KitMaker: 193 posts
Model Shipwrights: 186 posts
Posted: Monday, July 01, 2013 - 07:34 PM UTC
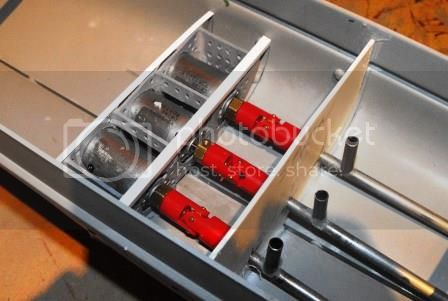
I made some progress on my new S18 Build. I established a shim to hold the middle prop shaft put some (bathroom) silicon in place, put the shim in place and afterwards put the propshaft in position, before watertighten the whole hull.

and here the propshaft is in place

Making everything watertight:

bis denne
Christian
and here the propshaft is in place
Making everything watertight:
bis denne
Christian
DanielMoscatelli
Joined: August 22, 2011
KitMaker: 998 posts
Model Shipwrights: 941 posts
Posted: Thursday, July 04, 2013 - 03:53 AM UTC
Hello Cristian!!Very good and prolix advance!!
So the chosen one is the S-18!! ........Ufff you will have Scratch's hard work!! .......
I am waiting for the new ones replace. And later initiates a work to duo with the friend "Julian Sallows" in the future post " Enemy of the Chanel " jejej Soon.....
Regards Daniel
xrz100
Joined: May 28, 2010
KitMaker: 193 posts
Model Shipwrights: 186 posts
Posted: Sunday, November 26, 2017 - 11:52 PM UTC
Sorry for the advertisement but shapeways is offering today 10% and no shipping cost for purchases over 25 , for all Schnellboot fans ion 1:72 and 1:35 this should serve as a reminder.
https://www.shapeways.com/shops/iron-models
Long mine rails with Track holders. LMB and TMB mines, targeting computer, smoke cans etc.
kind regards
Christian
https://www.shapeways.com/shops/iron-models
Long mine rails with Track holders. LMB and TMB mines, targeting computer, smoke cans etc.
kind regards
Christian
 |

WEB HOSTING BY


Copyright ©2021 Model Shipwrights and Kitmaker Network, a subsidiary of Silver Star Enterprises
All Rights Reserved. Please read our Conditions of Use and Privacy Policy.
All Rights Reserved. Please read our Conditions of Use and Privacy Policy.