_GOTOBOTTOM
Ships by Class/Type: Military Small Craft
For topics on PT boats, landing craft, Vietnam riverine, etc.
IJN UKURU Type B escort vessel 1:350
Black_sheep
Visit this Community
Bayern, Germany
Joined: December 11, 2009
KitMaker: 823 posts
Model Shipwrights: 551 posts
Posted: Saturday, November 19, 2016 - 11:45 PM UTC
Hi Mates,

as I watched all these recently fantastically build ships (Kostas Katseas especially) I want to go deeper and also try my hands now at a ship model. I chose 1:350 scale as it will show maybe more detail than 1:700. I do plan to present this one as a waterline model on top of a small sea diorama. So lets see how it will come out in the end - be gentle as it is my first try with ships

These are the beginning participants:


Cheers

Thomas
TRM5150
Visit this Community
Massachusetts, United States
Joined: January 03, 2010
KitMaker: 2,159 posts
Model Shipwrights: 1,400 posts
Posted: Sunday, November 20, 2016 - 06:12 AM UTC
Fine choice Thomas! ...and a fine looking pile of goodies to go along with it! Enjoy your first go-around on the floaty stuff!
rolltide31
#377
Visit this Community
Texas, United States
Joined: June 27, 2010
KitMaker: 1,481 posts
Model Shipwrights: 1,332 posts
Posted: Sunday, November 20, 2016 - 07:31 AM UTC
Thomas,

Welcome to the wetside!! Looking forward to seeing your build come together

Dave
Fordboy
Visit this Community
Auckland, New Zealand
Joined: July 13, 2004
KitMaker: 2,169 posts
Model Shipwrights: 1,597 posts
Posted: Monday, November 21, 2016 - 02:17 AM UTC
Ahoy Thomas

Cool looking build indeed.

Watching with interest.

Cheers

Sean
TimReynaga
Staff MemberAssociate Editor
MODEL SHIPWRIGHTS
Visit this Community
California, United States
Joined: May 03, 2006
KitMaker: 2,500 posts
Model Shipwrights: 1,830 posts
Posted: Tuesday, November 22, 2016 - 01:15 AM UTC
Hi Thomas,

Great possibilities with this build...


Have fun with it!

Black_sheep
Visit this Community
Bayern, Germany
Joined: December 11, 2009
KitMaker: 823 posts
Model Shipwrights: 551 posts
Posted: Tuesday, November 22, 2016 - 01:45 AM UTC
Thank you all for your warm welcome . Hey Tim thank you for the nice photo; I´ve made investigations about this ship class in the Internet before my build but never saw this one before.

Today I can show the results of my first works at the vessel. This is not only my first (surface) ship but also my first Pit-Road kit. I can say the plastic is comfortable, not too soft and details are good. Some details will be replaced and added by the Eduard PE set. Only the AA-guns look a little too clumsy but for them I have the excellent resin replacements from Alliance which do look spot on.

At first I glued together the ship´s hull and deck after I opened the holes for the anchor and anchorchain to make it more realistic. I also removed some plastic parts which will be replaced later by EDUARDS PE parts.


Then I tried my skills first at the smallest superstructure of the ship; it is the house with the ship´s searchlight and a radar (?) on top. I placed all the railings and glued them with a small toothstick. I´m glad it worked but, boy, even with my magnifier lens at my head it was a difficult job because of the size. But I´m satisfied with the first results


Now I already have a first question to the ship builder experts here: How do you finish these kind of ships? In separate built and painted segments or do you build everything first and carefully paint it later in the end? I have big concerns to ruin the glued railings and small parts during painting in the end . Thanks ahead for your advice.

Cheers

Thomas
RussellE
#306
Visit this Community
Victoria, Australia
Joined: June 27, 2010
KitMaker: 3,959 posts
Model Shipwrights: 2,777 posts
Posted: Tuesday, November 22, 2016 - 04:27 AM UTC
Hi Thomas

Welcome to the salty side of the hobby! 1/350 is a great scale-not too big to create storage problems, but not too small either as to be hard to detail.

And also welcome to MSW! The guys and gals here are all very helpful and can provide you with a wealth of knowledge to help your build along.

Hm, with regard to painting ships it's a bit of tricky question. Mostly I would say it depends on what colour scheme you are using and if you have an airbrush.

If you have an airbrush they are great for painting photo etch.

For myself I like to build ships as a serious of smaller kits. Build and paint the hull separately, then superstructure components with as many details added as possible then add them to the hull, then paint and add final detail components last and add them to the assembly.

Railings are a bit tricky though. If the deck is a different colour to the vertical surfaces I leave them off and add them later, so that I can mask up to paint the different colours without damaging the railings. The railings I paint on the fret and add pretty much near the end of the build.

There are lots of fine build logs here on MSW that you can trawl through which can step you through the process...

Ultimately though, it depends on what works best for you.
Blespooky
Visit this Community
Tel Aviv-Yafo, Israel
Joined: June 03, 2014
KitMaker: 277 posts
Model Shipwrights: 171 posts
Posted: Tuesday, November 22, 2016 - 02:50 PM UTC
Great Start Thomas, looks like a great little ship.

Ill be watching with interest, have fun.

Cheers,
Bryan
TRM5150
Visit this Community
Massachusetts, United States
Joined: January 03, 2010
KitMaker: 2,159 posts
Model Shipwrights: 1,400 posts
Posted: Tuesday, November 22, 2016 - 05:28 PM UTC
Fine start Thomas! Personally I like the sub-assembly approach. Build up individual structures, paint and assemble. As Russ mentioned some items are better left off and subsequently painted individually...please look p his build blogs as his production line style of little bits is fantastic! Keep plugging away over there...looking forward to seeing your next update soon!
RussellE
#306
Visit this Community
Victoria, Australia
Joined: June 27, 2010
KitMaker: 3,959 posts
Model Shipwrights: 2,777 posts
Posted: Wednesday, November 23, 2016 - 01:43 AM UTC

Quoted Text

Fine start Thomas! Personally I like the sub-assembly approach. Build up individual structures, paint and assemble. As Russ mentioned some items are better left off and subsequently painted individually...please look p his build blogs as his production line style of little bits is fantastic! Keep plugging away over there...looking forward to seeing your next update soon!


Aw shucks-thanks Todd
Black_sheep
Visit this Community
Bayern, Germany
Joined: December 11, 2009
KitMaker: 823 posts
Model Shipwrights: 551 posts
Posted: Friday, November 25, 2016 - 05:10 PM UTC
Hello Mates,

@Russel and Todd: Thank you very much for your advice! I will proceed now with sub-assemblies. I also think this is the best way to tackle this small ship.

@Bryan: Thank you for your comment and be welcome to watch my efforts here.

During the last few evenings I finished the aft superstructure with the funnel and the stern antenna mast. I can say it is challenging for a guy who is used to glue 1:35 tank kits together but I Keep sitting and singing "we shall overcome" . I drilled out and painted the funnel interior black to get some depht behind the photoetched screen.


It was also time for using that Alliance Modelworks IJN Type-96 25 mm triple Mount flak guns. First of all I´m very impressed about how these guys can make such small resin and pe-parts with such detail quality! However I feel it is just almost beyond my fine motor skills to finish These tiny parts (even with magnifier glasses and a pair of Detail tweezers). Each triple flak consist of the resin triple flak guns itself and another six (!) flimsy microscopical parts which also need to get bended into correct positons. The two gunner seats are so tiny that you almost can not grab anymore with the fine tweezers and many times the glue let the seats dry to the tweezers instead to the gun - but I made it and I am very proud now of my efforts. But look for yourself:

This is one gun in maximal focus with a Euro Cent coin in the back to see the actual miniscule size of everything (I just hope no parts will fly away during painting with my airbrush later):


And this is the actual stage of construction together:


I hope I can match the expectations of the professional ship builders here

I Need a beer now for calm down my hands

Cheers

Thomas
TRM5150
Visit this Community
Massachusetts, United States
Joined: January 03, 2010
KitMaker: 2,159 posts
Model Shipwrights: 1,400 posts
Posted: Friday, November 25, 2016 - 07:52 PM UTC
You seem to be right there my friend! Very clean work especially in the PE department! I know the feeling myself, as I tend to build my share of land-locked vehicles! Looking forward to seeing you next update!
JJ1973
#345
Visit this Community
Niedersachsen, Germany
Joined: August 22, 2011
KitMaker: 1,835 posts
Model Shipwrights: 1,832 posts
Posted: Friday, November 25, 2016 - 10:37 PM UTC
Hallo Thomas!

Very nice project, lots of extra stuff for a small model - looks really interesting!! And great work so far, really good start!! Crisp and clean work with this tiny PE!

I'm in and looking forward to your updates!

Cheers,
Jan
Black_sheep
Visit this Community
Bayern, Germany
Joined: December 11, 2009
KitMaker: 823 posts
Model Shipwrights: 551 posts
Posted: Friday, November 25, 2016 - 10:51 PM UTC
Hallo Jan!

Danke für die Blumen und Willkommen an Bord!
Blespooky
Visit this Community
Tel Aviv-Yafo, Israel
Joined: June 03, 2014
KitMaker: 277 posts
Model Shipwrights: 171 posts
Posted: Saturday, November 26, 2016 - 02:05 PM UTC
Good looking AA, have a beer to calm down, you earned it.

For the Macro photos, try backing away a bit with your camera and just crop the image later, you will get better focus.

Cheers,
Bryan
Black_sheep
Visit this Community
Bayern, Germany
Joined: December 11, 2009
KitMaker: 823 posts
Model Shipwrights: 551 posts
Posted: Saturday, November 26, 2016 - 04:06 PM UTC
*gulp gulp* feel better now

ok Bryan thanks for your tip, I will try it with my next pictures. I suspect I will need to make more macros during the build

Cheers

Thomas
RussellE
#306
Visit this Community
Victoria, Australia
Joined: June 27, 2010
KitMaker: 3,959 posts
Model Shipwrights: 2,777 posts
Posted: Sunday, November 27, 2016 - 01:37 AM UTC
Those AA guns are definitely work a few just as Bryan suggested.

Great progress Thomas
rolltide31
#377
Visit this Community
Texas, United States
Joined: June 27, 2010
KitMaker: 1,481 posts
Model Shipwrights: 1,332 posts
Posted: Sunday, November 27, 2016 - 03:39 AM UTC
Thomas,

Nice work on the triple 25's. I have used those on previous kits and they are a challenge but worth every second.

I am now trying out the Infini Twin 25's and have the triples on order for my next project.

Great work on your Ukuru. Looking forward to seeing it come together.

Dave
Black_sheep
Visit this Community
Bayern, Germany
Joined: December 11, 2009
KitMaker: 823 posts
Model Shipwrights: 551 posts
Posted: Sunday, December 04, 2016 - 01:45 AM UTC
@ Russel and Dave: Thank you for your comments, I will keep on this one with high morale

Today I can show you my progress of last week. The ship kept me really busy as I am not used with this tiny parts. And I stopped counting how often miniscule parts flipped away from the tweezers into carpet Monster land and/or kept sticking at my tweezers because some superglue went to the tweezers because of the capillary force . But in the end my tenacity paid off as I was able to finish the construction .

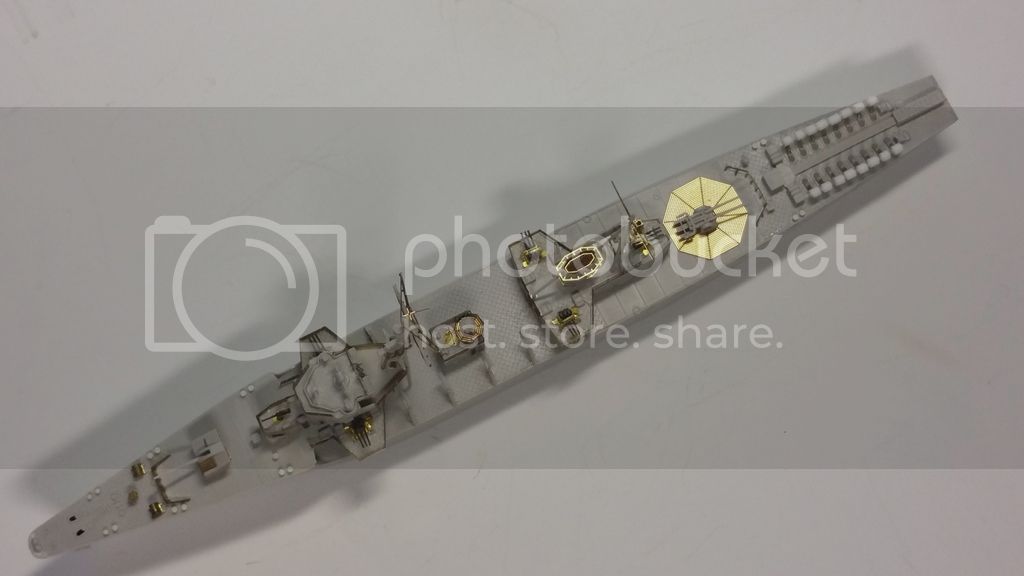
First I hat to pause with all the railings and wanted to finish the small parts at the ships hull. First I finished the bow gun and the etched cable reels. I also improved all the bollards with my finest evergreen sheet and the trustable Punch and Die set - that was an easy and comfortable task:


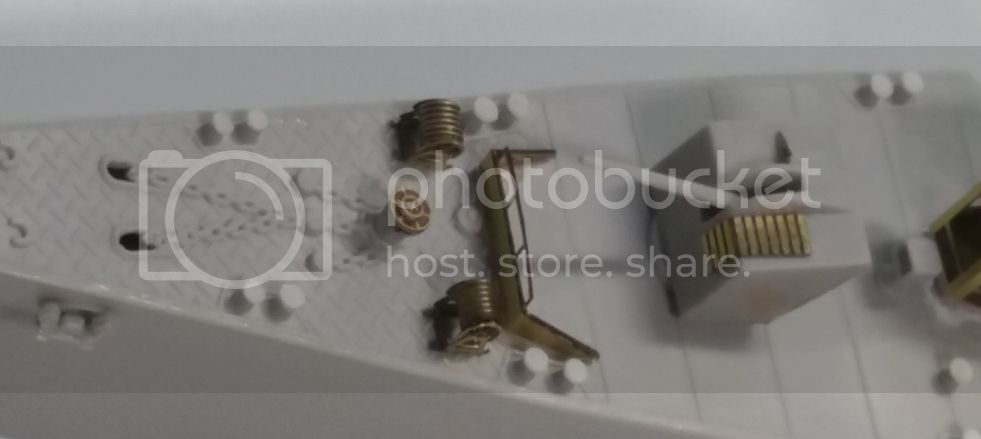
After this I switched my Attention to the aft depth Charge throwers. As all the parts of the PIT ROAD plastic ones suffered a seriously misalignment I had to do my own depth charges... here is the prototype


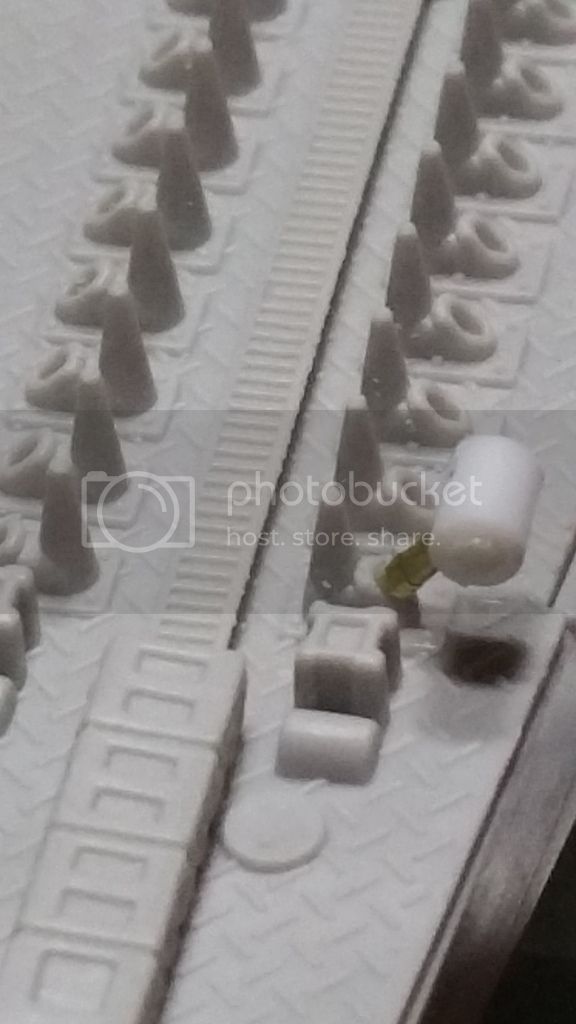
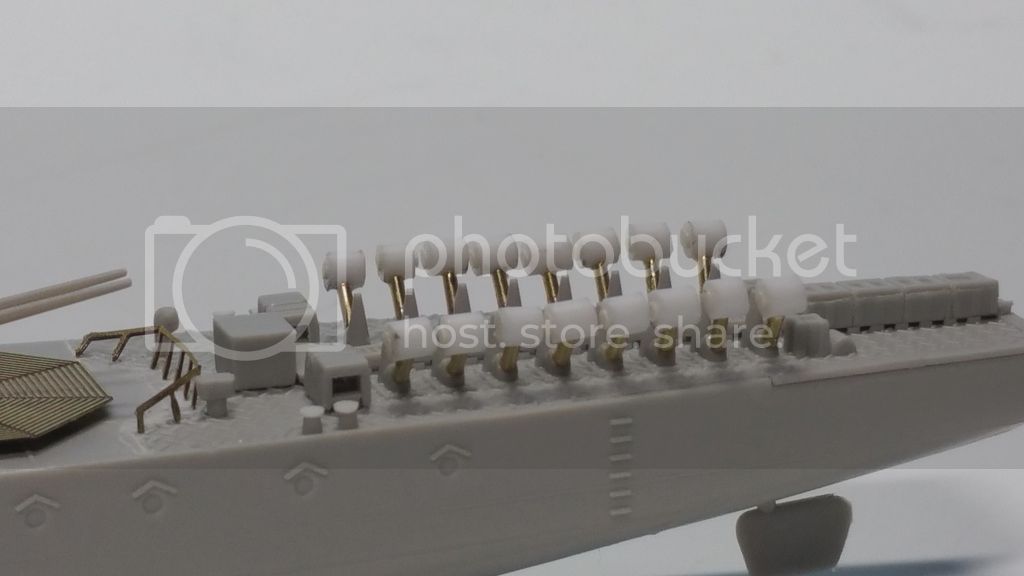
and this is after all were installed in their places


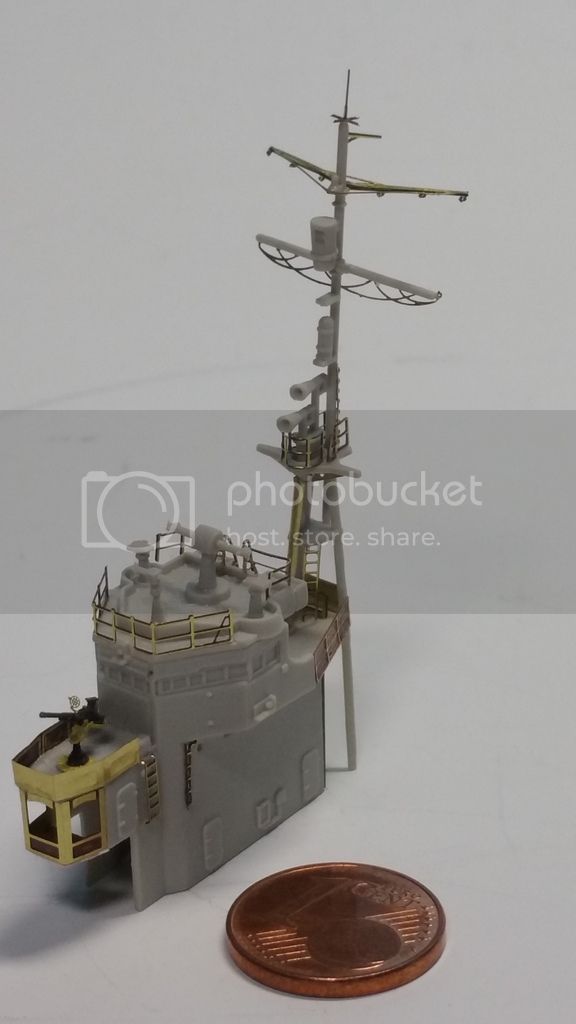
Now it was time for the last and most difficult superstructure of the ship. Here the railings and the very delicate mast almost took me to Desperation. But in the end and after some more beers I was able to finish it. Some railings are not optimal placed but it took me very long time with some of them and I was afraid in the end they will be bended beyond repair. Thats why I decided to let everything as it is now. I think it should be ok for a first-timer.


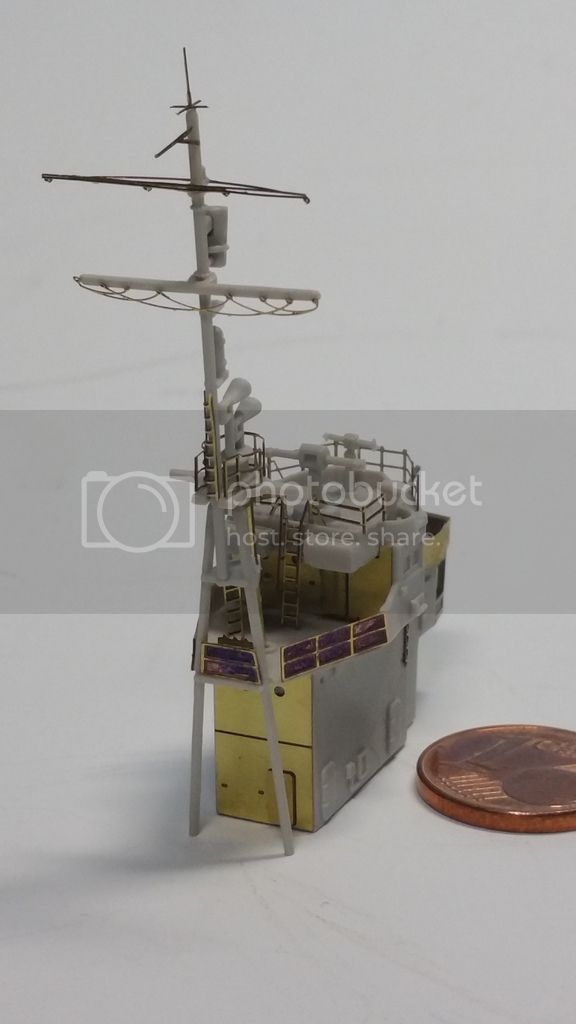
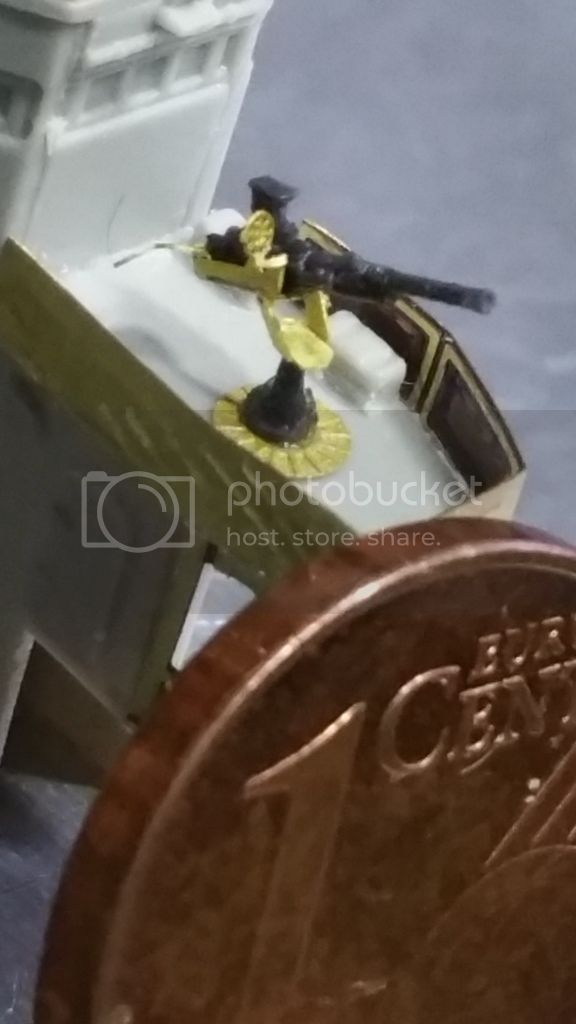
The single 25 mm flak gun in front of the casematte came together quite well, what do you think?


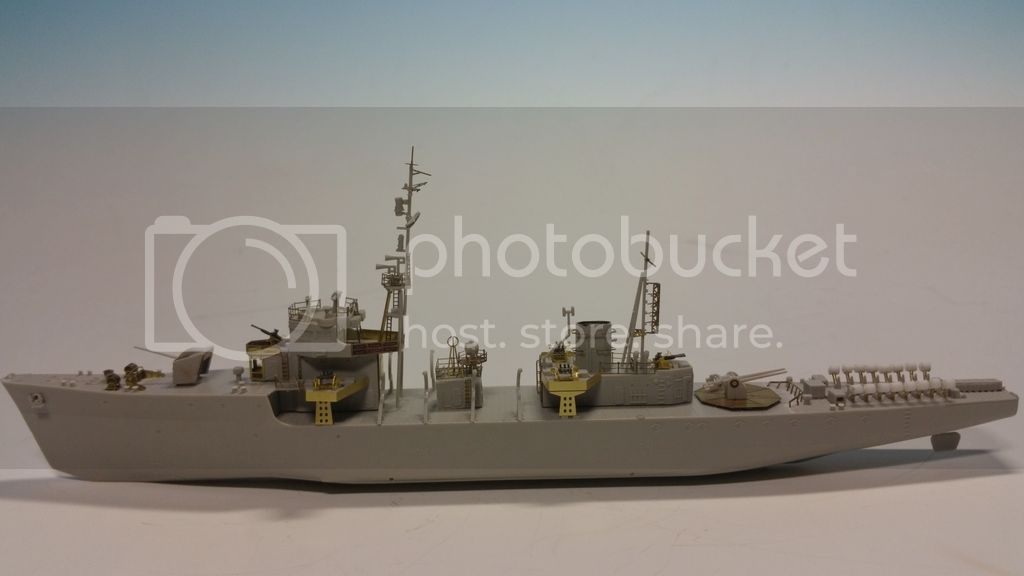
I put everything together finally without glue and the small rescue boats and outer railings. The whole ship is looking this way now


Now I can slowly beginn to saw off the ships bottom and decap the paint bottle!

Cheers

Thomas
RussellE
#306
Visit this Community
Victoria, Australia
Joined: June 27, 2010
KitMaker: 3,959 posts
Model Shipwrights: 2,777 posts
Posted: Sunday, December 04, 2016 - 02:23 AM UTC
Well Thomas

for a first timer on ships this is brilliant work!

Great attention to detail and good scratch building too.

Did I read it right you are going to waterline the hull?
TRM5150
Visit this Community
Massachusetts, United States
Joined: January 03, 2010
KitMaker: 2,159 posts
Model Shipwrights: 1,400 posts
Posted: Sunday, December 04, 2016 - 03:18 AM UTC
Excellent work on the alterations! Bollards and charges will look fantastic under a little color! Great progression on the bride too! Cutting to go waterline ey? More power to you my friend! I know Chris Flodberg had some great success with water dioramas with full hull placement by using ticker foam bases. Just a thought. Either case....best of luck!
Black_sheep
Visit this Community
Bayern, Germany
Joined: December 11, 2009
KitMaker: 823 posts
Model Shipwrights: 551 posts
Posted: Sunday, December 04, 2016 - 10:54 AM UTC
Russel and Todd thank you for the flowers . Yes I plan to place the ship into a small waterline diorama. I saw a very informative Video in Youtube of a german builder who sat his Graf Spee onto such a diorma and it looked great. I want to do it the same way as he did. I planned to cut the ships hull a bit beneath the waterline with a Dremel roundsaw which should not be too difficult. Maybe I will also follow Todds Suggestion and work with Styrodur. We will see what I will do during this week.

Cheers
rolltide31
#377
Visit this Community
Texas, United States
Joined: June 27, 2010
KitMaker: 1,481 posts
Model Shipwrights: 1,332 posts
Posted: Sunday, December 04, 2016 - 12:21 PM UTC
Thomas,

Amazing work. Have always wanted this kit but just haven't had the chance to get it. As far as cutting her Dow to waterline, your a braver man than me. I just use thicker layers of Styrofoam and place the full hull model in the diorama. Looking forward to seeing how that works out.

Dave
JJ1973
#345
Visit this Community
Niedersachsen, Germany
Joined: August 22, 2011
KitMaker: 1,835 posts
Model Shipwrights: 1,832 posts
Posted: Sunday, December 04, 2016 - 12:26 PM UTC
Hallo Thomas!

Excellent work!! As was already stated, great job on the tiny PE stuff!!
- your depth charges look great, I like the litte, kind of simulated end-cap! How did you do that, did you cut them from a rod? Your additions / alterations really give the model a nice touch!! Good luck with water lining - I would consider the styrofoam alternative - but that's just because I would be afraid to cut the hull...

Cheers,
Jan
Black_sheep
Visit this Community
Bayern, Germany
Joined: December 11, 2009
KitMaker: 823 posts
Model Shipwrights: 551 posts
Posted: Sunday, December 04, 2016 - 09:20 PM UTC
Hello David and Jan . Thank you for your good words and your advice about the waterlining. I still not decided what to do now as you guys scared me a bit with cutting the bow . I did see this way in another build - someone build the japanese antarctic Research ship SOYA and also cutted the bow with a drill saw and it worked perfectly.

@Jan: I made these end caps out of very thin Evergreen sheet. The plastic depth charges were unusable, see yourself:


I have a so called Punch & Die Set. don´t ask me who was the Producer of it - I really don´t remember but there should be some Producers of this at the market. This Little tool is very useful if you need small circles of different diameter and/or strength. I use it very often for different thinks like screw heads in 1:35 and so on


..and this is how the punched out circles look like


Grüße

Thomas
 _GOTOTOP