Schnellboot Typ S-38 / 1:35 of Italeri
Baden-Württemberg, Germany
Joined: December 26, 2009
KitMaker: 813 posts
Model Shipwrights: 304 posts
Posted: Wednesday, January 31, 2018 - 04:35 PM UTC
Hello everybody,
a new project started .... the Schnellboot S-38 in scale 1:35 of Italeri... the new huge kit based on the older S-100 kit.
Some upgrade parts will come from Eduard (etched parts of the S-100), some etched parts of Royal Model for the Bofors, some sea mines of Schatton, gun barrels of Master Model and detailed parts of Shapeways.
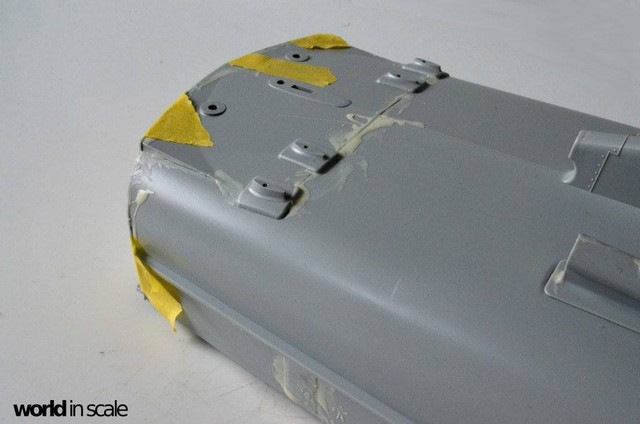
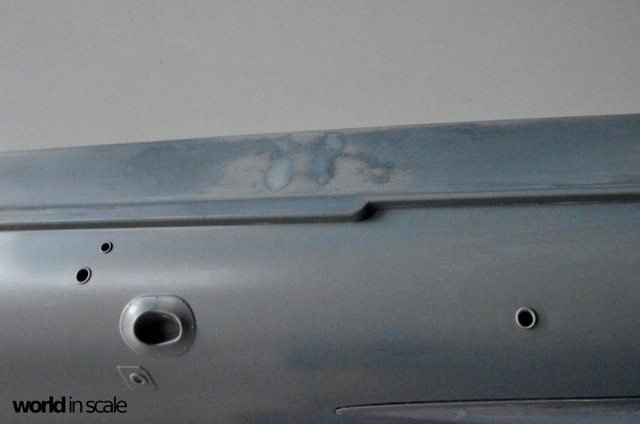
But first lot of putty is necessary to cover the areas where the bolts were used for mounting the two halfes of the hull...

Cheers
Micha
regards,
Michael
http://www.world-in-scale.de

#084
Quebec, Canada
Joined: September 14, 2005
KitMaker: 2,485 posts
Model Shipwrights: 1,157 posts
Posted: Wednesday, January 31, 2018 - 07:32 PM UTC
Great start Michael...will follow with interest.
Cheers,
Auckland, New Zealand
Joined: July 13, 2004
KitMaker: 2,169 posts
Model Shipwrights: 1,597 posts
Posted: Wednesday, January 31, 2018 - 10:32 PM UTC
Ahoy Michael
Another great build.
Looking forward to this one.
Cheers
Sean
New York, United States
Joined: January 21, 2008
KitMaker: 2,531 posts
Model Shipwrights: 1,244 posts
Posted: Thursday, February 01, 2018 - 11:25 PM UTC
Good start, look forward to seeing more. I saw photos of this boat built up and displayed by Italeri, taken at the Nuremburg show. Looks like the error made in the diameter of the forward gun tub in the S-100 kit was not corrected. It is still too small.
Gunner would not fit behind the gun. Al
Baden-Württemberg, Germany
Joined: December 26, 2009
KitMaker: 813 posts
Model Shipwrights: 304 posts
Posted: Sunday, February 04, 2018 - 07:00 PM UTC
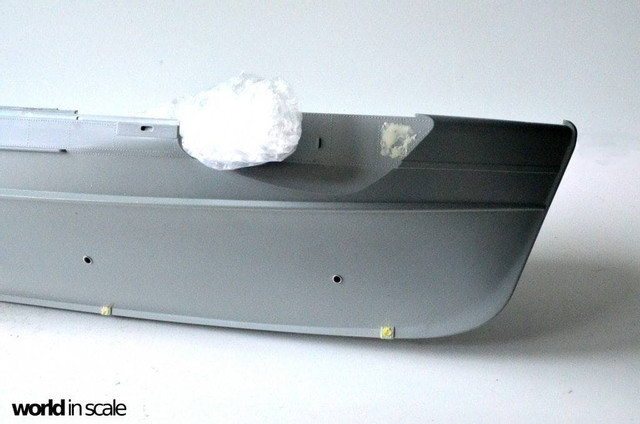
Hello everybody,
several rounds of sanding, putty, sanding, primering, putty,..... later - it is done. The surface is smooth and ready to continue.
Next step will be the torpedotuebes and the new rivets at the bow where I lost them during the sanding process... then I will take care of the display.
regards,
Michael
http://www.world-in-scale.de
TimReynaga
 Associate Editor
California, United States
Joined: May 03, 2006
KitMaker: 2,500 posts
Model Shipwrights: 1,830 posts
Posted: Sunday, February 04, 2018 - 07:24 PM UTC
Quoted Text
... rounds of sanding, putty, sanding, primering, putty,..... later - it is done. The surface is smooth and ready to continue...
Hi Michael,
That is boring stuff, to be sure, but taking care of these tasks now assures that things will look their best later! Solid work so far, I look forward to watching your progress.

Baden-Württemberg, Germany
Joined: December 26, 2009
KitMaker: 813 posts
Model Shipwrights: 304 posts
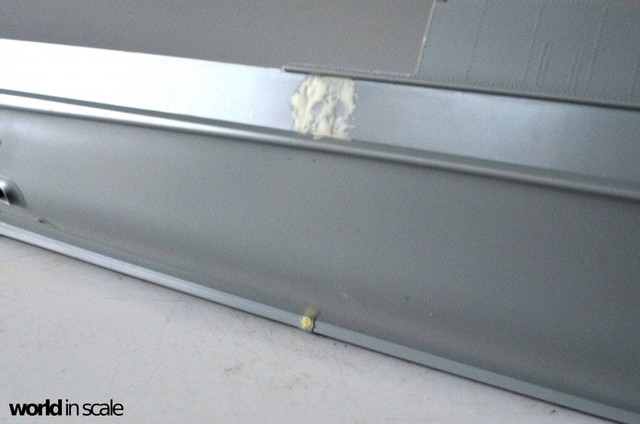
Posted: Wednesday, February 07, 2018 - 05:46 PM UTC
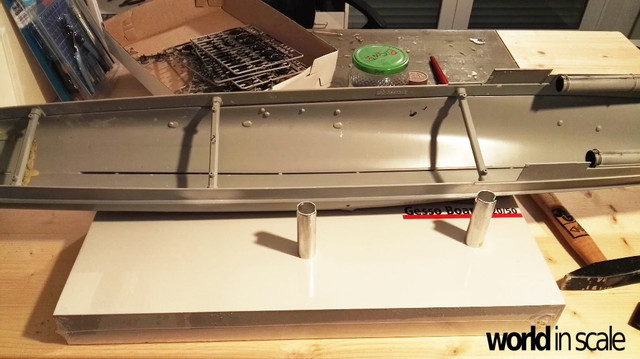
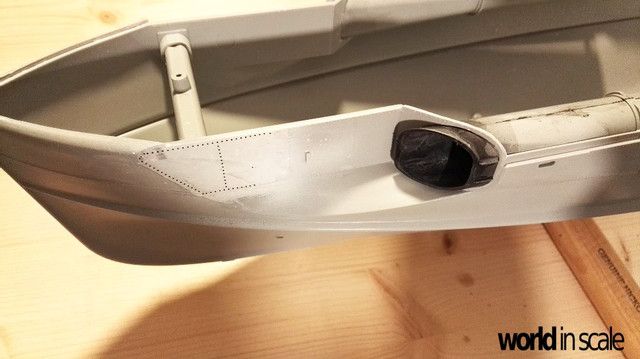
Hello everybody,
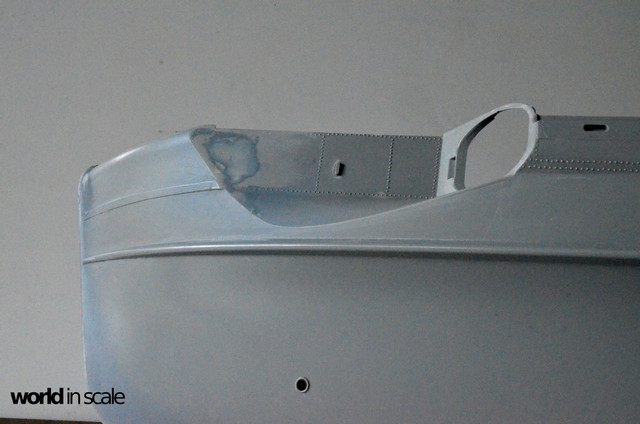
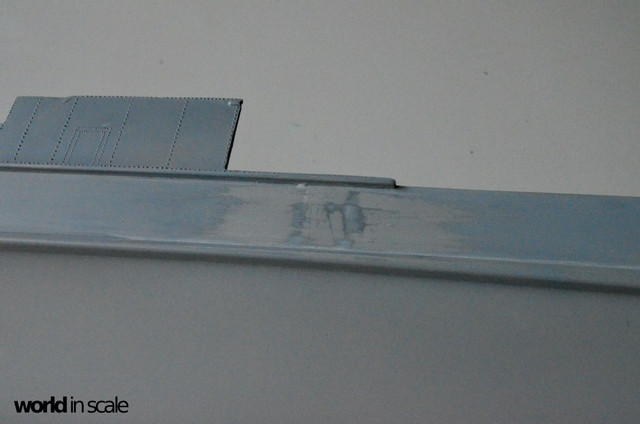
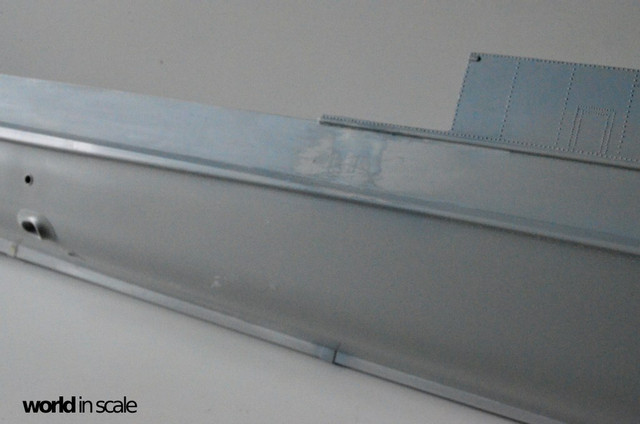
the hull is done, sanded and smooth now. The riverts at the bow were added and secured with a layer clear coat.
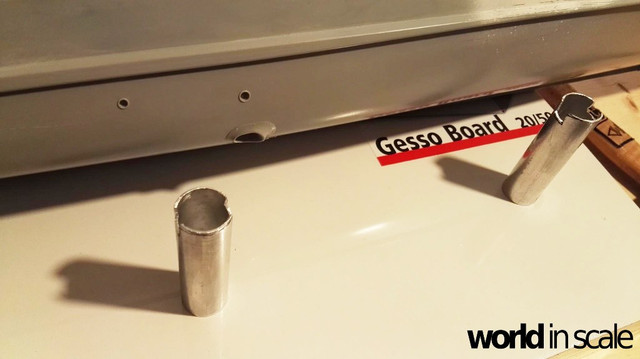
The ship will get a white wooden base with two feed made of aluminium pipe, cut already, now sanding it in the shape of the hull next.
regards,
Michael
http://www.world-in-scale.de
Berlin, Germany
Joined: May 28, 2010
KitMaker: 193 posts
Model Shipwrights: 186 posts
Posted: Wednesday, February 07, 2018 - 10:42 PM UTC
Hello Michael, nice progress. Can you provide more details how you added thoses rivest to the front. I still have somewhere ARCHER rivets, but actualy I am a HULK in applying them. You leave them on the foil? and glue it to the hull? Please enlight me

greetings from Berlin
Christian
PT Boat Command European Theater
Baden-Württemberg, Germany
Joined: December 26, 2009
KitMaker: 813 posts
Model Shipwrights: 304 posts
Posted: Thursday, February 08, 2018 - 07:04 PM UTC
Hi Christian,
these are decals.... normal decals.... cut the length of the decal you need, put the decal in the water .... apply it where you need it ... done
I have fixed it with a layer clear coat after that to secure it during the further works as I will paint the hull later. If you paint it directly afterwards then no clea coat will be necessary I think
Cheers
Michael
regards,
Michael
http://www.world-in-scale.de
#084
Quebec, Canada
Joined: September 14, 2005
KitMaker: 2,485 posts
Model Shipwrights: 1,157 posts
Posted: Thursday, February 08, 2018 - 09:15 PM UTC
Excellent work....those extra details will really pay off in the end!
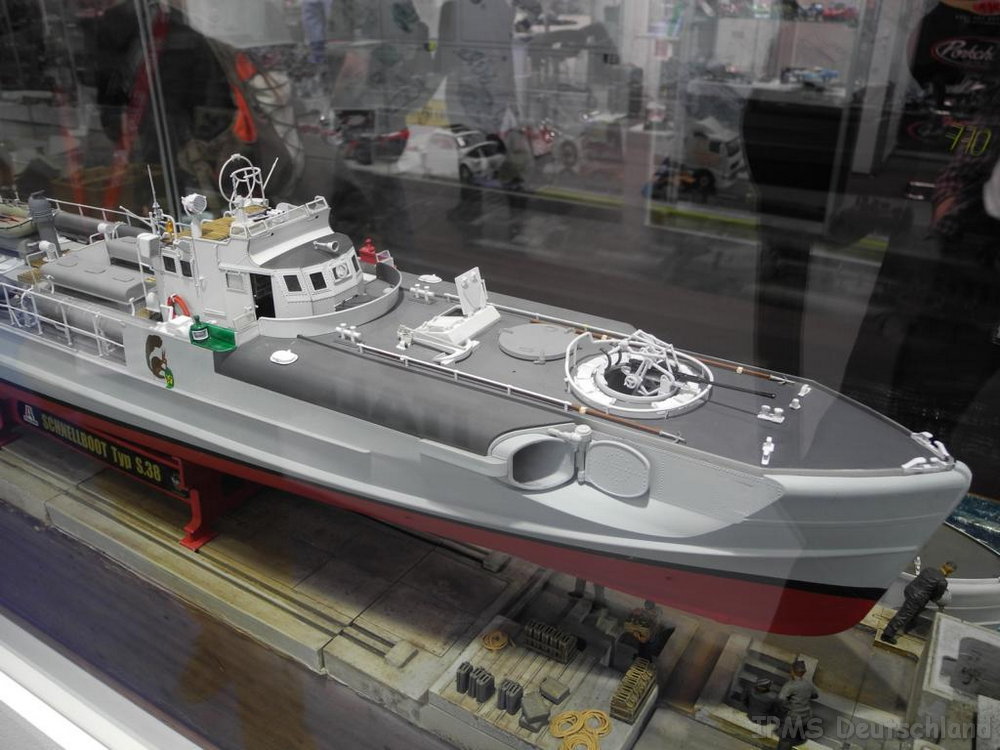
Just curious, what is that circular disc behind the 2cm gun position as
seen in the posted photo of the finished model?
Cheers,
Joe
New York, United States
Joined: January 21, 2008
KitMaker: 2,531 posts
Model Shipwrights: 1,244 posts
Posted: Friday, February 09, 2018 - 03:41 AM UTC
Quoted Text
Excellent work....those extra details will really pay off in the end!
Just curious, what is that circular disc behind the 2cm gun position as
seen in the posted photo of the finished model?
Cheers,
Joe
That's the foul-weather cover for the gun tub.

Al
#084
Quebec, Canada
Joined: September 14, 2005
KitMaker: 2,485 posts
Model Shipwrights: 1,157 posts
Posted: Friday, February 09, 2018 - 05:16 AM UTC
Thanks Al,
Ok, so I have seen many pictures with the cover attached since I posted that question
but then, were did they put the 2cm and its mount...was it stored below deck?
I figure kind of heavy for a couple of crew members to move.
Cheers,
Joe
New York, United States
Joined: January 21, 2008
KitMaker: 2,531 posts
Model Shipwrights: 1,244 posts
Posted: Friday, February 09, 2018 - 08:07 AM UTC
Quoted Text
Thanks Al,
Ok, so I have seen many pictures with the cover attached since I posted that question
but then, were did they put the 2cm and its mount...was it stored below deck?
I figure kind of heavy for a couple of crew members to move.
Cheers,
Joe
I believe the gun mount could unlocked, and swung down into the tub. They probably would remove the barrel.
Al
#084
Quebec, Canada
Joined: September 14, 2005
KitMaker: 2,485 posts
Model Shipwrights: 1,157 posts
Posted: Friday, February 09, 2018 - 08:51 AM UTC
Hi Al,
Ok, I see...that makes sense.
THANKS again!
Cheers,
Joe
England - East Anglia, United Kingdom
Joined: February 11, 2018
KitMaker: 7 posts
Model Shipwrights: 7 posts
Posted: Sunday, February 11, 2018 - 03:37 AM UTC
Hi new here have this one in the stash for when i finish my G5 looking forward to seeing how you get on
Baden-Württemberg, Germany
Joined: December 26, 2009
KitMaker: 813 posts
Model Shipwrights: 304 posts
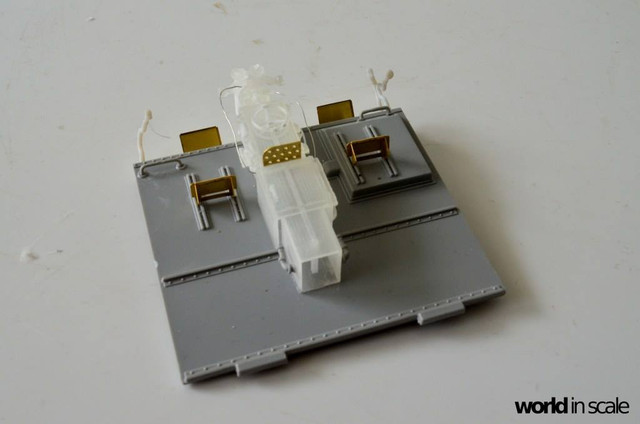
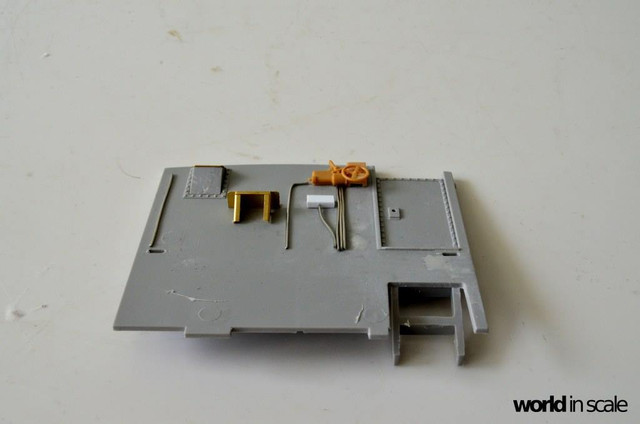
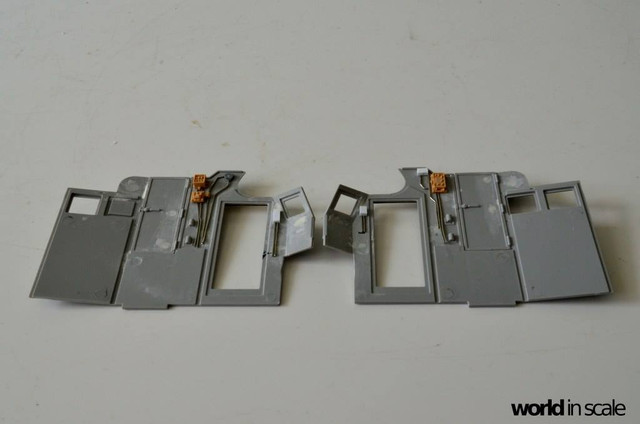
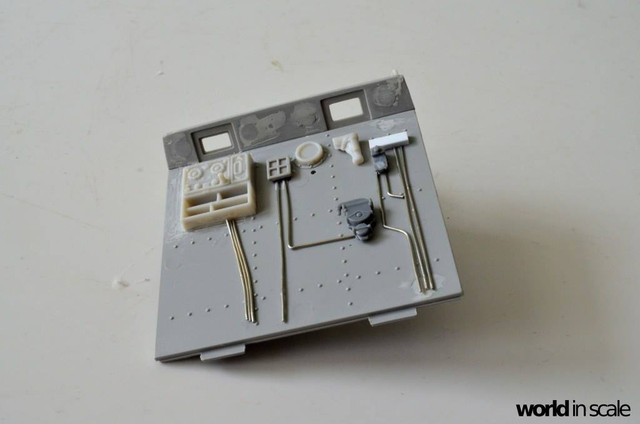
Posted: Monday, March 05, 2018 - 02:24 PM UTC
regards,
Michael
http://www.world-in-scale.de
Berlin, Germany
Joined: May 28, 2010
KitMaker: 193 posts
Model Shipwrights: 186 posts
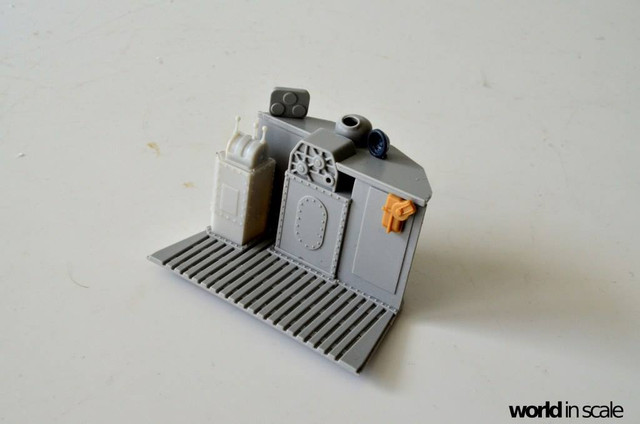
Posted: Wednesday, March 07, 2018 - 12:18 PM UTC
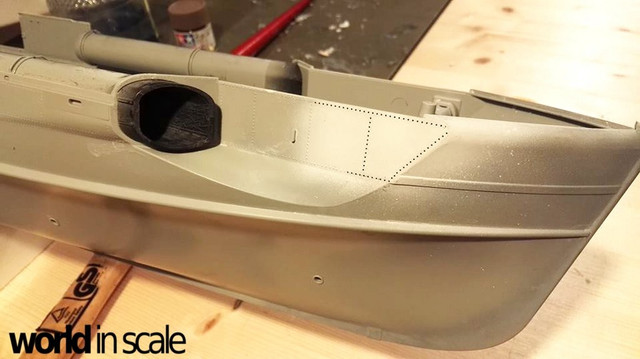
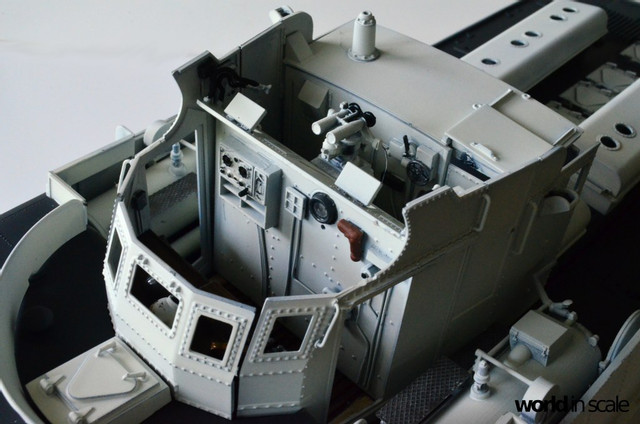
very nice progress Michael, with a lot of details, thank you for buying my products from Shapeways. IMHO especially the Torpedotargeting computer and the Torpeodtube ends benefit from more details.
But Michael what is the metal plate in the middle of the Targeting computer?
Greeting fom IRON Models
https://www.shapeways.com/shops/iron-modelsPT Boat Command European Theater
England - South East, United Kingdom
Joined: March 01, 2010
KitMaker: 7,078 posts
Model Shipwrights: 6,649 posts
Posted: Saturday, March 10, 2018 - 03:56 PM UTC
Interior is coming on really nicely Michael,
Loving all the extra detail.
Now I really want one of these.
Cheers
Si
Baden-Württemberg, Germany
Joined: December 26, 2009
KitMaker: 813 posts
Model Shipwrights: 304 posts
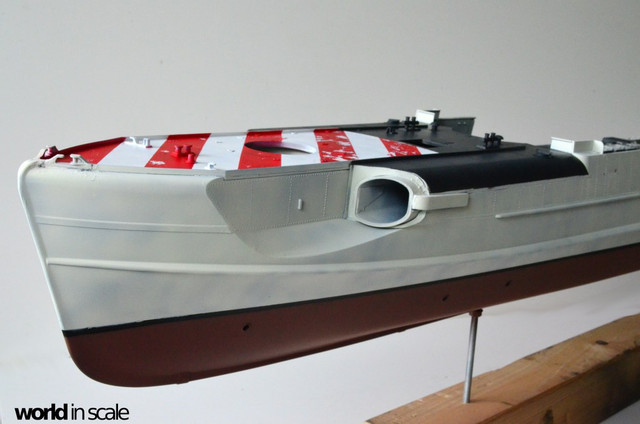
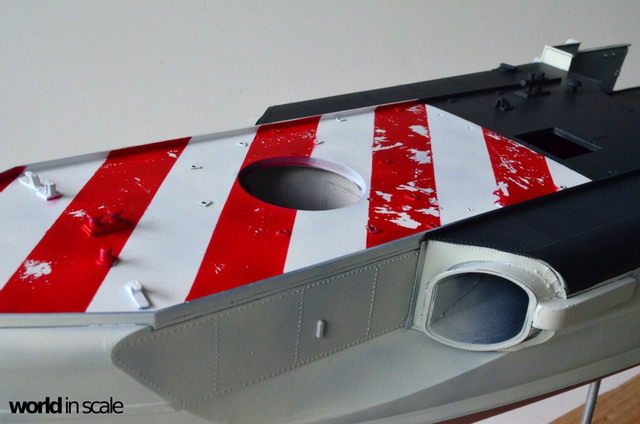
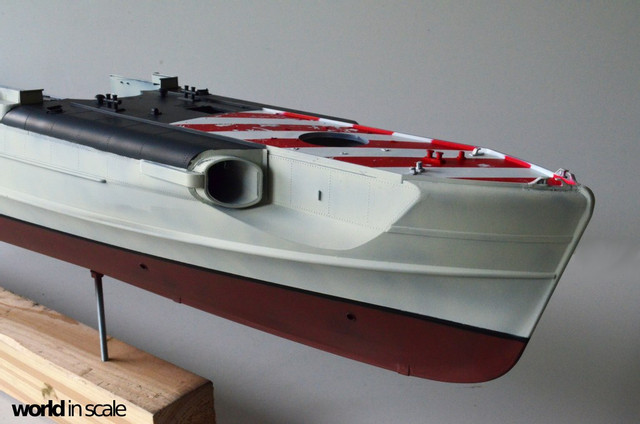
Posted: Wednesday, May 02, 2018 - 05:37 PM UTC
Hello everybody,
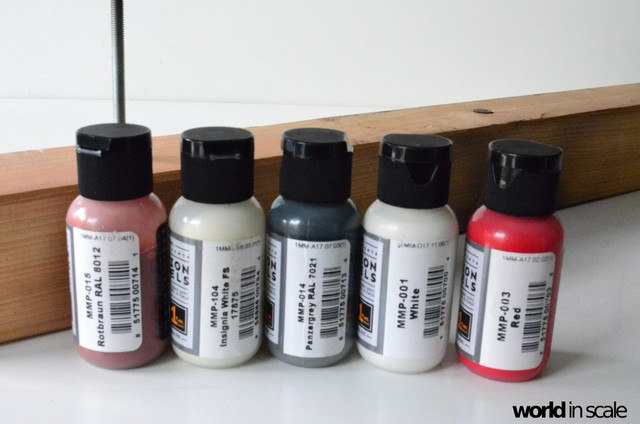
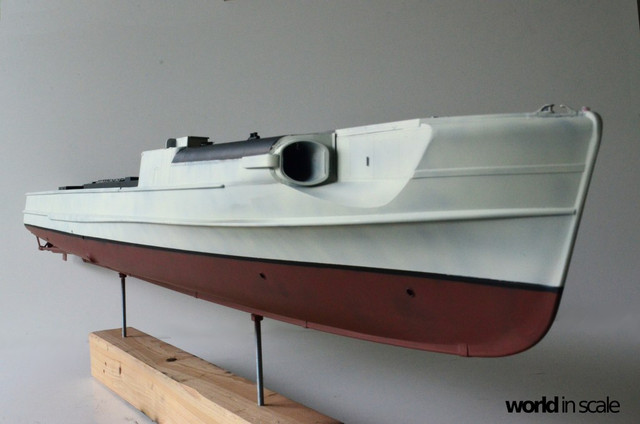
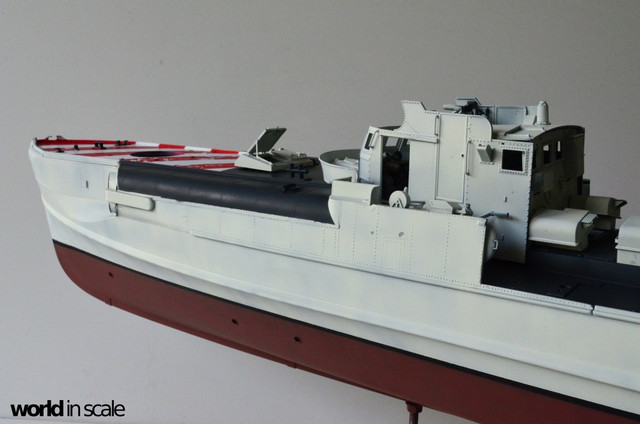
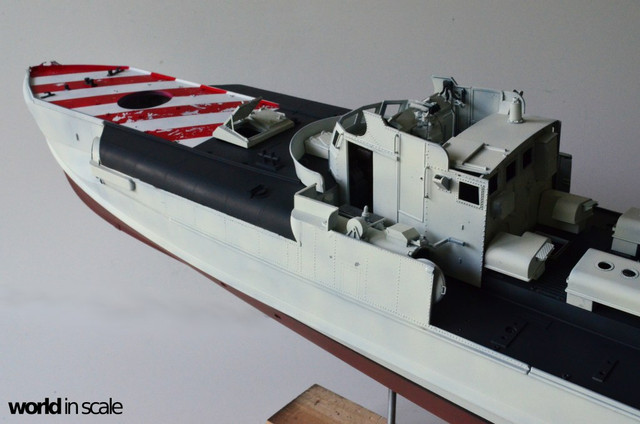
Vallejo's black primer as base coat, the further colors airbrushed only in thin, not covering layers to keep the black base as shadow color.
Paints used next:
Schnellbootweiß (S-Boat white): Insignia White + Light Grey
Under water: Red/Brown
Main Deck: Dark grey
Stripes: White & Red
All these paints are of Mission Models.
Some first damages on the red stripes added already, some further scratches and damages on the other areas follow, but first some further details brush painted all around the ship.... then oil color washs ...
Cheers
Micha
regards,
Michael
http://www.world-in-scale.de
Auckland, New Zealand
Joined: July 13, 2004
KitMaker: 2,169 posts
Model Shipwrights: 1,597 posts
Posted: Thursday, May 03, 2018 - 12:16 AM UTC
Ahoy Michael
Great work with the paint I like how its progressing.
Thanks for the update.
Cheers
Sean
#453
Texas, United States
Joined: August 28, 2016
KitMaker: 1,925 posts
Model Shipwrights: 1,298 posts
Posted: Thursday, May 03, 2018 - 06:42 AM UTC
Nice weathering you added. She is really shaping up nicely.
Netherlands
Joined: December 09, 2008
KitMaker: 336 posts
Model Shipwrights: 333 posts
Posted: Friday, May 04, 2018 - 01:45 PM UTC
Hi Michael, lovely modelling and detailing job! I only noticed today that Italeri has released this new kit
.
Regards,
Arjan
Baden-Württemberg, Germany
Joined: December 26, 2009
KitMaker: 813 posts
Model Shipwrights: 304 posts
Posted: Sunday, May 06, 2018 - 02:08 PM UTC
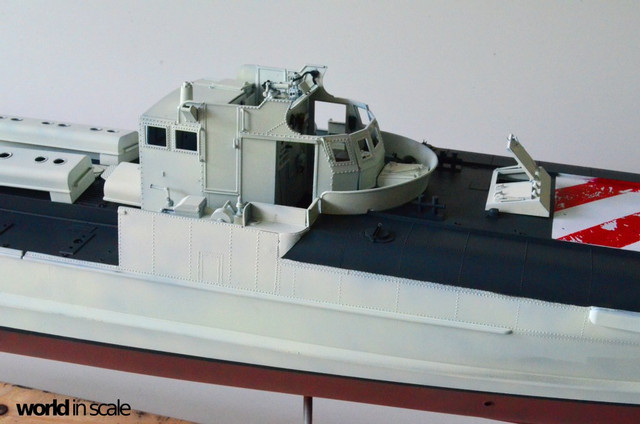
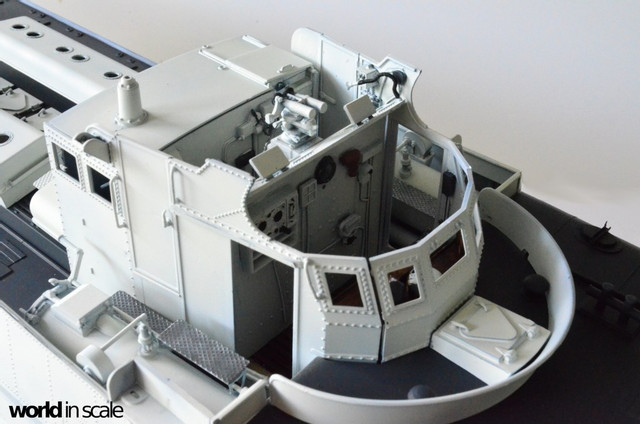
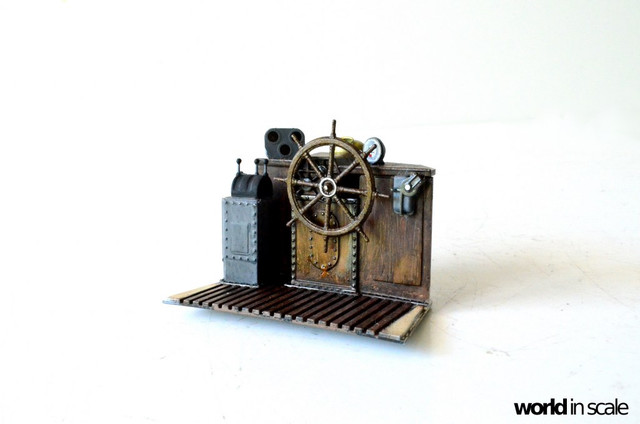
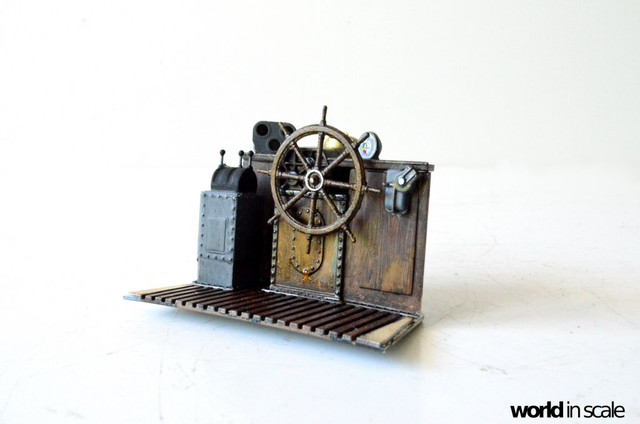
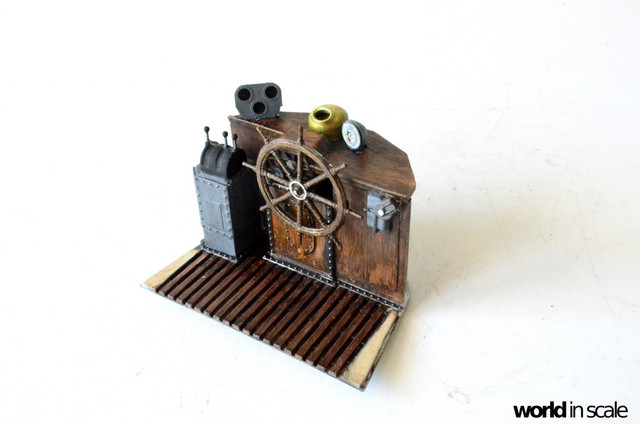
Hello everybody,
I made the wooden optics with different oil colors and a stiff brush, on a base paint in beige colors.
Metal colors Iron and Brass were used for the details ...
All this area remains good visible through the open doors left and right and the huge windows...
Cheers
Micha
regards,
Michael
http://www.world-in-scale.de
#335
Auckland, New Zealand
Joined: September 03, 2013
KitMaker: 1,808 posts
Model Shipwrights: 871 posts
Posted: Sunday, May 06, 2018 - 02:48 PM UTC
Great wood work! I love the detail you have added in the cabin.
cheers
Michael
Campaign:
Strip, Track and Trail - Porsche 917/20 - On the bench
Phantoms at 60 - F-4J Marines
Below 1000 tons - M50 minesweeper - Sailed for duty
Baden-Württemberg, Germany
Joined: December 26, 2009
KitMaker: 813 posts
Model Shipwrights: 304 posts
Posted: Monday, May 28, 2018 - 06:02 PM UTC
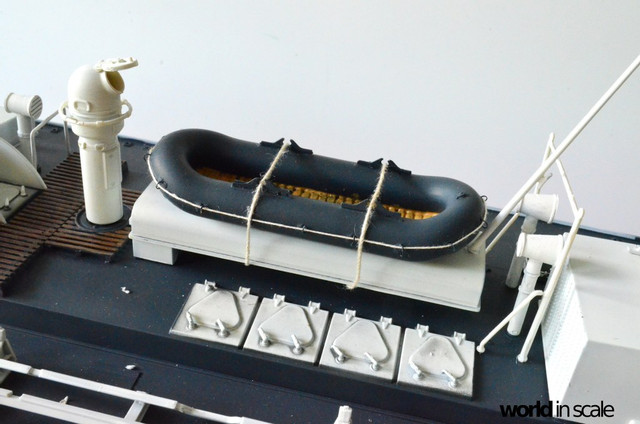
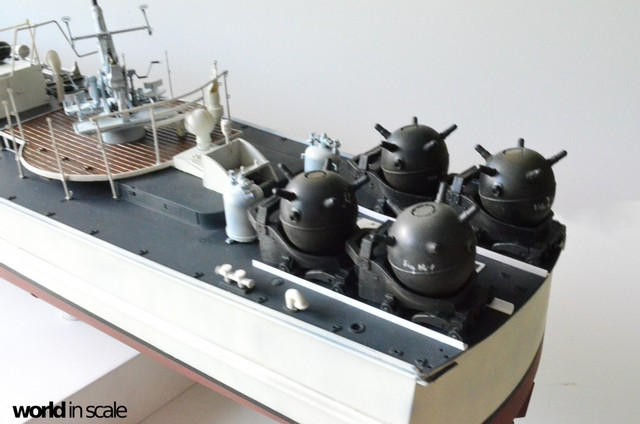
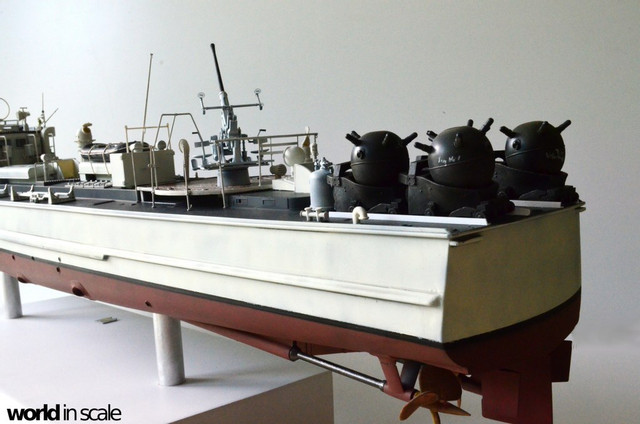
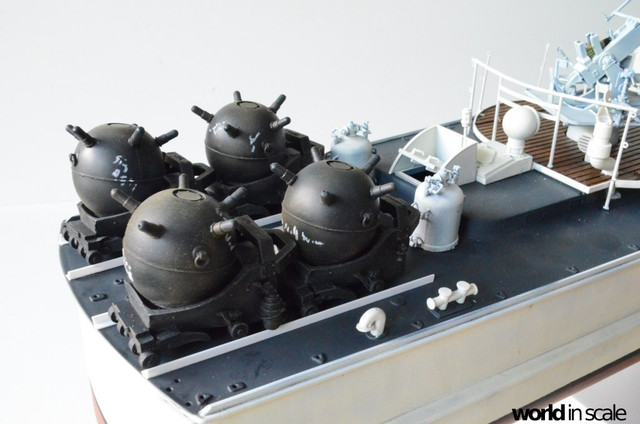
Hello everybody.
The sea mines of Schatton Modell are finished. These resin mines are wonderful updates for the S-Boat.
The rails for the mines are made of evergreen plastic profiles, still unpainted.
Also the dinghy is a resin model with photo etched details on it.

regards,
Michael
http://www.world-in-scale.de