

Si,
Ship looks brilliant! And that 3" gun...mind blowing!
Gaz


Go to modelshipwrights.com for the current dynamic site!
Hosted by Steve Joyce
Mikasa 1902 with Pontos 1/200th.

GazzaS

#424

Joined: April 23, 2015
KitMaker: 4,648 posts
Model Shipwrights: 249 posts

Posted: Saturday, March 30, 2019 - 05:56 PM UTC

RedDuster

Joined: March 01, 2010
KitMaker: 7,078 posts
Model Shipwrights: 6,649 posts

Posted: Saturday, March 30, 2019 - 09:32 PM UTC
Quoted Text
Si,
Ship looks brilliant! And that 3" gun...mind blowing!
Gaz
Thanks Gaz,
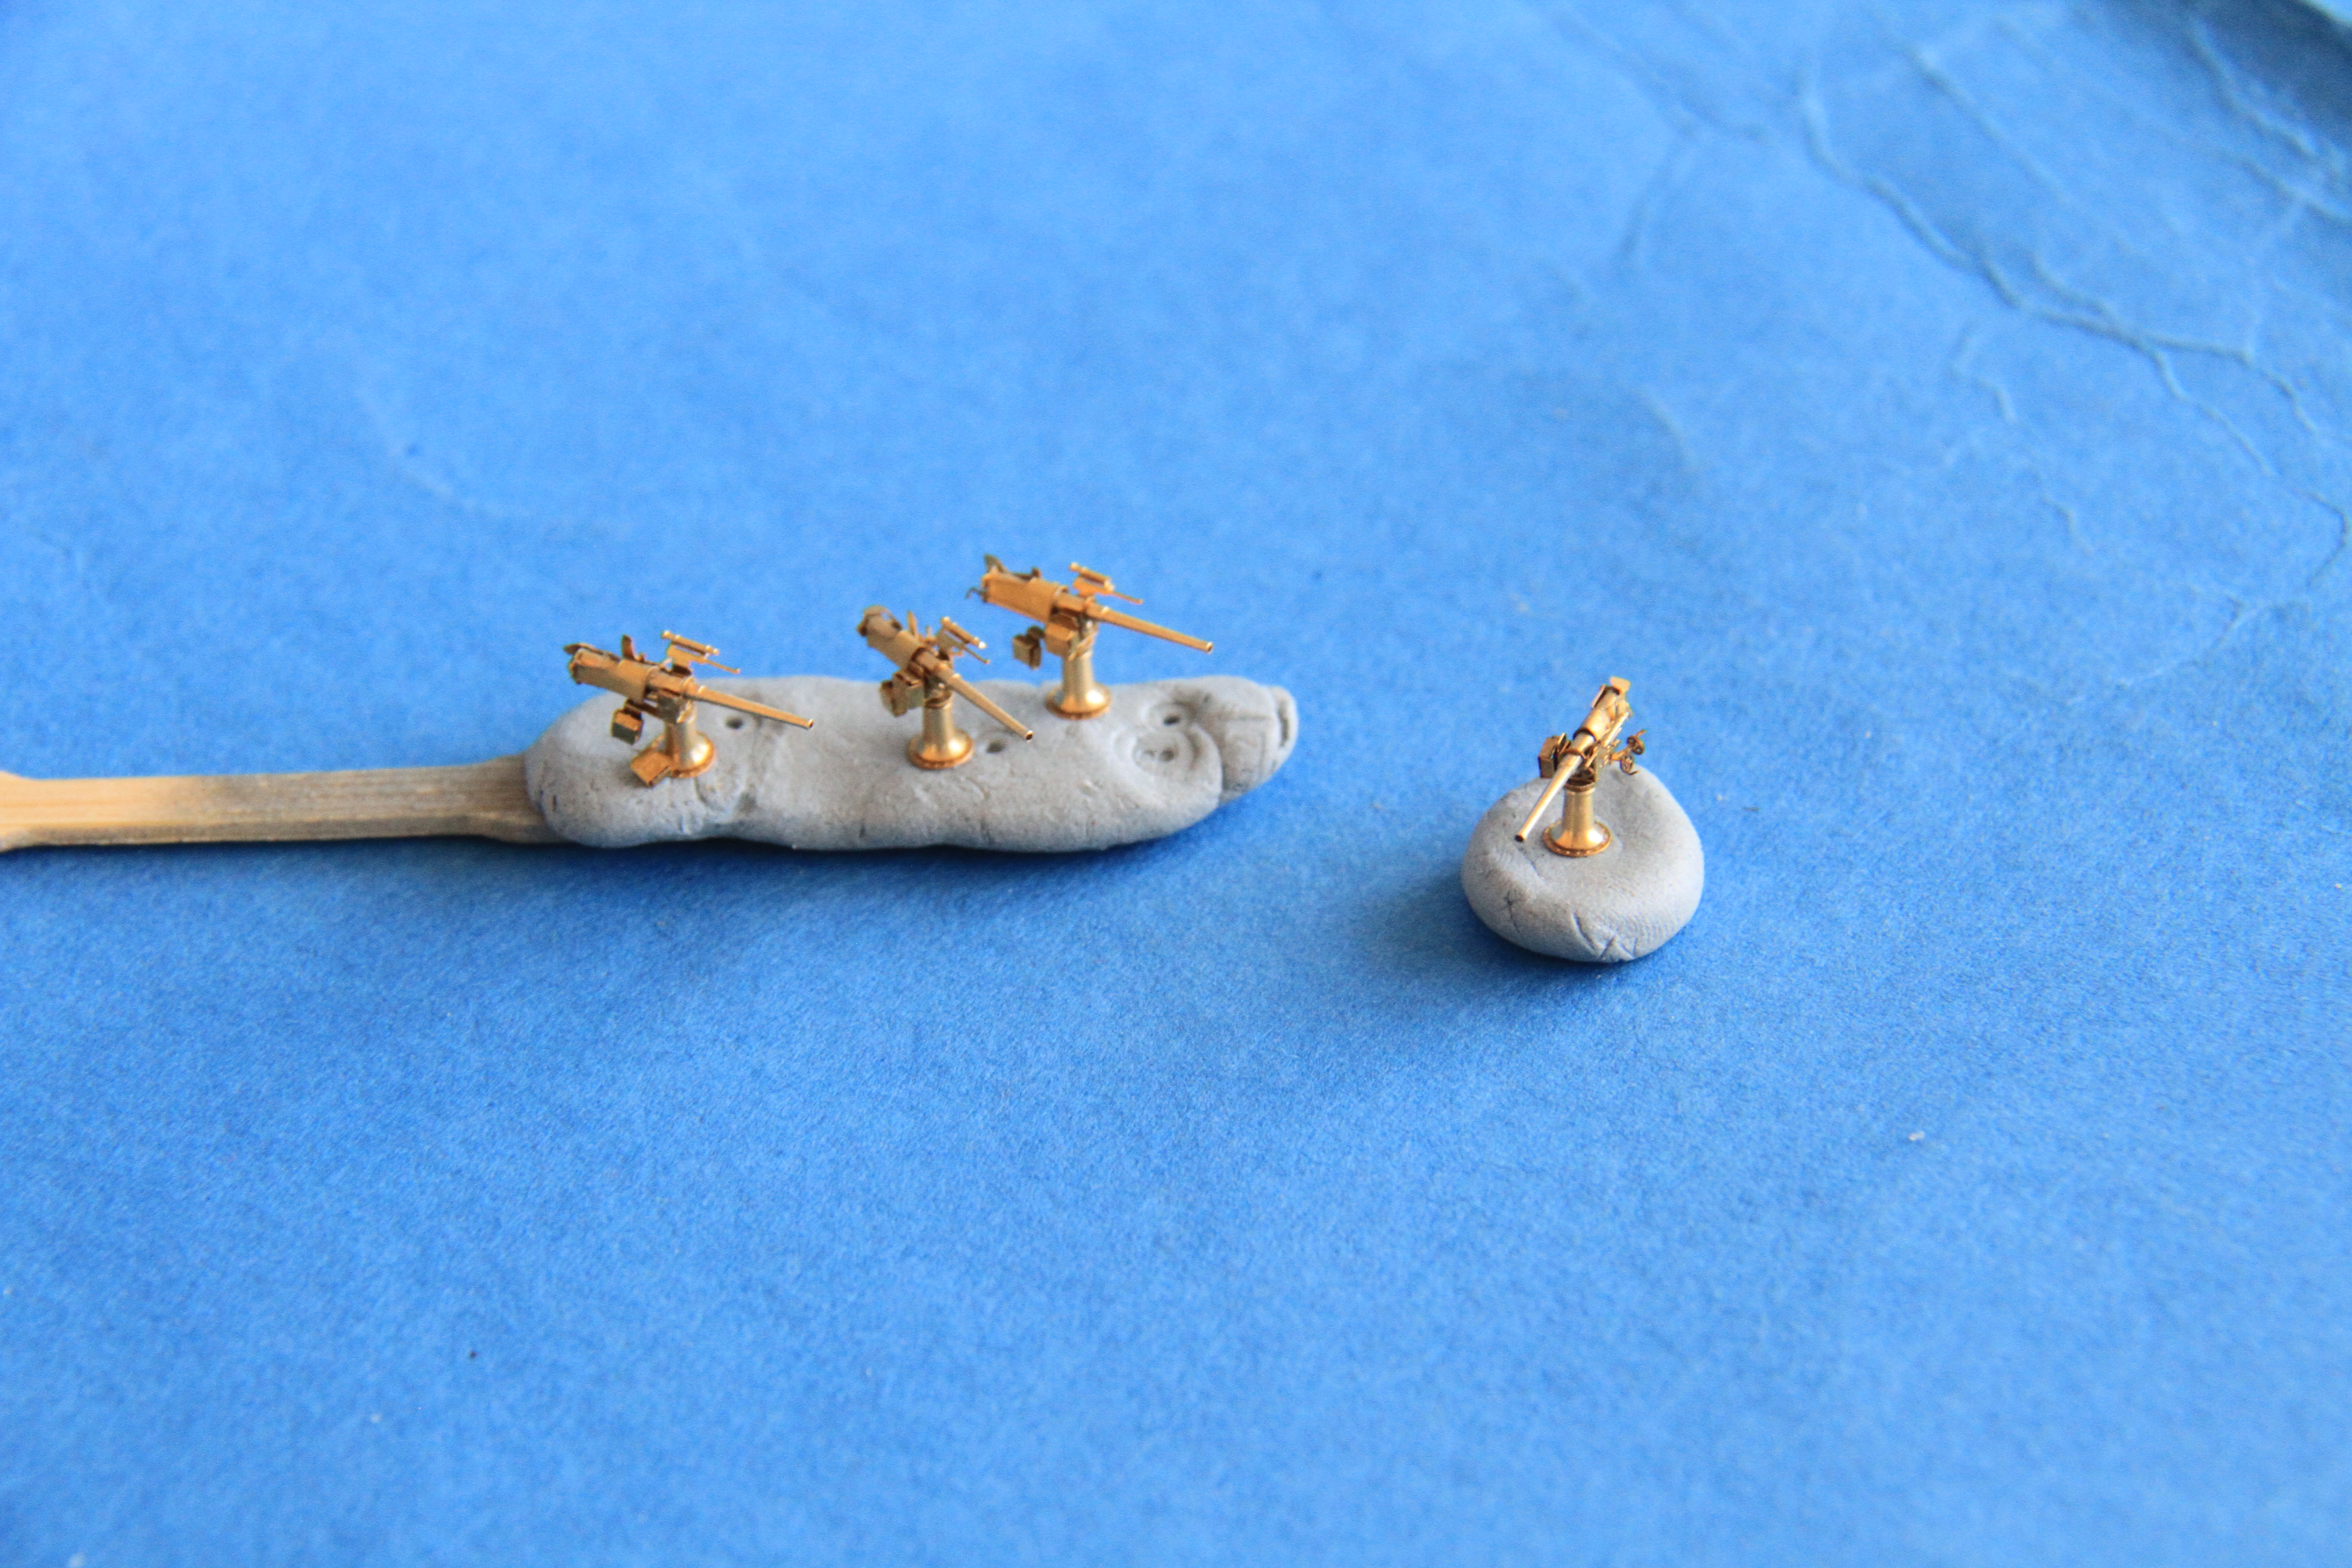
The ship has sixteen of these in total.
It was fun to put together, considering it consists of six turned and nine etched parts. It is a slight shame that the eight that sit on the upper deck were fitted with shields at this time.
Cheers
Si

d6mst0
#453

Joined: August 28, 2016
KitMaker: 1,925 posts
Model Shipwrights: 1,298 posts

Posted: Sunday, March 31, 2019 - 02:05 AM UTC
Si,
Really fine job you did with the assembly of that 3" gun. A lot of pieces came together just right. Nice work.
Mark
Really fine job you did with the assembly of that 3" gun. A lot of pieces came together just right. Nice work.
Mark
RedDuster
Joined: March 01, 2010
KitMaker: 7,078 posts
Model Shipwrights: 6,649 posts
Posted: Sunday, March 31, 2019 - 06:11 AM UTC
Quoted Text
Si,
Really fine job you did with the assembly of that 3" gun. A lot of pieces came together just right. Nice work.
Mark
Thanks Mark,
apart from curving the etched part that goes over the breach end of the barrel, whilst being a little fiddly the rest went together without too much
 Got three more finished today, and the other four under way.
Will get that update posted tomorrow.
Cheers
Si

surfsup
Joined: May 20, 2010
KitMaker: 1,230 posts
Model Shipwrights: 1,212 posts

Posted: Sunday, March 31, 2019 - 10:42 PM UTC
Ditto Si. Those 3 Inch Guns look beautiful.....Cheers Mark
RedDuster
Joined: March 01, 2010
KitMaker: 7,078 posts
Model Shipwrights: 6,649 posts
Posted: Sunday, March 31, 2019 - 11:00 PM UTC
Quoted Text
Ditto Si. Those 3 Inch Guns look beautiful.....Cheers Mark
Thanks Mark,
It was almost a shame to shoot paint at them. The manageable detail you can get into a mount like that in 1/200th is what I love about this scale.
Cheers
Si
RedDuster
Joined: March 01, 2010
KitMaker: 7,078 posts
Model Shipwrights: 6,649 posts
Posted: Tuesday, April 02, 2019 - 09:01 AM UTC
Very quick update.
All four 3" guns for the open ports on the starboard side built.
Sprayed off white.

also hit with paint, theu four remaining upper deck 6" guns, and the closed doors for the port side guns.

Next job, detail painting the 3", and some fitting.
Cheers
Si
All four 3" guns for the open ports on the starboard side built.
Sprayed off white.
also hit with paint, theu four remaining upper deck 6" guns, and the closed doors for the port side guns.
Next job, detail painting the 3", and some fitting.
Cheers
Si
d6mst0
#453
Joined: August 28, 2016
KitMaker: 1,925 posts
Model Shipwrights: 1,298 posts
Posted: Tuesday, April 02, 2019 - 11:49 PM UTC
Sweet!

Fordboy

Joined: July 13, 2004
KitMaker: 2,169 posts
Model Shipwrights: 1,597 posts

Posted: Wednesday, April 03, 2019 - 06:26 AM UTC
Ahoy Simon
What a great build so far of one of my favourite ships.
You have done a great job on those guns.
Cheers
Sean
What a great build so far of one of my favourite ships.
You have done a great job on those guns.
Cheers
Sean
RedDuster
Joined: March 01, 2010
KitMaker: 7,078 posts
Model Shipwrights: 6,649 posts
Posted: Wednesday, April 03, 2019 - 08:57 AM UTC
Quoted Text
Sweet!
Thanks Mark,
Will be happy when those guns are detail painted and fitted.
Cheers
Si
RedDuster
Joined: March 01, 2010
KitMaker: 7,078 posts
Model Shipwrights: 6,649 posts
Posted: Wednesday, April 03, 2019 - 09:06 AM UTC
Quoted Text
Ahoy Simon
What a great build so far of one of my favourite ships.
You have done a great job on those guns.
Cheers
Sean
Thanks Sean,
I have a soft spot for the pre dreadnought era, and as Mikasa is the last surviving British built Battleship, she is one of my favourites.
It is a great kit, and am loving the larger scale.
Cheers
Si
RedDuster
Joined: March 01, 2010
KitMaker: 7,078 posts
Model Shipwrights: 6,649 posts
Posted: Sunday, April 07, 2019 - 07:51 AM UTC
Saturday's progress/=.
The 3" guns for the stbd side detail painted, one example.

The port side gunports will be closed so I am using a different approach, the pedestals and barrels are being kept separate so the barrels will fit exactly into their slots.

The stbd side guns fitted.

Port side pedestals fitted.

And the barrels, all nestling neatly in their slots.

Closed ports in place, these are kit parts, etched parts will be used for the open parts on the stbd side.

3" guns from above.

Port side 6" guns with their ports closed.

Stbd side open.

Open ports with the gangways and lower bridges in place. No extra detail work will be required in the gun position.

The view through the 3" ports, at least some of the detail will be visible.

An overview, with the gangways and lower bridges fitted, the gap on the forward port 6" casemate will be an easy fix.

Did some more today but the photos are still on the camera. Will try and add those posted tomorrow ore Tuesday.
Cheers
Si
The 3" guns for the stbd side detail painted, one example.
The port side gunports will be closed so I am using a different approach, the pedestals and barrels are being kept separate so the barrels will fit exactly into their slots.
The stbd side guns fitted.
Port side pedestals fitted.
And the barrels, all nestling neatly in their slots.
Closed ports in place, these are kit parts, etched parts will be used for the open parts on the stbd side.
3" guns from above.
Port side 6" guns with their ports closed.
Stbd side open.
Open ports with the gangways and lower bridges in place. No extra detail work will be required in the gun position.
The view through the 3" ports, at least some of the detail will be visible.
An overview, with the gangways and lower bridges fitted, the gap on the forward port 6" casemate will be an easy fix.
Did some more today but the photos are still on the camera. Will try and add those posted tomorrow ore Tuesday.
Cheers
Si
d6mst0
#453
Joined: August 28, 2016
KitMaker: 1,925 posts
Model Shipwrights: 1,298 posts
Posted: Sunday, April 07, 2019 - 09:28 AM UTC
Si,
Nice work with the assembly and installations of those guns. She really is shaping up nicely.
Mark
Nice work with the assembly and installations of those guns. She really is shaping up nicely.
Mark
RedDuster
Joined: March 01, 2010
KitMaker: 7,078 posts
Model Shipwrights: 6,649 posts
Posted: Monday, April 08, 2019 - 06:48 AM UTC
Quoted Text
Si,
Nice work with the assembly and installations of those guns. She really is shaping up nicely.
Mark
Thanks Mark,
Looking at those 3" guns sitting under the gangway, poking out of their gunports, brings the old wooden warships to mind.
Would be nice to see another predread in this scale.
Cheers
Si

TimReynaga
Joined: May 03, 2006
KitMaker: 2,500 posts
Model Shipwrights: 1,830 posts

Posted: Monday, April 08, 2019 - 02:27 PM UTC
Nice, Si - the complexity is building!
I like the look of all those vents poking their heads up above the wales like so many black-headed meerkats!

I like the look of all those vents poking their heads up above the wales like so many black-headed meerkats!

GazzaS
#424
Joined: April 23, 2015
KitMaker: 4,648 posts
Model Shipwrights: 249 posts
Posted: Monday, April 08, 2019 - 04:49 PM UTC
some great progress, Si!
RedDuster
Joined: March 01, 2010
KitMaker: 7,078 posts
Model Shipwrights: 6,649 posts
Posted: Wednesday, April 10, 2019 - 08:55 AM UTC
Quoted Text
Nice, Si - the complexity is building!
I like the look of all those vents poking their heads up above the wales like so many black-headed meerkats!
Thanks Tim,
I am loving the complexity, and the depth of the larger scale.
Meerkats! brilliant comment mate, tickled my sense of humour.
Cheers
Si
RedDuster
Joined: March 01, 2010
KitMaker: 7,078 posts
Model Shipwrights: 6,649 posts
Posted: Wednesday, April 10, 2019 - 08:56 AM UTC
Quoted Text
some great progress, Si!
Thanks Gaz,
She is getting there.
Cheers
Si
RedDuster
Joined: March 01, 2010
KitMaker: 7,078 posts
Model Shipwrights: 6,649 posts
Posted: Thursday, April 11, 2019 - 09:10 AM UTC
Sunday's progress, the Gangways.
The Gangways with their support pillars fitted, the forward pillar on both sides has been omitted, as the etched skylight fouls it's position. The etched gangway cladding has been sprayed, the non slip steel sections dark grey. the sectopns at the end that look like they should be linoleum clad will brush painted red/brown.

Etched detail added to each end.

Details painted, and some 1/350th brass strip fitted, doesn't look too underscale.

The plastic sections fitted down.

The brass cladding fixed down, I used "Extra thing Gator glue to give me time for alignment. the forward & after lower bridges test fitted to ensure the fit is just so.

an overview.

More soon
Cheers
Si
The Gangways with their support pillars fitted, the forward pillar on both sides has been omitted, as the etched skylight fouls it's position. The etched gangway cladding has been sprayed, the non slip steel sections dark grey. the sectopns at the end that look like they should be linoleum clad will brush painted red/brown.
Etched detail added to each end.
Details painted, and some 1/350th brass strip fitted, doesn't look too underscale.
The plastic sections fitted down.
The brass cladding fixed down, I used "Extra thing Gator glue to give me time for alignment. the forward & after lower bridges test fitted to ensure the fit is just so.
an overview.
More soon
Cheers
Si
TimReynaga
Joined: May 03, 2006
KitMaker: 2,500 posts
Model Shipwrights: 1,830 posts
Posted: Thursday, April 11, 2019 - 09:56 AM UTC
Quoted Text
Sunday's progress, the Gangways.
Details painted, and some 1/350th brass strip fitted, doesn't look too underscale...
Great progress, Si - those brass strips look just right!
RedDuster
Joined: March 01, 2010
KitMaker: 7,078 posts
Model Shipwrights: 6,649 posts
Posted: Thursday, April 11, 2019 - 07:34 PM UTC
Quoted Text
Quoted TextSunday's progress, the Gangways.
Details painted, and some 1/350th brass strip fitted, doesn't look too underscale...
Great progress, Si - those brass strips look just right!
Thanks Tim,
I like the little touches of colour and shine on ships of the pre grey era, makes a nice change.
I would love to see one the classic British Pre dreads, a Majestic or a Formidable in this scale... Well I can dream

Cheers
Si
d6mst0
#453
Joined: August 28, 2016
KitMaker: 1,925 posts
Model Shipwrights: 1,298 posts
Posted: Thursday, April 11, 2019 - 11:41 PM UTC
Si,
That brass cladding really adds detail to the superstructure dimension.
Mark
That brass cladding really adds detail to the superstructure dimension.
Mark
RedDuster
Joined: March 01, 2010
KitMaker: 7,078 posts
Model Shipwrights: 6,649 posts
Posted: Friday, April 12, 2019 - 11:42 AM UTC
Quoted Text
Si,
That brass cladding really adds detail to the superstructure dimension.
Mark
Thanks Mark,
The different textures on it, the steel tread plate, and the linoleum sections were very will done.
Hoping to get on with lower bridges over the weekend.
Cheers
Si
GazzaS
#424
Joined: April 23, 2015
KitMaker: 4,648 posts
Model Shipwrights: 249 posts
Posted: Friday, April 12, 2019 - 09:40 PM UTC
Si,
Those brass strips holding down the lino are the cat's meow! I think they look great! It's good that your ship is 1/200 and not a smaller scale. Many guys have trouble getting their brass on 1/350 scale without it looking too big.
Gaz
Those brass strips holding down the lino are the cat's meow! I think they look great! It's good that your ship is 1/200 and not a smaller scale. Many guys have trouble getting their brass on 1/350 scale without it looking too big.
Gaz
RedDuster
Joined: March 01, 2010
KitMaker: 7,078 posts
Model Shipwrights: 6,649 posts
Posted: Saturday, April 13, 2019 - 08:56 AM UTC
Quoted Text
Si,
Those brass strips holding down the lino are the cat's meow! I think they look great! It's good that your ship is 1/200 and not a smaller scale. Many guys have trouble getting their brass on 1/350 scale without it looking too big.
Gaz
Thanks Gaz,
I did feel the Flyhawk strip was a bit overscale in 1/350th. even 1/200th some of the sections were a bit short. fortunately if was four small areas, not the whole deck/
Cheers
Si
 |

WEB HOSTING BY


Copyright ©2021 Model Shipwrights and Kitmaker Network, a subsidiary of Silver Star Enterprises
All Rights Reserved. Please read our Conditions of Use and Privacy Policy.
All Rights Reserved. Please read our Conditions of Use and Privacy Policy.