1/200 Nichimo Hatsuzuki build
TimReynaga
 Associate Editor
California, United States
Joined: May 03, 2006
KitMaker: 2,500 posts
Model Shipwrights: 1,830 posts
Posted: Sunday, June 07, 2020 - 11:46 AM UTC
Quoted Text
Very nice start on the bridge detail Tim,
Will add a nice amount of depth, are you going to leave the doors into the wheelhouse open?
Cheers
Si
Thanks Si. Yes, I'm building more details to add in the wheelhouse, but it will be pretty hard to see in there through those small bridge windows... so open doors should help!

#306
Victoria, Australia
Joined: June 27, 2010
KitMaker: 3,959 posts
Model Shipwrights: 2,777 posts
Posted: Monday, June 08, 2020 - 11:11 PM UTC
Love the level of detail you're adding to this model, Tim

Stay home and build models!
In 1/72
Gloster Gladiator MkII for the Bi-planes Campaign
In 1/350
Airfix 1:350 Type 45 Destroyer
TimReynaga
Associate Editor California, United States
Joined: May 03, 2006
KitMaker: 2,500 posts
Model Shipwrights: 1,830 posts
Posted: Wednesday, June 10, 2020 - 02:21 AM UTC
Quoted Text
Love the level of detail you're adding to this model, Tim
Thanks Russ. Adding extra details is one of my favorite aspects of modeling... although I seem to be going off the rails at the moment adding components that will be difficult to see inside the pilothouse!
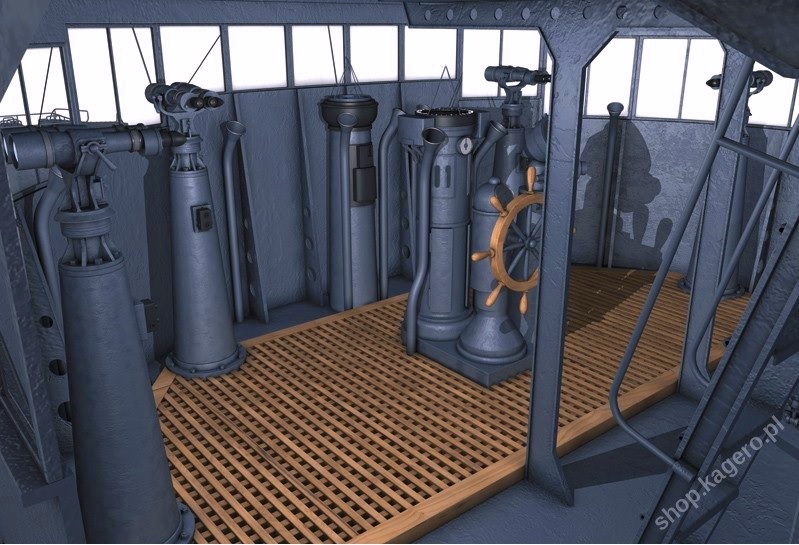
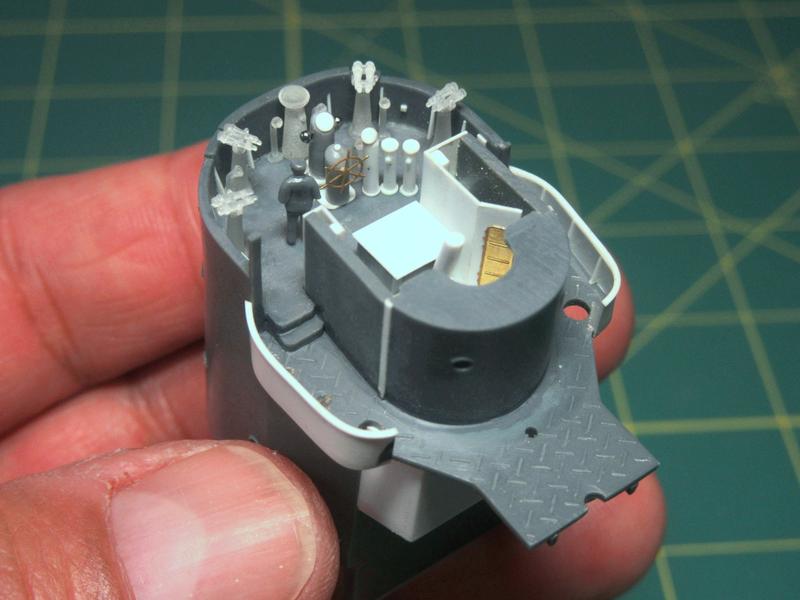
Kagero Publishings The Japanese Destroyer Akizuki by Mariusz Motyka and Lukasz Stach (ISBN 978-83-62878-69-7) has a beautiful rendering of the navigation bridge interior.
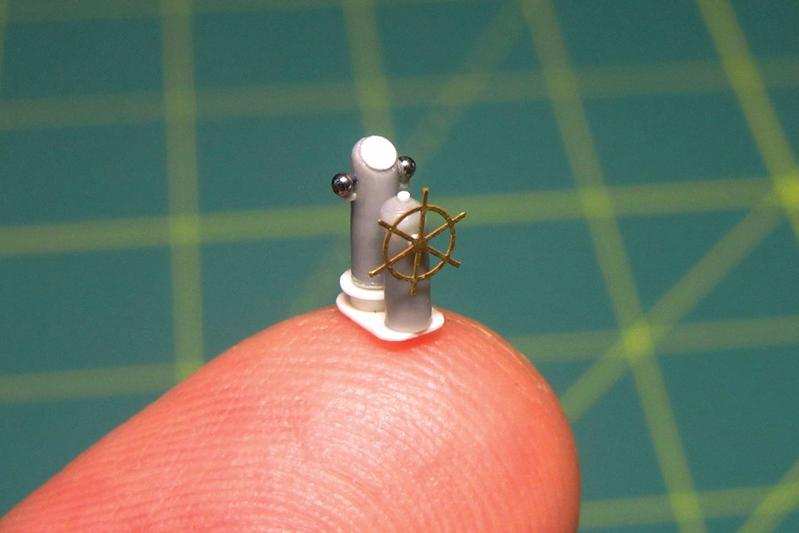
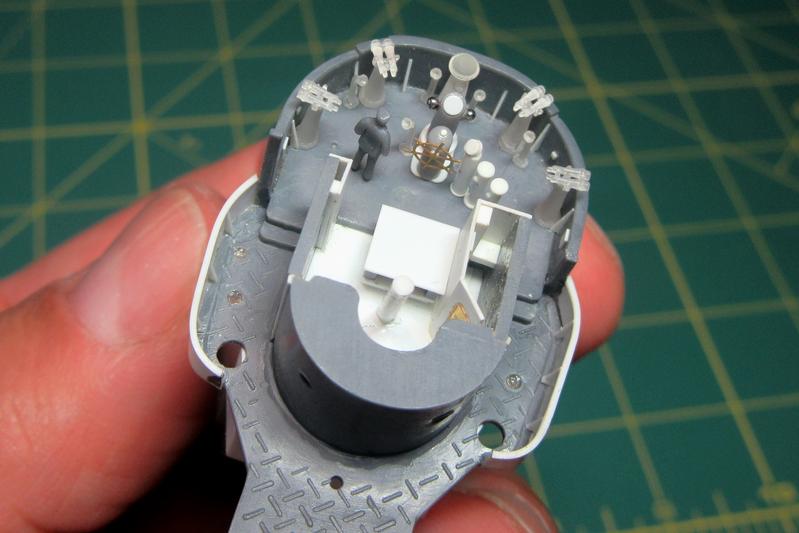
Following this and the images in the Kojinsha Maru Mechanic Mechanism of Japanese Destroyers book, I built up Hatsuzukis type 90 magnetic compass and helm from plastic sheet and sprue scrap. The wheel is an etched brass part from Gold Medal Models 1/350 Emden/Dresden set, and the quadrantal correctors (the iron spheres fitted in brackets on either side of the binnacle) began life as the rollerballs in ball point pens.
I also built up simple gyrocompass, repeater, and engine order telegraph assemblies.
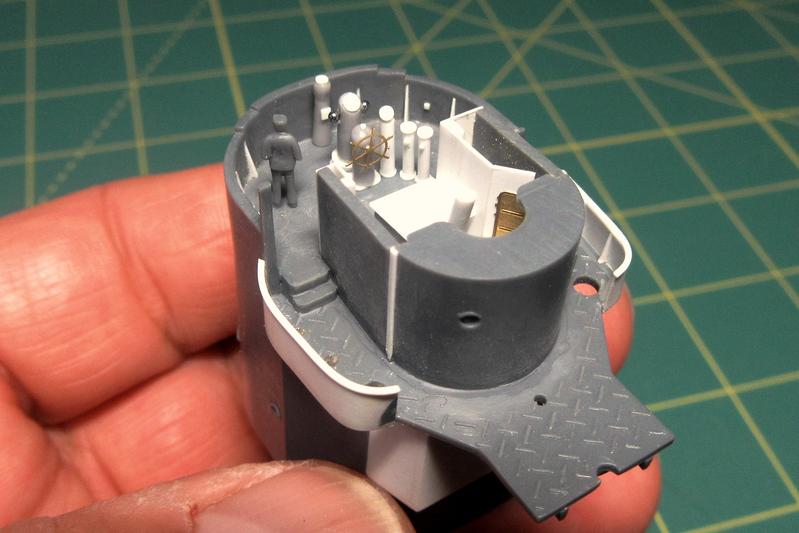
Test fitted in place, they show just how crowded the navigation bridges were on these small ships!
Virginia, United States
Joined: May 18, 2008
KitMaker: 496 posts
Model Shipwrights: 404 posts
Posted: Wednesday, June 10, 2020 - 02:54 AM UTC
Lookin' awesome, Mr. R.!!
#453
Texas, United States
Joined: August 28, 2016
KitMaker: 1,925 posts
Model Shipwrights: 1,298 posts
Posted: Wednesday, June 10, 2020 - 05:11 AM UTC
Tim,
Nice job upgrading the navigation bridge. That compass and wheel assembly looks bigger than some of your ships you built...LOL.
Mark

England - South East, United Kingdom
Joined: March 01, 2010
KitMaker: 7,078 posts
Model Shipwrights: 6,649 posts
Posted: Wednesday, June 10, 2020 - 06:17 AM UTC
What the guys said,
the binnacle is a very nice piece of work, the wheelhouse is looking nice busy.
very much enjoying following along.
Cheers
Si
Washington, United States
Joined: August 03, 2008
KitMaker: 436 posts
Model Shipwrights: 31 posts
Posted: Wednesday, June 10, 2020 - 10:38 AM UTC
Tim,
At least you are giving the people that really look at the model something to discover. Besides, there is always the old saying "At least I know it is there!"....
Fantastic build, and I am definitely enjoying following you through it....
Bob
#513
Alabama, United States
Joined: March 28, 2006
KitMaker: 554 posts
Model Shipwrights: 219 posts
Posted: Wednesday, June 10, 2020 - 01:28 PM UTC
Awesome detail work, as always Obiwan. The force is truly with you.
#424
Queensland, Australia
Joined: April 23, 2015
KitMaker: 4,648 posts
Model Shipwrights: 249 posts
Posted: Wednesday, June 10, 2020 - 10:59 PM UTC
That's awesome, Tim.But I love seeing it, too.
"Artillery adds dignity, to what would otherwise be an ugly brawl."
Frederick The Great
New Jersey, United States
Joined: February 06, 2015
KitMaker: 1,098 posts
Model Shipwrights: 34 posts
Posted: Thursday, June 11, 2020 - 03:09 PM UTC
Very impressive Tim ! Really enjoy watching this one !
#345
Niedersachsen, Germany
Joined: August 22, 2011
KitMaker: 1,835 posts
Model Shipwrights: 1,832 posts
Posted: Saturday, June 13, 2020 - 05:39 AM UTC
Tim,
that's absolutely stunning!! Seeing the master of micro modeling applying his skill to a 1/200 model...unbelievable detail. I love the way you are approaching the pilot house with all the interior!
Cheers
Jan
Queensland, Australia
Joined: May 20, 2010
KitMaker: 1,230 posts
Model Shipwrights: 1,212 posts
Posted: Saturday, June 13, 2020 - 05:30 PM UTC
It's good to see that I am not the only one who goes nuts adding things that may not be seen. You attention to detail is fantastic along with your Skills Mate. Love it so far.....Cheers mark
If I was your Wife I would Poison your Tea
If I was your Husband, I would drink it.
TimReynaga
Associate Editor California, United States
Joined: May 03, 2006
KitMaker: 2,500 posts
Model Shipwrights: 1,830 posts
Posted: Monday, June 15, 2020 - 02:16 AM UTC
Thanks everyone, I really do appreciate your kind comments! It is good to hear that I'm not entirely alone in my crazy micro world...

Here's hoping that at least SOME of this stuff will be visible through those tiny bridge windows... but that's a worry for another day.
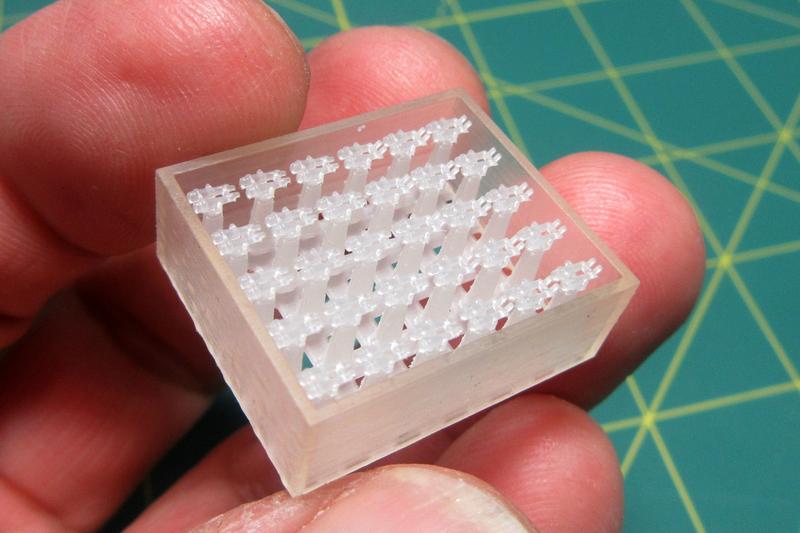
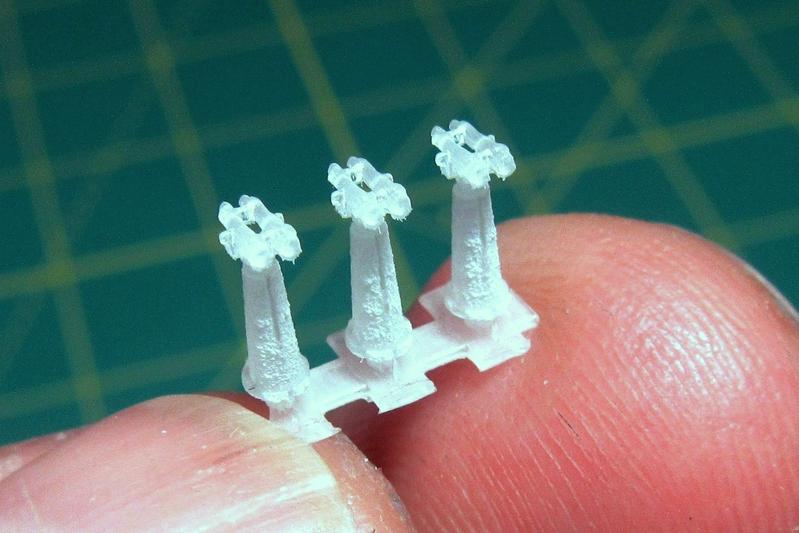
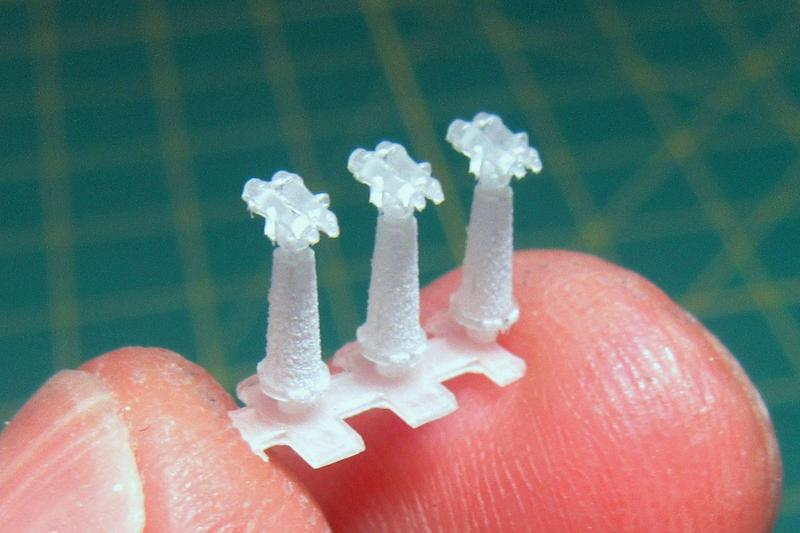
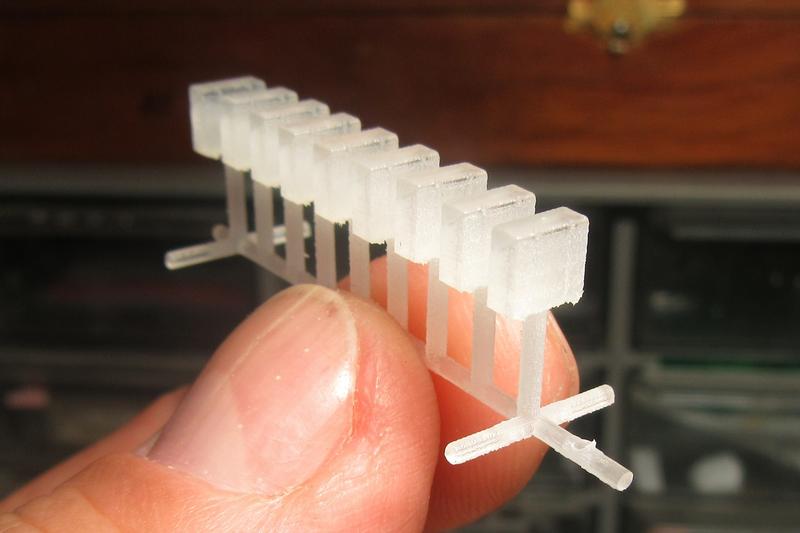
For now, after I began scratchbuilding the Hatsuzukis bridge interior I found that there are a number of 1/200 scale 3D printed Imperial Japanese Navy navigation bridge parts commercially available as well.

Ill still use my scratchbuilt components, but the bridge will now also sport Shapeways 3D-printed IJN gyrocompass repeaters and voice tubes by
ModelShipJP (Shingo Nakamura).
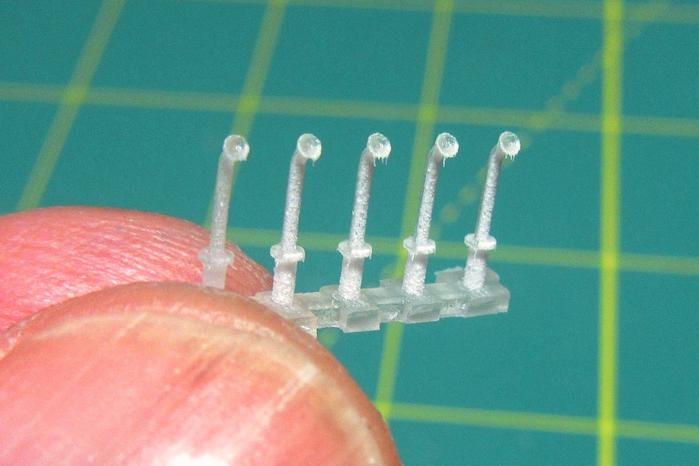
These parts are beautifully designed, although the Shapeways production standard of Smoothest Fine Detail Plastic is inferior to the Model Monkey 3D-resin gas cylinder parts I had used earlier. Still, the frost-like surfaces of the parts can be smoothed with steel wool, and once painted they will do a lot to busy-up the already crowded navigation bridge.
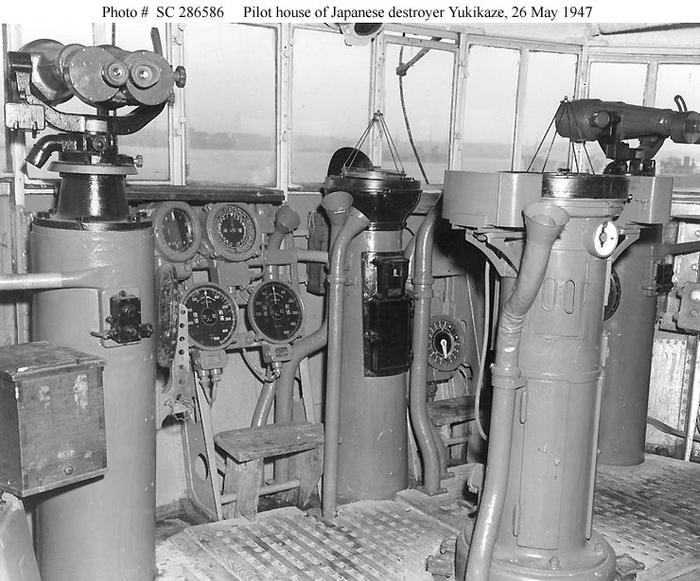
This postwar picture of the former IJN Yukikazes bridge gives a sense of how crammed with equipment these WWII destroyer pilothouses were.
#424
Queensland, Australia
Joined: April 23, 2015
KitMaker: 4,648 posts
Model Shipwrights: 249 posts
Posted: Monday, June 15, 2020 - 08:40 AM UTC
Love those tiny details, Tim. Surprised there is so much out there.
"Artillery adds dignity, to what would otherwise be an ugly brawl."
Frederick The Great
#453
Texas, United States
Joined: August 28, 2016
KitMaker: 1,925 posts
Model Shipwrights: 1,298 posts
Posted: Tuesday, June 16, 2020 - 12:01 AM UTC
Tim,
Those 3D models will give the PE and Resin market a run for their money. I hope Shapeway's increase their offering of 3D products for Japanese ships and Model Monkey enhances their offering for British and Japanese ships.
Mark
TimReynaga
Associate Editor California, United States
Joined: May 03, 2006
KitMaker: 2,500 posts
Model Shipwrights: 1,830 posts
Posted: Tuesday, June 16, 2020 - 02:18 AM UTC
Quoted Text
Love those tiny details, Tim. Surprised there is so much out there.
Quoted Text
Tim, Those 3D models will give the PE and Resin market a run for their money. I hope Shapeway's increase their offering of 3D products for Japanese ships and Model Monkey enhances their offering for British and Japanese ships.
Mark
Though the parts are expensive and fussy to work with, I agree, 3D printing technology offers a great new option to fill gaps not served by traditional etched metal or poured resin aftermarket. The range of potential products is limitless, and the detail possible far exceeds what can be economically produced by traditional resin casting.
I hope in future more products are produced using Model Monkeys gray resin process, like these oxygen and acetylene cylinders I applied earlier on the funnel:
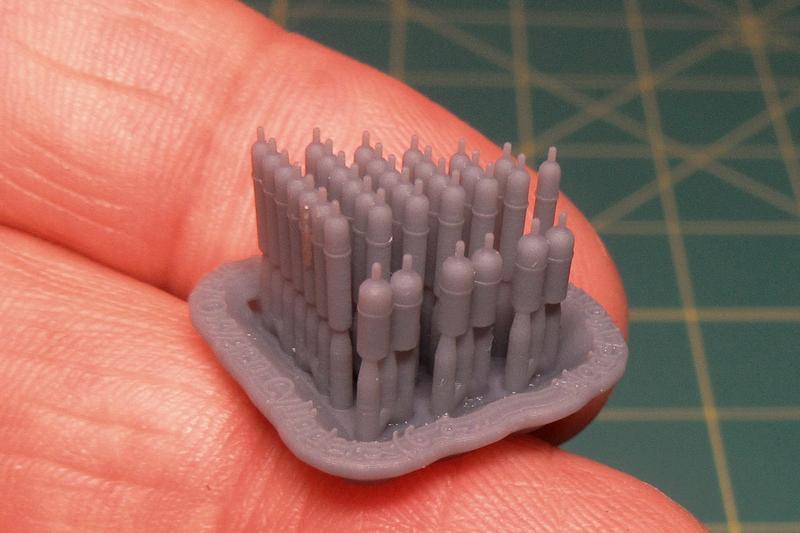
Model Monkey employs a different technology than that used by other 3D-printing companies like Shapeways; the gray resin is not nylon but rather an acrylate-based plastic chemically similar to Plexiglas. The parts print up much cleaner and sharper, and the solid gray is simpler to work with than the semi-clear material Shapeways uses.
Ultimately, though, even the lesser quality Shapeways parts offer tremendous new opportunities to go nuts with detailing and thats really the point, right?!

#491
Missouri, United States
Joined: April 06, 2016
KitMaker: 602 posts
Model Shipwrights: 349 posts
Posted: Tuesday, June 16, 2020 - 02:43 AM UTC
Quoted Text
Model Monkey employs a different technology than that used by other 3D-printing companies like Shapeways; the gray resin is not nylon but rather an acrylate-based plastic chemically similar to Plexiglas. The parts print up much cleaner and sharper, and the solid gray is simpler to work with than the semi-clear material Shapeways uses.
I will never not have anything good to say about Model Monkey and their products. They are excellent and the company is now in possession of quite a lot of my $$$

Currently working on: Multiple Campaigns :P
TimReynaga
Associate Editor California, United States
Joined: May 03, 2006
KitMaker: 2,500 posts
Model Shipwrights: 1,830 posts
Posted: Saturday, June 20, 2020 - 10:56 AM UTC
Washington, United States
Joined: March 15, 2009
KitMaker: 3,670 posts
Model Shipwrights: 173 posts
Posted: Saturday, June 20, 2020 - 11:06 AM UTC
Tim, How are you cleaning those parts? I think I read a while back that the roughness of these printed parts can be cleaned off using a tiny brush and some paint or lacquer thinner if youre careful. Have you tried that?
VR, Russ
TimReynaga
Associate Editor California, United States
Joined: May 03, 2006
KitMaker: 2,500 posts
Model Shipwrights: 1,830 posts
Posted: Saturday, June 20, 2020 - 11:49 AM UTC
Quoted Text
Tim, How are you cleaning those parts? I think I read a while back that the roughness of these printed parts can be cleaned off using a tiny brush and some paint or lacquer thinner if youre careful. Have you tried that?
VR, Russ
Naw, I was afraid of melting the tiny parts with solvent, so I limited my tools to fine steel wool and harsh language! Actually, with a bit of care and patience they do clean up well enough.
England - South East, United Kingdom
Joined: March 01, 2010
KitMaker: 7,078 posts
Model Shipwrights: 6,649 posts
Posted: Saturday, June 20, 2020 - 09:34 PM UTC
The bridge layout looks right with the parts test fitted Tim, Feels like you could walk on to it and take the con.
Cheers
Si
#453
Texas, United States
Joined: August 28, 2016
KitMaker: 1,925 posts
Model Shipwrights: 1,298 posts
Posted: Sunday, June 21, 2020 - 08:22 AM UTC
Tim,
I believe the material that Shapeway uses requires to be cure by exposing the material in the sun for a couple of hours, did you do that or am I wrong about the curing in the sun. I was wondering if that could had been why they were brittle. So far I only used their mushroom vents and I had no problem removing them from the base or smoothing out the rough spots.
Mark
#424
Queensland, Australia
Joined: April 23, 2015
KitMaker: 4,648 posts
Model Shipwrights: 249 posts
Posted: Sunday, June 21, 2020 - 12:58 PM UTC
Bridge looks awesome, Tim!
"Artillery adds dignity, to what would otherwise be an ugly brawl."
Frederick The Great
TimReynaga
Associate Editor California, United States
Joined: May 03, 2006
KitMaker: 2,500 posts
Model Shipwrights: 1,830 posts
Posted: Monday, June 22, 2020 - 04:00 AM UTC
Si and Gary, thanks! Those 3D printed detail parts are pretty awesome!

TimReynaga
Associate Editor California, United States
Joined: May 03, 2006
KitMaker: 2,500 posts
Model Shipwrights: 1,830 posts
Posted: Monday, June 22, 2020 - 04:00 AM UTC
Quoted Text
Tim,
I believe the material that Shapeway uses requires to be cure by exposing the material in the sun for a couple of hours, did you do that or am I wrong about the curing in the sun. I was wondering if that could had been why they were brittle. So far I only used their mushroom vents and I had no problem removing them from the base or smoothing out the rough spots.
Mark
Mark,
I tried working the Shapeways parts as they arrived, but they were incompletely cured and so slightly gooey. Exposing them to sunlight as Shapeways recommended did harden them up nicely, but the fully cured material is inherently brittle. Cleaning them up actually wasnt really all that difficult, just more fussy than traditional molded polystyrene plastic or the Model Monkey style acrylate-based gray resin 3D printed parts. The upshot is that although not perfect, these parts offer the possibility of huge detail improvements with less effort than scratchbuilding... so really, I cant complain!