

Go to modelshipwrights.com for the current dynamic site!


1⁄35How to weather your boats (Pier 51)
9
Comments
Weathering the Hull Sides and Interior Well
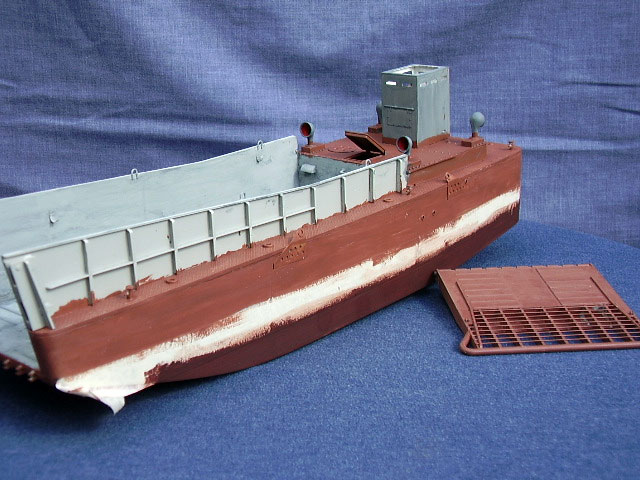
As there was going to be a certain amount of chipped and damaged paint it is important to paint those areas where you wish to go back to the Red Lead before anything else. In this case I painted the hull, ramp and ramp sides with Humbrol Flat 70 which is the closest Ive found to red lead. On top of that I added at random small areas off Flat Black FX 1, again where I wanted the chipping to occur and added Humbrol Maskol where appropriate.
The outside of the boat was then painted in Dark Sea Grey XF 54 as a base coat (I added a bit more Maskol to a few small areas) and then repainted in Neutral Grey XF 53 being the closest I could find to the US Navy colours (thanks Dave). The hull was painted in Hull Red XF 9. The interior/well was painted in a mix of Light Grey XF 66 and Flat White XF 2 giving a light colour for contrast.
Those of you who have seen my builds will know that I paint as I go. This has advantages and disadvantages. I also paint everything by hand as Im not trying to achieve a prefect kit so no spray guns for me. This I find is very useful as different parts of the kit receive different thickness of paint as I work through the kit and tends therefore to give a much more natural effect than that perfect coat of paint, but this is just my personal preference and not intended as comment on the excellent spray work Ive seen others do.
When the base coat was dry I then gave the whole boat a watery wash of Flat Black XF 1. I read somewhere that one isnt supposed to use flat black in this way, but for me it takes the new fresh look right off the boat and I just let the watery mix settle in the most natural places. Then I removed the Maskol and gave the exterior several further black watery washes until the grey started to take on the look I was after. If you feel youve over done it with the black just take a tissue and quickly wipe away any excess from the main surface or quickly dump a lot more water on the area youre working on.
Once reasonably happy with the effect I started to add the water line and wear lines from the outlets. The water line was created by using Dark Green XF 61 and given several washes along the water line until it slightly stained the length of the boat.
Then I added the wear lines from the outlets using a mix of Mig light rust and watery black and dark green (XF1/XF61). Mig Light Rust is very strong so I found it necessary to go over it with some watery black/green to tone it in a bit. The chipped areas were added to individually until they too then hopefully blended in.
Worn metal was created by using either Metallic Grey XF 56 or pencil and washes of dirt and rust added into areas where I felt they might naturally gather.
The upper deck was weathered in the same way with the addition of a watery wash of Metallic Grey (XF 56 being added to the herringbone plate before fore hand. For oil and stains Flat Black XF 1 and White Spirit can work quite well, the acrylic and white spirit dont mix so you get little spots of paint if you wash over an area. Take a little Flat Black XF 1 and then dip your brush into some white spirit (turps) and wash it over a small area. The paint should separate into little molecules whilst the whole area gets a little darker and greasier looking. Try it and see.
The interior of the well was darkened down with several washers of Flat black FX 1 and light grey XF 66 and water marks added with light single brush strokes of Dark Sea Grey XF 54. This produced a very pleasing effect but they were almost invisible when photographed so I darkened a few of them which is the stage you see it at now. I may or may not do some further work on the interior once Ive had a change to see how it settles down. The well deck was treated in the same way some rust being added and pencil used to highlight the worn areas of the tread. MIG Light Rust was added around several of the plate fittings and bolts and the ladder given a worn effect with a lead pencil.
These are both on going projects and things may change slightly before the final setting, ropes and fenders need more work and there is always something one misses!!!!!


About the Author


FROM: ENGLAND - EAST ANGLIA, UNITED KINGDOM
Greying slightly, but young at heart. I've been teaching adults off and on for most of my life. Left the services in 85 and first started modelling in about 87 for a few years. Then I had a long spell when I didn't build anything (too busy) and really just got started again during the summer of ...
Comments


Outstanding!
I wish I had seen this article before I started weathering U-625... but at least I'll be able to use it for my NEXT project.
JAN 19, 2007 - 10:28 AM

EXxcellent, congratulations Al! Your boats are looking real good
there is a real nice collection of tricks there
JAN 19, 2007 - 01:04 PM

Aye, Mr. McNeilly, there ye be!
I really like Al's methods of weathering. . .all very practical, and with great results!! Thanks for your patience, mate, and kudo's to a job well done!
Keep Modeling!
~Gunny
JAN 19, 2007 - 04:40 PM

Hi Guys,
Glad you enjoyed the article and hope it is of some help. Mostly trial and error, but fun to experiment :-) :-)
Skipper thanks for pulling it all together.
Cheers
Al
JAN 19, 2007 - 08:11 PM

Hi Dave,
Thanks for taking the time to reply and I'm glad you enjoyed it.
Al
JAN 20, 2007 - 07:02 PM

Hi Al,
As you know things that float on water are not my real interest however through our discussions, I do appreciate the work that you have put in to get this project to this stage, particularly as you still work with the good old fashioned brush.
The vessels are tremendous and each stage has tied the work together and brought them to life. I have to admit that the rather simple method that you use to create the different looks to the wooden products leads to impressive results.
I look forward to seeing Pier 51 evolve into what I feel will be a very special diorama.
John
JAN 27, 2007 - 07:43 PM
Hi John,
Welcome to the watery side of life. Many thanks for your kind remarks that are much appreciated.
Cheers
AL
JAN 29, 2007 - 01:02 AM
Copyright ©2021 by Alan McNeilly. _OPINIONS Model Shipwrights, KitMaker Network, or Silver Star Enterrpises. Images also by copyright holder unless otherwise noted. Opinions expressed are those of the author(s) and not necessarily those of Model Shipwrights. All rights reserved. Originally published on: 2007-01-19 00:00:00. Unique Reads: 16798

WEB HOSTING BY


Copyright ©2021 Model Shipwrights and Kitmaker Network, a subsidiary of Silver Star Enterprises
All Rights Reserved. Please read our Conditions of Use and Privacy Policy.
All Rights Reserved. Please read our Conditions of Use and Privacy Policy.