

Go to modelshipwrights.com for the current dynamic site!


Building Revell's USS Midway
5
Comments

The Airgroup
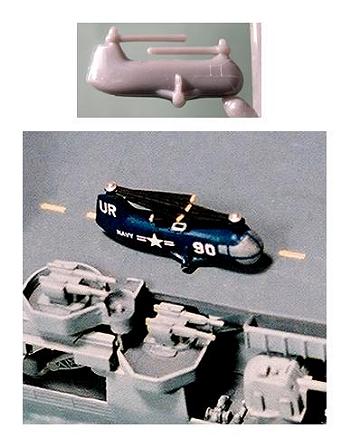
However well constructed the ship, it is the air group that really makes or breaks an aircraft carrier model. This kit comes with 26 aircraft including sixteen F9F-6 Cougars, eleven with folded wings, six F4U Corsairs, two A-1 Skyraiders, and a pair of Piaseki HUP-2 Retriever helicopters with folded rotors. The planes are simplified but basically accurate, and there is even a modest amount of raised detailing. Landing gear on the fixed wing aircraft is depicted with solid pegs. No decals are provided for any of the planes.
I started by cleaning up the flash and mold lines and assembling the prop planes. It was nice to work with such uncomplicated planes after Trumpeters 1/350 scale multi-part masterpieces that seem to take forever to complete. Midways aircraft are all just single parts, except the Corsairs and Skyraiders which have their engines/propellers as separate pieces. They were prepped for painting in no time, except that my old kit was missing three of the engine/prop parts, so no Skyraiders and one less Corsair. Despite their simplicity they looked pretty decent, if a little plain.
I brush painted the first of the planes in gloss Sea Blue. Looking at them as they dried, though, they didnt seem quite right. The paint, Testors Dark Sea Blue, FS15042, was the correct color for USN planes of this era, but it looked too dark, almost black on these tiny airplanes. I tried lightening the Sea Blue with white for a better scale effect, but for some reason that looked even worse! So using a little artistic license, I repainted them with Testors Blue Angel Blue (FS15050), a much lighter, bluer shade. Although not the technically correct color, the effect was much more convincing. The planes now actually looked blue.
After painting the glazed areas silver and making my best attempt at canopy framing, the air group was ready for its markings. Since the kit provided no decals, I used some aftermarket stuff I had on hand. The national insignia on the Cougars and Corsairs came from Gold Medal Models 1/700 scale Naval Aircraft Insignia Decals (set 700-3D), as did the white NAVY and MARINES fuselage markings on the Cougars. As for the white N, R, and M codes on the wings and tails, these letters were borrowed from MARINES markings from the Gold Medal Models 1/350 WW2 USN Aircraft Decals (set 350-6D). Following a recommendation from a fellow IPMS club member I applied the decals a little differently than I usually do, placing each on a little pool of Future applied to the aircraft, followed by another brushed on coat of Future when dry. It worked just fine, and the hand brushing saved the need to deal with the airbrush. I hadnt intended to use any aftermarket on this project, but the GMM decals went a long way toward dressing up those plain little birds!

Final Construction
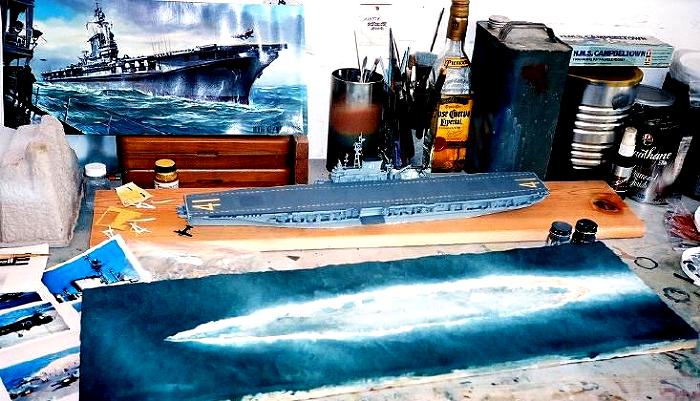
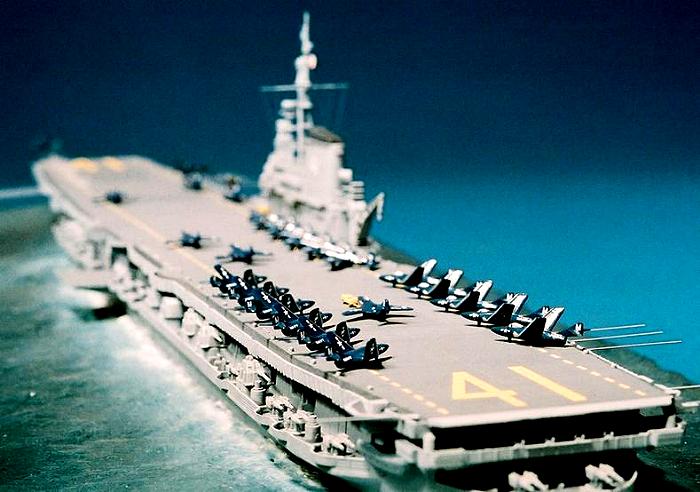
Setting aside the completed air group, I turned my attention back to the ship. Things looked good, but that jagged waterline demanded that it be placed on some sort of sea. I made a simple one from Celluclay paper maché over a piece of scrap plywood. The sea base actually didnt add a lot of time to the project, and it made the model display much more interesting. After painting it up and attaching the ship to it, I couldnt resist adding a few small extras, so the mast received a brass wire yardarm with some rigging and little decal flag. A couple of yellow gear tow mules borrowed from a 1/500 scale Nimitz and some horizontal brass wire antennas rounded out the detail on the flight deck. Finally, I suspended one of the Cougars on a blue-painted wire just off the bow as if it were just taking off.
And with that it was donea finished model! Not only that, it was accomplished with only a few evenings of pleasant, intermittent effort among the demands of the job, wife, and four busy kids. It certainly isnt the most detailed model Ive ever done, but it was a quick, fun diversion from those more elaborate builds I so rarely seem to actually complete.
Conclusions
Revells Midway is not the greatest kit ever produced, but considering the fact that it first appeared in 1954, it really isnt bad at all. With the exception of that dopey underwater hull it has good bones, and at 21½ inches in length it is eye-catching on the shelf. The basics are there for a impressive super detailed replica if you are inclined to make the effort, but if you are looking for something more relaxing it can also be assembled without fuss into an attractive display piece almost right out of the box.
This one was so much fun my next project will likely be that old Revell box scale USS Wasp lurking in my closet. Now if I can just get past the idea of improving the hull and scratch building a nice little hangar deck for it
References
USS Midway museum website http://www.midway.org/site/pp.asp?c=eeIGLLOrGpF&b=3038957
Pawlowski, Gareth L., Flat-Tops and Fledglings : A History of American Aircraft Carriers ; NY, Castle Books, 1971.


About the Author


FROM: CALIFORNIA, UNITED STATES
I am married with three daughters and a son, and I oversee the team of regional workforce policy advisors for the State of California. My wife is an elementary school teacher. Ive been building models since I was five years old (my first model was a NASA lunar module bought for a dime from a mag...
Comments

An excellent presentation on both the ship and a classic kit!
The layout of the kit represents the Midway between 1946 and 1952. The original armored pilothouse was actually chopped off and the island forward of the funnel was completely replaced and the part of the flight deck that overhung the forecastle was actually cut back to produce an odd 'semi-hurricane bow'. In effect, the forward 3"-50's were left exposed but the rest of the forecastle was walled off, leaving secondary conn as a projecting bay-window. I recommend Pete Clayton's book on the Midway as an essential reference.
An interesting note about the flight deck colors: she was the first U. S. carrier to have an armored deck, so the steel was painted a dark deck gray, but then it was surmounted by thousands of black adhesive non-skid pads. These pads just touched one another end-to-end but were separated by 2-3 inches on the sides, producing a strange courderoy effect. How to paint that in 1/547 will be a challenge....perhaps decal film would work?
One advantage to working on the Midway is that you can still see vestiges of the ship's earlier layouts, especially on the hangar and flight deck levels. A 1:350 series on the Midways would be a welcome addition to the hobby.
--Karl
MAY 14, 2009 - 05:48 AM


Tim, great job! Brings back memories. Aside from the 3 inch twins, it would be make you look twice to tell it from some of the new models from the 1990s. And you are right about the aircraft - 1/350 planes made with a zillion parts, these old Revell skysteeds look pretty good when painted and decaled as well as you did. Salute!
JAN 30, 2015 - 07:08 PM


Copyright ©2021 by Tim Reynaga. _OPINIONS Model Shipwrights, KitMaker Network, or Silver Star Enterrpises. Images also by copyright holder unless otherwise noted. Opinions expressed are those of the author(s) and not necessarily those of Model Shipwrights. All rights reserved. Originally published on: 2009-05-14 00:00:00. Unique Reads: 22868

WEB HOSTING BY


Copyright ©2021 Model Shipwrights and Kitmaker Network, a subsidiary of Silver Star Enterprises
All Rights Reserved. Please read our Conditions of Use and Privacy Policy.
All Rights Reserved. Please read our Conditions of Use and Privacy Policy.