

Go to modelshipwrights.com for the current dynamic site!


1⁄350HMS Campbelton
History
HMS Campbeltown was a Wickes Class destroyer, built in the US in 1919. In 1940 the obsolete ship was handed over to the Royal Navy - which was in desperate need of convoy escorts - as part of a lend-lease program. It had a first refit in 1941. HMS Campbeltown became famous with operation "Chariot", the St-Nazaire raid, after an extensive refit in 1942.
The model, which shows the 1941 refit, is about 90% scratchbuilt.
Scratchbuilding the hull
Drawings were scaled down to 1/350 from the AOTS book. Sections glued to a piece of styrene sheet and cut out. The negatives of the sections were checked to fit against the wooden hull, which was first sawn, then carved and sanded. A rubber mould was made and resin poured in. There were quite a few air bubbles so a lot of putty was used.
Styrene strips were glued on to create the hull plating (overscaled so you have to sand afterwards) and portholes drilled out.
Fittings and upper structures I have used parts of White Ensign Models photo etch sheet for another 4 stacker, which proved very useful for boat skids, searchlight platform structure and bow fittings. Unfortunately I got lost one part and had to buy yet another sheet... Quite a lot of spare photo etch parts from previous models went into the details, as well as styrene fittings (rod, strips,...) Boats were modified from other kits' spare parts.
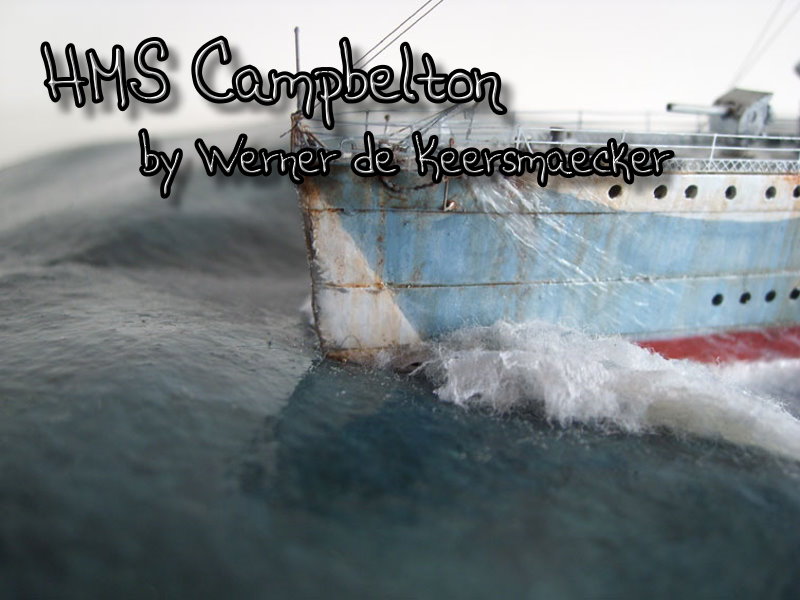
Weathering the model
The finished and painted model was first weathered with the same (Vallejo) colors as in the western approaches scheme as follows: White was added to the light blue and black areas and a bit of black added to the white parts. Thinner was added by drawing vertical lines so the darker base colour appears here and then. Next was "metalising" using a pencil and silver paint, most of it in the bow area. Then a wash with raw umber (oil paint) Then creating rust with burnt sienna (oil paint), Next was applying a mixture of gloss and satin varnish, corrected with matt varnish here and there. The last coat was a mixture of acrylic gel, with a tiny bit of white added to create the water on the deck and coming down. toilet paper (soaked in gloss varnish) in several layers was used to give extra thickness to the foam on the waves. Bow wave was made of toilet paper and tumble dryer fluff.
Sea base
The sea base was- like all my previous dioramas - made from a piece of styrofoam insulation plate. This was cut out using the wooden hull (master) to fit in. Next step was gluing watercolor paper on the base and cutting it out along the gap. I used the same method of painting as in my dio "rendezvous north atlantic" Normally I do not paint the base first but as this is a scratchbuilt model an exception was made. Reason is in case if you're not satisfied about the sea base, you can still use the model...


About the Author


Comments


All Rights Reserved. Please read our Conditions of Use and Privacy Policy.