

Go to modelshipwrights.com for the current dynamic site!


1⁄72Type VIIC U-Boat
20
Comments
Even though Im an AFV modeler at heart (and an occasional sci-fi model builder), I have always wanted to do a ship, specifically a Uboat. I settled on the large 1/72nd scale Revell VIIC Uboat after reading many good revues on it. Additionally, I knew I didnt want to simply build the boat to display on a static stand
It needed to be in a seascape diorama. If I didnt have any experience building a boat, I had even less building a seascape. I was confident that I could parlay my knowledge of modeling AFVs into the ship build itself, but I needed to do some serious research on the seascape.
I came across an amazing ship modeler by the name of Chris Flodberg and read as much as I could on his methods, both online and in the Weathering Magazines Water issue which featured Chriss work. One of his methods appealed to me right away: his oat bran method which basically entails filling a shallow diorama frame with oat bran cereal, forming into a sea shape and fixing into position before finishing/painting. But at the last moment I saw a foam approach utilizing a dremel to shape the sea and since I was after a rougher looking ocean I changed tack (heh). I already had a dremel, so I picked up some 2 foam insulation board at our local home improvement store.
Chris also suggested using a wood artists panel as the diorama base, and I ordered mine from the French Canvas company, custom sized to order. The rest as they say is history.
The goal was to depict the sub as it was in the process of surfacing. For something so outside my comfort zone I am happy to say the process went quite smoothly. Chris method turned out to be fantastic, and he even granted me a few pointers along the way via email. Im very happy with the results. The entire build process can be seen on my Instagram account @70skid.
As for the ship itself, I opted for a few upgrades to the base model. These include: the Eduard PE set; Nautilus Models wood deck kit; EZline (heavy, black) rigging, and .5mm wire for the deck gun rope. All other parts are kit-supplied.
Other finish specs are as follows:
White for hull/conning tower: 5:1 mix Tamiya flat white xf-2, dk sea grey xf-54
Gray camo striping: 4:2:1 mix of Tamiya ocean grey xf-82, dk sea grey xf-54, film grey xf-22
Lower hull: Tamiya dk grey xf-24
Hull panel seam demarcation and rust: AIM products 110-3102 grimy black powder (pigment) applied over the paint with small brush
Hull panel highlights: white pastel powder
Wood deck staining: thinned AK Streaking Grime base coat, then thinned Testors flat black along edges, then AK Naval series AK 301 dk wash for wood decks for really dark accents
Lighter rust areas: AK Light Rust Wash
Rigging floats: Tamiya gunship grey and nato brown
Chipping: AK Chipping color 711


About the Author


Comments

Hopefully Chris will stop by here again because I found one of his works at Model Warship that uses a very similar effect of water pouring off a battleship deck:
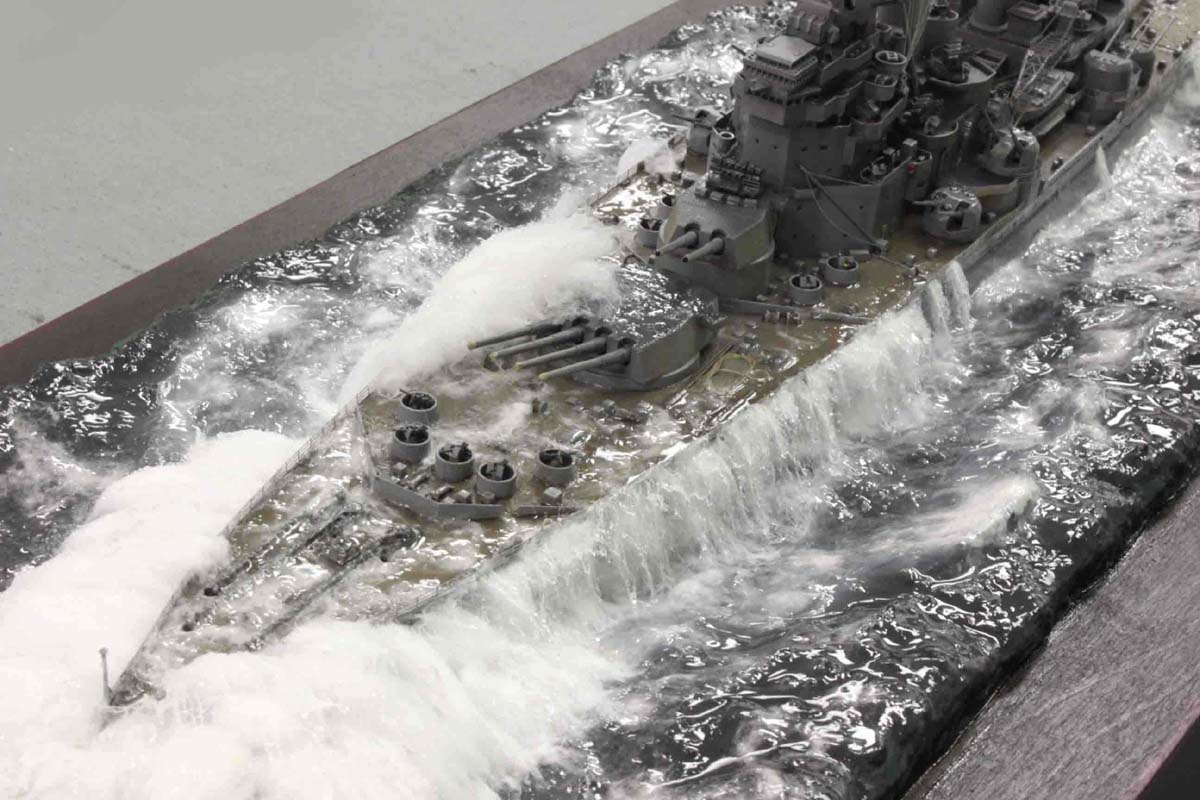 Chris, if you see this, how did you model the streaming water?
Chris, if you see this, how did you model the streaming water?AUG 24, 2015 - 11:05 PM

Hi Scott,
Tiny strands of the cotton covered with layers of acrylic gel
will does the job.
Cheers,
Joe
AUG 25, 2015 - 12:58 AM

Thx guys. Just ordered some rayon balls (in lieu of cotton) and I'm anxious to try the rayon. The cotton was great on the wake but the spillage is too uniform. Looks great before the medium is applied, but then the individual strands get lost...
AUG 25, 2015 - 05:46 AM
Cotton batting (rayon kind) attached first, then carefully brushed-on acrylic high gloss varnish (medium). I never ever use gel for any purpose when making my water.
AUG 25, 2015 - 06:03 AM

It looks awesome! Great details and beautiful water effect. The boat seems very dry though. Should it not by more gloss/wet?
AUG 26, 2015 - 11:57 AM
Thank you! Yes, I realize it's dry. It should be wet, of course. Sort of a balance between realism and artistic license⦠Plus I finished the boat in pigments, and any finish I put over it alters their appearance or makes them disappear. I need to consider how I might go about adding a bit of wetness.
AUG 26, 2015 - 04:12 PM
Love this kit and the new Type-IX. Excellent build, though I also feel it could be wetter. Chris Flodberg is the master on water effects IMO.
AUG 27, 2015 - 01:59 AM
Snapped a few more pics today...https://www.dropbox.com/sh/pce3bcon1fucq4w/AACGP_SGGZ79P20dDZCJH0Oua?dl=0
AUG 30, 2015 - 07:19 AM
Copyright ©2021 by Scott Withers. _OPINIONS Model Shipwrights, KitMaker Network, or Silver Star Enterrpises. Images also by copyright holder unless otherwise noted. Opinions expressed are those of the author(s) and not necessarily those of Model Shipwrights. All rights reserved. Originally published on: 2015-08-23 19:10:13. Unique Reads: 9573

WEB HOSTING BY


Copyright ©2021 Model Shipwrights and Kitmaker Network, a subsidiary of Silver Star Enterprises
All Rights Reserved. Please read our Conditions of Use and Privacy Policy.
All Rights Reserved. Please read our Conditions of Use and Privacy Policy.