

Go to modelshipwrights.com for the current dynamic site!


1⁄700HMS Badsworth and ORP Krakowiak
...
Post a Comment
Building the IBG 700 Scale HMS Badsworth and ORP Krakowiak
Not too long ago, Keith Butterley gave his review of the IBG Models kits, HMS Badsworth and ORP Krakowiak. You can follow this LINK to his review. Recently, Keith finished building both of these 1/700 scale destroyers and share his experience.
Steps 1-6 Badsworth Steps 1-4 Krakowiak
The first few steps are the same for both kits, with the extra steps for the Badsworth involving the life raft platforms and aerial spreader, or if you will, a very short main mast. Things went as planned with the only problem being the 20mm guns. The instructions call for a three step folding process but do not tell you in what order they are to be done. The PE frets contain 6 guns and I ruined 4 of the Badsworth before I figured it out. For the record, fold the gun barrel first, then the shield and proceed from there. These things are tiny and do not take any abuse.The quad two-pounder once together looked better than I thought it would. I still think it should have been one piece and the modeller will be better served with an aftermarket unit.
Step 7 Badsworth Step 5 Krakowiak
These steps involved putting together the searchlight platform for the Badsworth, which by 1944 had morphed in to the 271 radar platform for the Krakowiak. The biggest problem in these steps was trying to fold the railings per instructions. I failed in that regard, but I did manage to get them on.Step 8 Badsworth Step 6 Krakowiak
Putting the forward superstructure was no problem and had no fit issues. I did find it difficult painting the Badsworths camo scheme and it was hard getting the 20mm guns on their pedestals. This was not a kit problem, this was a builder problem. These small parts are putting my skills to the test.Step 9 Badsworth Step 7 Krakowiak
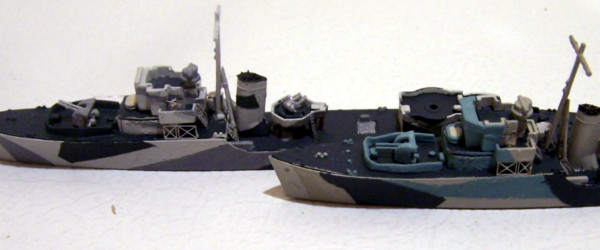
This is the point where the kits finally starting to look like a ship. The decks went on as well as the aft gun house, the two-pounder platform, the galley and some other bits. The camo scheme was also applied to the hull. None of the parts fitted in their per-cut slots. I had to fille down the edges of the gun house and forward bulwarks for them to fit said slots. I also had to drill out the locating holes for the two-pounder platform supports. I was not expecting this kind of a fit problem.The camo schemes were fun to do and brought the little beasts to life. I found that the shade difference between G45 and B55 very slight. Unless you are very close to the kits, it is hard to tell the difference, particularly when they are beside each other as they are at the bow of the Krakowiak.
Step 10 Badsworth Step 8 Krakowiak
Here I installed the 2 pounder, starboard ladders, anchor, foredeck railing and 20mm gun on the Krakowiak only. Also the port and starboard sponson supports and A gun. I chose not to put on the bow staff. I was impressed at how easily the PE parts could be removed from the fret and how I had absolutely no problems with trimming them.Step 11 Badsworth Step 9 Krakowiak
This was more or less a repeat of the previous steps, but for the port side. Additional items installed were the funnels, mast and in the case of the Krakowiak, the 271 radar tower, platform and HF/DF aerial. This item really should have been PE. I also decided at this point to remove the PE railing. I thought it looked to overscale.Step 12 Badsworth Step 10 Krakowiak
Now we are moving to the midships/stern area and getting closer to the finish line. Once again mostly working on the port side of the ships, items to be installed for both were depth charge racks and throwers plus one of the ships boats. The searchlight platform and Y gun for Badsworth and both X and Y for Krakowiak. I had to drill a small hole in order to get the aerial spreader to sit properly on the Badsworth. Of note in this step was the installation of part A18, a mushroom vent, on both ships. It is perhaps the smallest part I ever had to work with and I surprised myself by getting it on, properly. I shall see if I have the same success with the starboard one.Step 13 Badsworth Step 10 Krakowiak
Step 12/10 repeated on the starboard side, with the main difference being Badsworth received her X gun and the mushroom vents were mounted.Finishing Up
I then sprayed both with a coat of Testors Dusllcote, and black-washed them using artist oil. Rigging was the final step and this was done with 40 denier super fine black lycra.Conclusion
At the end of the day I am quite pleased with the results and cant say I found any major problems with construction. My criticism of the kits would be that I did not like the attachment points to the sprues on a number of parts. That made cleaning them up quite difficult. The locating slots for parts were too small and that made for some not particularly good fits. The kit supplied PE railing was much to over scale and you are better off digging around in your spares box for some replacements. So, to buy or not to buy? My recommendation would be, to buy. The Hunt Class destroyers are definitely a must addition to any RN aficionados fleet. They build up to quite fine replicas and would be a fine addition to your collection.


Copyright ©2021 by Keith Butterley. _OPINIONS Model Shipwrights, KitMaker Network, or Silver Star Enterrpises. Images also by copyright holder unless otherwise noted. Opinions expressed are those of the author(s) and not necessarily those of Model Shipwrights. All rights reserved. Originally published on: 2018-05-20 20:32:50. Unique Reads: 7348

WEB HOSTING BY


Copyright ©2021 Model Shipwrights and Kitmaker Network, a subsidiary of Silver Star Enterprises
All Rights Reserved. Please read our Conditions of Use and Privacy Policy.
All Rights Reserved. Please read our Conditions of Use and Privacy Policy.