_GOTOBOTTOM
Ships by Class/Type
For discussions on ships by class and type.
USS Navarro APA 215 build
RickHeinbaugh
Visit this Community
Washington, United States
Joined: April 26, 2007
KitMaker: 73 posts
Model Shipwrights: 70 posts
Posted: Sunday, November 25, 2007 - 11:39 AM UTC
This build turns out to have been entirely too late for the Sept - November Ship of the Quarter competition I intended it for, and it is too late for Veteran's Day. But it is still intended for presentation to a veteran. This will be a conversion (a mild conversion I thought) of the Revell WWII Montrose kit to Navarro as she appeared in 1965, post FRAM II refit, during her Vietnam service. My primary reference is Norman Friedman's "U.S. Amphibious Ships and Craft - an Illustrated Design History", and various photos from the internet, including navsource.org.

I assumed I would be working on a reasonably presentable kit, just replacing the molded-in railings and guns with photo-etch. I normally work in 1/700, so this beast in 1/375 scale is huge for me and nothing seems normal.

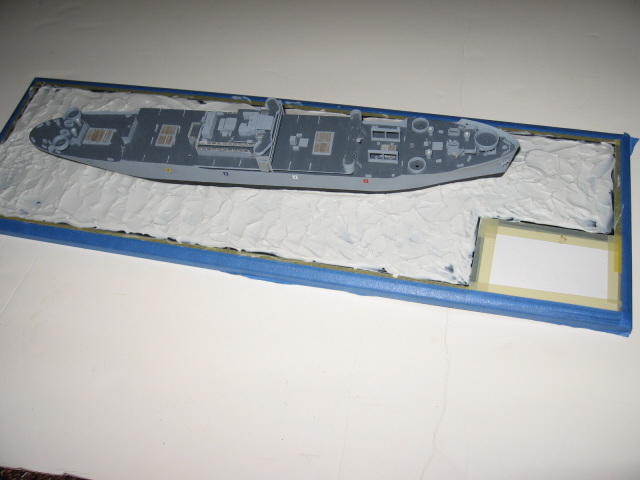
The first realization was that the ancient Revell kit (molds oriiginally dating back to the late 1950's, I believe) is not a full-hull kit; it really only shows the part of the ship visible from the waterline up, even though there was no such title back then as "waterline model". So I will not use the kit display stand, I will use a water display. And to do that, I cut the inner part of the kit's flat bottom out with a Dremel tool. (I wanted to make less resistance for the "water" gunk to press the ship into.) And to give the remaining hull some rigidity, I glued plastic sprue beams athwartships at four points inside.


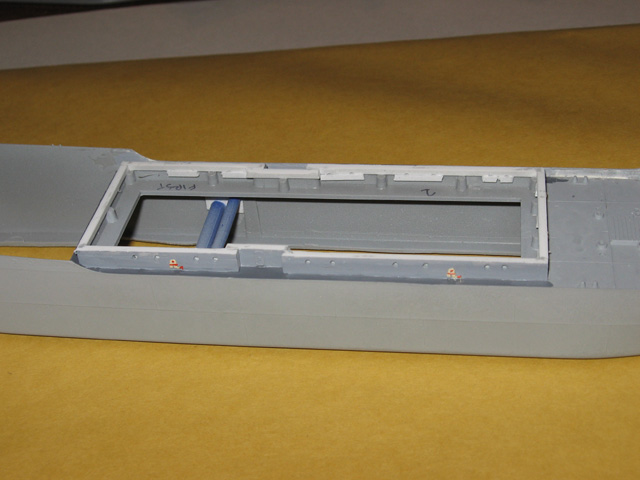
Next, for the Vietnam modifications, I needed to come to grips with the concept that the 1963 FRAM II refit had stripped the ship down to only five gun mounts - one quad 4pmm and four twin 40mms. The 5" and all the molded-in 20mms had to go. After grinding them off of the 20mms (and all the winches, because Frank "wildspear" put the idea in my head with his Montrose/Talledage build earlier) on the 01-level deck amidships, there wasn't much left but a battlefield, so I decided to replace it with sheet plastic. How hard can that be?

Of course, replacing that deck meant that the top haf of the lower deckhouse and the lower half of the upper deckhouse that were molded to it would also have to be replaced. That was almost as straightforward as I expected. When I drilled out the port holes, I put backing plates behind each, so you couldn't see all the way through the model.

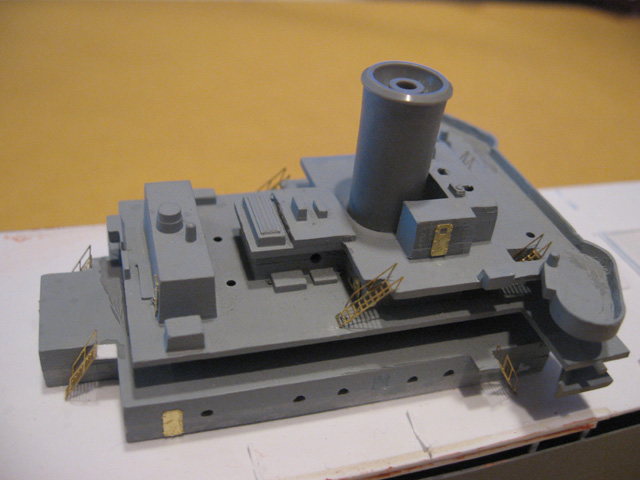
Replacing the hatchcovers and the forward deckhouses were a challenge. The hatchcovers were made from lots of plastic strip. each with two edges beveled off, that will show through some paint I hope. The curved ends of the deckhouses were made from the .003" stainless steel sheet that surrounds GMM railings sets, shaped and glued in place. I only hope they don't go "sproing" someday in the future.


Superstructure: so far, so good.


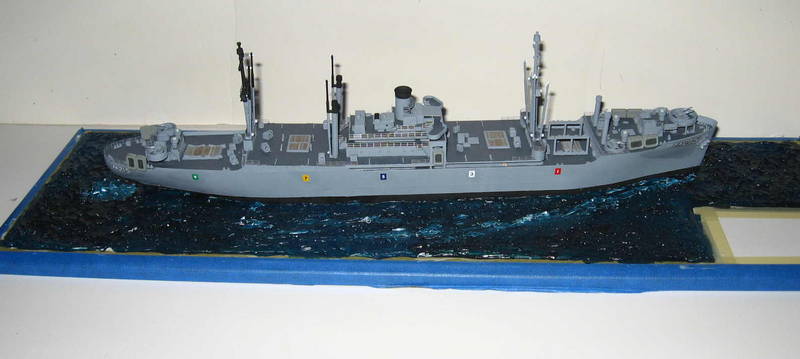
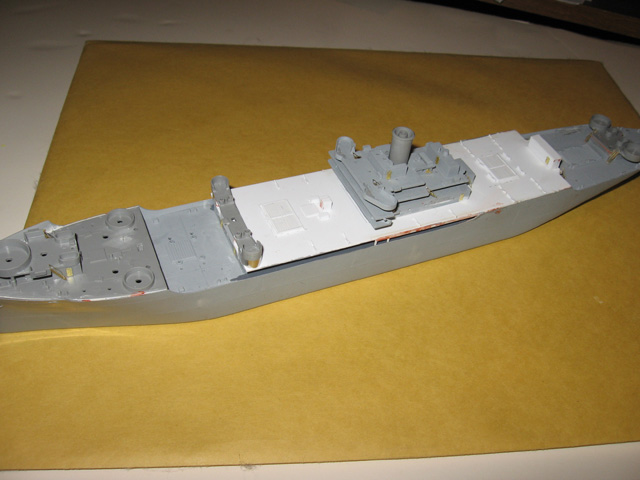
The ship is ready for primer and boot topping now. The paint on the main deck below the superstructure is final - I will stuff that area with tissue before spraying the rest of the ship. I painted the firehoses with an off-white and red framework that looked exactly the way I remember the old cotton-jacketed firehoses. Nowadays they're orange, but they used to be white.


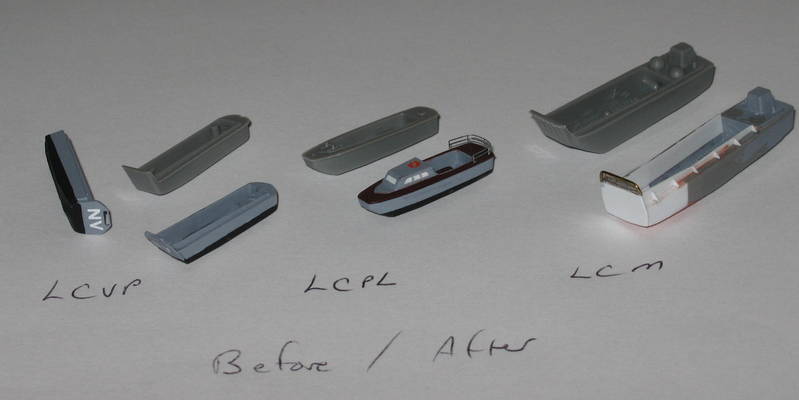
A few challenges remain. Landing craft. The kit doesn't have enough - I will need to pillage a second kit. Also, I am reshaping them quite a bit. Haven't figured out how to correctly shape the triple Welin davits - that should be an adventure. Also, for decals on them, I am still waffling between using MidShip Models 1/700 ship round font numbers or MicroScale HO train Gothic numbers. Had a hard time finding the MicroScale sheet around Seattle, but this is taking so long, I might as well order some in the mail.
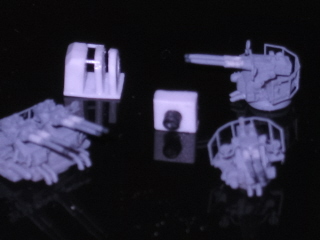
The 40mm guns will be 1/400 resin aftermatket pieces from L'Arsenal of France. They look beautiful, and there are enough in the package to practice on.

Signal flags will be a new experience - will have to practice a lot before doing the real thing.

More to come.
Rick
#027
Visit this Community
Louisiana, United States
Joined: April 13, 2005
KitMaker: 5,422 posts
Model Shipwrights: 5,079 posts
Posted: Sunday, November 25, 2007 - 12:25 PM UTC
Looking good Rick.

Gator
Gunny
Visit this Community
Pennsylvania, United States
Joined: July 13, 2004
KitMaker: 6,705 posts
Model Shipwrights: 4,704 posts
Posted: Sunday, November 25, 2007 - 12:30 PM UTC
Very interesting project, Mr. Heinbaugh...I'll be following along closely, mate!
Keep Modeling!
~Gunny
Harry_at_BFM
Visit this Community
Colorado, United States
Joined: February 04, 2007
KitMaker: 594 posts
Model Shipwrights: 556 posts
Posted: Sunday, November 25, 2007 - 01:57 PM UTC
Looks like you have done a lot of rebuilding there, very nice, Rick.

I am working on a 1/700 C3 myself.
RickHeinbaugh
Visit this Community
Washington, United States
Joined: April 26, 2007
KitMaker: 73 posts
Model Shipwrights: 70 posts
Posted: Tuesday, December 18, 2007 - 09:03 PM UTC
Landing craft are driving me nuts. I had to get an extra Montrose kit to have the full load of LCVPs that I wanted. And each one needs the bow ramp to be reshaped, the sides to be skinned out wider, the stern to be reshaped, the cox'n's station to be built out a bit and to have a nasty ejector pin marking removed from the inner deck.
It stopped being fun after the second one. Now the challenge is to just get them all to look the same.

There will be just a single LCPL, and it will need a deckhouse, which wasn't on the WWII rig. I haven't even started looking at the two big LCMs yet.

Clearly, the ship wasn't done for Veteran's Day and won't be done by Christmas. Should I aim for Memorial Day or the Fourth of July? good grief.
RickHeinbaugh
Visit this Community
Washington, United States
Joined: April 26, 2007
KitMaker: 73 posts
Model Shipwrights: 70 posts
Posted: Wednesday, March 26, 2008 - 08:33 PM UTC
Still plugging at it. Current target for completion is 5 April.


The super structure is finished, less the stack and masts, and I am working toward the ends with railings and details. The next challenge is to make all the deck winches to replace the nasty blobs I shaved off.


The boats haven't seen a ton of progress recently. I'll have to get into afterburners with them.

Gunny
Visit this Community
Pennsylvania, United States
Joined: July 13, 2004
KitMaker: 6,705 posts
Model Shipwrights: 4,704 posts
Posted: Wednesday, March 26, 2008 - 08:49 PM UTC
Hi Rick!


I've been wondering where you were with this build, mate, you've definitely made some major progress...looks like a great build!

I can feel your pain with the LC boats, Rick, especially when you put it into picture form...like you said, getting them all to look the same is quite the challenge...especially with an April 5 deadline!

Are you trying to complete for a show?

Looking fine, mate, thanks for the updates!
skipper
Visit this Community
Lisboa, Portugal
Joined: February 28, 2002
KitMaker: 5,182 posts
Model Shipwrights: 4,070 posts
Posted: Thursday, March 27, 2008 - 12:38 AM UTC
Hi Rick

You're going in the right track
My advice for the winches: punch and die set
keep us posted,
Rui
goldenpony
Visit this Community
Zimbabwe
Joined: July 03, 2007
KitMaker: 3,529 posts
Model Shipwrights: 2,419 posts
Posted: Thursday, March 27, 2008 - 01:05 AM UTC
That is going to be a nice project when she is all done. Looks great so far!!!

RickHeinbaugh
Visit this Community
Washington, United States
Joined: April 26, 2007
KitMaker: 73 posts
Model Shipwrights: 70 posts
Posted: Thursday, April 10, 2008 - 08:16 AM UTC
Glacial progress continues. I missed the goal to complete it for a show and to present it to its new owner on 5 April. Next deadline is to show it on 19 April, present it and have it out of my hair forever.

The winches are complete.


I made a dozen of the larger winches, to choose the best ten for the ship, and to have extras to feed the carpet monster. They still lack the cable spool inside - I will spray the gray, then slip in a .080" plastic rod, colored with black marking pen, instead of fat black paint. Then the 1/16" rod gypsy head sticking off the side.

I made ten of the smaller winches, for the eight needed. They just needed a mounting hole for the 1/16" gypsy head to stick out. On the other side, I gave each one an "access panel" of a 1/700 photo-etch door, turned horizontal. It was a perfect fit.

Here is a photo of leftover winches, alongside the L'Arsenal 40mm resin guns that will be used. The photo doesn't do them justice.

Again, for the Vietnam era, Navarro didn't mount anything besides this quad 40mm and four twin 40mm mounts.

Here is a photo of one of the class of ships, showing how big the winches are -


Time to get back to work. Those landing craft aren't building themselves.
RickHeinbaugh
Visit this Community
Washington, United States
Joined: April 26, 2007
KitMaker: 73 posts
Model Shipwrights: 70 posts
Posted: Tuesday, June 10, 2008 - 07:53 PM UTC
I'm finally getting close to the end, give or take four or five deadlines.


The scratch-built winches looked better than I expected. There is still a lot of touch-up left to do on the paint. Nothing like a closeup photo to find more problems!


The boats were a ton of work. Each LCVP had the bow ramp and sides and cockpit modified. The LCPL was modified with a deckhouse, per a number of photos found on the internet. The LCMs turned out to be World War II vintage LCM(3)s in the kit, shorter and shaped differently from the Vietnam-era LCM(6).

I settled on just puttling the letters on the bow ramps of the boats and not putting the numbers on the sides, even though MicroScale railroad decals provide the small numbers that would be correct for the sides of the boats. I just couldn't make them look right.

I'm settling on using the triple Welin davits out of the kit, I guess. They're not really THAT bad. The masts are from the kit, with some adjustments. I modified some of the booms, and it turned out, from much study of photos, that two of the booms by the after mast were removed in the 1960's. Also, it turns out that I still need to add a heavy-duty boom on the centerline on the after side of the after mast. This wasn't in the kit at all, and I never noticed it.

I got a ton of assistance from a few people who had built this kit or sailed on this ship or Victory ships over on the FinsecaleModeler forum.

Nearly done.
Clanky44
Visit this Community
Ontario, Canada
Joined: September 15, 2005
KitMaker: 1,901 posts
Model Shipwrights: 934 posts
Posted: Tuesday, June 10, 2008 - 11:06 PM UTC
Looks good Rick, the boats are coming along, the P.E. looks spot on. I'm sure you have noticed from the close up photo, spray a dull coat over the hull side decals to remove the gloss.

Will you be adding a wash to the paint job? If so, have you ever tried using tube water colours for washes? It's very forgiving in that if you don't like the finish, you can just touch it up with a wet brush and remove the wash. The technique works best on a matt finish, which is what you have. It will add a nice touch of depth to the recesses.

Great job Rick, keep us posted.

Frank
 _GOTOTOP