North Carolina, United States
Joined: February 22, 2002
KitMaker: 11,718 posts
Model Shipwrights: 69 posts
Posted: Tuesday, January 15, 2008 - 11:42 PM UTC
I guess it has officially started. I got this ship for Christmas in 2006 (yes 6).
So the itch now needs to be scratched. This will be very slow because it is very involved. This is a wooden 1/35 scale ship. It's huge!

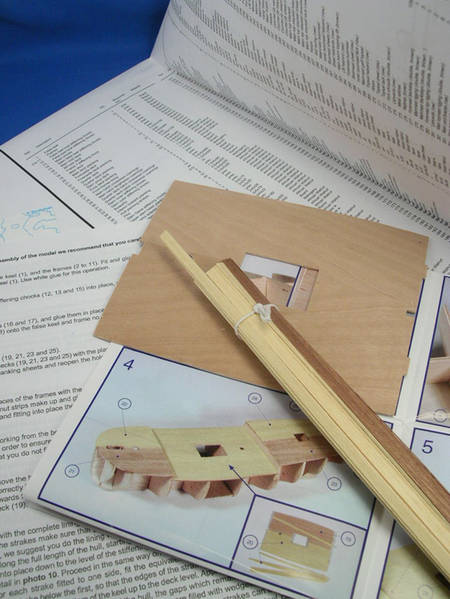
My first issue is 'what are these pieces?' The thin dental work pieces with the notches. I can't find them in the instructions anywhere. I have emailed the manufacturer. We are playing email tag so it's still in progress. They are about 2-3" long each.

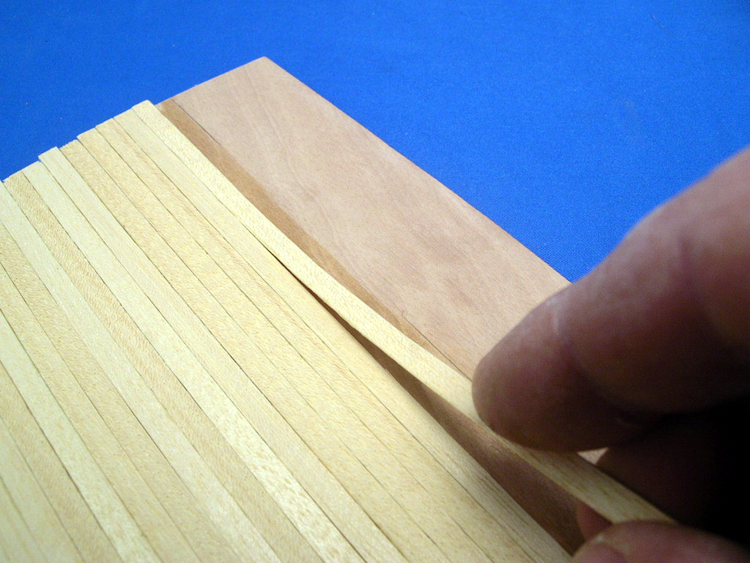
I don't believe they are hull material - here is a shot of the planks for the hull.
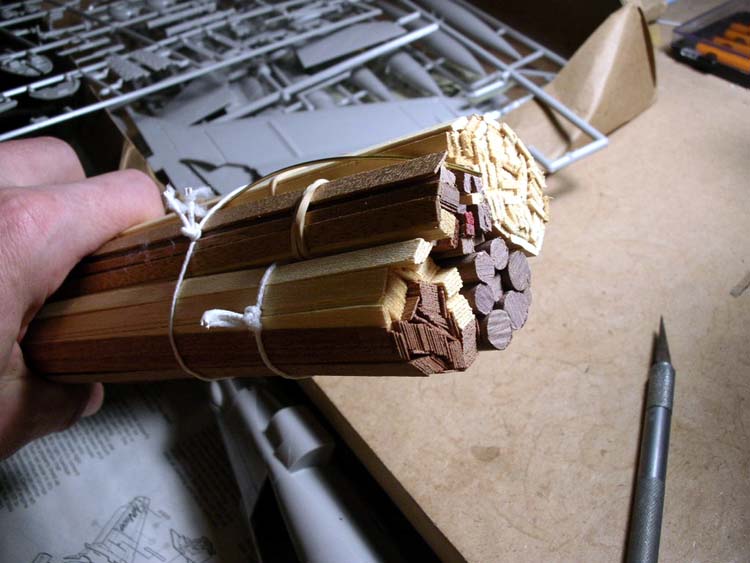
If you have any input - I'm all ears and eyes.
Zimbabwe
Joined: July 03, 2007
KitMaker: 3,529 posts
Model Shipwrights: 2,419 posts
Posted: Wednesday, January 16, 2008 - 01:04 AM UTC
Now that looks like it is going to be an interesting build.
Not sure about the notched pieces. My guess would be ribs of some sort, but since they don't look to be curved they are not for the hull.
I am sure some body here will have a better answer for you.

New York, United States
Joined: December 07, 2004
KitMaker: 1,888 posts
Model Shipwrights: 213 posts
Posted: Wednesday, January 16, 2008 - 02:45 AM UTC

Hi Scott looks like a great kit, i have you covered on those parts they are lattice like parts you have to put together to cover most of your hatches look at my Sultana build you will see them. The parts you have are in this pic i posted center hatch inside the red framing, hope this helps.
North Carolina, United States
Joined: February 22, 2002
KitMaker: 11,718 posts
Model Shipwrights: 69 posts
Posted: Wednesday, January 16, 2008 - 11:31 PM UTC
Robert - cool! Thanks. That makes sense.
North Carolina, United States
Joined: February 22, 2002
KitMaker: 11,718 posts
Model Shipwrights: 69 posts
Posted: Sunday, March 09, 2008 - 12:50 AM UTC
Ok - it's been a little while sorry about that.....
Here's an update:
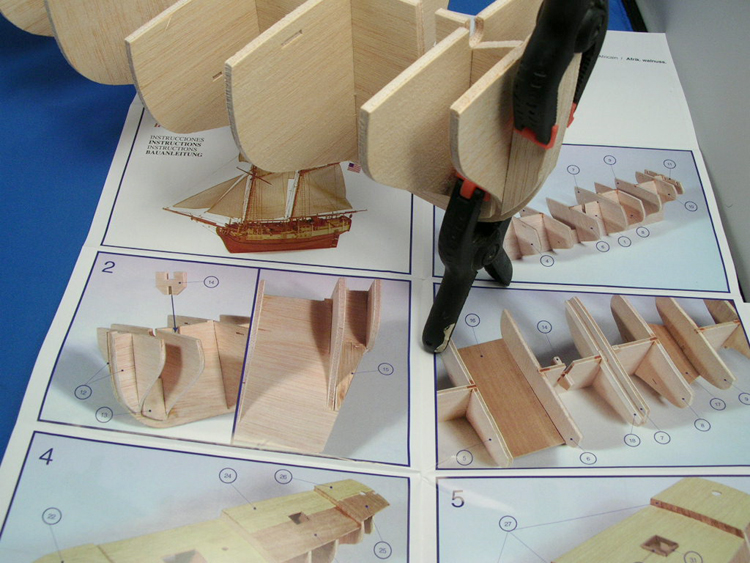
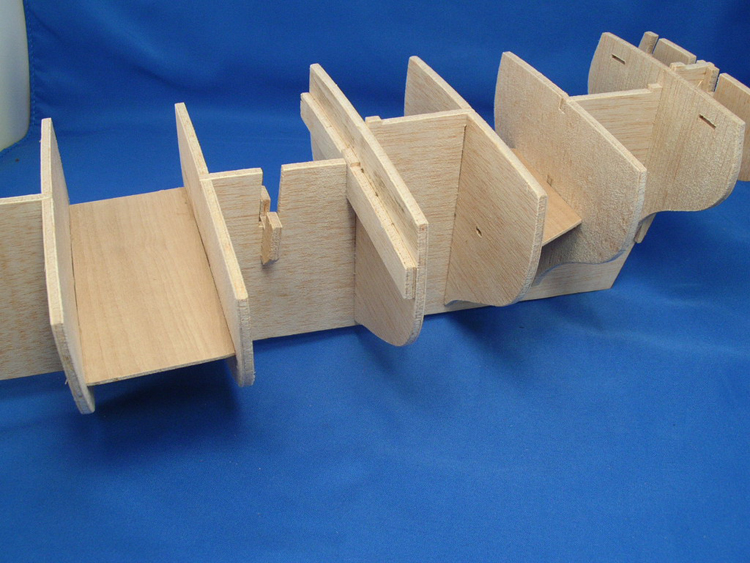
I got through steps 1 and 2 building the false keel and getting the frames, stifffeners, and mast chocks in place.
Pennsylvania, United States
Joined: July 13, 2004
KitMaker: 6,705 posts
Model Shipwrights: 4,704 posts
Posted: Sunday, March 09, 2008 - 01:27 AM UTC
Ahoy, Scott!
Been wondering where you were at with this build, mate...looks like you have the groundwork laid, and are heading in the proper direction...thanks for the update, and keep the images coming!
BTW, I have the same portable light box...what do you think of it?
Cheers,
Mark

"And all I ask is a tall ship and a star to steer her by..."
North Carolina, United States
Joined: February 22, 2002
KitMaker: 11,718 posts
Model Shipwrights: 69 posts
Posted: Sunday, March 09, 2008 - 02:25 AM UTC
Mark - yea - it took a bit to clean my workbench to have the space for a wooden model. They take up way more space. The instruction include a 12 page multi-language 8.5x11" booklet, two 8.5x11" loose leaf 'note' sheets, three 2x3 foot front and back poster layout sheets, and a color glossy image sheet (as seen in the photo above). Plust the sheer quantity of mateials......
Anyway -it's underway and I will keep updating this blog and keep notes along the way and photos of everything. If you want a build feature - you'll get.
The photobooth is great, Once I figured out how to set the white balance on my camera AND do macro setting I was thrilled. The flexibiity of the booth is nice.
The two lights that came with it were a bit weak, they are LED tripod lamps and aren't that bright at all and cast a very blue light. I use them as 'helper' lamps, and as work lamps for DIY project

.
I use three 100watt lamps (left right top) to light this and it's pretty nice.
Queensland, Australia
Joined: October 03, 2006
KitMaker: 353 posts
Model Shipwrights: 207 posts
Posted: Sunday, March 09, 2008 - 03:16 AM UTC
Hi Scott,
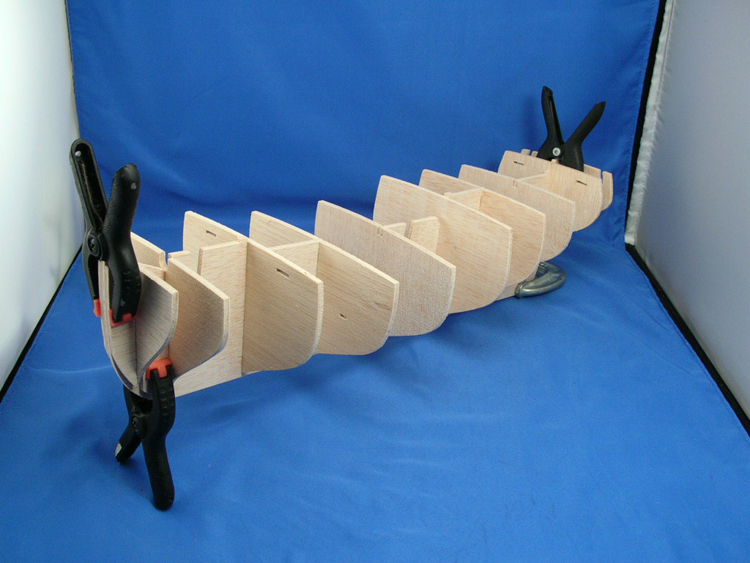
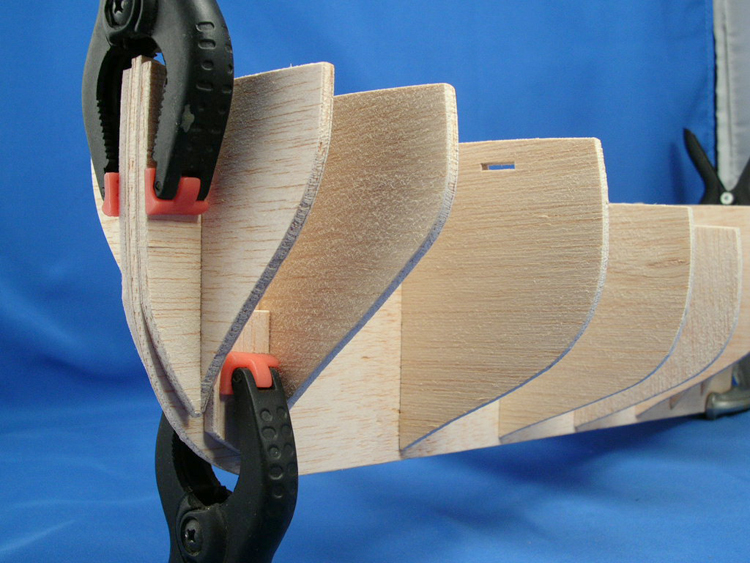
Just a quick bit of help before you start laying planks. Get yourself a sanding block 8 to 10 inches long so you can bevel the edges of the bulkheads in line with the direction you will lay the planks. This way the planks have plenty of 'meat' to glue to. This is very important at the bow and stern. The best way to check, is to hold one of the plank strips along the side of the hull then have a close look where it does and doesn't touch the bulkheads, then sand accordingly. Good luck
Queensland, Australia
Joined: October 03, 2006
KitMaker: 353 posts
Model Shipwrights: 207 posts
Posted: Sunday, March 09, 2008 - 03:30 AM UTC
Another thing Scott, with the hatch grates, assemble the lot into the full squares. I found that it's best to sit down and construct all the grates then do all hatch frames. Once that is done work out how much is needed from each grate to fill each frame. I say this as sometimes they give just enough to do the job and by cutting too many of one size from one full grate may leave you with not enough to complete the rest at different sizes.
Hope I make sense.
North Carolina, United States
Joined: February 22, 2002
KitMaker: 11,718 posts
Model Shipwrights: 69 posts
Posted: Sunday, March 09, 2008 - 03:47 AM UTC
Great tips Rab,
I hadn't considered either, the first is a real structural one too. So to rephrase what you suggested is to take the 'skeleton' in the photo above and gently sand down the outside 'edges' of the bulkheads from bow to stern to give it all a smoother streamlined shape to give the hull planks 100% grip. Do I have it right?
The grate building tip is solid experience -thanks.
New York, United States
Joined: December 07, 2004
KitMaker: 1,888 posts
Model Shipwrights: 213 posts
Posted: Sunday, March 09, 2008 - 05:21 AM UTC
Looking good so far Scott Kym has it wright run a plank across your bulkheads so you can see the high spots, if you have a spots that seem to low you can add a thin piece of wood if you like. You will soon be ready to start that first layer of planks, to make it easy for yourself soak the planks in hot water for about 1 hour pat them dry with a towel this will make the planks much easier to bend and less likely to split or break, also when planking alternate from side to side so you don't warp the hull.
North Carolina, United States
Joined: February 22, 2002
KitMaker: 11,718 posts
Model Shipwrights: 69 posts
Posted: Sunday, March 09, 2008 - 06:13 AM UTC
great tips all around thanks - there are some hold floors and deck sub pieces that come before the outside. But it's moving along.
North Carolina, United States
Joined: February 22, 2002
KitMaker: 11,718 posts
Model Shipwrights: 69 posts
Posted: Tuesday, March 11, 2008 - 03:08 PM UTC
here I am again, going slow. I've got the two hold decks in place and the mast braces and deck brace.
Next it the decking. If you have built AFVs and marvelled at the complexity of the Dragon instructions - they're easy compared to this. You have to cross reference three documents, (photo instructions, written instructions, and part list) with the raw materials in various forms. All that to make sure you have the right part. Then you get to figure out how to do it. Actually, all fun, slow but fun.
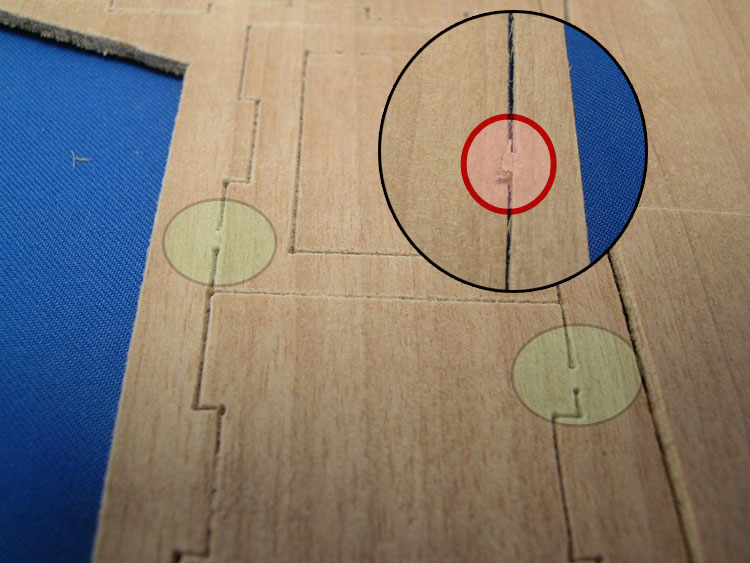
With these laser cut sheets you do have to be careful - there are 'tabs' that are not cut all the way through (light green circles). You need to make sure you cut these or you'll rip up the surface of the piece - red circle.
New Jersey, United States
Joined: January 05, 2005
KitMaker: 2,185 posts
Model Shipwrights: 80 posts
Posted: Tuesday, March 11, 2008 - 11:21 PM UTC
Scott, nice work and a great looking kit.
I'm currently working on a woodie myself, a 1/33 scale fishing boat from Billings.
You should have no hair left by the time you're done, and what is left will be white.
The hull spreaders on my kit had no numbers so I spent the day lining them up and guestimating the proper sequence.
No other parts are numbered also, so like you I have to check the directions for clues, check the picture sheet, and the overview sheet, ........ exhausting !!!!!!
So far what you've done looks great, and the suggestions of the others ring true.
Keep at it and measure twice, prefit constantly !!!!
Your wood bits look like solid basswood or balsa ?
Mine are laminated and are rather strong, but alot of the pieces are a tad warped so when fitting the deck comes around, this just might get launched into the bay ...... literally, no pun intended !!!!!
I'm looking foward to your progress. It looks like a much more daunting build than mine.
And yes building these kits are a lesson in patience, very slow going glue, clamp and wait !!!!
Good luck - Glenn
North Carolina, United States
Joined: February 22, 2002
KitMaker: 11,718 posts
Model Shipwrights: 69 posts
Posted: Wednesday, March 12, 2008 - 03:27 AM UTC
Thanks Glen
These woodies are challenging. I've done some aircraft - this is my first ship. Boy are the instructions massive.
The wood is a bunch of different things:
"Wood" - bass - the skeleton
African walnut
Sapelli
Ramin
Coral
Some woods I've never heard of - some better than others, there is a bit of warping but not much.
The hair is going gray for sure
Queensland, Australia
Joined: October 03, 2006
KitMaker: 353 posts
Model Shipwrights: 207 posts
Posted: Wednesday, March 12, 2008 - 03:42 AM UTC
Scott and anybody else thinking of doing a wooden ship kit, it is imperative that one of the first things you do after scratching your head at the complexity of the contents, is to mark all the wooden pieces with their part number while still in their frames. All these kits have a parts plan with the numbers marked - transfer the numbers onto the laser cut parts. It will save a lot of 'blood, sweat & tears' later on.
New Jersey, United States
Joined: January 05, 2005
KitMaker: 2,185 posts
Model Shipwrights: 80 posts
Posted: Wednesday, March 12, 2008 - 07:22 AM UTC
Scott, just went back to look at your first post, this is a 1/35th job ? - very cool it must be a biggy. I'm going to check into the Independence, it looks to be a very cool build.
I've also got some exotic woods in this kit - deck planking and such.
Artesania Latina makes the loose ship parts [ portholes and such ] that I'm using for my freighter.
Kym, no such thing as part numbers on the laser cut sprues. It's strictly eye up and try not to screw up.
Once I found the correct sequence of spreaders though I numbered them in ink according to the numbers on the directions.
Smoothe move - numbers on the instruction sheet and none on the laser cut sheets !!!!!!!!
Patience Scott, l.o.l., if we can build these we can run for President. After building one we'll surely have more experience than the Democrats front runners !!!!!
Glenn
Queensland, Australia
Joined: October 03, 2006
KitMaker: 353 posts
Model Shipwrights: 207 posts
Posted: Wednesday, March 12, 2008 - 07:43 AM UTC
Glenn, that's what I'm saying, the builder must write the numbers on the lazer-cut parts themselves, using the instruction sheet as a guide.
New Jersey, United States
Joined: January 05, 2005
KitMaker: 2,185 posts
Model Shipwrights: 80 posts
Posted: Wednesday, March 12, 2008 - 08:06 AM UTC
Kym, gotcha, still seems bass akwards to me.
Glenn
Queensland, Australia
Joined: October 03, 2006
KitMaker: 353 posts
Model Shipwrights: 207 posts
Posted: Wednesday, March 12, 2008 - 12:17 PM UTC
Glenn, I think the reason they don't put the numbers on the parts is that it would be lazer burnt onto them and as some of the parts are visible when finished, a black number would look very out of place. That's why I just pencil them on for easy removal by sanding later.
North Carolina, United States
Joined: February 22, 2002
KitMaker: 11,718 posts
Model Shipwrights: 69 posts
Posted: Wednesday, March 12, 2008 - 02:45 PM UTC
On the laser cut sheets there is a 'translation' sheet that specs the pieces on the sheets. I've been very careful to leave them all in the 'dead' space until I need them. If they do fall out the 1st thing I've done is use pencil and mark the number.
That doesn't help much for the planks, boards and mast pieces and all the 100's of bits and pieces. Not complaining, this is a 100 tons of fun to build. It's a wonderful diversion from dioramas and plastic. Just the texture of working with wood is great. Plus the way you have to really think ahead to make sure you dont waste wood or use the wrong glue or sand away something required.
Glenn - yup 1/35 - The skeleton is about 14 inches long and 4-5 inches high already. Cant wait to step a mast and see it elevate to 2feet tall.
It's a ball - thanks for the help and encouragement
North Carolina, United States
Joined: February 22, 2002
KitMaker: 11,718 posts
Model Shipwrights: 69 posts
Posted: Monday, March 24, 2008 - 12:11 PM UTC
Ok - I'm back. I have finished laying the deck planks.
These were fun and telling of things to come - lots of sanding and lots to learn.
One thing, keep the waste to a minimum and (as noted by the arrow) cut your pieces short and consistent. I makes sanding easier and doesn' waste a lot.
Another thing I did was to work from the center out. I bisected the deck, drew a line down the middle knew that at least they would all run parallel and pretty close to 'down the center of the ship'. If you start from one edge and work across you're more prone to kiltering the pieces and really mucking up the last few planks.

Contact cement - yea - one shot type of stuff. Once it bites you're not moving your pieces. I learned quickly to use the flex in the planks to ease the piece down from one side to the other.
Now - next step touch up the edges to fit the skeleton and then sand the deck smooth. Fill in any imperfections (and screw ups on my part) with some excess saw dust and sandable glue. A trick my dad tought me: put a bit of wood glue (sandable) down, work a bit of some gathered saw dust from the same stock into the glue. Then once dry sand it down, instand matching 'putty'.
North Carolina, United States
Joined: February 22, 2002
KitMaker: 11,718 posts
Model Shipwrights: 69 posts
Posted: Saturday, March 29, 2008 - 02:35 AM UTC
Moving on....
I used the build a tool campaign to get a leg up on my ship and the campaign. I build a bending jig for the hull planks. More detail here
BAT Thread This piece is the top most piece of the hull,eveything builds down from it.

Pennsylvania, United States
Joined: July 13, 2004
KitMaker: 6,705 posts
Model Shipwrights: 4,704 posts
Posted: Saturday, March 29, 2008 - 09:16 AM UTC
Hi Scott!
Very good thinking on the jig, mate...very useful, and makes a dandy "extra set" of hands that we all need from time to time,,,thanks for the tip!
"And all I ask is a tall ship and a star to steer her by..."
Limburg, Netherlands
Joined: November 06, 2006
KitMaker: 2,714 posts
Model Shipwrights: 11 posts
Posted: Saturday, March 29, 2008 - 02:32 PM UTC
Wooden ships are always very special, the are almost built like the natural thing. I realy like this blog its very interesting.
Best Regards Manuel
Huidig Projecten:
Eens afmaken
Member of Twenot