Grumpy's MSW Staff Build Blog--USS ENGLAND
Grumpyoldman
 _ADVISOR
Florida, United States
Joined: October 17, 2003
KitMaker: 15,338 posts
Model Shipwrights: 981 posts
Posted: Thursday, June 05, 2008 - 12:29 AM UTC
Here's my entry.
Trumpeters 1/350th scale USS England.
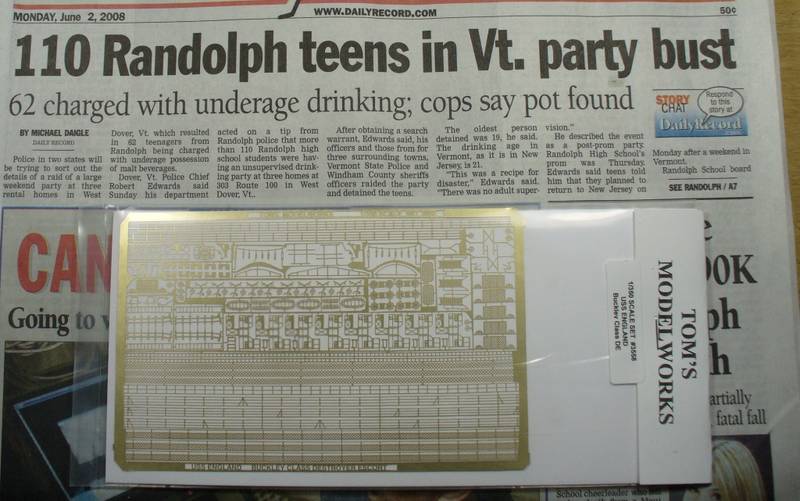
Tom's Models Photo Etched set.
Battlefleet barrels

The virgin parts:
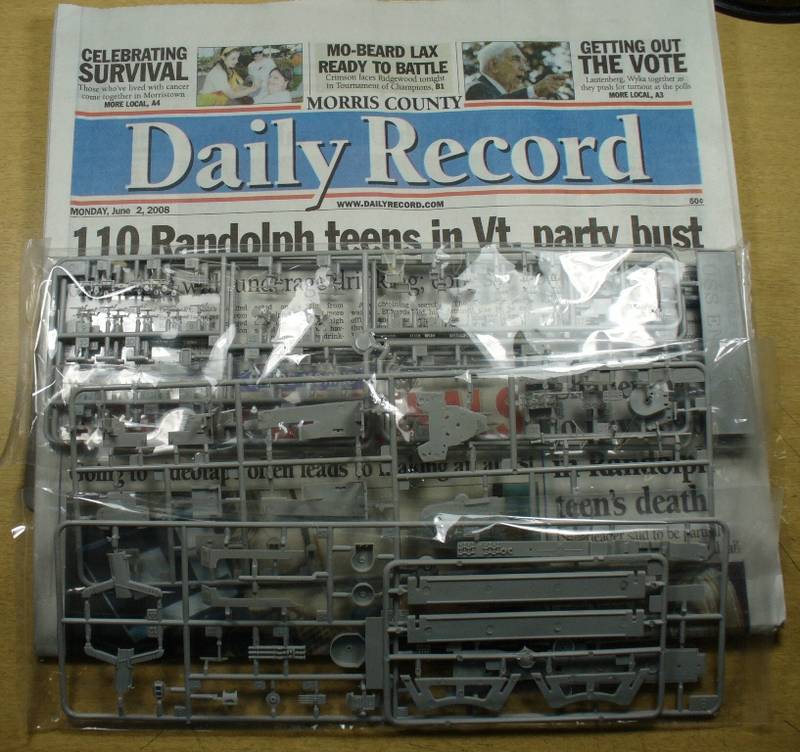
The hull:

The kits photo etched, and flags:

Tom's Photo Etched...... what did I get myself into?
BattleFleet Barrels.... these things are small!

Character is what you do when no one is looking.
Few things are harder to put up with than a good example.- Mark Twain
Make yourself an honest man, and then you may be sure that there is one less scoundrel in the world.--Thomas Carlyle
Zimbabwe
Joined: July 03, 2007
KitMaker: 3,529 posts
Model Shipwrights: 2,419 posts
Posted: Thursday, June 05, 2008 - 12:39 AM UTC
Dave,
Welcome! Good to see they let you off work for a while.

Grumpyoldman
_ADVISOR Florida, United States
Joined: October 17, 2003
KitMaker: 15,338 posts
Model Shipwrights: 981 posts
Posted: Thursday, June 05, 2008 - 12:44 AM UTC
Character is what you do when no one is looking.
Few things are harder to put up with than a good example.- Mark Twain
Make yourself an honest man, and then you may be sure that there is one less scoundrel in the world.--Thomas Carlyle
Pennsylvania, United States
Joined: July 13, 2004
KitMaker: 6,705 posts
Model Shipwrights: 4,704 posts
Posted: Thursday, June 05, 2008 - 12:57 AM UTC
Hi Dave!

Glad to see you made it, mate...nice looking batch of supplies, my friend, looking forward to seeing her progress!
~Gunny

"And all I ask is a tall ship and a star to steer her by..."
Ontario, Canada
Joined: September 15, 2005
KitMaker: 1,901 posts
Model Shipwrights: 934 posts
Posted: Thursday, June 05, 2008 - 05:07 PM UTC
Hi Dave,
Good to have you aboard!.... make sure you eventually take some well deserved time off!
Frank
Currently working on:
350th Hasegawa Nagato
350th Hasegawa Isokaze
England - South West, United Kingdom
Joined: August 07, 2004
KitMaker: 6,391 posts
Model Shipwrights: 67 posts
Posted: Thursday, June 05, 2008 - 05:56 PM UTC
Wow, that looks like some serious Photo-etch there Dave...
Luckily, appropriate medication should be at hand if needed..
Looking forward to seeing this progress.
Henk
The early bird may catch the worm, but the second mouse gets the cheese...
Lisboa, Portugal
Joined: February 28, 2002
KitMaker: 5,182 posts
Model Shipwrights: 4,070 posts
Posted: Tuesday, June 17, 2008 - 05:37 AM UTC
Hi Dave!
You have all you need to make it GOOD (time included: we have ONE YEAR!)
Please keep us posted on your progresses and if anything is needed to help, we are here too
Rui
Ship Modelers of the World Unite!
Grumpyoldman
_ADVISOR Florida, United States
Joined: October 17, 2003
KitMaker: 15,338 posts
Model Shipwrights: 981 posts
Posted: Sunday, July 27, 2008 - 08:04 AM UTC
Well, I actually managed to do a little on this campaign.

Decided to go for the waterline version. I glued the bottom plate on, CAed a few ounces of lead shot into the hull to add a little weight, then glued on the deck. I figured the weight would help me not knock it over too easily as I progressed along the build. I really don't know if anyone else does this, but it made sense to me.

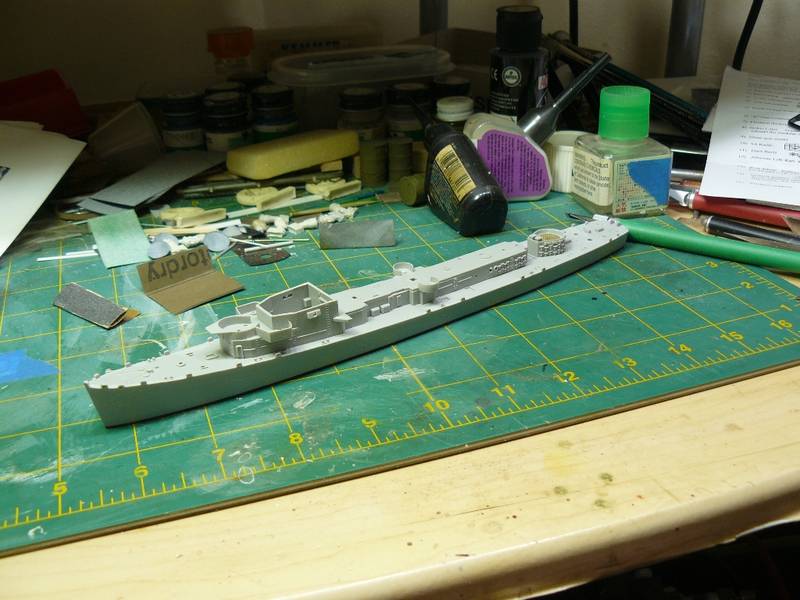
Started the deck houses, they are only placed in place right now, as I have some filling and sanding to do yet.
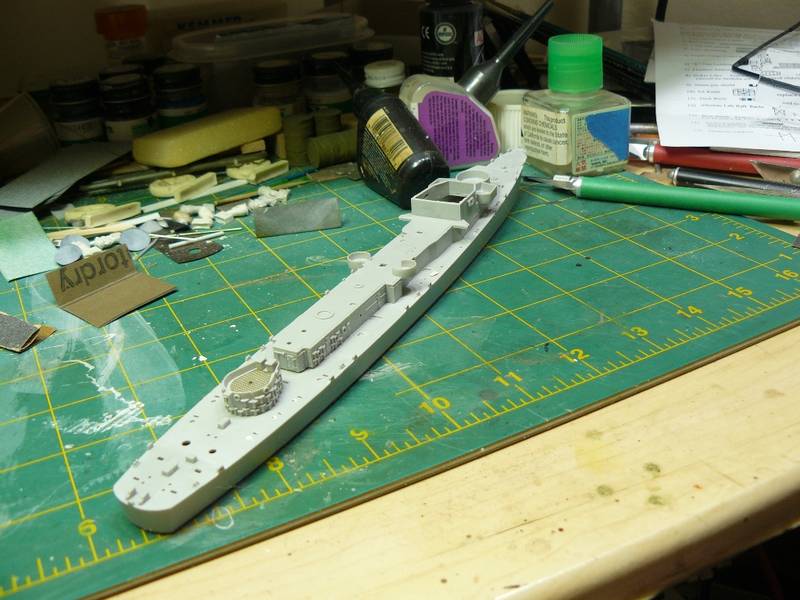
Another view.

My first piece of photo etched added.
I'm still wondering how the heck you guys deal with some of this stuff, as a few of the items on the sheets are as thin as a human hair, and it appears to me that simply trying to remove them from the frame is going to cause them to bend out of shape. I also just ordered TM's water tight doors set, and also his deck fitting set.
Have I turned into a photo etched demon?
Character is what you do when no one is looking.
Few things are harder to put up with than a good example.- Mark Twain
Make yourself an honest man, and then you may be sure that there is one less scoundrel in the world.--Thomas Carlyle

#027
Louisiana, United States
Joined: April 13, 2005
KitMaker: 5,422 posts
Model Shipwrights: 5,079 posts
Posted: Sunday, July 27, 2008 - 08:37 AM UTC
Very nice work Dave!
Kenny
"Hark, now hear the sailors cry
Smell the sea and feel the sky
Let your soul and spirit fly into the mystic
Nevada, United States
Joined: June 12, 2008
KitMaker: 552 posts
Model Shipwrights: 493 posts
Posted: Sunday, July 27, 2008 - 10:37 AM UTC
Nice job so far. And yes, you are now a fully fledged Photo Etch Demon.


The Water Tight Door set is most excellent, inner and outer doors as well as door frames. Don't worry too much about the tiny stuff, brass is very forgiving about being tweaked in and out of shape a few times before it gives it up. One of my favorite tools for working with the stuff is a pair of flat jawed square nosed mini pliers, not only does it do double duty as a straightening tool, you can use it to make simple 90 degree bends in parts. If you haven't already, find a chunk of tile like they use in the john on the walls, makes an excellent surface to cut PE on, just make sure to use a finger tip to hold the part down as you cut or you will be getting down on all fours with a light trying to locate parts that are looking for the Twilight Zone after being cut free and leaping off the bench.
I have been considering this kit for a while now, I will be watching to see how she goes together.
Jay Massey
treadhead1952
Las Vegas, NV
Lisboa, Portugal
Joined: February 28, 2002
KitMaker: 5,182 posts
Model Shipwrights: 4,070 posts
Posted: Sunday, July 27, 2008 - 12:56 PM UTC
Nice start here, Dave!
It's a matter of practice (the PE parts)... so when you get to the end of this project, you'll be a master of the thing!
Keep up
Rui
Ship Modelers of the World Unite!
Illinois, United States
Joined: February 23, 2006
KitMaker: 133 posts
Model Shipwrights: 128 posts
Posted: Monday, July 28, 2008 - 09:59 AM UTC
Nice work, Dave. PE looks great. Extra weight makes sense to me - can't really hurt. I really like your subject and am looking forward to more. Barry
Pennsylvania, United States
Joined: June 06, 2005
KitMaker: 1,602 posts
Model Shipwrights: 665 posts
Posted: Wednesday, July 30, 2008 - 07:06 AM UTC
looks good Dave.
Personally I dont know if adding weight is worth it. Does more damage if the model falls.
As for the PE good luck.
Im using the stuff more now and it still scales me.

Ontario, Canada
Joined: September 15, 2005
KitMaker: 1,901 posts
Model Shipwrights: 934 posts
Posted: Wednesday, July 30, 2008 - 03:08 PM UTC
Good start Dave, I look forward to seeing further progress.
Frank
Currently working on:
350th Hasegawa Nagato
350th Hasegawa Isokaze
Putrajaya, Malaysia
Joined: March 04, 2004
KitMaker: 2,511 posts
Model Shipwrights: 89 posts
Posted: Wednesday, July 30, 2008 - 03:52 PM UTC
Hi Dave,
it's good to see your work again.
May i know is the hull comes prepainted?? I saw in the pic the bottom hull is painted.
Good luck Sir!
The more i know, the less I understand!!!!
Grumpyoldman
_ADVISOR Florida, United States
Joined: October 17, 2003
KitMaker: 15,338 posts
Model Shipwrights: 981 posts
Posted: Wednesday, July 30, 2008 - 05:26 PM UTC
Quoted Text
May i know is the hull comes prepainted?? I saw in the pic the bottom hull is painted.
No Zaidi, it wasn't pre-painted. The lower hull and flat water line bottom come molded in a dark red plastic.
Character is what you do when no one is looking.
Few things are harder to put up with than a good example.- Mark Twain
Make yourself an honest man, and then you may be sure that there is one less scoundrel in the world.--Thomas Carlyle
Putrajaya, Malaysia
Joined: March 04, 2004
KitMaker: 2,511 posts
Model Shipwrights: 89 posts
Posted: Thursday, July 31, 2008 - 08:35 PM UTC
Quoted Text
Quoted Text
May i know is the hull comes prepainted?? I saw in the pic the bottom hull is painted.
No Zaidi, it wasn't pre-painted. The lower hull and flat water line bottom come molded in a dark red plastic.
thanks mate.... never knew they made from different color these days....
The more i know, the less I understand!!!!
Nordrhein-Westfalen, Germany
Joined: May 26, 2008
KitMaker: 1,168 posts
Model Shipwrights: 676 posts
Posted: Friday, August 01, 2008 - 12:35 AM UTC
You gotta loves those DEs!
Somebody please enlighten me what all those "sticks" around the aft stuctures are. K-gun bars?
AKA "Tailor" -VMF'06 - German Gamblers
http://www.youtube.com/channel/UCk8zhb1sc4Pe3BRLqq3d-SQ
New Jersey, United States
Joined: October 18, 2007
KitMaker: 1,698 posts
Model Shipwrights: 1,514 posts
Posted: Monday, August 04, 2008 - 12:37 PM UTC
Grumpyoldman
_ADVISOR Florida, United States
Joined: October 17, 2003
KitMaker: 15,338 posts
Model Shipwrights: 981 posts
Posted: Monday, August 04, 2008 - 03:30 PM UTC
Quoted Text
You gotta loves those DEs!
Somebody please enlighten me what all those "sticks" around the aft structures are. K-gun bars?
I think they are the spigots for the depth charge launchers, but don't bet the kids on my answer!
Character is what you do when no one is looking.
Few things are harder to put up with than a good example.- Mark Twain
Make yourself an honest man, and then you may be sure that there is one less scoundrel in the world.--Thomas Carlyle
Nordrhein-Westfalen, Germany
Joined: May 26, 2008
KitMaker: 1,168 posts
Model Shipwrights: 676 posts
Posted: Monday, August 04, 2008 - 07:56 PM UTC
Quoted Text
..., but don't bet the kids on my answer!
Aye!
AKA "Tailor" -VMF'06 - German Gamblers
http://www.youtube.com/channel/UCk8zhb1sc4Pe3BRLqq3d-SQ
Grumpyoldman
_ADVISOR Florida, United States
Joined: October 17, 2003
KitMaker: 15,338 posts
Model Shipwrights: 981 posts
Posted: Sunday, August 17, 2008 - 04:46 PM UTC
OK, managed to get a little more done, I realized I needed to do some filling of holes etc on the deck for the photo etched parts, so spent some time filling and sanding the holes. (Next time it would probably be easier to do this before attaching the deck to the hull, so I could back up the filler with tape or some plastic card)

The deck houses are not glued yet, just fitted so I can add the WT doors and ladder rungs easier.
Now for the dumb questions--- these rungs, do you guys normally replace them? If yes what do you use? I have some .006 brass wire, and some .003 copper wire on hand, or do you guys simply use the photo etched ladders in the photo etched set? If you use wire, how do you keep them alined, and straight? 
Character is what you do when no one is looking.
Few things are harder to put up with than a good example.- Mark Twain
Make yourself an honest man, and then you may be sure that there is one less scoundrel in the world.--Thomas Carlyle
Nordrhein-Westfalen, Germany
Joined: May 26, 2008
KitMaker: 1,168 posts
Model Shipwrights: 676 posts
Posted: Monday, August 18, 2008 - 02:11 AM UTC
Dave!
Certainly the most impressive method will be to create real rungs.
That .006 brass will be a bit over scale, but the .003 copper will be delicately soft and may be too easily damaged. If I were you I'd use the brass (There! I said it).
This is what I did on my 350th Austrian Torpedo boat (and what I will do along the mast of my Leipzip in the Community contest):
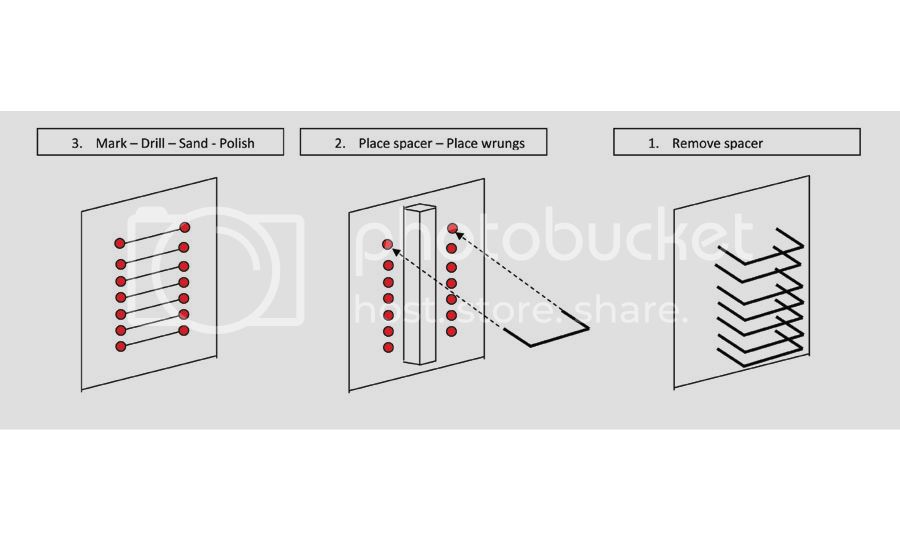
I use a needle to make an indentation at the rung's ends. Take a pin wise to drill holes on each end of the rungs. The hole should fit the brass rod you'll be using for rungs. If the alignment of all holes in 2 (almost) straight lines is good I sand away the plastic rungs and polish the surface.
Create a mandrel in desired width to bend the brass rod into desired width (i.e. the distance of the holes for one rung you had just drilled). Now take .75mm to .8mm square rod a good bit longer than the intended ladder. You may fix this Spacer between the 2 lines of holes with the tiniest amount of Elmers on one end to keep it temporarily in place.
Apply a bead of Elmers to each end of the rungs in insert it into the hole. Leave the spacer in pace until the glue has fully dried. Untill fully dry you can move the rungs into place. Finally remove the spacer.
It is a lot of work and it is time consuming and demanding, but the result is worth the effort IMHO. I hope this helps.
AKA "Tailor" -VMF'06 - German Gamblers
http://www.youtube.com/channel/UCk8zhb1sc4Pe3BRLqq3d-SQ
Grumpyoldman
_ADVISOR Florida, United States
Joined: October 17, 2003
KitMaker: 15,338 posts
Model Shipwrights: 981 posts
Posted: Monday, August 18, 2008 - 10:46 AM UTC
Thanks Guido for the help.
Character is what you do when no one is looking.
Few things are harder to put up with than a good example.- Mark Twain
Make yourself an honest man, and then you may be sure that there is one less scoundrel in the world.--Thomas Carlyle
Nevada, United States
Joined: June 12, 2008
KitMaker: 552 posts
Model Shipwrights: 493 posts
Posted: Monday, August 18, 2008 - 01:56 PM UTC
Looking pretty good there Dave.
I will admit to cheating on my build of the USS Baltimore as far as the rungs on the sides of the quad mount towers, I just used some chopped up sprue and the Mark One eyeball, but then it is in 1/700 scale, be pretty hard to do justice to spacing on such a small item there. But it does look like Guido has come up with a pretty good solution to your dilemma. Can't wait to see more as you go.
Jay Massey
treadhead1952
Las Vegas, NV