_GOTOBOTTOM
General Ship Modeling: Super-detailing
Topics on photo-etch, metal-parts, and all types of additional detailing.
1/700 Scale IJN Oyodo Light Cruiser
treadhead1952
Visit this Community
Nevada, United States
Joined: June 12, 2008
KitMaker: 552 posts
Model Shipwrights: 493 posts
Posted: Wednesday, February 24, 2010 - 05:04 PM UTC
Hi All,

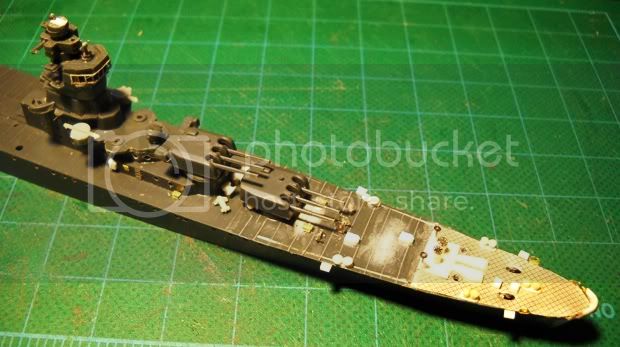
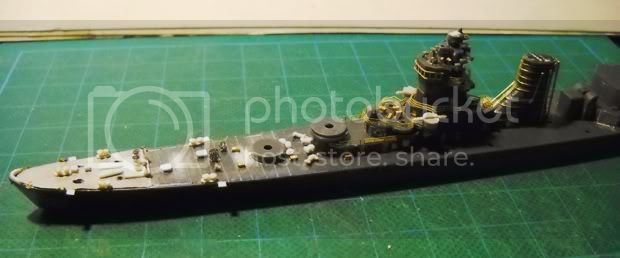
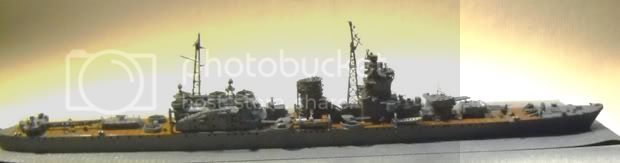
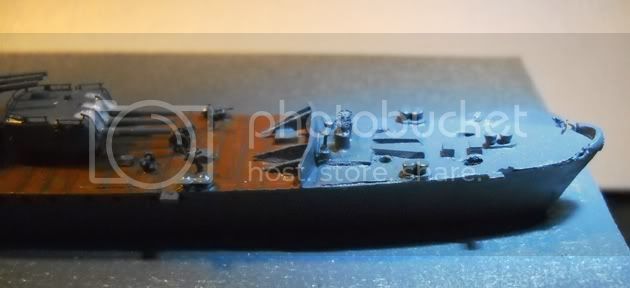
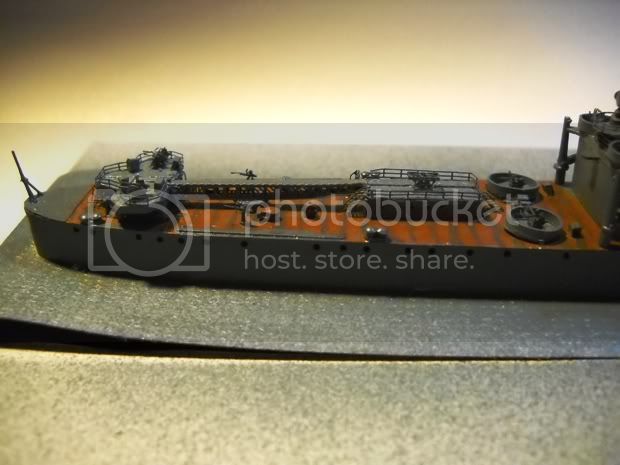
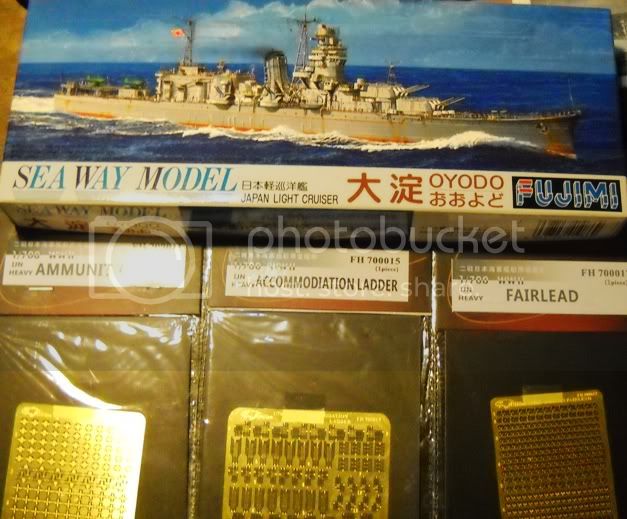
With the slowing down of my build of the Z Class Destroyer, I have decided to get started on my next project in the ship line. As the title suggests, this will be the Fujimi 1/700 scale IJN Oyodo Light Cruiser. This is an older kit and as such it does lack quite a bit of detail that newer model kits carry. But just because it is an oldie doesn't mean that it can't be reworked to make for a nicely detailed finished project. These older kits are somewhat simplified as to the parts they contain so that they might appeal to a larger cross section of modelers and they are less expensive as well.


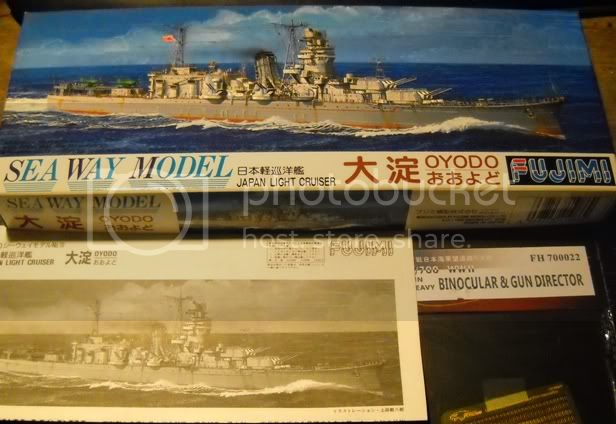
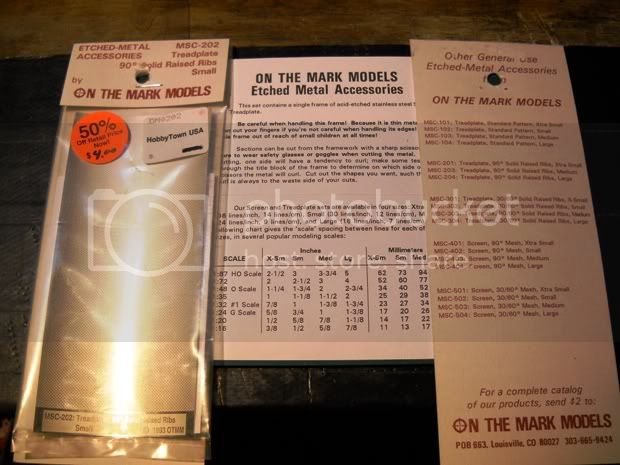
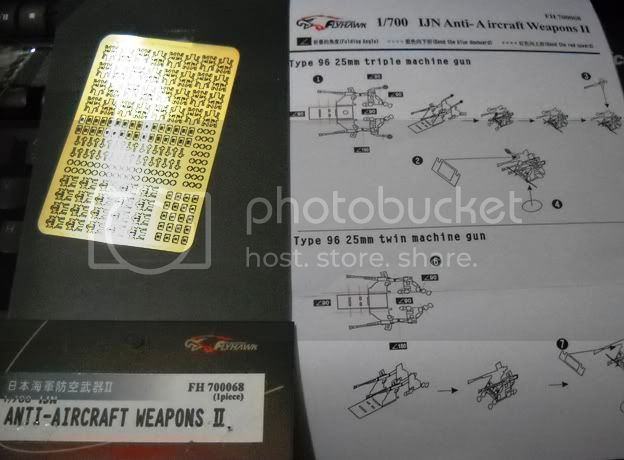
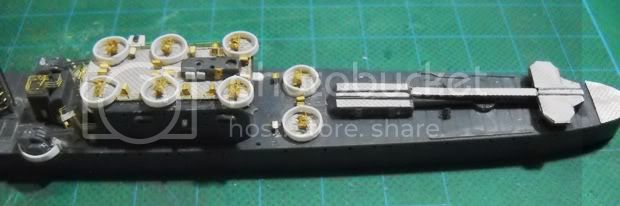
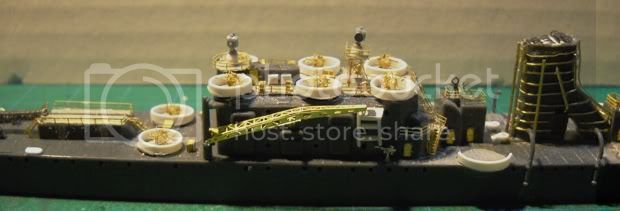
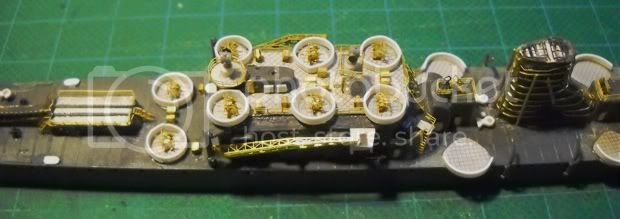
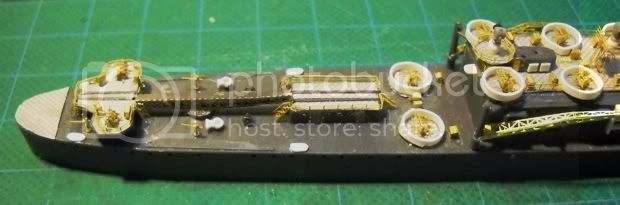
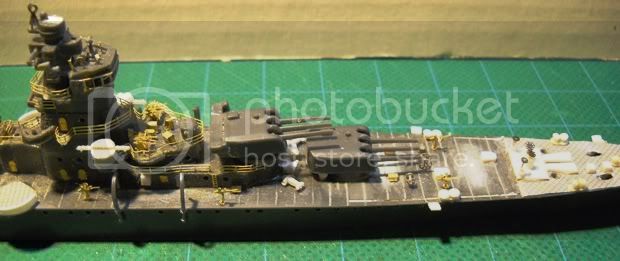
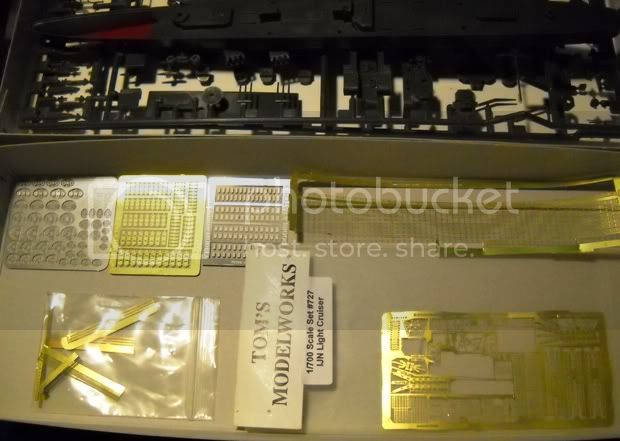
I have found a few new Photo Etch sets from Flyhawk to help me add some new life to this one. These were obtained through E Bay, the four in question are sets FH 700011, IJN Ammunition Boxes; FH 700015, IJN Accommodation Ladders; FH 700017, IJN Fairleads; and FH 700022, IJN Binoculars and Gun Directors.


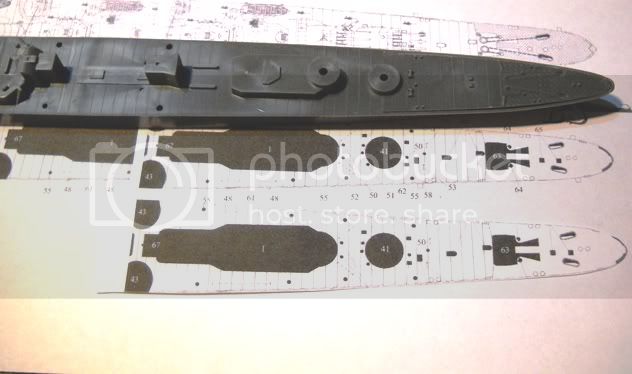
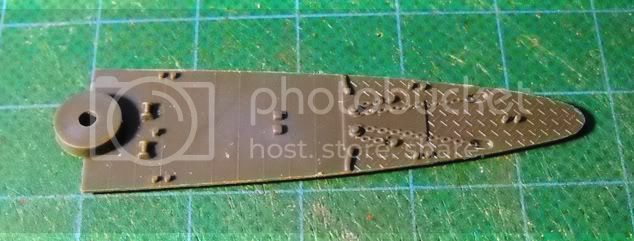
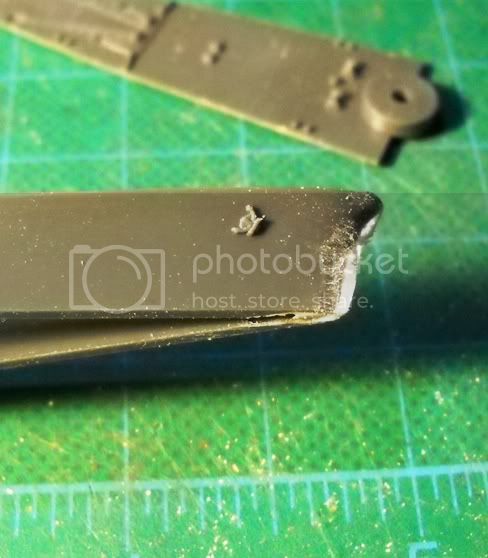
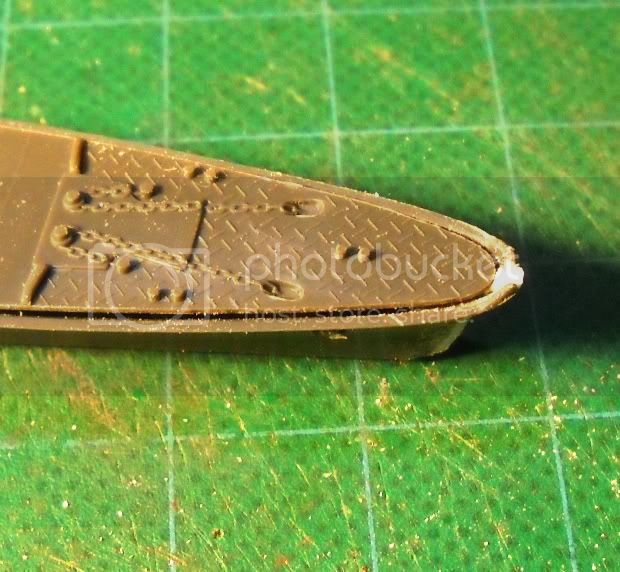
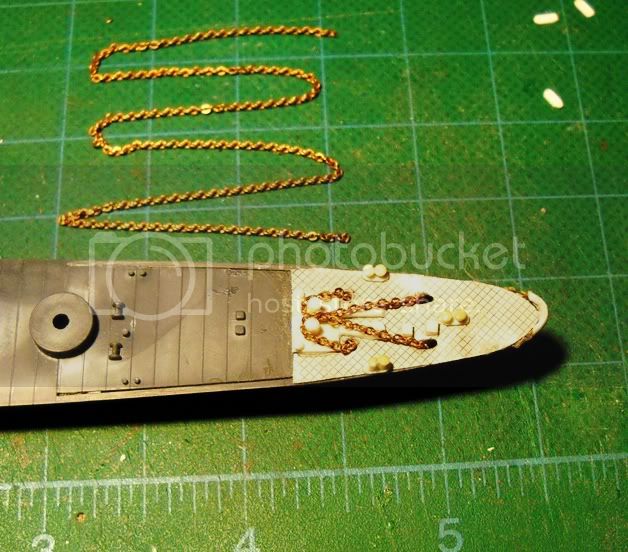
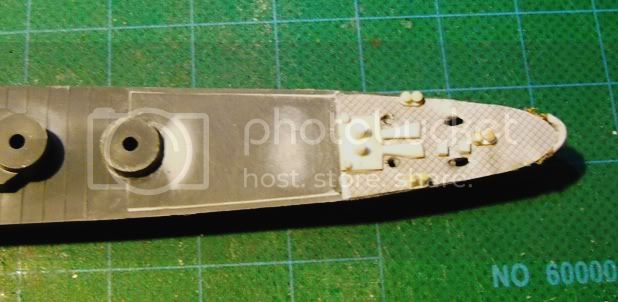
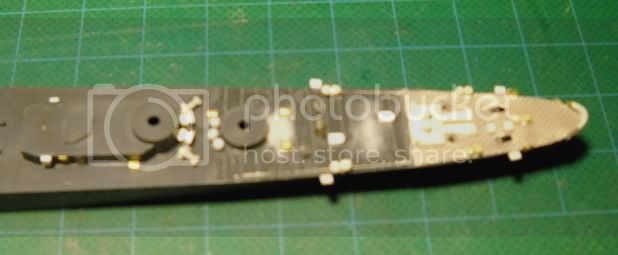
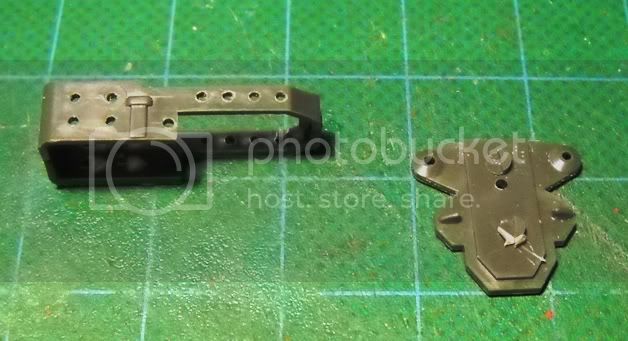
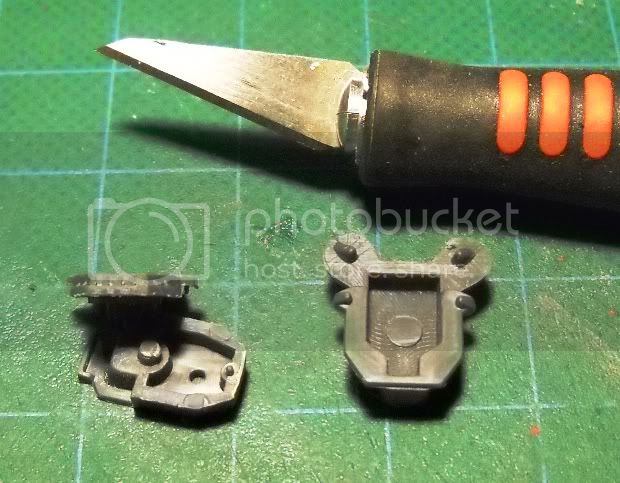
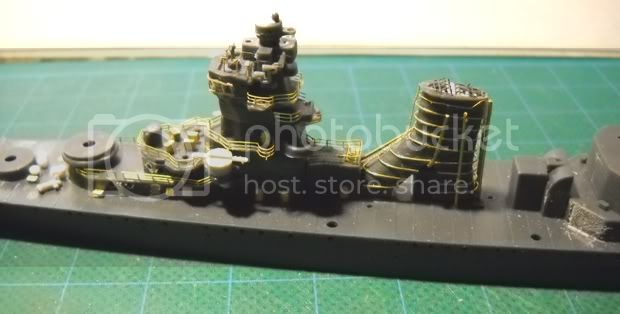
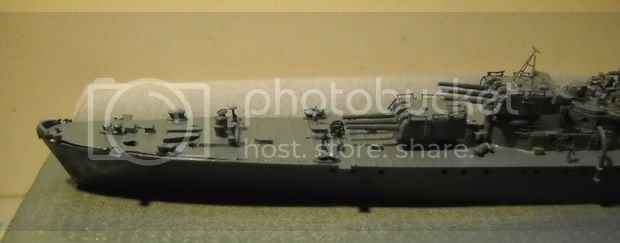
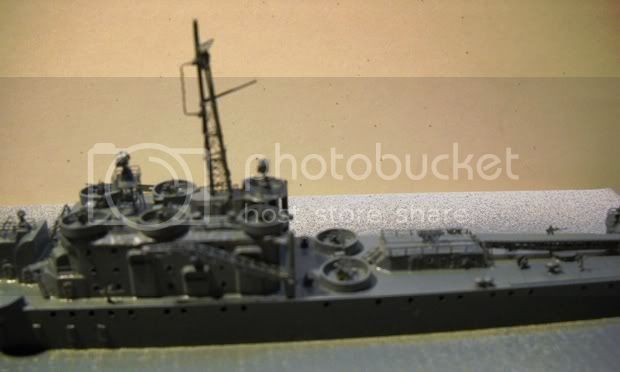
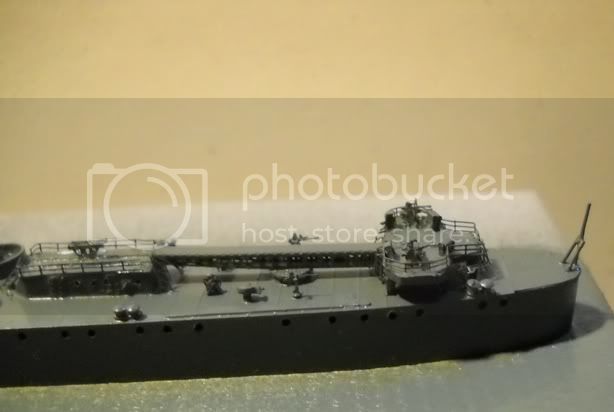
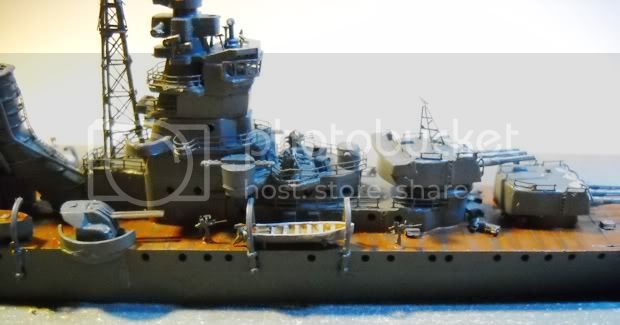
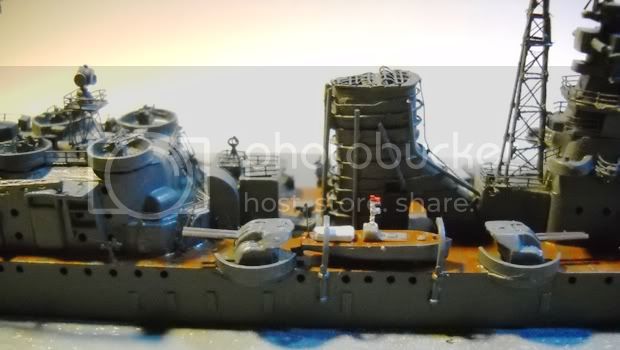
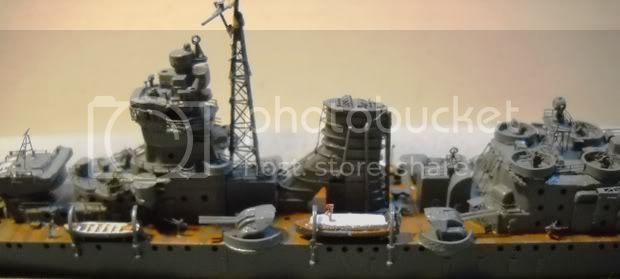
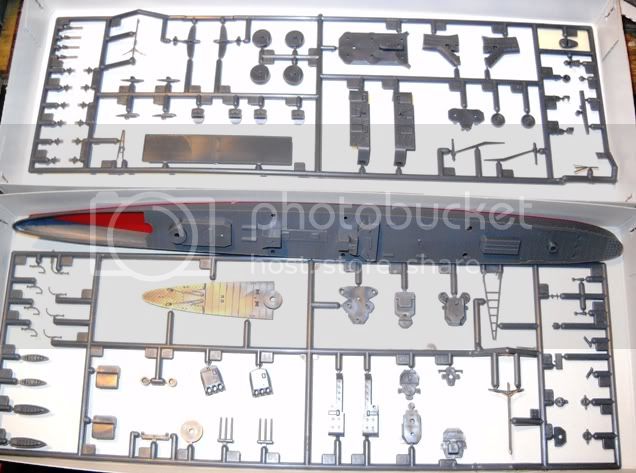
The basic kit looks like this when you open the box, two large frets in one plastic wrapper hold all the small pieces and the main lower hull and bottom plate are in a second plastic wrapper. They also include a weight to be glued to the bottom plate as well as a pair of ensigns and a section of window material printed on a paper sheet. I have quite a nice little stack of these saved up from various model kits as I never use them and have other methods of working those details out. Looking closely at the hull section you can notice that the deck details are rather simplified, they don't even include fairleads any where, hence the Flyhawk detail set. The ladder ways are the old "Aztec Temple" Steps where added, these will get replaced. They do have some molded on details here and there but there is a lot more that can be added to bring it up to snuff.


In addition to the Flyhawk pieces I will be adding some White Ensign, Toms' Modelworks and Gold Medal Models Photo Etch parts to the mix. Doors and Hatches, Ladderways, Railings, Air Craft Catapults, Rigging Tower, and various other small parts that either absent or take the shape of some heavily molded pieces. As I work my way through this one, you will get to see where I add these parts and how I remove the originals or substitute PE for the kit pieces.


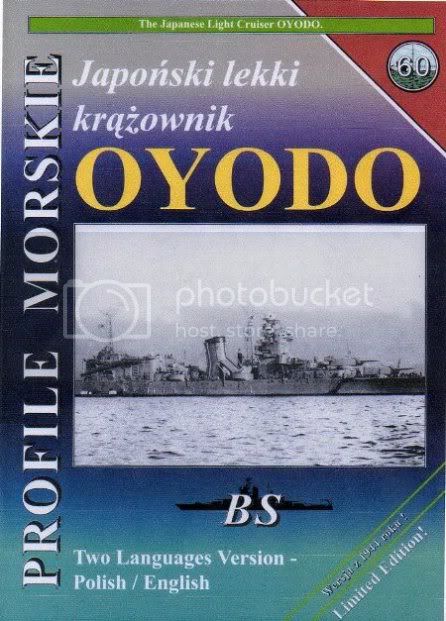
I have a couple of references to use to assist in parts placement and take some of the guesswork or study of the box art to answer questions. The most used one from my experience will be a Morskie Monograph #60 on the ship, the one I dug up is from my reference library, but these are available from White Ensign Models online and other sources. The newer ones are printed in Polish and English to make it a bit easier. They are an invaluable resource as the art work includes blown up drawings of most of the smaller details as well as 1/400 scale three page drawings of the side and overhead views of the ship as it looked in 1944. There is even a splendid full color drawing of the ship in overhead and side view.


So stay tuned as I have a ball with an older kit in the small scale.
DMcGillavry
Visit this Community
Istanbul, Turkey / Türkçe
Joined: July 15, 2006
KitMaker: 104 posts
Model Shipwrights: 102 posts
Posted: Wednesday, February 24, 2010 - 10:10 PM UTC
Hello Mr.Massey,

Here at start, I would like to remind Mr.Jeff Linn's refining build for his OYODO. Probably you are aware of it but besides your sources, may helps and gives some ideas. Consisted of five articels, please check all, :

http://blog.roodo.com/duroyal420/archives/cat_12713.html&page=4

Regards
Serhan
treadhead1952
Visit this Community
Nevada, United States
Joined: June 12, 2008
KitMaker: 552 posts
Model Shipwrights: 493 posts
Posted: Thursday, February 25, 2010 - 05:27 AM UTC
Hi Serhan,

Thanks for the link to Jeff Lins' excellent build articles on the Oyodo. I saw the build on the Modelwarships' site and it prompted me to want to try my hand at this short lived but active light cruiser. From stem to stern, there are a host of improvements that can be added to this old kit and I think that Jeff probably hit on most of them.

A bit of history on this ship, it was originally intended to be the class leader of an 8 ship group and an improvement on the Agano class. As it turned out due mostly to the fortunes of war the Oyodo and Niyodo were the only two actually named with the building of the Niyodo canceled when the sudden and obvious need for aircraft carriers in the fleet was realized. Originally intended to be the flagship of submarine scout groups it was designed to carry the E15K1 Norm float planes with an aft mounted hangar and large heavy duty catapult system. Its' main armament were a pair of triple 155mm turrets forward much like the HMS Nelsons' design. These turrets were made surplus when the Mogami class heavy cruisers were upgraded to twin 203mm main guns. Intended to be dual purpose weapons, anti shipping and anti aircraft, the limited elevation of 55 degrees and relative slow firing, 5 to 6 rounds per minute, prevented them from being realized in their anti aircraft role. This did not preclude them from being fine anti ship weapons however. Combined with 4 twin mounted 100mm sets and several single and triple 25mm AA guns, the ship was launched on the second of April 1942 and completed on February 28, 1943. Due to the weight of the aircraft and related handling equipment it was decided that the ship was not destined to have any torpedo mounts, sort of a singular omission from most other IJN combatants.

She was sent to Truk to join the fleet there. Her first mission was a resupply operation to Rabaul and Kavieng then she was made the flagship of Admiral Ozawas' Third Fleet. Allied operations advancing rapidly in early 1944 caused the ship to be sent from Truk to Palau and then on to Singapore along with other heavy units of the fleet to avoid loss. During the transit from Palau to Singapore she was part of the battleship Musashis' escort when that ship was torpedoed and damaged by the US Submarine Tunny.

The E15K1 Float Plane program was a problem child for the IJN, the aircraft suffered from design faults and poor performance of float planes when engaged by fighter units the Oyodo only ever received two of them at any one time with only six of the aircraft being operational at Palau. After completion of only 15 units the program was shelved and the more proven E13A1 Jake Float Plane was provided for the ship. As a result of this the ship was refitted in March of 1944 with a lighter standard catapult and her hangar was refitted to provide accommodations for her new role as flagship of the Combined Fleet. In addition to these changes six more Type 96 triple 25mm and 11 more single mount 25mm guns were added to provide a more robust AA compliment bringing her total count to 47 25mm barrels. A Type 22 Search Radar system was also added.

In October 1944 the ship was sent to the Philippines as part of Admiral Ozawas' Northern Force of decoy Aircraft Carriers, her E13A1 Jake's providing antisubmarine and reconnaissance patrols as none of the carriers had any aircraft at this point. At Cape Engano under ferocious attack by Admiral Marc Mitschers' Task Force 38 she suffered a bomb hit that damaged her number 4 boiler room and later in the morning she took part in her most famous operation, the transfer of Admiral Ozawas' flag from the sinking carrier Zuikaku. Retiring from the battle she led the remnants of the Northern Force back to Japan.

The ship took part in operations around the Philippines, Brunei and Camranh Bay and while other ships in her attack forces were damaged or sunk outright, the ship was relatively unscathed. In February 1945 she loaded up in Singapore with 300 tons of critical war supplies and successfully ran the gauntlet of US Naval forces in the area returning to Japan to Kure Naval Base. That was her last operational use. She was at Kure when aircraft from Task Force 58 sortied to attack the remaining Japanese Fleet in March 1945. She suffered three bomb hits and was towed and beached at Etajima. It was here in July of 1945 when under attack from Task Force 38 aircraft that she succumbed to bomb hits and capsized where she remained for the rest of the war. In September of 1947 the wreck was raised and towed back to Kure where she was scrapped less than five years after she had been built in the same place.
treadhead1952
Visit this Community
Nevada, United States
Joined: June 12, 2008
KitMaker: 552 posts
Model Shipwrights: 493 posts
Posted: Friday, February 26, 2010 - 12:56 PM UTC
Hi All,

After going to Jeff Linns' site and studying the photos and reading what little English printing he had attached then consulting my Morskie Monograph and the GPM 1/200 scale paper model kit I had in my stash, I came to the same conclusion that he did, the bow is not properly shaped. To get around this he has a simple enough remedy, cut the bow at the pointy end and add a section of styrene sheet to widen it a bit to get the proper shape. He probably told what thickness he used in his text, but unfortunately it is in Oriental Symbols and I couldn't spot any numbers to indicate it. Taking a clue from his build log, I did a bit of manipulation in the Adobe Reader printing program and printed out a 1/700 scale sized set of plans from the Morskie Monograph. Comparing it to the hull and forward deck insert from the kit, I would have to say that it is pretty close as the major components seem to be in the proper places.


Before anyone gets the idea that a complex formula was required to arrive at the proper printing size ( it wasn't), all I did was select "print" from the Adobe Reader. I saved the scans from the book as a PDF file for the pages I was interested in first. When I selected the print option from the Reader, I chose to make the printouts as two pages printed on one, selected the pages and let the printer cough up a copy. The lower copy is a section I cut out with a pair of scissors which will get sectioned up further to give me the shape I need as a pattern to cut out the brass tread plate and anchor windlass and chain plate sections. Another bit of magic that I garnered from Jeff Linns' excellent build up.

Piotr Wisniewski and Gregor Nowak, the authors of the Morskie Monograph on the ship and series of books are masters when it comes to reproducing the drawings for the series. I stand in awe of their abilities and have used these books on a number of models to guide me in adding details and making corrections in kits for a long time. While some may argue that there are errors here and there, that is just fine by me. They do their best to provide a superior product and it makes my projects look better than I could by following the kit instructions by a long shot. Since making myself happy with a project is my main goal, it all works out for me.

So stay tuned as I accumulate more tricks and tips from as many sources as I can find, I will post where I get them as I run across them so you can check them out as well. I will also post the progress shots of what I am doing as I go along.

The history and tabular record of movement of the ship as well as specifications comes from the Wikipedia article on the ship and the Nihon Kaigun site here.

http://www.combinedfleet.com/

It contains many references to all sorts of Imperial Japanese Navy ships and systems as well as articles of interest.

Jeff Linns' excellent build articles that he has on his site can be tracked down through Serhans' post above.

The GPM Paper Model 1/200 Scale Kit of the Oyodo that I got came from the Paper Model Store at this location on the net.

https://www.papermodelstore.com/index.php

I have used his store to procure many paper ship model kits and his service is excellent and prices are quite fair. Since he is in Chicago, his shipping rates are much better than what you can expect to pay over European and Asian stores for the same products.

And just in case anyone is interested, I obtained my kit from Squadron Mail Order a few years back. There are many sources listed on the forum here as well so locating one shouldn't be a real problem.
treadhead1952
Visit this Community
Nevada, United States
Joined: June 12, 2008
KitMaker: 552 posts
Model Shipwrights: 493 posts
Posted: Tuesday, March 02, 2010 - 05:19 PM UTC
Hi All,

Starting at the bow end of things I took a shot of the original bow insert as issued just in case I wanted to refer back to it for any items of interest. When ever making radical changes to things, it is always nice to have a nice clear image in case you need it for later purposes. According to the Morskie Monograph and Jeff Linns' build up, radical is about what it entails.


The first thing required was to widen the prow of the ship, I finally settled on a piece of .060 styrene sheet as my filler material to add the look I was after. There are also a set of molded on anchors that will be getting removed as I intend to open up their locations so I can install a pair of Photo Etch Anchors in more realistic looking hawse pipes.


A trial fitting of the original part in the opening in the hull showed how much room was added by inserting my spacer. This also required putting in a couple of support strips on the inside of the hull as the original molded areas where the bow insert is supposed to join is now pretty much useless except at the very rear of the opening. I also created a step in my piece of .060 sheet stock so that the front tip of the insert would have something to get glued to.


The next thing was what to use to create the needed tread plate surface. Jeff used a Lions Roar product but unfortunately all I could come up with was some On The Mark Models small 90 degree tread plate material from the HT USA shop locally. It comes in a sheet 5 1/2 inches by 2 1/2 inches which has a slight bow in it from manufacturing. When cutting, it develops it's own little bow but by rolling over it with a round Xacto Hobby Knife handle while the part is laid on the yielding surface of a mouse pad, that was flattened out. Once made this piece was super glued down after removing all the surface detail from the area where it was to mount.


I also started making up the other pieces that I would need such as the bollard mounting plates, there are nine of them required for this according to the Morskie Monographs' line drawing of the ship. To make them, I selected a strip of styrene strip .015 X .060 and chopped out sections then rounded the ends off with a sanding stick. Since the hull form is completely devoid and the bow insert piece has three pair of bollards without the plates this seemed like a worthwhile improvement. To make the upright parts I used a piece of styrene rod in the smallest size from Evergreens Styrene Rod and Tube Assortment pack. After installing the sections of rod on the plates and supper gluing them down to the tread plate I used a heat source to mushroom the tops of all of them to look like the bollards' shape. To make up the chain plates and capstan mounting plate I used some sheet styrene in .015 thickness for the capstan mounting plate and two sections cut from a piece of .015 X .060 strip for the chain plates. All this was super glued to the tread plate section. The heads of the capstans were from some larger bits of styrene rod from the Assortment Pack as well as the bases for the control wheels for the capstans. I also had a pair of small hatches that were on the drawings that needed to be put on, these were from some more styrene strip, in this case, .030 thickness. Next came drilling out the holes for the anchor chain. To make the oblong shaped holes leading to the hawse pipes, I used two holes drilled side by side and then a hobby knife tip and round mini file to open the area up and add the shape. The other two holes were drilled in leading to the chain lockers and then opened up with the round mini file a bit so the chain could pass through. I selected some 27 link per inch brass chain from Model Shipways to use for my anchor chain. This won't be attached until after the hull gets painted and the chain will then be blackened with some Blacken It also from Model Shipways. For illustration purposes, here is where I got to with all this so far. There will also be some cable reel ends from one of my Photo Etched Cable Reel sets that I will be using for the tops of the capstans and the control wheels for the capstans a little later, but due to the handling of things for now, these small parts will be left off.

I also added the first set of Fairleads just behind the raised part of the bow where the Imperial Chrysanthemum is mounted. There are another set just a little further aft as well as a set of sounding platforms that set out from the sides of the hull. Once the fairleads were installed I used a needle as an applicator and ran a bit of white glue over the surface to give them the rounded shape that they had. All of this will be more apparent later once painted as the white glue dries clear.


There are a number of other details that will get worked over as I move aft on the hull. Some of the molded on details that come on the kit will be removed, some replaced and others that are incorrect will just be left off. According to my references there are a number of hatchways that have not been placed, where there are two cable reels just ahead of the forward main turret, there is supposed to only be one. Lots of little changes that are just improvements on an older kit to bring it up a notch or two.
treadhead1952
Visit this Community
Nevada, United States
Joined: June 12, 2008
KitMaker: 552 posts
Model Shipwrights: 493 posts
Posted: Thursday, March 04, 2010 - 04:54 PM UTC
Hi All,

Tinkering my way through the weekend has seen a bit done to the Oyodo.I back filled the two spots where I removed molded on kit parts to the bow section and filled the now opened up sides where widening the hull at the prow left gaps. I used Squadron White Filler Putty for this task as it dries quickly and is easy to sand down. Of course, all this left some of the linoleum hold down lines in a sad state and the design of this area also left these lines off the upper edges of the full hull form where the insert went. To fix this I sanded them down all the way to the forward turret so I had a relatively smooth area and then stretched out some heated sprue to replace the hold down strips, adding them with Testors' Liquid Cement.


Next up came replacing all the detail I had removed as well as adding the missing bits that I gleaned from the Morskie Monograph drawings. These included the two prominent hatchways shaped like a stretched "D" shape, the 20MM single mount Ammo ready lockers from the Flyhawk IJN Ammo Locker set, three round shaped forced air vents at the rear of the forward turret mount, two more that had a bit stranger shape at the forward part of the second main turret mounting and a pair of "towed fish" at the outer areas of the second mount on the deck. The shapes of the two odd vents were gleaned from the Morskie Monograph illustrations and made up by sanding at a stick of styrene to get the curved back sections then a round mini file worked in the curved surfaces. A bit of careful cutting with the hobby knife and mounting them on some smaller styrene rod glued to the deck was all that took. The two towed fish were made up from a set of four half shapes from one of my Sky Wave Extra IJN Equipment sets.

Working out the cable reels required looking over the Morskie drawings a little more carefully. I discovered that there were actually three and not one. All three are different sizes and were made up from White Ensign and Eduard PE Sets. Making these up led me to a little discovery about making these tiny things up. Wanting to have axles that ran through the mounting holes in the bases as well as the center holes of the reel ends, I had tried wire. But as the wire is uniform in shape it was a bit of a task to keep everything in place and apply CA to lock them in the proper locations. I tried a bit of stretched sprue instead. As stretched sprue is naturally tapered even in a tiny size, if you place one end through the first open mounting hole in a base then thread the two reel ends on, you can then feed the free end of the sprue through the other hole of the base and then draw the sprue through until it wedges the widest part at the beginning side. Applying a tiny drop of CA at that point to lock one end down and one cable reel side to the same end then letting it dry, you can then trim it off even. Repeat the process on the smaller diameter side of the reel base and letting it dry then trim it off even with the outside of the base and I wound up with a set of cable reels that can be later wrapped with different colored threads to represent the hoses and cables after painting overall is done.


At this point I was ready to start working on the forward bridge. Drilling out the port holes in the sides was first then came adding the various levels. Looking at the underside of some of the levels revealed where there were supposed to be some support shapes. On the real ship these were angled shapes of steel sheet that had holes bored through to lighten them. Lions Roar makes a set of PE Perforated Angle Bracing in several sizes that can be added after removing the cast on parts.


Continuing on with the construction of the forward structure also brought up adding some parts from the kit and Sky Wave Equipment sets to replace some of the funkier looking kit pieces. To add the bridge window section I turned to a section of 1/400 Ships Ladder after gluing the tower shapes one atop the other. There is a lot more detailing to go on here with railings, ladder ways, range finder binocular sets and other small parts but I couldn't resist building up the two forward main turrets so I could check out how they would allow fitting some of the railings and seeing what sort of modifications I would have to do with them in place. So here is where my weekend of hard work at the bench got me.


treadhead1952
Visit this Community
Nevada, United States
Joined: June 12, 2008
KitMaker: 552 posts
Model Shipwrights: 493 posts
Posted: Thursday, March 11, 2010 - 05:03 PM UTC
Hi All,

Having gotten another weekend off as well as a few evenings to tinker at my Oyodo some more, here is a little update on my progress.

Once I got the superstructure up and running it was time to add a few details like the railings, ammo boxes, spotting and ranging binoculars, a few more hatches and doors as well as a couple of modifications. The ammo boxes were from the Flyhawk set and positioned around the forward triple mount locations aft of the "B" Turret. The railings are all from Tom's Modelworks IJN Railings and the binoculars atop the main bridge were more Flyhawk parts. I included a pair of Double Ranging Horns from one of my Sky Wave Extra Equipment sets and moving further aft opened up a hole in the roof of the main engineering deck house. A set of stairs with side rails from the Flyhawk set of ladders was inserted in the hole and then some more Tom's Modelworks railing added around the opening and then more added all around the top of the engineering deck house edge. A few more doors were added to various bulkheads according to the Morskie Monograph as well as a few porthole openings drilled in.

Next came the funnel. I chose to use some .010 copper rod to replace the molded on shapes and then went to .020 copper rod for the steam vent piping. This was also a good time to fill in the two sinkholes on either side of the funnel from the molded in alignment pins. I will be robbing some terminal fittings from the Sky Wave Extra Equipment sets later to top those off. All the copper rod comes from the Special Shapes Co. line of brass and copper. A ladder up the front of the funnel comes from the Tom's Modelworks IJN Railing set. I whittled out the top of the funnel with a sanding stick and drills then refilled it with sheet styrene baffles and then topped it off with some Photo Etch Stainless Steel bits from Eduard's IJN Extra Equipment fret. A final extra was the addition of some styrene rod supports underneath the positions of the large range finders on the third deck, trimmed to fit at an angle. All these little parts and additions makes things look considerably busier.


For the next bit of work, I will be adding some of the triple 25MM gun mounts from Flyhawk's IJN AA Weapons set II. These are easy to build up, mostly requiring folding and the addition of a extra center gun to improve on the molded kit parts. They also have twin 25MM mounts on the same fret.


To improve the look of the kit molded gun mounts that are located atop the hangar and just aft of it as well as the two 100MM twin mounts I require some more of the tread plate. This material is round shaped for these positions and was easy enough to make up by just punching the shapes and sizes with some hollow punches and a bit of filing on the bottoms of each to smooth them out. There will also be splinter shielding made up from thin styrene strips applied around the rear most mounts as well as the larger 100MM mounts. I will be trimming the overhangs off the molded kit parts to add to those rather than trying to fill the areas with putty or something. More of the Flyhawk Ammo Boxes will also be used to dress these positions up some more for the 25MM triples as well as more for the 25MM single mount positions.


So that is where I am at for the moment, more work to do in the coming week, something to look forward to after the salt mines each day.
#027
Visit this Community
Louisiana, United States
Joined: April 13, 2005
KitMaker: 5,422 posts
Model Shipwrights: 5,079 posts
Posted: Saturday, March 13, 2010 - 06:24 AM UTC
That's beautiful work Jay! I like the PE deck plate.
treadhead1952
Visit this Community
Nevada, United States
Joined: June 12, 2008
KitMaker: 552 posts
Model Shipwrights: 493 posts
Posted: Saturday, March 13, 2010 - 01:15 PM UTC
Thanks Kenny,

I am exploring the Flyhawk line of PE, they seem to offer a lot of nice pieces at some pretty fair prices. I am also glad to see that Toms' Model Works has been reopened after his passing so that we can continue to get all those excellent sets that he had to offer over the years. With Lions Roar, Eduard, White Ensign, Tauro, Gold Medal Models and other detail oriented manufacturers out there, it is awful hard to not gussy these divine waterline ships up a notch or three.
treadhead1952
Visit this Community
Nevada, United States
Joined: June 12, 2008
KitMaker: 552 posts
Model Shipwrights: 493 posts
Posted: Wednesday, March 24, 2010 - 09:36 AM UTC
Hi All,

Had a busy last couple of weeks so the work had to get slowed down a tad bit, sorry. But it did give me time to work out a couple of wrinkles so it was all good.

After punching out the required number of tread plate disks using the hollow punch set and getting them in the proper places on deck, this is what I came up with.


As these needed some splinter shields around them I had to make those up from some styrene stick. I used an old modelers trick to get the rounded shape that I needed by rolling it up into a tight little bundle and clamped it with an alligator clip to hold the roll together and offer a handle for the next step. To make it more or less hold the shape, I dunked it into some hot water for a soak and then let it cool down. I did this a couple of times to insure that the plastic would take a nice set.


With the curl set in the plastic, it was a simple matter to cut pieces and then glue them in place over each of the tread plate disks. Looking at the reference drawings from the Morskie Monograph, I did discover that the 100mm mount tread plates were not perfect circles but shaped a little differently on the inside. A little work with a file accomplished the reshaping easily.


The next thing to do was to start making up the various gun mounts. I used the original 100mm plastic parts as a base and added some hatches and ladders to make them look a little better. For the Type 96 triple mount 25mm gun sets I used the Flyhawk pieces. I have used a few different manufacturers in the past to accomplish these, but after figuring out how to make the Flyhawk mounts up after a first trial set that didn't go too well, I did figure out the trick and it is quite easy to make them up. Here is a shot of the instructions for these little jewels.


They do give you the angles to fold the parts and I differed in the order of assembly only a little bit to make it easier for my tweezer built units. The directions have you fold most of the parts up and then add the center gun barrel once this is all accomplished. I found that it was much easier to add the center mounted gun barrel before folding it up. They only give you so much space once it is folded to hit that tiny mounting hole. By getting the center barrel attached and glued down first it makes for a much easier time of it. I also found that folding the seat sections out from the outer panels first before folding those panels over the sides with the gun barrels and gluing them up is another easier way to do it. This avoids having those seats glued in place when it comes time to unfold and bend them to shape.

Basically there are only four individual parts that make up each mount. The center part is mostly just folded upon itself to accomplish the foot rests, sights, seats, sides and center pedestal. The mounting base, gun shield and center gun are the only other parts that you have to add. You do have to be gentle with folding the parts up, they won't withstand a lot of folding before the tiny folding surfaces give it up and you have breakaway parts. These are far easier to construct than using kit plastic parts and adding tiny bits to add details as in Eduard, Tom's Model Works and other makers. Here is a sort of step by step progression shot of how they go together. The first one is the basic parts laid out, the second with the center gun barrel added and the final one of it all assembled.


As the model requires no less than ten of them, I wanted to figure out the easiest way to accomplish this little detail part. But they do look quite nice compared to the over sized and block molded kit parts. I highly recommend these excellent little detail items for IJN Ship models requiring the Type 96 25mm Triple Mounts.
Quincy
Visit this Community
Oklahoma, United States
Joined: October 29, 2008
KitMaker: 99 posts
Model Shipwrights: 97 posts
Posted: Wednesday, March 24, 2010 - 02:23 PM UTC
Your Oyodo is coming out very well Jay! If you can get your hands on them I would recommend getting multiple sets of the Fine Molds single, double and triple 25mm gun sets. They are exquisite. All you have to do is paint them and clip them off the sprue. They are the closest thing to photoetch as you can get.


Bob Pink.
treadhead1952
Visit this Community
Nevada, United States
Joined: June 12, 2008
KitMaker: 552 posts
Model Shipwrights: 493 posts
Posted: Thursday, March 25, 2010 - 12:45 AM UTC
Thanks Bob,

Yeah, I have looked around for the Fine Molds IJN 25mm mount sets but haven't had any luck locating them. Most places I have checked are out of stock or want the first born male child in return. lol

One of those with the addition of the forward shield from the Flyhawk sets would be most excellent. But these little Flyhawk pieces are fairly easy to assemble and look quite nice when done. In the past I have labored over flea speck sized bits from Eduard and others to attempt to improve the look of the kit provided parts. Those improvements are usually removal of some bits from the kit molded items and adding the magazines, seats, sights and shields. Needless to say, in 1/700 scale it is a lovely task with some ultra tiny bits, when you multiply the number of mounts required for any ships larger than a destroyer, you are talking a few days worth of tedium to deal with it. Even modeling the later destroyer kits with the additional added AA weapons fit they featured it can quickly get to be an onerous task.
treadhead1952
Visit this Community
Nevada, United States
Joined: June 12, 2008
KitMaker: 552 posts
Model Shipwrights: 493 posts
Posted: Wednesday, April 07, 2010 - 12:40 PM UTC
Hi All,

No, I haven't disappeared, just busy with working at the salt mines and as my project goes along getting into the fussy little bits, those fussy little bits take more time to get to a place where I can show something. Case in point, the tiny triple 25mm mounts. Making up the even dozen required for this ship takes a bit of time as the work is fine and getting them made up and mounted along with the related parts just to cover one area like the top of the hangar takes a bit.

Along with the mounts, covering the roof in tread plate, making up the gun tubs, adding the ready ammo magazines, hatches, original parts that needed to go back on as well as hanging a few more pieces on that part, well, you get the picture. I also added more tread plate covers to the top of the small after deck house and platform on the aft end of the deck. The catapult came from the Eduard IJN Naval Accessories set. I also added a bit of tread plate to the very aft end of the deck so it would match all the other tread plate covered areas on the ship. Four more bollard mounting plates were made up to add a little later. So here is where I got to go to get the six triple 25mm mounts added.


Once that was accomplished there was more railings, ladder ways and other tiny bits made from photo etch from various sources as well as kit pieces. I added the cranes from Toms' Model Works IJN Light Cruiser set, using the original kit uprights and cutting the solid crane booms off. There was also a boom rest that was added with some styrene sheet parts to the side of the hangar structure on one side. That bit came from the Morskie Monograph drawings I am using to guide parts placement and design. The searchlight tower was also from the Light Cruiser parts set, I did have to remover a lower section to adjust the height of that part, make a deck plate from some more of the tread plate as well as a search light base from some styrene stick and railings and a ladder. The search light itself is from one of the Sky Wave Extra Parts sets and a cable reel side was added to act as a adjustment wheel. The rear searchlight was done the same way using a tread plate disc and railing sides rather than the overly thick kit part with another searchlight and cable reel side piece. The railings were added all around the hangar roof as well as ladder ways and more railings all around. It does serve to busy up an area that would have been pretty bare using just what the kit provides.


Turning to the Flyhawk Photo Etch IJN Weapons set for the single mount 25mm weapons showed just how easy these pieces are to make up. Just fold the main part over to make up the gun and its' pedestal is all that is required. They provide three different bases for you to chose from, a small round metal base I used here as well as a square flat mount or a larger round one to represent the wooden decked mount. I found it was easiest to add the folded mount to the small base by dipping the end in Super Glue once it was folded then cut the whole assembly free from the fret after it had dried hard. Trying to cut the base first was inviting disaster in attempting to place it on the bottom of the mount. I managed the first one that way, but it was a lot longer to do than gluing them en masse and clipping them free. Once you have the assembled mount cut free, holding them in the tweezers lets you bend the sight section down and tilt the rounded part upright as well as bend the two rests into place.


To make up and mount all12 of the single mounts only required a couple of evenings to do. These were placed across the decks where my references showed them to be to get to a total of 48 25mm barrels for the whole ship. I can definitely recommend the Flyhawk IJN Weapons sets as a fairly painless way to add these parts.


Now I get to add the masts along with all their related odds and ends. I will also be changing the mounting position of the forward mast. The kit has the after section legs of the forward mast mounted to the main deck on either side of the funnel with the main forward leg up on the engineering deck house behind the bridge works. While it would be a quick and easy way to get there, I am going to be building the masts up and placing the forward mast in its' proper place atop the engineering deck house roof forward of the open hatchway on its' after section. The rear mast gets place where the kit mast goes forward of the after search light platform but it will be up detailed just a bit.
treadhead1952
Visit this Community
Nevada, United States
Joined: June 12, 2008
KitMaker: 552 posts
Model Shipwrights: 493 posts
Posted: Thursday, April 08, 2010 - 10:26 AM UTC
Hi All,

I like weekends like this, nice and productive at the bench without a lot of interruptions (girlfriend is off in California visiting folks ).

Making up the masts for my little project required a tool to hold the three uprights in position while I used a soldering iron to join the top. To that end I used a block of balsa wood and drilled three holes with a mini vise to match the sizes of the uprights. The main upright is a bit of copper wire that I flattened out by rolling between two flat cutting boards after removing it from the spool. The rear legs are some Special Shapes Co. brass rod. Measuring the area that I needed these parts to fit into, I marked the block then drilled the holes eyeballing the angles for the rear legs.


Once they were soldered at the top, I started clipping out sections of bracing from an old Toms' Model Works PE fret that contained a number of different sized tower sections. Adding the sections of bracing with CA to hold them stiffened the masts up considerably.

Once I had the required number of bracing sections added I glued the masts into position on the ship, the forward one atop the roof of the engineering deck house where it needed to go. The after one went in the same three holes that the kit molded part would have gone on the roof of the small shack on top of the hangar. After they had set up and were solid enough to handle a bit, I cut and sectioned up more brass rod and bits of PE material to add the cross braces, styrene bits and such to match the drawings from the Morskie Monograph on the ship. I also added a radar antenna from the Eduard IJN Ship Fittings PE Set trimming down the mounting legs to match up with the drawings.


Now I have a pair of masts that I can add my rigging to when it comes time that are stout enough to withstand the pressure that adding rigging adds without worrying about distorting them. While the styrene kit parts are just fine if an out of the box build is what you want to do, changing things up and adding details requires something a bit different. As you can see from this, it isn't that difficult to make up more detailed masts, just takes a little time and help from a home made jig.

A few more bits and bobs to add and then I can start thinking about some paint work. The main turrets have to be detailed a bit more. I will wait until I have the overall main color and linoleum deck paint on before I add the secondary gun mounts, railings, and rigging as well as final details. But it is much easier to paint the deck before adding these things.
Quincy
Visit this Community
Oklahoma, United States
Joined: October 29, 2008
KitMaker: 99 posts
Model Shipwrights: 97 posts
Posted: Friday, April 09, 2010 - 04:44 AM UTC
Way to go Jay!!!
treadhead1952
Visit this Community
Nevada, United States
Joined: June 12, 2008
KitMaker: 552 posts
Model Shipwrights: 493 posts
Posted: Sunday, April 11, 2010 - 11:18 AM UTC
Hi All,

Thanks Bob.

Since this model is supposed to represent the ship after her last overhaul at Yokosuka Naval Arsenal and Ship Yard in 1944 I figured along with all the additions of AA Weapons, modifying the hangar space to crew quarters, and a major overhaul of the engines and running gear, they would probably have all the crew busily engaged in scraping and painting, I chose Model Master Acryl in Yokosuka Naval Arsenal Gray # 4253 for the basic color. Using the bottom of the box as a paint stand, I applied a strip of duct tape to it folding the ends under to give me a nice long section of sticky side up tape to hold the ship. I got happy with the airbrush, in this case, my single action Harbor Freight model which is just fine for an overall spray job like this, adjusted the pressure on the air compressor down to about 15PSI and let her rip. I will admit it does look a lot better in a nice uniform Navy Gray color rather than the multi-hued construction version.


I did notice after all this work, I forgot to add the wave breaker at the back of the anchor windlass and chain gear. Oh well, nothing that can't be fixed and touched up. I did add ladders and railings to the sides and tops of the main turrets. To get the railings, I chopped a two rail section free from a section of the regular railing from Tom's Model Works. I was easier to section these up further into smaller bits with a stanchion at each end to apply to the turret roofs. The single rail piece that I removed to make those shortened rails also got used to make the curved sections of rail across the face of the turret in between the barrels. I added a rigging tower also from Tom's Model Works fret for Light Cruisers. These will get further modifications later by making up the blast bags at the bases of each barrel using some Aleenes' Tacky Glue. I like it better than my old choice of Elmer's White Glue as it is thicker and dries a lot faster. That allows you to form a few creases here and there as the top of the glue dries first. Being thicker, it also doesn't run to places you don't want it.


The next step in all of this will be to paint in the linoleum sections of deck with some Model Master Leather Enamel. I like the way it looks to represent this part of IJN ships and being enamel it doesn't react with the Acryl. Once it dries I can do a little shading and weathering to the lines that represent the brass strips that held it down to the deck. My attack on the masts with the sections of cross pieces from various towers doesn't look too bad once they were covered over with paint and look a lot better than the kit provided styrene bars. Being copper and brass, they will also withstand the rigors of rigging a lot better than styrene pieces. My rigging material of choice is fine stretched sprue and using a heat source can be stretched tight once they are in place. You can also allow a little sag here and there with it to represent things like flag lines.


The hangar section with all the triple mounted AA guns, splinter shields and other odds and ends looks a lot better in a uniform color as well. I like the see through appearance that the PE towers provides better than the kit parts although one could use them and do some shading with darker colors to provide some depth with dry brushing over the outer surfaces for contrast if you had to. The cranes will be getting rigged out with some more stretched sprue and small hose reel ends for the pulleys to busy things up even more.


I added a single air craft trolley on the forward section of railings ahead of the catapult. This is from the Tom's Model Works Light Cruiser fret as well. I will be mounting a single aircraft atop of it later. I also used some more of the brass rod to make up the aft upright so I will have a stout termination point for the rigging work equal to the masts. It was mounted to a drilled hole in the section of tread plate and deck. I also added the aft sets of bollards to the after deck in the proper places. For some reason, these were completely ignored on the original model while they did add the sections of steel plate on either side of the deck, go figure.

JMartine
Visit this Community
New Jersey, United States
Joined: October 18, 2007
KitMaker: 1,698 posts
Model Shipwrights: 1,514 posts
Posted: Monday, April 12, 2010 - 02:33 AM UTC
Jay - just a quick note to say I am following your build with interest. Love your attention to detail and in depth WIPs. Lots of great ideas on SB additions.
Anyways, just because I am quiet does not mean I am not reading
Look forward to the rest, cheers
treadhead1952
Visit this Community
Nevada, United States
Joined: June 12, 2008
KitMaker: 552 posts
Model Shipwrights: 493 posts
Posted: Monday, April 12, 2010 - 04:07 PM UTC
Thanks James,

I appreciate the note. Even though there are only 16 or so postings to the thread, the read count of over 750 shows me there is a "little bit of interest" out there.

I do enjoy adding a few bells and whistles to these older kits if for no other reason to see how far I can take one. If my work gives someone an idea or a tip on adding to their own projects, so much the better.

I have gotten the linoleum sections painted in and am waiting on it to dry so I can do a little touch up here and there and move on to other additions in the project. I will show a few pictures once the paint dries and dust settles.

Nice to hear from you.
Sammuel
Visit this Community
California, United States
Joined: September 02, 2008
KitMaker: 200 posts
Model Shipwrights: 95 posts
Posted: Monday, April 12, 2010 - 05:06 PM UTC
Jay;

I'm a big fan of your work and you really push a project to the limit. I have learned so much from your posts and also have a bug for 1/700 IJN ships.

I have to go back and re-read your posts. The detail work is outstanding and I will have to practice some of your ideas on some of my projects.

Sam
treadhead1952
Visit this Community
Nevada, United States
Joined: June 12, 2008
KitMaker: 552 posts
Model Shipwrights: 493 posts
Posted: Tuesday, April 13, 2010 - 03:08 PM UTC
Hi All,

Thanks Sam!

The first thing that I did was add the wave breaker at the back of the anchor capstans and chain ways. I used some styrene strip and cut a piece just a little longer than the width of the deck. Once the ends were bent slightly it fit nicely. I cut two more smaller pieces of the strip and then cut them from corner to corner to make the angled supports and glued it all together. After painting it with a brush I let it dry then glued it in place with some CA Glue.

I got the linoleum deck paint applied, touched up the gray, touched up the deck paint, etc, until I was relatively happy with the results. With all the tiny details added to the decks it was hard to do it all in one shot, hence the touch ups required to make it happen. I used Model Master Enamel in Leather color #1736, stirring it well in the bottle first. Remember to resist the temptation to shake it like you see the folks in the paint stores do with the gallon paint cans. All this does is coats the inside top of the cap quite nicely until when you open the jar the first time you very neatly coat the top lip of the jar with first wet paint that soon dries, usually after you have tightly capped the jar. This serves to make a very nice seal that is difficult to unscrew the next time you want to use it. Should you get any paint on the upper surface of the top of the jar, use a rag or Kleenex or something to wipe it off before you screw the cap back on.

After pouring an appropriate amount of paint in a larger plastic cap I added some Testors Universal Enamel Thinner and stirred it up some more. This helps the paint flow out so you don't have to paint right up to the edges of the deck houses and details, just get close and the thinned paint will flow right to the edge for you. I also used a small 000 sized sable brush to do the painting, yeah, I know, pretty small, but it helps to get around everything on a well detailed project like this without slopping too much paint on at any given time. If you find the brush getting too stiff with loaded up paint, stop and clean the brush in some thinner and carry on rather than trying to carry on with an overloaded brush. Once I had things painted up as I wanted I let it sit overnight until it was dry.

The next step was to highlight the strips on the linoleum decking with some darker paint. I chose a dark gray rather than black paint for this step, The contrast is more than sufficient in this small of a scale. I first thinned it out in a small plastic cap to let it flow better. Using the same brush that I used to paint the decking, I went over each of the strips the length of the deck.


I added the secondary gun mounts and the ships small boats that I had detailed up a bit using the Morskie Monograph as a reference. Some of these parts came from the Eduard IJN Miscellaneous Parts set and others were just sections of other pieces of unused PE and fret sections like the operators railing on the rear of the motor launch which is actually six pieces cut out and glued together in place. It helps to keep these parts just as well detailed as the rest of the ship so they don't stick out. I also added rudders to each boat from some bits of PE Fret material cut appropriately to shape and size.


With the decking painted and weathered a bit it is starting to look more like a finished project. I still have the railings to add and rigging to do, two of my favorites in ship modeling. There are also some other small parts to add once I get these parts done then final weathering and sealing, but as you can see it is coming right along.

Sammuel
Visit this Community
California, United States
Joined: September 02, 2008
KitMaker: 200 posts
Model Shipwrights: 95 posts
Posted: Tuesday, April 13, 2010 - 03:53 PM UTC
Jay;

It is looking great. I sent you a PM. Basicly requesting some help on a 1/700 IJN ship. When you get the time, please take a look at it. I'm just requesting a shopping list of PE parts I need to order. I already have the LR IJN railings.

Thanks for you help.

Sam
treadhead1952
Visit this Community
Nevada, United States
Joined: June 12, 2008
KitMaker: 552 posts
Model Shipwrights: 493 posts
Posted: Wednesday, April 14, 2010 - 01:22 AM UTC
Hi Sam,

PM sent regarding the IJN Isuzu, one of the three stack light cruisers built during the period in between the two great wars. I look forward to your build up. I built the kit a while back and quite enjoyed the process.

Fordboy
Visit this Community
Auckland, New Zealand
Joined: July 13, 2004
KitMaker: 2,169 posts
Model Shipwrights: 1,597 posts
Posted: Wednesday, April 14, 2010 - 10:22 AM UTC
Hi Jay

Mate this is looking truly superb.

Well done.

Thanks for taking the time to share your build.

Cheers

Sean
#027
Visit this Community
Louisiana, United States
Joined: April 13, 2005
KitMaker: 5,422 posts
Model Shipwrights: 5,079 posts
Posted: Wednesday, April 14, 2010 - 01:00 PM UTC
Wonderful work Jay!
DMcGillavry
Visit this Community
Istanbul, Turkey / Türkçe
Joined: July 15, 2006
KitMaker: 104 posts
Model Shipwrights: 102 posts
Posted: Thursday, April 15, 2010 - 08:36 AM UTC
Its SO wonderful Mr.Massey and absolutely huugee amount of effort you have spend. Just my opinion : Those high angle AA's looks better and changes ships outlines in fighting trim when they pointed towards sea..

Cheers
Serhan
 _GOTOTOP