_GOTOBOTTOM
General Ship Modeling
Discuss modeling techniques, experiences, and ship modeling in general.
Tall Ship Help
slodder
Visit this Community
North Carolina, United States
Joined: February 22, 2002
KitMaker: 11,718 posts
Model Shipwrights: 69 posts
Posted: Sunday, October 03, 2010 - 12:20 AM UTC
So, this project has been on the bench for 3 years now.

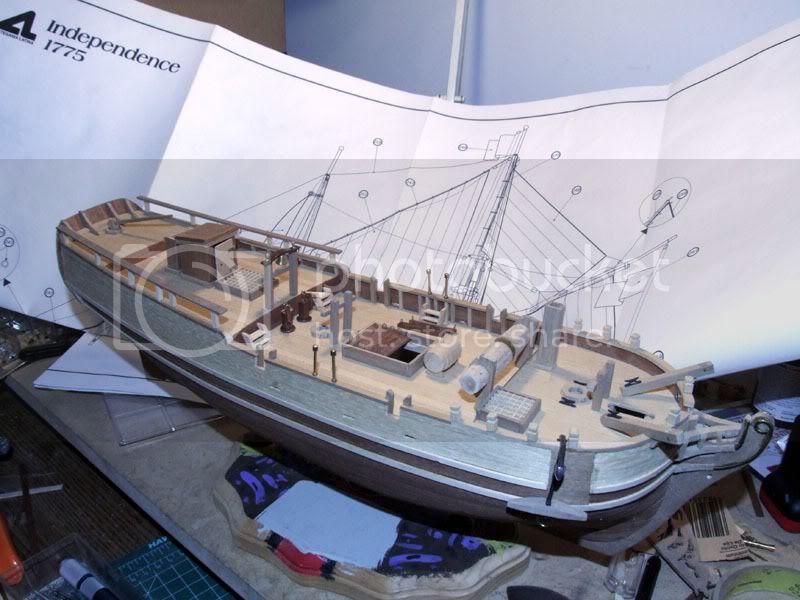
These are slow builds, lots of learning, lots of tested new techniques and they just take while. Anyway I'm getting to the point where I can't avoid rigging any more.
So, I'm looking for any technique help I can get. Is there a product or technique that helps keep the rigging tight. I'm toying with the idea of wax or maybe a bit of white glue and water.
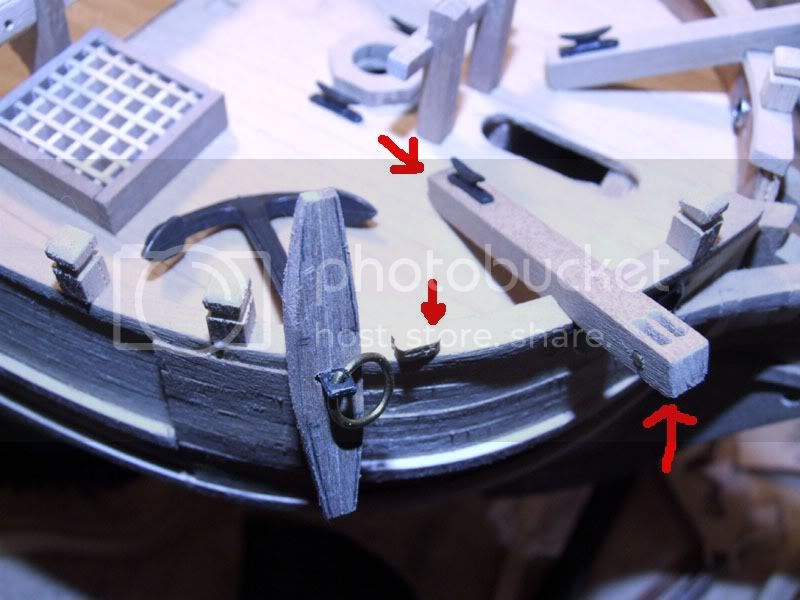
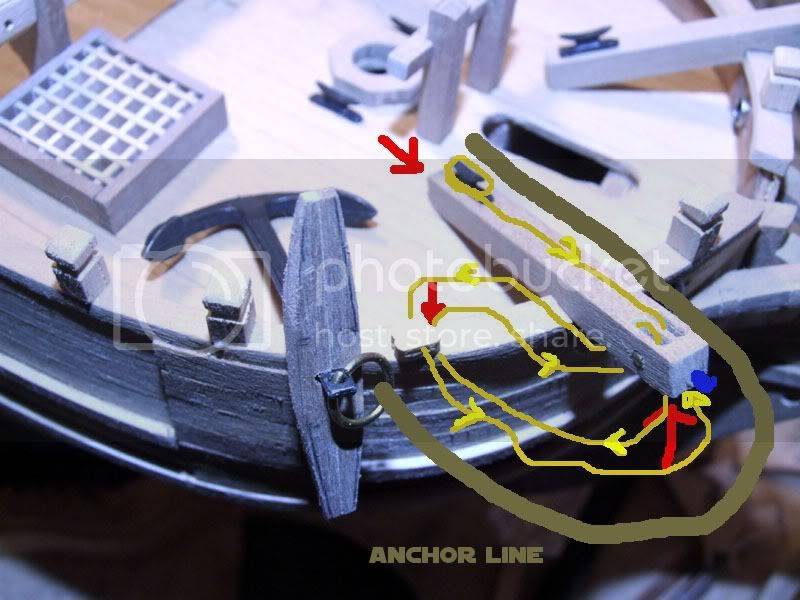
How about research? I'm starting with the anchors (seemed simple enough). The instructions are horrible and you get one wide shot and no guide. I get that one end is wrapped around the cleat, but where is the other end connected- cleat end (drill a hole insert glue), or at the overboard end, or in the block?

allycat
Visit this Community
England - North East, United Kingdom
Joined: October 03, 2004
KitMaker: 942 posts
Model Shipwrights: 278 posts
Posted: Sunday, October 03, 2010 - 01:24 AM UTC
Scott,
I've never made a wooden kit, but have done some plastic over the years and the principles should be the same so here goes

The Anchor.

Large diameter rope spliced through metal ring leading to hawse hole (located between two light strakes on hull at bow)

Other ropes are for securing the anchor when not in use and would be a 2-1'tackle' (pulley) system ending at the cleat (but easier to describe from there)

from cleat, through slot (with pulley wheels inside) at outboard end of the cathead (big up arrow in second pic), through pulley block (I'll call it 'A') attached (tied?) to anchor ring. Then back up through the second slot in cathead and back down to the 'A' block. Other ropes are used to 'sheet' the anchor to the bulkhead (ship's side)

Might I suggest you obtain a copy of

THE 32-GUN FRIGATE ESSEX from Conway's Anatomy of the Ship series.
Although a frigate and not a brig(?) they are both of the same time period and should (famous last words!) have similar rigging etc.

Good Luck
Tom

slodder
Visit this Community
North Carolina, United States
Joined: February 22, 2002
KitMaker: 11,718 posts
Model Shipwrights: 69 posts
Posted: Sunday, October 03, 2010 - 02:52 AM UTC
Tom, I think I'm seeing this come together better now.
What I can see now is a thick line main rope from the anchor ring up through a metal hole just to the inboard side of the 'jig' in the second photo.
The Jig is actually as you mentioned only for secondary lines to hoist the anchor on board. makes sense since the gaps and holes and cleat are small compared to the anchor line.
So, the secondary lines remain a bit of a mystery.


so now I get the jig and block and reason I have two line sizes. The anchor line would be tied to the ring and run up through the hole (Dark brown line). Would make sense to run the assist line (light tan) to run from the cleat over the inboard hole down to the block through one hole (forgot to mention there are two holes in the block) back up over the second hole in the jig back to the block through the second hole then back up to the jig and either drill and connect the end of the line tothe end or loop it over the end and tie (or maybe even fashion a metal/wire loop eye connector)?

allycat
Visit this Community
England - North East, United Kingdom
Joined: October 03, 2004
KitMaker: 942 posts
Model Shipwrights: 278 posts
Posted: Sunday, October 03, 2010 - 03:41 AM UTC
I think you're getting the hang of things now.
Are you sure the lower block has two holes and not a slot with a wheel in it that could be (mis)interpreted as 2 holes? (thread rope through bottom hole from one side, round half the pulley wheel 180 degree reversal of the rope's direction.
Tom


Just had a thought. Try Google Imaging some historic ships, USS Constitution, HMS Victory for example and look for detail pics of the areas you're rigging.
slodder
Visit this Community
North Carolina, United States
Joined: February 22, 2002
KitMaker: 11,718 posts
Model Shipwrights: 69 posts
Posted: Sunday, October 03, 2010 - 04:33 AM UTC
Tom
Yea - the block the instructions call for is the two hole block. I guess in non-ship terms this would be a double pully.
There is another type in the kit with only one hole - like you're describing. I would call this a single pully.
I can see the difference and the instructions do call for the double. That much I can get from the instructions.

Thanks for the help - it's huge to get this kind of help with this type of kit. There is so much research required.
 _GOTOTOP