_GOTOBOTTOM
General Ship Modeling
Discuss modeling techniques, experiences, and ship modeling in general.
REVIEW
Heller HMS Victory
pzkw
Visit this Community
United States
Joined: May 05, 2003
KitMaker: 50 posts
Model Shipwrights: 10 posts
Posted: Thursday, May 07, 2015 - 05:41 AM UTC
So here's the first couple of pictures of a past project, Revell's "Thermopalaye". I'm not sure of the scale of this model, but it's about 36 inches long, from bowspirit to stern. I built this when I was around 13 or 14 years old; I remember late on Saturday nights, I would watch SNL on a small TV in my bedroom while I did some rigging on this model. Still looks good for being about 40 years old!


pzkw
Visit this Community
United States
Joined: May 05, 2003
KitMaker: 50 posts
Model Shipwrights: 10 posts
Posted: Thursday, May 07, 2015 - 05:52 AM UTC
Here's the USS Constitution. This is a wood model, I think it was produced by American Scientific. This kit was a Christmas present (mid to late 70's), and I didn't start building it until about 1987. I wish I had taken a bit more time on carving the hull, but you live and learn. I had built the first display case shortly after I built the ship, and it had been in storage for about 5 years. So I got it out of storage, stuck it in our new home, and there it sat for a couple more years. Then, we bought another new home, and in the process of moving in, I had the dispay case (with ship inside) sitting on a wheelbarrow, because I was going to take it around to the basement door. Well, I walked away for a minute, and I heard something like the tinkling of chimes or something. When I got back to wheelbarrow, a sudden gust of wind had knocked the case out of the wheelbarrow, and the tinkling I had heard was the glass breaking! Arrrrrrggggghhhhhh! So for many years, the broken case and the broken ship sat in the house, until I finally got motivated to re-build the case and fix the damage to the ship. In the picture, the display case sits on top of a bookshelf - there's about an inch of space between the ceiling and the case.

I'm guessing the hull length is about 18 inches, give or take an inch. That obviously does not include the length of the bowspirit.

pzkw
Visit this Community
United States
Joined: May 05, 2003
KitMaker: 50 posts
Model Shipwrights: 10 posts
Posted: Thursday, May 07, 2015 - 06:18 AM UTC
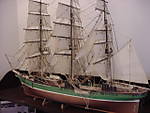
So now, some photos of the Victory. In this first photo, it's just a pic of the starboard hull, with most of the painting completed:


Here's an image of the outside port hull half:


Here's an image of the starboard hull, on the inside:


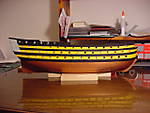
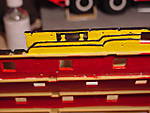
This next pic is of the moulding detail on the gunwale of the starboard hull half. I've had to go back and forth several times with black paint and then yellow paint to get the detailing correct - so the finished mouldings actually look better now, than what is in the picture. At this point, I've also painted the inside edges of the gun ports.


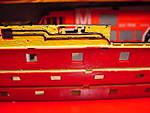
Here's the port side gunwale. Again, there has been touch-up painting done since the photo was taken. The unpainted light brown/tan part of the hull, just below the uppermost gun ports, is a ledge for the deck to fit into. The "notch" that is seen is the pocket where cross-member deck supports will fit in. You can see the same notch, or pocket, below the second row of gun ports. There are 5 or 6 crossmembers per deck. And let me vent here a bit: The crossmembers are moulded in red plastic, yet the instructions say to paint them white. So the question is, why in the world didn't they mould these parts in white plastic, instead of red? was red styrene pellets on sale that week?


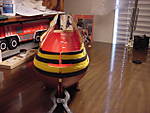
So here's a view from the bow, with lowest deck just put in place. At this point, the hull isn't glued together, but what worries me, is the gap between the hull halves at the top part of the hull. I've since glued the hull together, and that gap is much less, but I don't know if I should try to fill-in the gap with putty, or try to force the halves together with string and tape and glue the gap, or just let it go, and hope some of bow fittings will cover it up. Of course, the instructions don't show if there's supposed to be a gap, or if they hull halves are supposed to be firm against each other.

On the deck, the white stuff that you see along the centerline, is masking tape that is wrapped around from the bottom side. See, the instruction say to paint the bottom of the decks white (and they're molded in white!), but I had traced on the undersides where the ledge & pockets were, so I wouldn't have a lot of paint to scrape off when I go to glue the decks in place. However, I see that with the deck in place, there is a mismatch of wherer the masking tape is on each deck half. So it's back to square 1.5 on that.


So here's essentially the same picture, it's just a view from the stern. You can see here, in some better detail where the masking tape is coming up from the underside, and how it mis-matches to the other half.


warreni
Visit this Community
South Australia, Australia
Joined: August 14, 2007
KitMaker: 5,926 posts
Model Shipwrights: 2,624 posts
Posted: Thursday, May 07, 2015 - 08:19 AM UTC

Quoted Text

Thanks for trying to lend a hand here Timothy. It appears Marshall has not logged in since a few days after making his post more than a year ago. I have to assume he might have given up on the less than stellar instructions given with this kit and moved on.

I am, however, looking forward to seeing you post some of those old and hopefully newer builds you have going on!!


Todd, did you look to see over what period those requests were made? And if he had been back to have a look at them.

I think this is a very helpful site and if people have knowledge they will normally share it.

srmalloy
Visit this Community
United States
Joined: April 15, 2012
KitMaker: 336 posts
Model Shipwrights: 3 posts
Posted: Tuesday, September 08, 2015 - 02:31 AM UTC

Quoted Text

Something bad, the anchor cable is to be 2mm diameter, "braided with several 0.3 mm diameter threads". But no jig or instructions on how to go about doing the braiding are included.


Based on what I remember from my copy of Ashley's Book of Knots, I would bet that 'braiding' is an inaccurate description, and what it actually is would be the 2mm cord being wormed with the .3mm cord. Worming a rope is taking smaller stuff and laying it into the [auto-censored]lines between the strands of the rope to give it a more even diameter. Typically, though, it's only the first step, after which the line would be parceled (wrapped with a covering like canvas) and served (a layer of twine wrapped over the parceling as protection).
pzkw
Visit this Community
United States
Joined: May 05, 2003
KitMaker: 50 posts
Model Shipwrights: 10 posts
Posted: Wednesday, October 28, 2015 - 07:54 AM UTC
Hi Sean,

Thanks for the explanation - I, too have Ashley's book of Knots, as well as the U.S. Navy's Bluejacket Manual, which explains some of those worming & parceling techniques.

Unfortunately, the problem remains: There is no 2 mm anchor cable supplied with the kit! I went out to a Michael's craft store and bough some 2 mm braided cord. I got it in black (photos I've seen show the anchor cable to be a light color).
 _GOTOTOP