


Go to modelshipwrights.com for the current dynamic site!
General Ship Modeling: Super-detailing
Topics on photo-etch, metal-parts, and all types of additional detailing.
Topics on photo-etch, metal-parts, and all types of additional detailing.
Hosted by Jim Starkweather
My first PE Ladder

britbitter

Joined: February 20, 2013
KitMaker: 55 posts
Model Shipwrights: 55 posts
Posted: Monday, April 01, 2013 - 01:11 AM UTC
First attempt at a pe ladder with landing and DogZebra fitting. Clearly wish I had filed down the connector tabs. All in all it was fun if slightly frustrating. The hardest things were the regular ladders that just have the prongs to raise the ladder up off the bulkhead. How do you glue those down without killing the family pet?

Biggles2

Joined: January 01, 2004
KitMaker: 7,600 posts
Model Shipwrights: 833 posts

Posted: Monday, April 01, 2013 - 02:30 AM UTC
Prepare to make constant trips to the dog kennel. Those ladders stick to tweezers, your fingers, anything else nearby, but not where you want them to go  . But after the dust has cleared, it looks good!
. But after the dust has cleared, it looks good! Biggles2
Joined: January 01, 2004
KitMaker: 7,600 posts
Model Shipwrights: 833 posts
Posted: Monday, April 01, 2013 - 05:40 AM UTC
Useful advice: when glueing ladders or stairs try laying your model on it's side so that the wall or bulkhead is horizontal. That way gravity will hold your part in place while applying glue. "NESSESSITY IS THE MOTHER OF INVENTION" For applying very small spots of glue I got a darning needle (a large sewing needle) and clipped off the tip at an angle, filed and de-burred it so that the end now has an oval shaped surface to hold a micro spot of glue for application. When dry glue buids up on the tip it burns off readily with a butane lighter. Another handy tool is a length of brass wire rod with the end bent in a small "W" shape. With it I can push, pull, and hold down pieces. I made it mostly for rigging, but has mutiple uses. For placing small PE parts ie; hatch covers, port holes, etc., I use another needle modified as above. Dip the tip in thin Tamiya glue for a bit of tack, just enough to hold the piece until placement.
britbitter
Joined: February 20, 2013
KitMaker: 55 posts
Model Shipwrights: 55 posts
Posted: Monday, April 01, 2013 - 06:02 AM UTC
That is useful advise, thanks . I bought a tapestry needle for the purpose you suggest but haven't cut the loop yet. It might be too big as well. I got a package of 3 embossing tools that seem to hold ca at the tip very well. I'm trying to envision the tubing construct you're talking about. Any chance you could upload a picture?
Thanks very much for taking the time to help a noob. This project is probably too big for a first timer but I also figure the best way to learn things is to do them and that includes the hard things. I guess most people would say it's a waste of money (of which I have spent quite a lot) but I don't give a rat's about the money and I don't expect to churn out museum quality any time soon. I just want to do the best I can applying the resources at my disposal. I certainly have a lot more patience than I had in my 'build it in an afternoon' youth. Still more seems to be required. Age does have a few benefits.
Cheers,
John
Building Tamiya 1/350 New Jersey (1980's) with
Pontos detail upgrade
. I bought a tapestry needle for the purpose you suggest but haven't cut the loop yet. It might be too big as well. I got a package of 3 embossing tools that seem to hold ca at the tip very well. I'm trying to envision the tubing construct you're talking about. Any chance you could upload a picture? Thanks very much for taking the time to help a noob. This project is probably too big for a first timer but I also figure the best way to learn things is to do them and that includes the hard things. I guess most people would say it's a waste of money (of which I have spent quite a lot) but I don't give a rat's about the money and I don't expect to churn out museum quality any time soon. I just want to do the best I can applying the resources at my disposal. I certainly have a lot more patience than I had in my 'build it in an afternoon' youth. Still more seems to be required. Age does have a few benefits.
Cheers,
John
Building Tamiya 1/350 New Jersey (1980's) with
Pontos detail upgrade

goldenpony

Joined: July 03, 2007
KitMaker: 3,529 posts
Model Shipwrights: 2,419 posts

Posted: Monday, April 01, 2013 - 06:05 AM UTC
Very nice.
Why didn't I think of laying the ship on its side when applying things like that!

Why didn't I think of laying the ship on its side when applying things like that!
britbitter
Joined: February 20, 2013
KitMaker: 55 posts
Model Shipwrights: 55 posts
Posted: Monday, April 01, 2013 - 06:08 AM UTC
A couple more questions. Are those stair treads supposed to rotate to the horizontal (the way they are in real life)? If so then more generally how do you protect such a delicate construct once completed? is there some sort of fixative I should use? I wouldn't want a stray touch or aircurrent to knock it out of sorts.
Thanks,
John
Building Tamiya 1/350 New Jersey with
Pontos detail kit
Thanks,
John
Building Tamiya 1/350 New Jersey with
Pontos detail kit

TRM5150
Joined: January 03, 2010
KitMaker: 2,159 posts
Model Shipwrights: 1,400 posts
Posted: Monday, April 01, 2013 - 09:07 AM UTC
Hello John! Seen the post earlier today but was busy at work to reply. Needless to say...I am home now! Sound advice all around so far on the PE. Not easy crossing the threshold into the upgrade world even tougher trying to gain info sometimes. This is a bit mute at the moment, but I am working on an SBS for the site on PE, more specifically 1/700, but for all intensive purposes it's the same...LOL...only smaller.
If you have any straight edge razors and either a piece of plexiglass, old tile, old glass picture frame, these are almost a must for cutting these tiny buggers out.
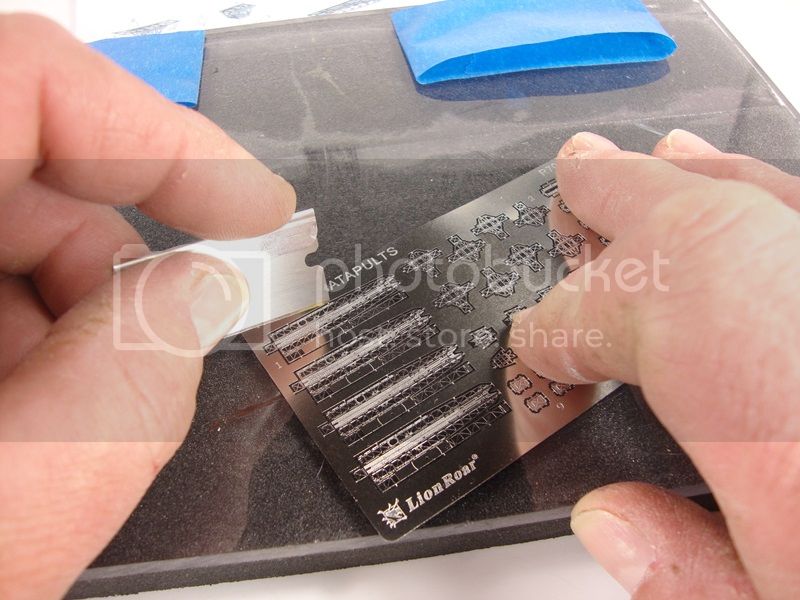
Here is a piece of plexiglass I picked up from work and I added some foam underneath to cushion things when I am at the kitchen table. The flat razor has a thinner cutting edge than the #11 blade and if you slide it up right against the part when you remove it from the tree, there is less to cut off.
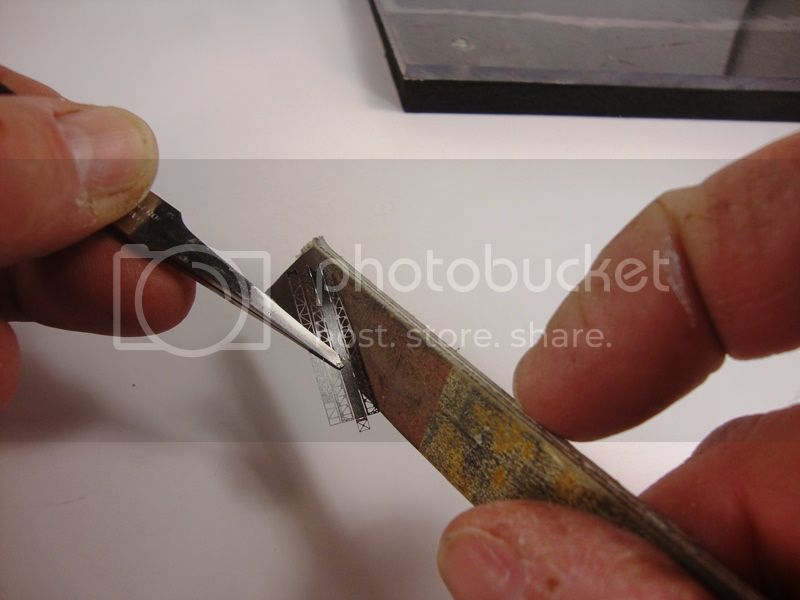
I use a variety of sanding tools but the sanding stick...sticks out most. Softer than sandpaper, this will take those tiny nubs left from cutting right off.
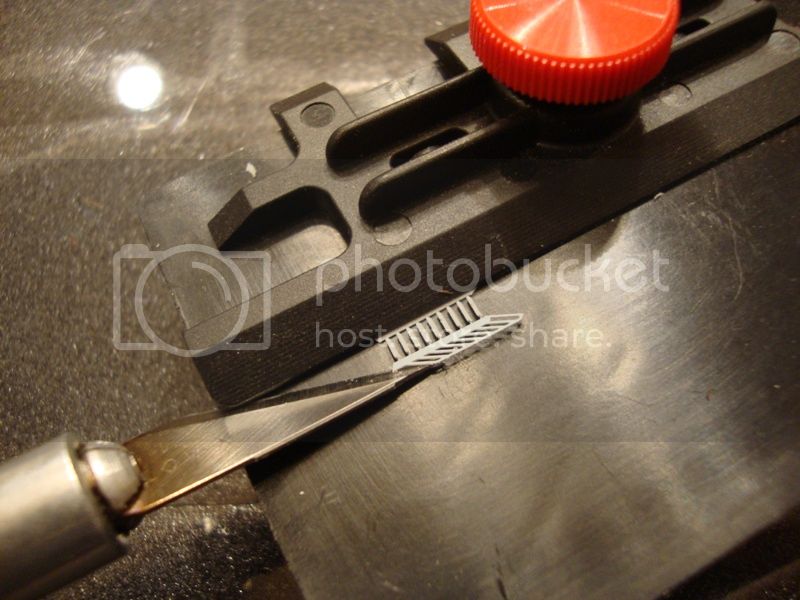
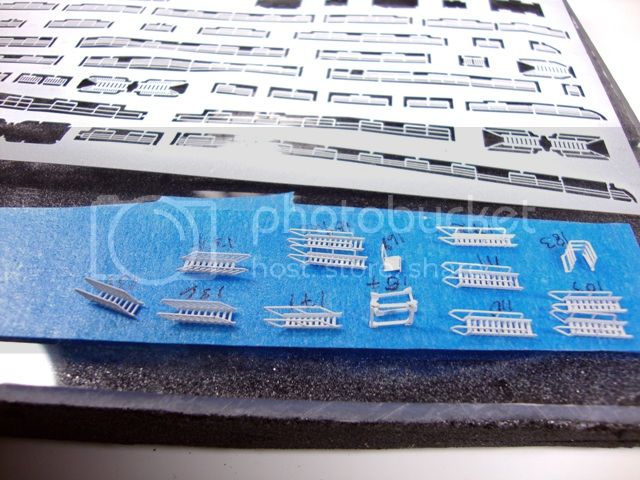
As for the ladders, the treads need to be folded out. I found it easier, for me, to fold the two sides up first, then while holding down the piece lightly with your tweezers covering all the steps but the one you are starting on. Carefully 'pick' the tread lightly with your #11 blade until it is at a 45 degree angle, slide the tweezers back repeating until the entire run is done.
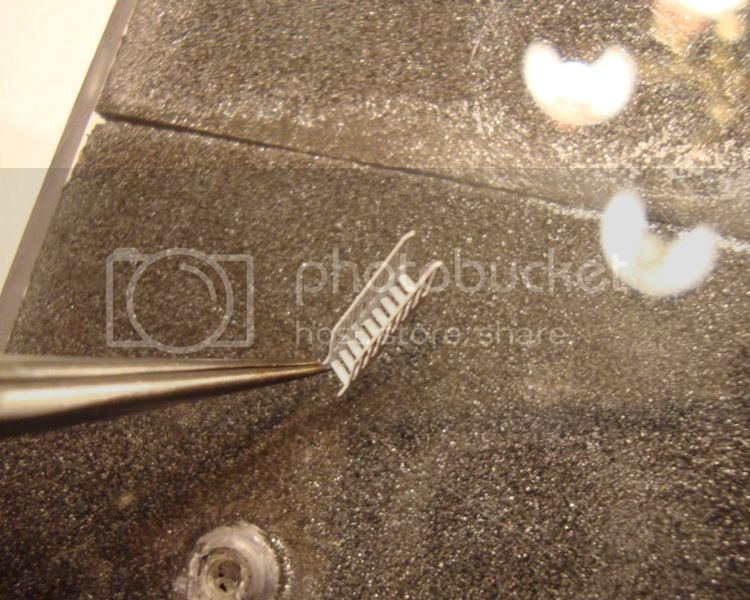
As you can see, I like to paint mine first...not required. Attaching is the fun part. I use CA (superglue) some of the time, but with ships in particular, I use PVA...common everyday white glue. White glue, first of all, drys almost clear and if I screw up and touch something I shouldn't, it washes off with a damp Q-tip....second the slightly slower drying time allows for adjustment and finally PVA dries pretty hard. I have yet to have a piece fall off...unless I bang is with my sausage fingers. LOL!!
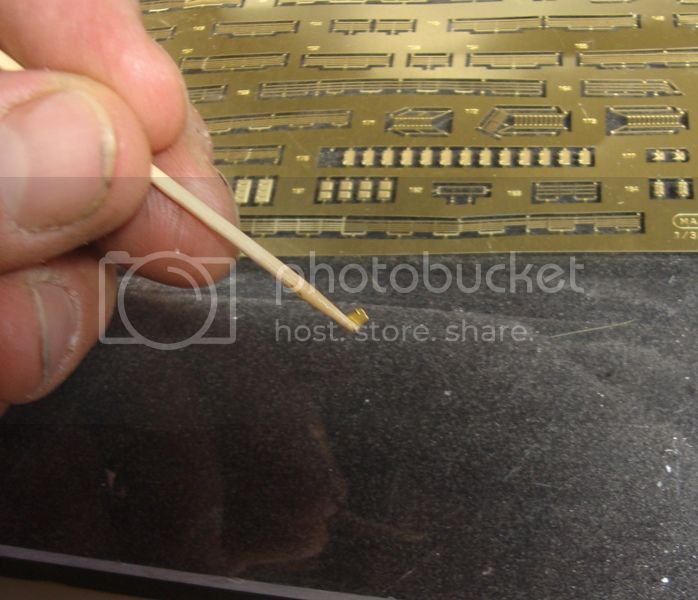
With singular pieces, like bulkhead doors, I will place a drop of CA or PVA in the spot I want the door with a toothpick, then with the other end, or a clean separate one, I will touch the tip of the toothpick to my tongue quickly and then touch the part...it will stick to the end of the toothpick and you can place the part and manipulate the part in the same manner.
One more helpful hint is to keep some doubled back masking tape on your cutting surface to keep the parts from getting lost.
Take you time, PE takes patience as you have come to realize by now. Move on to another section if it becomes troublesome and come back when ready.
Hope some of this helps....I will have my SBS done soon I hope. The writing part takes the most time...as you can see, I guess I write too much sometimes...LOL!!
Good luck and talk with you soon!
If you have any straight edge razors and either a piece of plexiglass, old tile, old glass picture frame, these are almost a must for cutting these tiny buggers out.
Here is a piece of plexiglass I picked up from work and I added some foam underneath to cushion things when I am at the kitchen table. The flat razor has a thinner cutting edge than the #11 blade and if you slide it up right against the part when you remove it from the tree, there is less to cut off.
I use a variety of sanding tools but the sanding stick...sticks out most. Softer than sandpaper, this will take those tiny nubs left from cutting right off.
As for the ladders, the treads need to be folded out. I found it easier, for me, to fold the two sides up first, then while holding down the piece lightly with your tweezers covering all the steps but the one you are starting on. Carefully 'pick' the tread lightly with your #11 blade until it is at a 45 degree angle, slide the tweezers back repeating until the entire run is done.
As you can see, I like to paint mine first...not required. Attaching is the fun part. I use CA (superglue) some of the time, but with ships in particular, I use PVA...common everyday white glue. White glue, first of all, drys almost clear and if I screw up and touch something I shouldn't, it washes off with a damp Q-tip....second the slightly slower drying time allows for adjustment and finally PVA dries pretty hard. I have yet to have a piece fall off...unless I bang is with my sausage fingers. LOL!!
With singular pieces, like bulkhead doors, I will place a drop of CA or PVA in the spot I want the door with a toothpick, then with the other end, or a clean separate one, I will touch the tip of the toothpick to my tongue quickly and then touch the part...it will stick to the end of the toothpick and you can place the part and manipulate the part in the same manner.
One more helpful hint is to keep some doubled back masking tape on your cutting surface to keep the parts from getting lost.
Take you time, PE takes patience as you have come to realize by now. Move on to another section if it becomes troublesome and come back when ready.
Hope some of this helps....I will have my SBS done soon I hope. The writing part takes the most time...as you can see, I guess I write too much sometimes...LOL!!
Good luck and talk with you soon!
britbitter
Joined: February 20, 2013
KitMaker: 55 posts
Model Shipwrights: 55 posts
Posted: Tuesday, April 02, 2013 - 12:38 AM UTC
Thanks you so much for your kind assistance! I look forward to implementing these ideas. I tried to rotate treads last night but bolloxed it pretty badly. Ah well practice and humility.
Thanks again.
John
Thanks again.
John
TRM5150
Joined: January 03, 2010
KitMaker: 2,159 posts
Model Shipwrights: 1,400 posts
Posted: Tuesday, April 02, 2013 - 03:29 AM UTC
You are welcome John!
Unfortunately, especially with PE there can be a little trial and error associated with it. If the piece that you were working is to far gone for repair there are a few small sets out there that consist of one small sheet of US ladders and stairs for short costs...unless there is an extra in the set or maybe in your spare parts box.
Keep at this I love these ships! You are making me want to break out my Mighty Mo I have collecting dust on the shelf!!
Biggles2
Joined: January 01, 2004
KitMaker: 7,600 posts
Model Shipwrights: 833 posts
Posted: Tuesday, April 02, 2013 - 03:48 AM UTC
There's a bit of a trick doing the stair treads, but once you got it, it's easy. Place the blade tip between two treads, and using the next tread as a fulcrum, or leverage, rotate the blade so that it lifts the tread you're working on. All the treads are done this way until the last one when you no longer have a next one for a fulcrum. The last one you can just bend with fine tweezers as you have more space to work on it. Although they look fragile, stairs, when folded, are surpringly strong and will withstand some handling. As for my multi-tool, I use fine brass WIRE not TUBING, and bend a small 'W' shape in the end. That way, you have one 'V' shaped notch for pushing and holding, and another reversed 'V' shape for pulling. My Mk ll model had the straight end CA'd into a section of brass tubing for a handle. I glued another straight section into the other end of the tubing handle to use as a 'poker' to poke around and separate, especially rigging lines, where there wasn't space to use the other end, or where I didn't want to accidently hook onto something else. I'm not big on posting pics, but just draw a pic of a straight line with a W at 90 degrees at the end (sideways to the wire). You'll see what I mean. Since wire rod is so malleable you can re-bend and adapt the design for any particular task at hand.
Biggles2
Joined: January 01, 2004
KitMaker: 7,600 posts
Model Shipwrights: 833 posts
Posted: Wednesday, April 03, 2013 - 04:01 AM UTC
I forgot to mention that a piece of stretched sprue is also great for applying micro-spots of CA when you want to attach small PE parts. CA seems to hold better to the tip of the stretched sprue than to a needle tip, and the sprue is free!
TRM5150
Joined: January 03, 2010
KitMaker: 2,159 posts
Model Shipwrights: 1,400 posts
Posted: Wednesday, April 03, 2013 - 05:23 AM UTC
Good point John! When it builds up you just snip it or make another! Another quick tip is to use wax paper as a CA pallet. A drop or two does not stick and does not dry as fast on it. 
Biggles2
Joined: January 01, 2004
KitMaker: 7,600 posts
Model Shipwrights: 833 posts
Posted: Wednesday, April 03, 2013 - 11:50 AM UTC
I save milk carton and pop bottle covers. The inside is good for mixing small amounts of paint, or oil washes. The top is good for a couple of drops of CA. Again, they are FREE!!! 
britbitter
Joined: February 20, 2013
KitMaker: 55 posts
Model Shipwrights: 55 posts
Posted: Thursday, April 04, 2013 - 08:03 AM UTC
Have any of you used xuron pe scissors? I like them when there is room to cut but if I can't easily get the nose in there (which is quite often on these pontos frets) I get spooked and just cut them with an exacto or razor blade on a glass cutting board. Do you guys have the same experience?

Gremlin56
Joined: October 30, 2005
KitMaker: 3,897 posts
Model Shipwrights: 3,301 posts
KitMaker: 3,897 posts
Model Shipwrights: 3,301 posts

Posted: Thursday, April 04, 2013 - 04:26 PM UTC
Yes, excellent tool but as you notice you need some space to remove the pieces of PE from the main sheet/sprue with them.They are also handy for trimming of the stubs that remain on the parts after removing them with a knife. I also use a pair of hobby scissors to remove the stubs, (I'll get a photo posted to show you what I mean).
Julian
Julian
britbitter
Joined: February 20, 2013
KitMaker: 55 posts
Model Shipwrights: 55 posts
Posted: Friday, April 05, 2013 - 12:46 AM UTC
That's a great idea Julian thanks. If only they could make the tip ever so slightly thinner I think I could get in almost any gap I've seen. I never thought about using them to trim the stubs! I've been clamping down near the stub with tweezers and using a sanding stick. Works for the most part but I have on a couple of occasions bent the part and I think sometimes I stop too soon because I'm afraid of damaging the part so a little bit gets left.
I really appreciate the pointers. Soon I'll be working the main mast and the radar so I need all the help and practice I can get. Also the Pontos instructions are like some drunk guy at Ikea wrote them. You know, part A gets folded and added to part B then voila! radar antenna!
I really appreciate the pointers. Soon I'll be working the main mast and the radar so I need all the help and practice I can get. Also the Pontos instructions are like some drunk guy at Ikea wrote them. You know, part A gets folded and added to part B then voila! radar antenna!
Gremlin56
Joined: October 30, 2005
KitMaker: 3,897 posts
Model Shipwrights: 3,301 posts
KitMaker: 3,897 posts
Model Shipwrights: 3,301 posts
Posted: Friday, April 05, 2013 - 03:03 AM UTC
If you are having trouble with Pontos instruction sheets you should give Fujimi a try. They are really dreadful.
Julian
Julian
britbitter
Joined: February 20, 2013
KitMaker: 55 posts
Model Shipwrights: 55 posts
Posted: Friday, April 05, 2013 - 03:30 AM UTC
Lol! I consider myself warned. One thing I do like about the pontos instructions is that you can get them online and then you can really zoom in close to see the details of what's going on. Thanks Julian for you continued help.
Gremlin56
Joined: October 30, 2005
KitMaker: 3,897 posts
Model Shipwrights: 3,301 posts
KitMaker: 3,897 posts
Model Shipwrights: 3,301 posts
Posted: Friday, April 05, 2013 - 03:54 AM UTC
Here are the scissors I use a lot with PE parts to trim off the stubs and lips that remain after cutting the parts off:
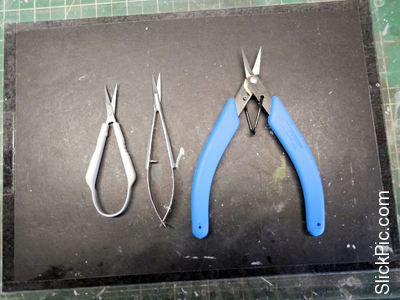
I hold the scissors under slight pressure and slide them along the side of the PE part until they catch on the stub, then you can snip the stub off very easily.
I keep these three "snippers" for PE and PE only.
Cheers,
Julian
I hold the scissors under slight pressure and slide them along the side of the PE part until they catch on the stub, then you can snip the stub off very easily.
I keep these three "snippers" for PE and PE only.
Cheers,
Julian
 |

WEB HOSTING BY


Copyright ©2021 Model Shipwrights and Kitmaker Network, a subsidiary of Silver Star Enterprises
All Rights Reserved. Please read our Conditions of Use and Privacy Policy.
All Rights Reserved. Please read our Conditions of Use and Privacy Policy.