_GOTOBOTTOM
Ships by Class/Type: Destroyers
This forum covers all types of destroyers from all eras.
USS Decatur (DD-5) 1/350 build
TimReynaga
Staff MemberAssociate Editor
MODEL SHIPWRIGHTS
Visit this Community
California, United States
Joined: May 03, 2006
KitMaker: 2,500 posts
Model Shipwrights: 1,830 posts
Posted: Thursday, November 14, 2013 - 01:34 PM UTC
Having taken a break from ships after completing a Revell Olympia this past summer, I’ve been casting about for a new project. A nice little 1/350 scale USS Bainbridge (USN DD-1) has been in my stash for FAR too long, so I thought I’d finally give it a go.


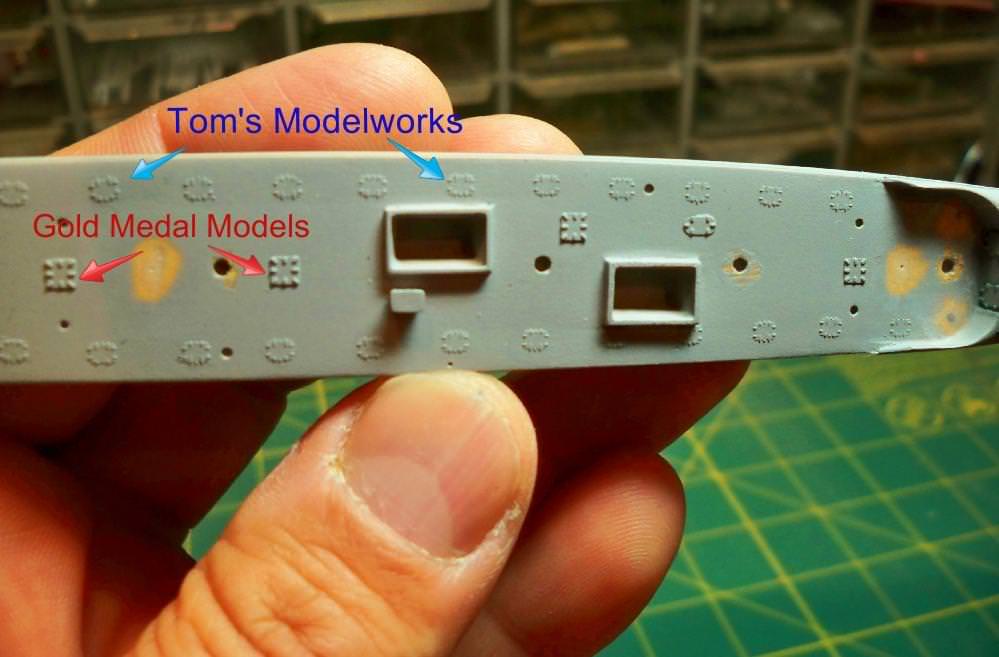
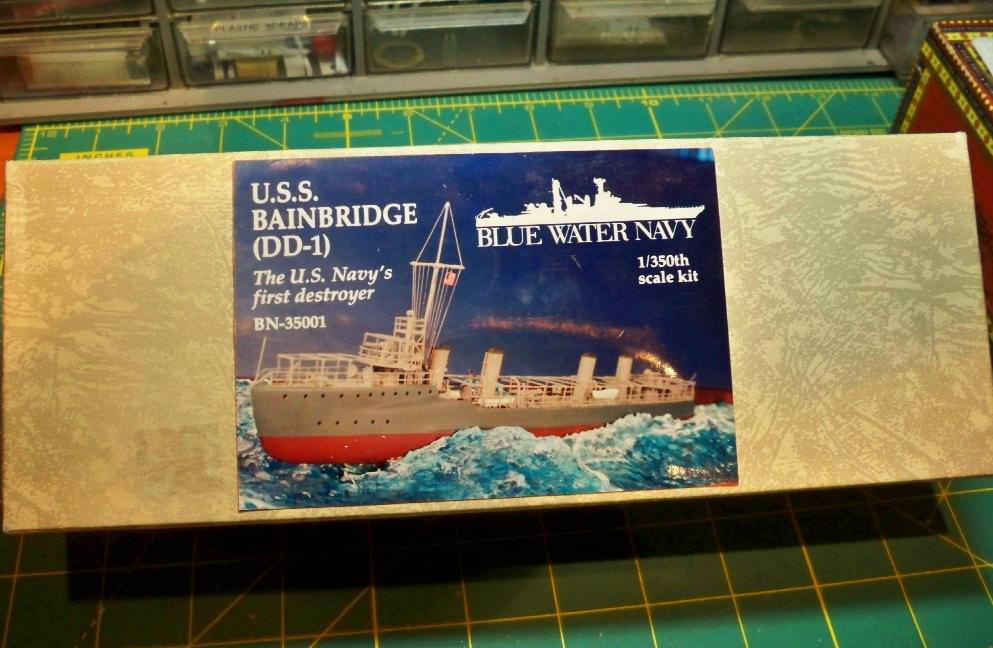
This kit has an interesting history. With resin designed by John Ficklin and photoetch by Loren Perry, it was one of the very first mass marketed resin model ship kits (in fact it was the second, after their excellent Oliver Hazard Perry class frigate). The kit was originally sold under the Blue Water Navy label, which was MB Models' line of ships back in the early 1990s. It was later produced by Gulfstream (kit #GS-8004). In addition, Iron Shipwright (kit # 4-123) and Yankee Modelworks (kit #YM35024) also issued 1/350 Bainbridge kits, which, although somewhat different with one piece hulls and redesigned photoetch, might possibly have been descendants of that original BWN kit as well.

Anyway, the one I’m building here is the original Blue Water Navy release. When I first saw this kit back in the early 1990s it just blew me away. I’d never seen a resin kit before, and the completeness of the structures and detail cast directly into the resin hull parts really impressed me. The unfamiliar resin looked awesome, and this was the first kit with its own photoetch I’d ever seen–very cool! It was a bit more expensive than a comparable styrene model, but the already in place detail and simple cast shapes made it look like a fun weekend project, so I was in!

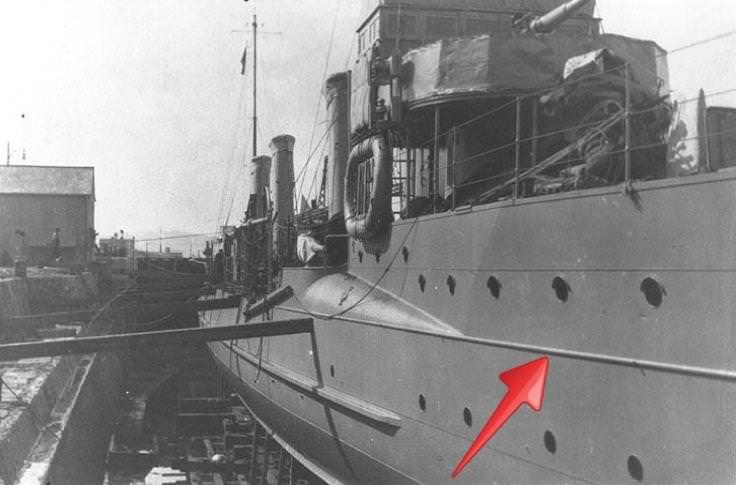
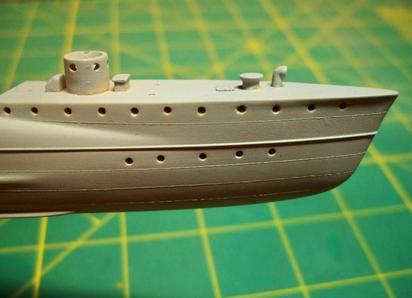
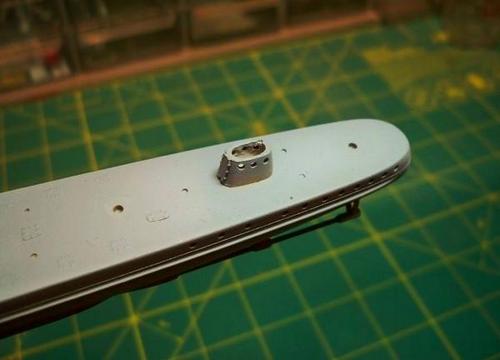
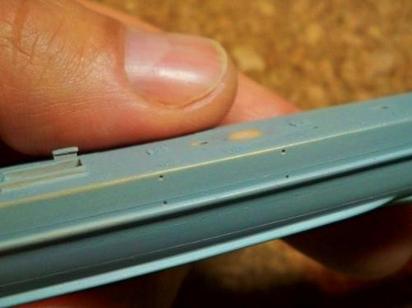
Well... upon getting it home, the simple BWN kit turned out to be a little more complicated to construct than I had originally thought. To start with, after removing the upper and lower hull halves from their massive casting blocks, I discovered that they were both badly corkscrewed – and in opposite directions! Now this was my first resin kit, so I had no experience fixing this sort of thing. Softening the parts in hot water, I did my best to straighten them out, but they required a lot of manipulation during which I managed to destroy the bilge keels and damage many of the kit’s other delicate molded in details. I was also disagreeably surprised by the numerous air bubbles just below the model's surface which appeared as I sanded the parts in getting them to fit. By the time I wrestled the hull parts into reasonable shape, mated, filled, and sanded them, filled the air bubbles, replaced the bilge keels and repaired the damaged vents and lockers, I had become disillusioned with resin and irritated with the project. So I put it away for another day.

That was some time in the early 1990s!


Fordboy
Visit this Community
Auckland, New Zealand
Joined: July 13, 2004
KitMaker: 2,169 posts
Model Shipwrights: 1,597 posts
Posted: Thursday, November 14, 2013 - 02:25 PM UTC
Ahoy Tim

This looks challenging to say the least however after seeing the work on the Olympia I am going to keenly follow this build.


Cheers


Sean
Gremlin56
Joined: October 30, 2005
KitMaker: 3,897 posts
Model Shipwrights: 3,301 posts
Posted: Thursday, November 14, 2013 - 07:49 PM UTC
This is a challenge Tim, be interesting to see what you do with this kit.
surfsup
Visit this Community
Queensland, Australia
Joined: May 20, 2010
KitMaker: 1,230 posts
Model Shipwrights: 1,212 posts
Posted: Thursday, November 14, 2013 - 10:40 PM UTC
This will be a very good one to watch.....Cheers mark
RedDuster
Visit this Community
England - South East, United Kingdom
Joined: March 01, 2010
KitMaker: 7,078 posts
Model Shipwrights: 6,649 posts
Posted: Friday, November 15, 2013 - 07:30 AM UTC
Hi Tim,

Very interesting looking build, will be following with interest.

Good luck!

Si
TimReynaga
Staff MemberAssociate Editor
MODEL SHIPWRIGHTS
Visit this Community
California, United States
Joined: May 03, 2006
KitMaker: 2,500 posts
Model Shipwrights: 1,830 posts
Posted: Friday, November 15, 2013 - 03:56 PM UTC
Thanks guys. Here’s the state of the model as I pick it up again all these years later:

The hull is assembled, with an additional horizontal .010 X .010 inch styrene strip bar added midway up the forecastle from the main deck to the prow.


I’m not sure what this detail actually was, perhaps a strengthening strake? Anyway, it was present on some of the Bainbridge class, including the ship I chose to model, the Decatur (DD-5).

Built for speed, the welded sides of these ships were pretty smooth, but I tried to suggest hull plating with alternating bands of primer.


I also replaced most of the propulsion gear. The stern tube bearings, molded directly on the resin lower hull, were pretty good. The rest of the propulsion parts provided in the original kit were basic: cast white metal "V" shaped bits for the main struts/bearings and a piece of steel wire for the shafts. I wasn’t nuts about the mushy detail on the cast metal, and the kit provided shaft wire was too thin. Also, the forward (whip) struts and bearings were missing entirely. I scratchbuilt new gear from styrene strip, brass rod, and tube.

1.90E_31
Visit this Community
Tennessee, United States
Joined: December 24, 2004
KitMaker: 252 posts
Model Shipwrights: 89 posts
Posted: Saturday, November 16, 2013 - 02:52 AM UTC
Hi Tim,

One correction. Gulfstream #8-004 is this pattern, but kit #4-123 is not this kit. The Bainbridge kit we make is a new pattern which has nothing to do with this pattern.

Jon Warneke
Commander Models, Inc.
TimReynaga
Staff MemberAssociate Editor
MODEL SHIPWRIGHTS
Visit this Community
California, United States
Joined: May 03, 2006
KitMaker: 2,500 posts
Model Shipwrights: 1,830 posts
Posted: Saturday, November 16, 2013 - 03:04 AM UTC
Thanks Jon, my mistake!

TimReynaga
Staff MemberAssociate Editor
MODEL SHIPWRIGHTS
Visit this Community
California, United States
Joined: May 03, 2006
KitMaker: 2,500 posts
Model Shipwrights: 1,830 posts
Posted: Tuesday, November 19, 2013 - 01:53 AM UTC
The main deck had several hatches sharply cast into it, but I had mushed some of them when I was manhandling the heated resin hull halves trying to get them straightened out. I noticed that they were identical with some of the hatches on a Gold Medal Models photoetch brass set I happened to have on hand from another project (“watertight doors, hatches, scuttles, fire hose racks & life rings”, dated 1993). No doubt these were part of Loren Perry’s original contribution to the kit; fortunate for me as it made replacing the mangled molded hatches with equivalent photoetch parts simple. The photoetched brass parts were also a little sharper than the cast ones, so I ended up sanding off and replacing the undamaged hatches too for consistency.

Also, though not depicted on the original kit casting, I added 26 coal scuttles along the main deck edges (Tom’s Modelworks photoetch brass) – you can’t have a coal-fired ship without coal scuttles, right? These turned out to be very thin, almost disappearing under the primer coat, but with luck they should still be visible on the completed model.
TimReynaga
Staff MemberAssociate Editor
MODEL SHIPWRIGHTS
Visit this Community
California, United States
Joined: May 03, 2006
KitMaker: 2,500 posts
Model Shipwrights: 1,830 posts
Posted: Wednesday, November 20, 2013 - 01:14 PM UTC
The last change I had made before abandoning the project was to improve the small conning towers fore and aft. The kit representations of these emergency armored control positions weren’t bad, but they had been cast solid as part of the resin hull. To give them a little more life I hollowed them out and drilled the portholes through. It won’t be a dramatic change, but it will create a nice see-through effect through the portholes from the sides.

And that’s where the model has stood since 1993 or so; I guess it’s high time to get re-started on construction...!
RedDuster
Visit this Community
England - South East, United Kingdom
Joined: March 01, 2010
KitMaker: 7,078 posts
Model Shipwrights: 6,649 posts
Posted: Wednesday, November 20, 2013 - 08:49 PM UTC
Hi Tim,

Keep up the good work, will be watching with interest.

Si
TimReynaga
Staff MemberAssociate Editor
MODEL SHIPWRIGHTS
Visit this Community
California, United States
Joined: May 03, 2006
KitMaker: 2,500 posts
Model Shipwrights: 1,830 posts
Posted: Saturday, November 23, 2013 - 01:21 PM UTC
Thanks, Si.

As I resume construction, a small mistake immediately attracted my attention. The davits for the 20 foot whaleboats are depicted on the kit as mounted to the hull sides, with little holes on the hull for attaching the photoetch davit parts.

I had left them, but while researching the project this time around I came across the pic below showing Decatur and her sister Dale fitting out, which clearly shows Decatur’s davits mounted to the deck.


Time for some filler...
RussellE
#306
Visit this Community
Victoria, Australia
Joined: June 27, 2010
KitMaker: 3,959 posts
Model Shipwrights: 2,777 posts
Posted: Sunday, November 24, 2013 - 09:18 PM UTC
Interesting choice of subject matter, Tim. Watching with interest
warreni
Visit this Community
South Australia, Australia
Joined: August 14, 2007
KitMaker: 5,926 posts
Model Shipwrights: 2,624 posts
Posted: Monday, November 25, 2013 - 04:19 AM UTC

Quoted Text

Thanks, Si.

As I resume construction, a small mistake immediately attracted my attention. The davits for the 20 foot whaleboats are depicted on the kit as mounted to the hull sides, with little holes on the hull for attaching the photoetch davit parts.

I had left them, but while researching the project this time around I came across the pic below showing Decatur and her sister Dale fitting out, which clearly shows Decatur’s davits mounted to the deck.


Time for some filler...


Maybe the davits were moved in a later re-fit or something Tim. They actually look mighty small for lifeboat davits...
TimReynaga
Staff MemberAssociate Editor
MODEL SHIPWRIGHTS
Visit this Community
California, United States
Joined: May 03, 2006
KitMaker: 2,500 posts
Model Shipwrights: 1,830 posts
Posted: Monday, November 25, 2013 - 04:12 PM UTC

Quoted Text

Maybe the davits were moved in a later re-fit or something Tim. They actually look mighty small for lifeboat davits...


You might be right, Warren. They do look small, but other pictures (like http://www.navsource.org/archives/05/0500510.jpg) confirm that those little davits did serve the 20' whaleboats, at least originally. Anyway, I'll stick with the documentation I actually have; I'm doing Decatur as of 1908, so I'm betting that the ship still had the original fittings at that time.

TimReynaga
Staff MemberAssociate Editor
MODEL SHIPWRIGHTS
Visit this Community
California, United States
Joined: May 03, 2006
KitMaker: 2,500 posts
Model Shipwrights: 1,830 posts
Posted: Thursday, November 28, 2013 - 07:02 AM UTC

Quoted Text

Interesting choice of subject matter, Tim. Watching with interest


Yeah, Russell, I guess the subject is just a little off the beaten path! I decided to build Blue Water Navy’s Bainbridge (DD-1) kit up as the Decatur (DD-5) for a couple of reasons. To begin with, despite the boast on the BWN Bainbridge kit box that she was “The U.S. Navy’s first destroyer,” that distinction actually belongs to Decatur (DD-5) which entered service on May 19, 1902 – some six months before the Bainbridge. Also, I thought it was cool that this ship was an early command of future Fleet Admiral Chester W. Nimitz (red arrow).

Nimitz had an interesting association with the Decatur. In July 1908, while operating in an poorly charted lagoon in Manila Bay, he suffered what is almost always a catastrophic event in the career of a naval officer: he ran the ship aground. According to eyewitness Commander (then Midshipman – on Nimitz's left) Hugh Allen, U.S.N. (Ret.),

“The ship was conducting torpedo practice; I was torpedo officer; Nimitz, commanding officer, was on the bridge. We fired at a target moored in shallow water near the beach, which made recovering torpedoes easier. Then the ship headed toward a dinghy stationed to secure the spent torpedo. We proceeded cautiously, taking soundings. Since the bottom was known to be soft, there could be little damage to the ship if she did touch; Nimitz might have considered he was taking a calculated risk. When the ship did touch, we felt no jolt; she just stopped. Engines were reversed. All hands were ordered aft to lift the bow; the ship floated free. Nimitz conscientiously reported the incident”.

Relieved of command and court-martialed, 22-year old Ensign Nimitz was found guilty of “neglect of duty” and formally reprimanded. Not an auspicious beginning for the future five-star admiral!
Fordboy
Visit this Community
Auckland, New Zealand
Joined: July 13, 2004
KitMaker: 2,169 posts
Model Shipwrights: 1,597 posts
Posted: Thursday, November 28, 2013 - 07:15 AM UTC
Hi Tim

Great historical "tid-bit" & I just love those period perfect black & white images.

IMHO a little history gives a project a nice personal edge.

Thanks for sharing.

Cheers


Sean
Removed by original poster on 02/21/15 - 06:45:14 (GMT).
Removed by original poster on 07/21/18 - 02:04:25 (GMT).
Removed by original poster on 06/14/19 - 19:20:27 (GMT).
 _GOTOTOP