

Joe,
How did you attach the hull to the brass tubes? Did you go straight through up to the deck or did you attach the hull to the tubes with a screw?


Go to modelshipwrights.com for the current dynamic site!
Hosted by Harry
HMCS Snowberry (Mirage 1:350 Conversion)

Aurora-7

#360

Joined: June 18, 2003
KitMaker: 1,020 posts
Model Shipwrights: 630 posts

Posted: Friday, April 04, 2014 - 12:09 AM UTC


Grauwolf

#084

Joined: September 14, 2005
KitMaker: 2,485 posts
Model Shipwrights: 1,157 posts

Posted: Friday, April 04, 2014 - 09:20 AM UTC
Hi Jeremy,
I am really enjoying this build, have not yet run into any
major drawbacks.
The Snowberry went through 3 modifications according to
the reading that I have done so far.
This mod is representing the 1943 refit as most of the
photos I have come across show her in this configuration.
Overall, the kit is quite nice but it could have used a
bit more detailing on the part of the manufacturer.
My copy has a lot of broken parts and a few mis-shot parts.
Some of the parts are so tiny and thin that I guess this
is to be expected but I will repair or completely rebuild
anyway so no problem.
So that is it for now...back to the yards,
Cheers,
Joe
Grauwolf
#084
Joined: September 14, 2005
KitMaker: 2,485 posts
Model Shipwrights: 1,157 posts
Posted: Friday, April 04, 2014 - 09:25 AM UTC
Hi Michael,
I drilled holes on the bottom of the hull and installed
nuts on the inside.
The brass tubing slips over the bolts with run up from the
base and get screwed into the nuts.
By doing it this way, the bolts are always the same size
but I can change the diameter of the brass tubes to suit
the ship.
Cheers,
Joe
Grauwolf
#084
Joined: September 14, 2005
KitMaker: 2,485 posts
Model Shipwrights: 1,157 posts
Posted: Sunday, April 13, 2014 - 01:35 PM UTC
I have tried a little generic etch on the Snowberry build to
give it some extra detail.
Used 1:35 Panther grills to emulate the webbing on the rafts
and the two scratch Carley floats, which were present
as per 1943 photos I have of her.
Also found some PE engine parts from a WW1 aircraft that I will be using for the ribbing on the main gun platform.
I am not much of a PE user but these details I won't attempt
to do scratch in 1:350 scale.

Cheers,
Joe
give it some extra detail.
Used 1:35 Panther grills to emulate the webbing on the rafts
and the two scratch Carley floats, which were present
as per 1943 photos I have of her.
Also found some PE engine parts from a WW1 aircraft that I will be using for the ribbing on the main gun platform.
I am not much of a PE user but these details I won't attempt
to do scratch in 1:350 scale.
Cheers,
Joe
Aurora-7
#360
Joined: June 18, 2003
KitMaker: 1,020 posts
Model Shipwrights: 630 posts
Posted: Monday, April 14, 2014 - 01:53 AM UTC
Quoted Text
Hi Michael,
I drilled holes on the bottom of the hull and installed
nuts on the inside.
The brass tubing slips over the bolts with run up from the
base and get screwed into the nuts.
By doing it this way, the bolts are always the same size
but I can change the diameter of the brass tubes to suit
the ship.
Cheers,
Joe
Never had mounted any of my ship models this way but I'm going to try this with my Blyskawica build for the BOA campaign.
Nice idea on the rafts. I'm trying to figure out how so squeeze in some detail for my 1/400 Blyskawica beyond railings.
Grauwolf
#084
Joined: September 14, 2005
KitMaker: 2,485 posts
Model Shipwrights: 1,157 posts
Posted: Sunday, April 27, 2014 - 09:05 AM UTC
Ahoy all,
Progress on the Snowberry has been a little slow but nonetheless I am slowly pushing forward.
The main gun platform has now received some ribbing, PE part
scavenged from a WWI aircraft detail set...looks the part.
The brass main mast has begun to receive detail, parts transferred from the very fragile kit part and some scratch.
Tried to glue the yard arm with CA but it kept breaking off
so I soldered it....very strong now and should have no problem holding the rigging.


Must get back to the shipyard now,
Cheers,
Joe
Progress on the Snowberry has been a little slow but nonetheless I am slowly pushing forward.
The main gun platform has now received some ribbing, PE part
scavenged from a WWI aircraft detail set...looks the part.
The brass main mast has begun to receive detail, parts transferred from the very fragile kit part and some scratch.
Tried to glue the yard arm with CA but it kept breaking off
so I soldered it....very strong now and should have no problem holding the rigging.
Must get back to the shipyard now,
Cheers,
Joe

Fordboy

Joined: July 13, 2004
KitMaker: 2,169 posts
Model Shipwrights: 1,597 posts

Posted: Sunday, April 27, 2014 - 09:40 AM UTC
Ahoy Joe
This is shaping up very nicely indeed.
Cheers
Sean
This is shaping up very nicely indeed.
Cheers
Sean
Grauwolf
#084
Joined: September 14, 2005
KitMaker: 2,485 posts
Model Shipwrights: 1,157 posts
Posted: Sunday, April 27, 2014 - 02:27 PM UTC
Ahoy Sean,
Thanks for checking in and comments.
Cheers,
Joe
Thanks for checking in and comments.
Cheers,
Joe

Gremlin56
Joined: October 30, 2005
KitMaker: 3,897 posts
Model Shipwrights: 3,301 posts
KitMaker: 3,897 posts
Model Shipwrights: 3,301 posts

Posted: Sunday, April 27, 2014 - 04:48 PM UTC
Quoted Text
Ahoy Sean,
Thanks for checking in and comments.
Cheers,
Joe
Beautiful work on the mast Joe, she's coming along nicely,

Grauwolf
#084
Joined: September 14, 2005
KitMaker: 2,485 posts
Model Shipwrights: 1,157 posts
Posted: Monday, April 28, 2014 - 02:37 AM UTC
Thanks...Julian
More progress soon
Cheers,
Joe
More progress soon
Cheers,
Joe

RedDuster

Joined: March 01, 2010
KitMaker: 7,078 posts
Model Shipwrights: 6,649 posts

Posted: Monday, April 28, 2014 - 07:22 AM UTC
Looking good Joe,
The mast is a real improvement on the kit parts, like the ingenuity with the liferafts as well.
Following with much interest.
Si
The mast is a real improvement on the kit parts, like the ingenuity with the liferafts as well.
Following with much interest.
Si
Grauwolf
#084
Joined: September 14, 2005
KitMaker: 2,485 posts
Model Shipwrights: 1,157 posts
Posted: Monday, April 28, 2014 - 08:31 AM UTC
Thanks Simon.
Should have more pics up tonight or tomorrow.
Cheers,
Joe
Should have more pics up tonight or tomorrow.
Cheers,
Joe
Grauwolf
#084
Joined: September 14, 2005
KitMaker: 2,485 posts
Model Shipwrights: 1,157 posts
Posted: Monday, April 28, 2014 - 03:22 PM UTC
Ahoy shipmates,
Got a new photo of the Snowberry today and realized that I need to make a correction to my build.
As can be seen in a previous posted photo, I had installed a
cable reel on foredeck, portside. This is what the Zinnia
has, just one.
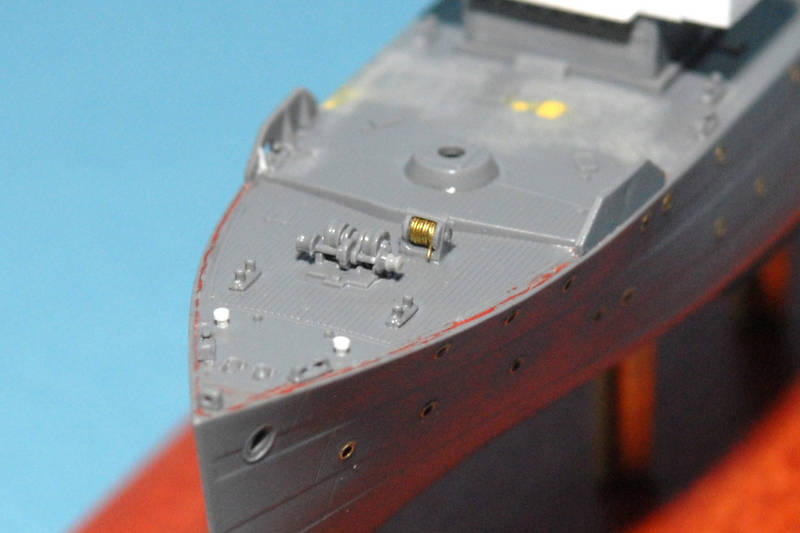
It turns out, the Snowberry had two of these, port and starboard and much closer to the breakwater. So I have
cut off the previously installed one and will be doing
the correct installation. Needless to say, the planking
on the deck will need to be re-scribed as the original
gluing and the removal has left some marring.
Photos to follow,
Cheers,
Joe
Got a new photo of the Snowberry today and realized that I need to make a correction to my build.
As can be seen in a previous posted photo, I had installed a
cable reel on foredeck, portside. This is what the Zinnia
has, just one.
It turns out, the Snowberry had two of these, port and starboard and much closer to the breakwater. So I have
cut off the previously installed one and will be doing
the correct installation. Needless to say, the planking
on the deck will need to be re-scribed as the original
gluing and the removal has left some marring.
Photos to follow,
Cheers,
Joe
Fordboy
Joined: July 13, 2004
KitMaker: 2,169 posts
Model Shipwrights: 1,597 posts
Posted: Tuesday, April 29, 2014 - 10:32 AM UTC
Ahoy Joe
Hang in there bud sometimes its "one step backward to take two steps forward".
Cheers
Sean
Hang in there bud sometimes its "one step backward to take two steps forward".
Cheers
Sean
Aurora-7
#360
Joined: June 18, 2003
KitMaker: 1,020 posts
Model Shipwrights: 630 posts
Posted: Wednesday, April 30, 2014 - 02:33 AM UTC
Wow, that is impressive micro-surgical skills you have there!
Grauwolf
#084
Joined: September 14, 2005
KitMaker: 2,485 posts
Model Shipwrights: 1,157 posts
Posted: Sunday, August 31, 2014 - 12:22 PM UTC
Ahoy all,
While working on all those small bits for this conversion, I took a break before going
too cross-eyed and decided to paint the hull.
This is the result.
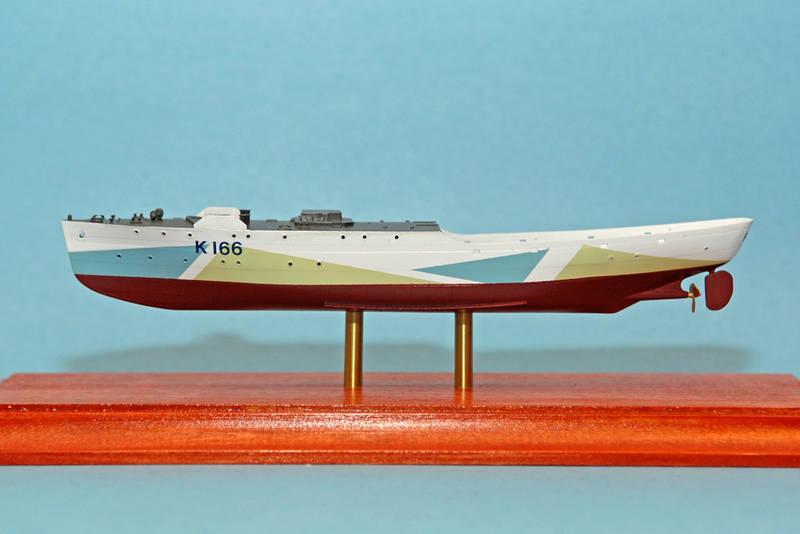
Now back to finalizing the bits that make up the superstructure and final assembly.
Hope you like.
Cheers,
Joe
While working on all those small bits for this conversion, I took a break before going
too cross-eyed and decided to paint the hull.
This is the result.
Now back to finalizing the bits that make up the superstructure and final assembly.
Hope you like.
Cheers,
Joe
Fordboy
Joined: July 13, 2004
KitMaker: 2,169 posts
Model Shipwrights: 1,597 posts
Posted: Sunday, August 31, 2014 - 03:17 PM UTC
Ahoy Joe
Nice work again.
Looking good bud.
Cheers
Sean
Nice work again.
Looking good bud.
Cheers
Sean

Blespooky

Joined: June 03, 2014
KitMaker: 277 posts
Model Shipwrights: 171 posts

Posted: Sunday, August 31, 2014 - 11:48 PM UTC
Awesome Paint, and the main mast came out excellent. Did you have a purpose made yard arm or is it simply brass rod?
Bryan
Bryan
Grauwolf
#084
Joined: September 14, 2005
KitMaker: 2,485 posts
Model Shipwrights: 1,157 posts
Posted: Monday, September 01, 2014 - 12:30 AM UTC
The main mast is all brass rod and brass bits soldered together.
Cheers,
Joe
Cheers,
Joe
RedDuster
Joined: March 01, 2010
KitMaker: 7,078 posts
Model Shipwrights: 6,649 posts
Posted: Monday, September 01, 2014 - 06:54 AM UTC
Nice Paint Job Joe,
Really clean.
Si
Really clean.
Si
Grauwolf
#084
Joined: September 14, 2005
KitMaker: 2,485 posts
Model Shipwrights: 1,157 posts
Posted: Monday, September 01, 2014 - 08:31 AM UTC
There will be some amount of weathering applied, once the whole
ship is assembled.
Thanks all for looking in,
Cheers,
Joe
ship is assembled.
Thanks all for looking in,
Cheers,
Joe

damoore46
Joined: January 28, 2008
KitMaker: 107 posts
Model Shipwrights: 26 posts

Posted: Saturday, September 06, 2014 - 04:51 AM UTC
Still following your work on this, Joe. A fantastic job - much better than I could do. I am really looking forward to the stretch run. Take plenty of pics! 

Grauwolf
#084
Joined: September 14, 2005
KitMaker: 2,485 posts
Model Shipwrights: 1,157 posts
Posted: Saturday, September 06, 2014 - 06:28 AM UTC
Thanks, DC.
Some more pics this weekend.
Cheers,
Joe
Some more pics this weekend.
Cheers,
Joe
Gremlin56
Joined: October 30, 2005
KitMaker: 3,897 posts
Model Shipwrights: 3,301 posts
KitMaker: 3,897 posts
Model Shipwrights: 3,301 posts
Posted: Saturday, September 06, 2014 - 06:51 AM UTC
I have been off station for a while Joe. The build looks great so far.Colors are spot on, ( a bit clean  ).
).
Like it,
cheers,
Julian
).Like it,
cheers,
Julian
Grauwolf
#084
Joined: September 14, 2005
KitMaker: 2,485 posts
Model Shipwrights: 1,157 posts
Posted: Saturday, September 06, 2014 - 08:25 AM UTC
Hi Julian,
Yes, too clean.....this is just my base coat...weathering to
follow once superstructure is installed so that the colors
will harmonize.
From photos that I have seen, the paint on these ships was
very beat up.
Thanks for looking in,
Cheers,
Joe
Yes, too clean.....this is just my base coat...weathering to
follow once superstructure is installed so that the colors
will harmonize.
From photos that I have seen, the paint on these ships was
very beat up.
Thanks for looking in,
Cheers,
Joe
 |

WEB HOSTING BY


Copyright ©2021 Model Shipwrights and Kitmaker Network, a subsidiary of Silver Star Enterprises
All Rights Reserved. Please read our Conditions of Use and Privacy Policy.
All Rights Reserved. Please read our Conditions of Use and Privacy Policy.