

I am finishing up the Trumpeter 1/350 HMS Dreadnought 1915 and could use some help. I used the kit's masts and tried rigging with EZ Line. Try as I might when I put tension on the masts they bend like and English longbow. I'm thinking of replacing the plastic with some thin brass rod that I have, maybe .5 mm or less. I'm wondering if I need to solder them together or if superglue might hold well enough. Any tips you can offer will be greatly appreciated.
Thanks.


Go to modelshipwrights.com for the current dynamic site!
General Ship Modeling
Discuss modeling techniques, experiences, and ship modeling in general.
Discuss modeling techniques, experiences, and ship modeling in general.
Hosted by Jim Starkweather
Replacing kit masts with brass rod?

Halfyank

Joined: February 01, 2003
KitMaker: 5,221 posts
Model Shipwrights: 1,821 posts

Posted: Thursday, April 23, 2015 - 05:24 AM UTC

JPTRR

#051
Joined: December 21, 2002
KitMaker: 7,772 posts
Model Shipwrights: 476 posts

Posted: Thursday, April 23, 2015 - 05:35 AM UTC
Rodger,
My experience with supergluing brass rod/wire is not successful unless you can notch the pieces to mate unto the other. I suggest solder.
My experience with supergluing brass rod/wire is not successful unless you can notch the pieces to mate unto the other. I suggest solder.


RussellE

#306

Joined: June 27, 2010
KitMaker: 3,959 posts
Model Shipwrights: 2,777 posts

Posted: Thursday, April 23, 2015 - 08:32 AM UTC
Hi Rodger
I replace pretty much every mast component on all my ships with Brass Rod, because of this exact problem: EZ line requires tension and the plastic masts don't have the strength to resist.
Frederick is right, you would be best to notch the masts and spars before joining them together.
On larger diameter masts, I solder the join, but on the smaller diameters, I use two part epoxy glue, as, although it takes longer to cure, it is much stronger than super glue.


TimReynaga
Joined: May 03, 2006
KitMaker: 2,500 posts
Model Shipwrights: 1,830 posts
Posted: Thursday, April 23, 2015 - 06:19 PM UTC
I agree with Frederick and Russ; notching and soldering or epoxying new masts works best if you want to use EZ line, because of the tension.
Another option I often use is wire. Extremely fine copper wire is available which can make for very effective scale rigging, and it can be used on kit parts without creating mast-bending tension.

Another option I often use is wire. Extremely fine copper wire is available which can make for very effective scale rigging, and it can be used on kit parts without creating mast-bending tension.


Halfyank
Joined: February 01, 2003
KitMaker: 5,221 posts
Model Shipwrights: 1,821 posts
Posted: Thursday, April 23, 2015 - 07:52 PM UTC
Thanks all.
I've been considering notching the rods but I'm not sure since they are so thin. I hadn't considered two part epoxy since I've not had good luck using that in the past. On the other hand I haven't soldered since 7th grade shop class. I might give all three methods, super glue, solder, epoxy, a try and see which works best.
Thanks again.
Halfyank
Joined: February 01, 2003
KitMaker: 5,221 posts
Model Shipwrights: 1,821 posts
Posted: Sunday, May 03, 2015 - 06:59 AM UTC
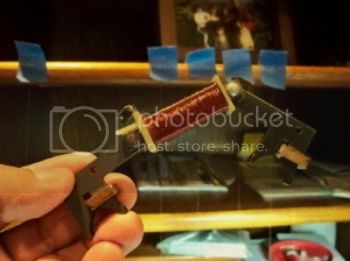
Thanks to all who responded. Here are the results of my first efforts.
First I tried using super glue to connect the rods. Didn't work. In fact I found a new use for brass rod, you can put super glue on it and it never seems to set at all!
Next I tried two part epoxy. Even after notching the rods and putting plenty of epoxy on it didn't hold worth a darn.
Tim I have some very thin wire, it says "32 TC" on the roll, or 1/4 lb. I have no idea what those numbers mean but it's very fine. I really wanted to use EZ Line though since what I have is black and this wire I would have to color with either marker or paint.
So finally after getting a crash course in soldering from a friend at our latest club meeting I managed to solder some rod together. The center section is tube, with the cross pieces thinner rod. Now I need to find out how to use the macro setting on my phone, which is currently my only camera. It's also been forever since I tried posting images so I don't know how this is going to work.


Hope this works
Edit: Ok, that didn't work. I'll have to read up on posting using Photobucket.
First I tried using super glue to connect the rods. Didn't work. In fact I found a new use for brass rod, you can put super glue on it and it never seems to set at all!
Next I tried two part epoxy. Even after notching the rods and putting plenty of epoxy on it didn't hold worth a darn.
Tim I have some very thin wire, it says "32 TC" on the roll, or 1/4 lb. I have no idea what those numbers mean but it's very fine. I really wanted to use EZ Line though since what I have is black and this wire I would have to color with either marker or paint.
So finally after getting a crash course in soldering from a friend at our latest club meeting I managed to solder some rod together. The center section is tube, with the cross pieces thinner rod. Now I need to find out how to use the macro setting on my phone, which is currently my only camera. It's also been forever since I tried posting images so I don't know how this is going to work.
Hope this works
Edit: Ok, that didn't work. I'll have to read up on posting using Photobucket.
RussellE
#306
Joined: June 27, 2010
KitMaker: 3,959 posts
Model Shipwrights: 2,777 posts
Posted: Sunday, May 03, 2015 - 08:59 AM UTC
Hi Rodger
yep, super glue won't work. There's just not enough area for the CA to bond to, and it doesn't perform well under the tension created by the rig.
I find 2 part epoxy works well on the smaller diameters that soldiering won't work on. Here's a quick SBS on how I use 2 part epoxy:


You need to make certain the 2 parts are mixed correctly, and leave the mast 24hours for the epoxy to thoroughly cure. Don't apply too much either (just enough to cover the join) as it will be less strong than if you were sparing.
When you attach your EZ line, I find applying a little accelerator to the attachment point first, then dipping the EZ line into medium CA before positioning it allows the EZ to attach quickly to the desired fixing point.
EZ line should always be a little shorter than needed to create the tensioned look.
One last tip-using a #80 drill, put a small hole into any flat areas you wish to attach the EZ to, then follow the steps above.
Hope this helps
Russ
yep, super glue won't work. There's just not enough area for the CA to bond to, and it doesn't perform well under the tension created by the rig.
I find 2 part epoxy works well on the smaller diameters that soldiering won't work on. Here's a quick SBS on how I use 2 part epoxy:
You need to make certain the 2 parts are mixed correctly, and leave the mast 24hours for the epoxy to thoroughly cure. Don't apply too much either (just enough to cover the join) as it will be less strong than if you were sparing.
When you attach your EZ line, I find applying a little accelerator to the attachment point first, then dipping the EZ line into medium CA before positioning it allows the EZ to attach quickly to the desired fixing point.
EZ line should always be a little shorter than needed to create the tensioned look.
One last tip-using a #80 drill, put a small hole into any flat areas you wish to attach the EZ to, then follow the steps above.
Hope this helps
Russ
Halfyank
Joined: February 01, 2003
KitMaker: 5,221 posts
Model Shipwrights: 1,821 posts
Posted: Tuesday, May 05, 2015 - 10:04 PM UTC
Thanks Russ. I really do think I like solder now better than the two part epoxy, but I'll consider using epoxy again. One brilliant idea you have is using blue tack to hold the mast while connecting. That is a great suggestions and I'll use it next time.
I'm going to try posting pics again. This time using my gallery.


If this works I only need to work on my macro photography.
edit: getting closer. I got the link to work, now I need to get the photo to appear.
I'm going to try posting pics again. This time using my gallery.
If this works I only need to work on my macro photography.
edit: getting closer. I got the link to work, now I need to get the photo to appear.
Removed by original poster on 05/06/15 - 17:06:27 (GMT).
Halfyank
Joined: February 01, 2003
KitMaker: 5,221 posts
Model Shipwrights: 1,821 posts
Posted: Tuesday, May 05, 2015 - 10:07 PM UTC
Ok, I think I've got this.


RussellE
#306
Joined: June 27, 2010
KitMaker: 3,959 posts
Model Shipwrights: 2,777 posts
Posted: Wednesday, May 06, 2015 - 04:27 PM UTC
Hi Rodger
that's not a half bad looking Dreadnought! Good work!
Yep, I totally agree with you on the soldiering. Always try for the soldier first, and keep the epoxy as a back up.
Just one more thing with the soldier-make sure the blue tack is a long way from the join as the soldier will soften it beyond its ability to keep the pieces in the right spot. Use clamps instead of blue tack if necessary
Hope this helps
TimReynaga
Joined: May 03, 2006
KitMaker: 2,500 posts
Model Shipwrights: 1,830 posts
Posted: Wednesday, May 06, 2015 - 05:30 PM UTC
Great advice Russ - I'll have to remember it for next project. Love the diagrams!

Biggles2

Joined: January 01, 2004
KitMaker: 7,600 posts
Model Shipwrights: 833 posts
Posted: Wednesday, May 06, 2015 - 07:59 PM UTC
Something else no one mentioned: when the lower portion of a mast is larger diameter than the upper section, use brass tubing of appropriate diameter for the lower part and insert solid brass rod (which fits snugly into the tubing) for the upper part. The thinner upper mast will be stronger and be able to hold more tension. I suppose if there is molded-on detail on the kit mast, it can be trimmed off and glued onto the new brass mast.

warshipbuild

Joined: June 06, 2006
KitMaker: 222 posts
Model Shipwrights: 207 posts

Posted: Thursday, May 07, 2015 - 01:37 AM UTC
Guys,
A most informative thread.
Could I please ask what size brass rod/tube you folks use to replicate your 1/350 ship masta?
For example, I have most of Trumpeter's WW2 RN & DKM ships to construct, and would be looking to replace the plastic masts on most if not all kits.
I am looking to buy in a stock of brass rod/tube in various sizes, but what would you recommend, and where is the best place to get it from?
Thanks
Dave
Halfyank
Joined: February 01, 2003
KitMaker: 5,221 posts
Model Shipwrights: 1,821 posts
Posted: Thursday, May 07, 2015 - 05:33 AM UTC
I figured somebody was going to ask this question but I'm ashamed to say I didn't write down the sizes I got. I picked up two packages at Hobbytown and two packages at Hobby Lobby. One package had two different sizes of rods, one had two different sizes of tubes, and I think two packages were of the same size. They came with four pieces in each package. I have no idea what's going to be available on the other side of the pond.
If I had to say I'd guess one size rod was 1mm, and one size 2mm. The tubes might have been about the same.
If I had to say I'd guess one size rod was 1mm, and one size 2mm. The tubes might have been about the same.
Kevlar06
Joined: March 15, 2009
KitMaker: 3,670 posts
Model Shipwrights: 173 posts

Posted: Thursday, May 07, 2015 - 09:59 AM UTC
Dave,
I solder my masts with a resistance soldering unit from American Beauty, which can be purchased through Micromark here in the US. It's expensive, but worth every penny because there is minimal heat transfer, so using Blue Tack as Russ illustrated is not a real problem. As to sizes of brass rod, I gave up trying to buy the rod to match a particular mast-- I just went out and purchased every size of brass rod and tube K & S brass offers, and I keep them on my workbench in a cardboard tube-- I used to take the mast to the hobby center/hardware store and try and match sizes, but soon realized I'd need different rods for individual ship masts anyway. K & S brass makes 4 foot long lengths, which a good hardware store can order-- 4 feet of brass will last quite a while. As someone mentioned above--"telescoping" the rod in brass tubes adds incredible strength and it will also allow you to use Milliput, putty or even plastic tube to "taper" the rod to match the prototype's taper. The suggestion about using things like the kits ladders and other fixtures re-attached to the brass mast is a good one, and remember there are generic aftermarket resin and photo etch details you can use too. One thing I might add to what's been said above is to use minimal solder, and "tin" the separate parts to be joined first ("tinning" is coating the join area with liquid solder before actually joining the parts) This will reduce the heat transfer time, and eliminate "globs" of solder in unwanted places. VR, Russ
I solder my masts with a resistance soldering unit from American Beauty, which can be purchased through Micromark here in the US. It's expensive, but worth every penny because there is minimal heat transfer, so using Blue Tack as Russ illustrated is not a real problem. As to sizes of brass rod, I gave up trying to buy the rod to match a particular mast-- I just went out and purchased every size of brass rod and tube K & S brass offers, and I keep them on my workbench in a cardboard tube-- I used to take the mast to the hobby center/hardware store and try and match sizes, but soon realized I'd need different rods for individual ship masts anyway. K & S brass makes 4 foot long lengths, which a good hardware store can order-- 4 feet of brass will last quite a while. As someone mentioned above--"telescoping" the rod in brass tubes adds incredible strength and it will also allow you to use Milliput, putty or even plastic tube to "taper" the rod to match the prototype's taper. The suggestion about using things like the kits ladders and other fixtures re-attached to the brass mast is a good one, and remember there are generic aftermarket resin and photo etch details you can use too. One thing I might add to what's been said above is to use minimal solder, and "tin" the separate parts to be joined first ("tinning" is coating the join area with liquid solder before actually joining the parts) This will reduce the heat transfer time, and eliminate "globs" of solder in unwanted places. VR, Russ
 |

WEB HOSTING BY


Copyright ©2021 Model Shipwrights and Kitmaker Network, a subsidiary of Silver Star Enterprises
All Rights Reserved. Please read our Conditions of Use and Privacy Policy.
All Rights Reserved. Please read our Conditions of Use and Privacy Policy.