_GOTOBOTTOM
Ships by Class/Type: Submarines
Topics on submarines of all types and eras.
USS Maryland - Reboot
TRM5150
Visit this Community
Massachusetts, United States
Joined: January 03, 2010
KitMaker: 2,159 posts
Model Shipwrights: 1,400 posts
Posted: Wednesday, June 01, 2016 - 02:33 AM UTC
Howdy Fellas,

I have been out straight for quite awhile...life stuff, modelling stuff and what-have-you. In an effort to get back into the swing of things I decided to try and clear some things from the queue. Basically things that have been languishing in exile on the shelf of shame. I do not have any sort of plan as to which ones fall off the shelf and when they might, but they will start falling as time permits.

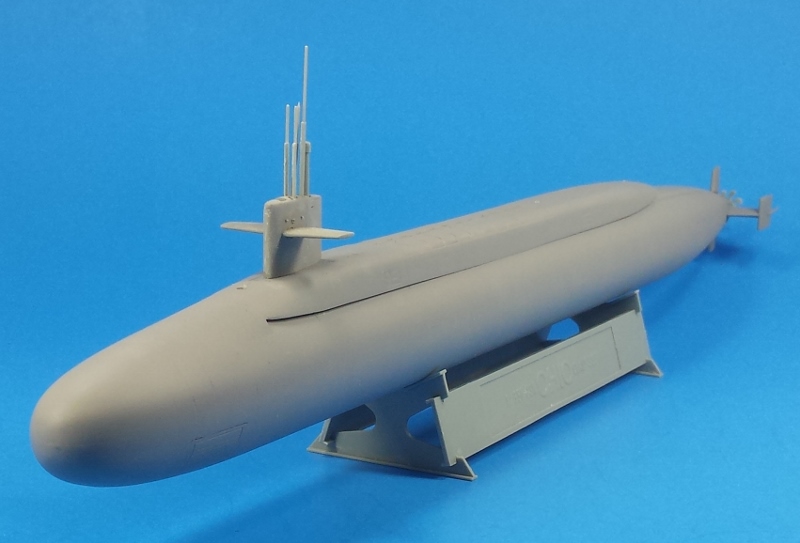
With that out of the way...the first up on the chopping block will be a floaty from way back. I received this kit as part of a Secret Santa build a couple years back. One thing led to another and and I only got as far as everything coming together but the conning tower. Out of respect to my Secret Santa (my friend Brian), this one needs to see the end of the tunnel. As part of the gift, the kit actually took a tour aboard the Maryland in the Atlantic. In addition, I was given some memorabilia...patches, challenges coin, stickers and and a personalized work uniform...pretty freaking cool if I say so myself!

I probably would have entered this into the Silent Service Campaign, but she seemed to have been farther along than the rules might have applied. Okay...let bring this up to where I am as of today....


The conning tower and prop was finally added and things were readied for a painting session.


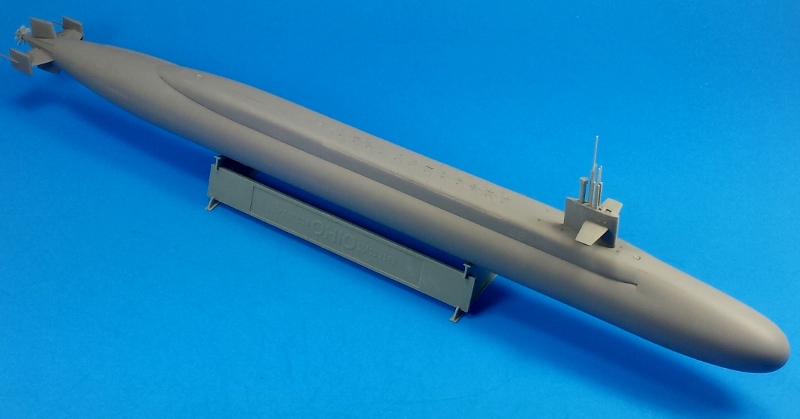
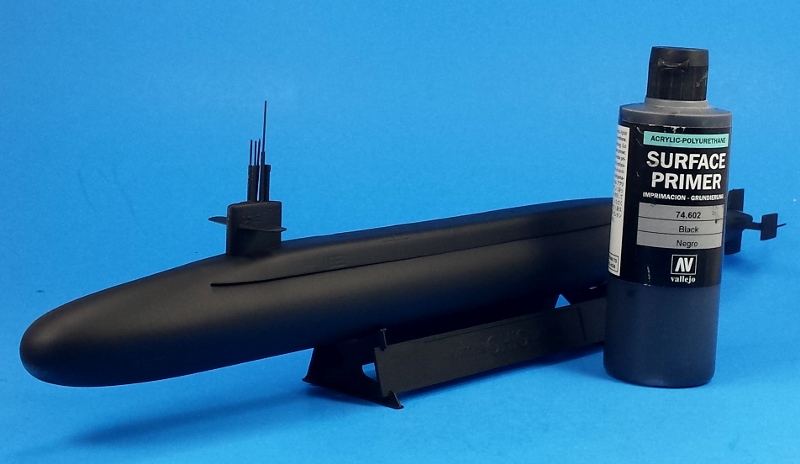
Just before this past weekend, I had the chance to sling some primer onto this. Since the Maryland was all black, including the hull (not as depicted on the box), a littla black primer was in order. THis will serve as the priming coat and base to the color!


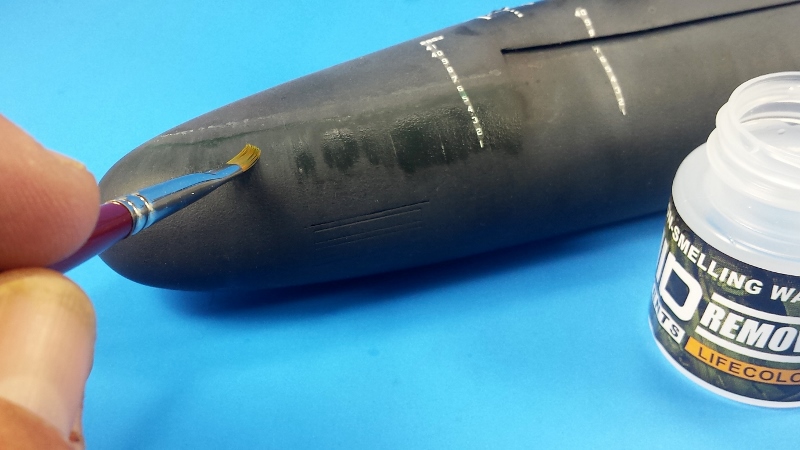
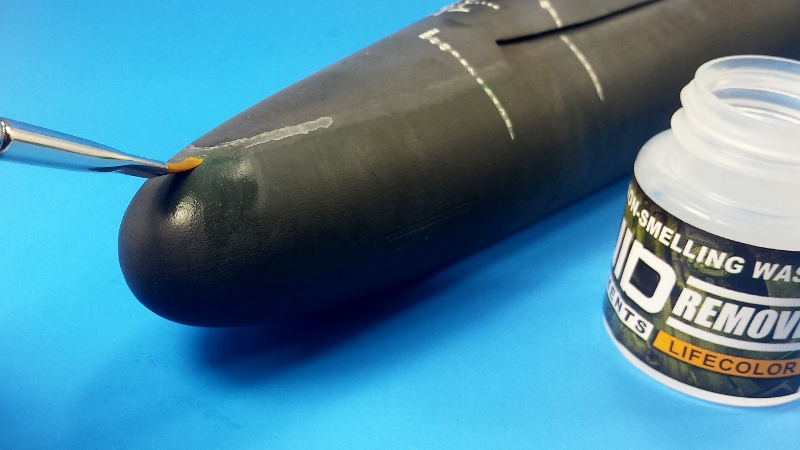
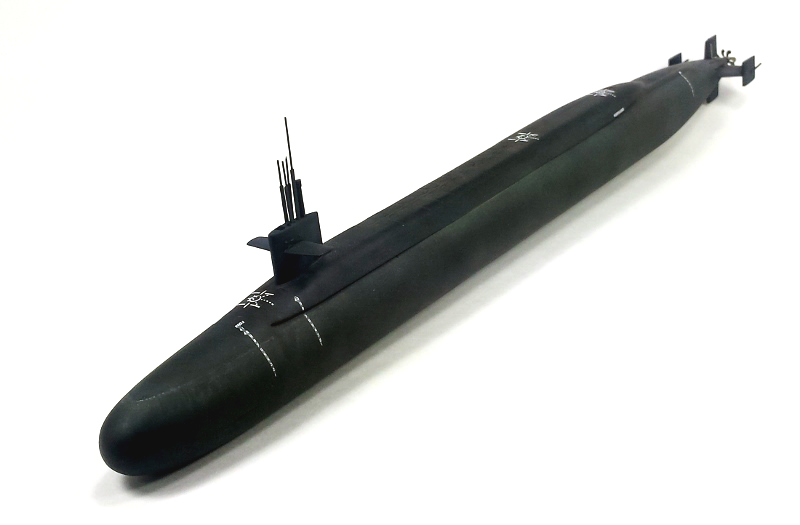
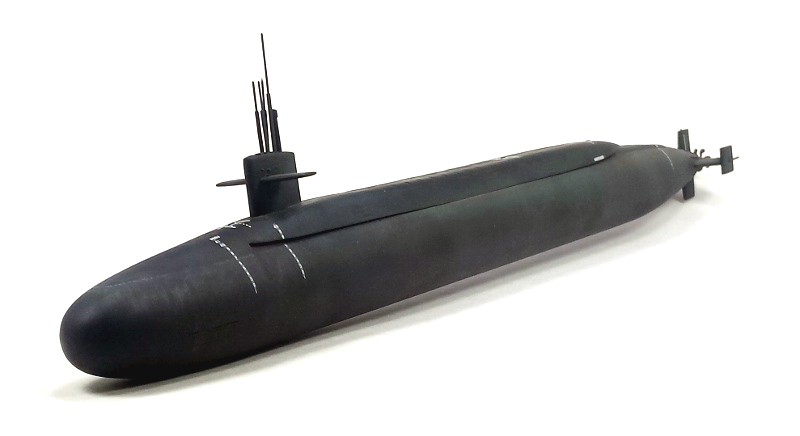
Last night I was able to hit the booth again after some well-placed masking and begin adding a little color which will help the weathering along.


So basically I am now ready to hit the weathering stage of the build. Funny how it took almost 3 years to get this back on the bench...and in a couple days the finish line is on the horizon!


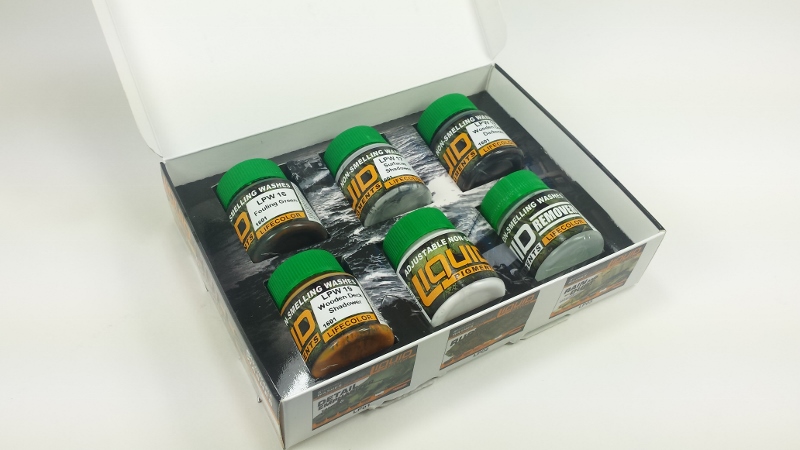
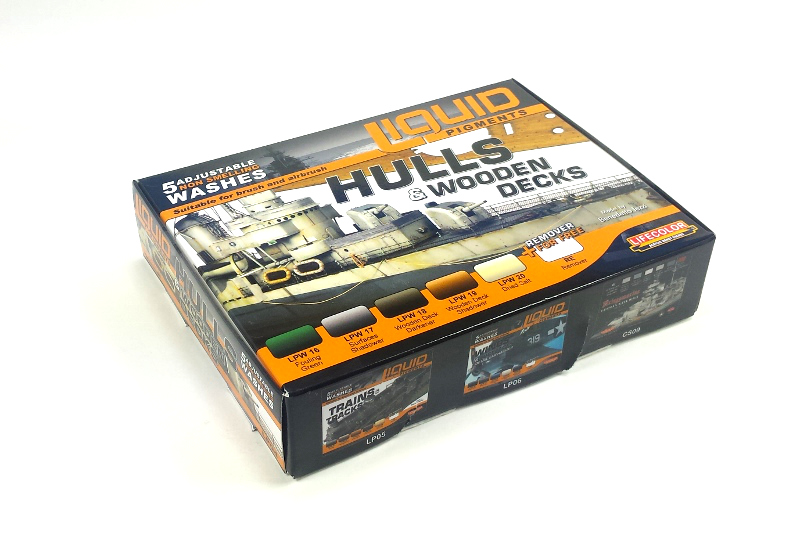
I was fortunate enough in the past week to get my hands on a new set of Liquid Pigments from Life Color. I am thinking this is one of the best projects I could give these a try on. As I work the weathering on this one, I will try and get a review together for the Liquid Pigments over the next week as well.


Thanks for stopping by for a bit...I hope to have another update on this one real soon!
Littorio
Visit this Community
England - South East, United Kingdom
Joined: September 15, 2004
KitMaker: 4,728 posts
Model Shipwrights: 1,080 posts
Posted: Wednesday, June 01, 2016 - 02:46 AM UTC
Nice to see this one on the bench Todd, I'm for sure following along as I have the other Dragon boxing with the same class of subs but different name subs. Nice to know that the boomer is all black, I think that my build will progress soon knowing that and love the first stage of your weathering.
TRM5150
Visit this Community
Massachusetts, United States
Joined: January 03, 2010
KitMaker: 2,159 posts
Model Shipwrights: 1,400 posts
Posted: Wednesday, June 01, 2016 - 03:02 AM UTC
Thanks Lucino! Glad to have you along for the ride! Pretty cool kit if you ask me. I am saving the Chicago for a rainy day somewhere down the road. The Maryland was the prize in all this to begin with...LOL! I will keep a eye open for yours when it comes about! Funny how these things look pristine shallow in the water....get them in dry dock and the weathering just goes crazy!
TimReynaga
Staff MemberAssociate Editor
MODEL SHIPWRIGHTS
Visit this Community
California, United States
Joined: May 03, 2006
KitMaker: 2,500 posts
Model Shipwrights: 1,830 posts
Posted: Wednesday, June 01, 2016 - 04:09 AM UTC
Hi Todd,
She's looking good! Can you give us a little description of the process so far... airbrush? Colors in sequence, or mixed? I'm not very good at weathering, so any insights are useful!
TRM5150
Visit this Community
Massachusetts, United States
Joined: January 03, 2010
KitMaker: 2,159 posts
Model Shipwrights: 1,400 posts
Posted: Wednesday, June 01, 2016 - 05:09 AM UTC
Thanks Tim! Glad to have you on board! So far, nothing too bad when it comes to paint. The Black primer works just fine for the base color...as you would figure. After that, I masked off the waterlines...there is two...maybe three I was thinking of showing in the final weathering. Most of the bottom one I dusted with thinned down paint...maybe close to 50/50. Gave me a little more control to making softer tones I guess. Greys followed by the greens. Removed the first run of tape and sprayed the lighter grey onto the masking left allowing the over spray to color the 1/4 or so of clean surface where the 1st tape was. Once that was done I dusted things with some antique white...maybe 60/40 thinner to paint. This was light to take the curse off the black and to blend the edges. I also thinned some rust color to dust the corner edges of the vents to add some color.

'Bout it at the moment. I am going to hit the new weathering set up and see what it can do. I have another set from LC I played with not too long ago...the liquid pigments are somewhat like using standard pigments for washes but they are a bit more responsive. You can manipulate them with water if you just put them down, but if they dry, the remover takes over...which works superb. I should be playing around with it shortly. I will make an update showing what I find out so far...kind of a preemptive review...LOL
JJ1973
#345
Visit this Community
Niedersachsen, Germany
Joined: August 22, 2011
KitMaker: 1,835 posts
Model Shipwrights: 1,832 posts
Posted: Wednesday, June 01, 2016 - 09:10 AM UTC
Hi Todd,

seems like a nice project - an a cool story behind it! I'll be on for the rest of the ride, and I am looking forward in particular to learn about the weathering and what you're accomplishing with the liquid pigment stuff - I tried my hand at weathering here and there, but I am still quite in the embryonic state for myself with it...

Cheers,
Jan
Cosimodo
#335
Visit this Community
Auckland, New Zealand
Joined: September 03, 2013
KitMaker: 1,808 posts
Model Shipwrights: 871 posts
Posted: Wednesday, June 01, 2016 - 11:48 AM UTC
Always good to see the abandoned retrieved. They do tend to make you feel guilty when you see them on the shelf.
I like the black primer effects and the subtle weathering. You can't get any of those brands here but I will interested to see how the Lifecolour pigments work.

cheers
Michael
RedDuster
Visit this Community
England - South East, United Kingdom
Joined: March 01, 2010
KitMaker: 7,078 posts
Model Shipwrights: 6,649 posts
Posted: Wednesday, June 01, 2016 - 12:42 PM UTC
Hi Todd,

Good to see you at the bench. Very nice looking build, and interesting back story. I do understand the shelf of shame, mine needs looking at.

Will be very interesting to see how the weathering materials work.

Cheers

Si
TRM5150
Visit this Community
Massachusetts, United States
Joined: January 03, 2010
KitMaker: 2,159 posts
Model Shipwrights: 1,400 posts
Posted: Saturday, June 04, 2016 - 06:42 AM UTC
Thanks for climbing aboard Jan! For starters I am thinking of holding back and keeping the weathering to the subtle side of things...but with weathering, it sometimes has a mind of its own. You kind of evaluate as you go for the most part. The Liquid Pigments are an interesting set of washes to work with. While traditional washes darken and accent, the LP's add the flat, almost layered appearance of pigments as well. Super easy to use especially with the provided remover. Water does the trick for the most part, but the LP's dry rather quick and keeping the Remover close by is warranted

Thanks for joining in Michael! LOL...I swear I had a few kits on he shelf actually say stuff as I walk by! I was hoping I was just losing my mind a bit, but now they are getting unruly altogether!

Thanks for hanging about Si! The guilt over not finishing this one was far greater than just about everything else on the shelf! With any luck it will all be behind me soon!


Okay...not too much of an update as I am still running around like a chicken with its head removed...but there is progress. I cracked into the Liquid Pigments. I think I mentioned it once or twice already, but I do like them. Very simple to use. The overall look is up to the builder basically. I like to start light and build things up, but you can go heavy and still manipulate the effects afterwards.

What you get in the box, if you were curious at all...


There are a few ways to apply these effects. You can use an airbrush, depending on the desired effects and area of coverage. You can also apply the effects by brush of course. I look at this in two ways, wet and/or dry. You could dampen the area which disperses the wash allowing for softer tones to work with or full strength with a dry base which of course will leave darker deposits.


Once applied you can immediately begin to manipulate and soften the look with water or wait until it has dried to the surface which at that time you would use the provided remover.


As you saw above I used the Fouling Green color first. The second color I chose is the Dried Salt. I wanted a couple of bands to show as the ship will sit at different heights in the water depending on where she is at on her cruise.


Again I used the Remover to manipulate what I put on the model. The first layer had dried enough that the remover barely effected the first application. In some respect though, this is not a bad thing if it take some of the first color and blends into the new whiter coloring. This gives things more variation in tone.


And this is more or less how she sits right now. I have more things to play around with and will let what I am seeing sink in for a day or two before deciding to add more.


Thanks for tuning again!! Hopefully I will have something new to report soon!
JJ1973
#345
Visit this Community
Niedersachsen, Germany
Joined: August 22, 2011
KitMaker: 1,835 posts
Model Shipwrights: 1,832 posts
Posted: Saturday, June 04, 2016 - 10:03 PM UTC
Cool stuff, Todd!! The effects look really good - I particularly like the green, as long as it's a little wet it looks like the real thing!!

Looking forward to see what you eventually decide to do to her!

Cheers,
Jan
TRM5150
Visit this Community
Massachusetts, United States
Joined: January 03, 2010
KitMaker: 2,159 posts
Model Shipwrights: 1,400 posts
Posted: Sunday, June 05, 2016 - 02:00 AM UTC
Thanks Jan! I am still on the fence of adding more. Maybe some lighter greens and white streaks. Going to get the stand set today and see what it looks like after stepping back!
RussellE
#306
Visit this Community
Victoria, Australia
Joined: June 27, 2010
KitMaker: 3,959 posts
Model Shipwrights: 2,777 posts
Posted: Sunday, June 05, 2016 - 04:08 PM UTC
Good to see you pick this one back up Todd-not often we see a modern sub around here

Really appreciate that you've added a water/scum line. It's all too often missed on subs when weathered
TRM5150
Visit this Community
Massachusetts, United States
Joined: January 03, 2010
KitMaker: 2,159 posts
Model Shipwrights: 1,400 posts
Posted: Sunday, June 05, 2016 - 11:05 PM UTC
Thanks Russ! LOL...I had to stat somewhere with the backlog of Queens hanging about! I liked the contrast of greens I see in some pictures...the lines were a must at that point. Hopefully finish this one up this week sometime and I can break something else out!
TRM5150
Visit this Community
Massachusetts, United States
Joined: January 03, 2010
KitMaker: 2,159 posts
Model Shipwrights: 1,400 posts
Posted: Tuesday, June 21, 2016 - 05:34 AM UTC
Well, I am going to call this one done! After sitting on the shelf of queens for about 3 years or so, this one is finally put to be. I went back and forth about doing heavy weathering to her, but in the end, decided light was best. Thanks for tagging along while I cleared this one off the list!


Grauwolf
#084
Visit this Community
Quebec, Canada
Joined: September 14, 2005
KitMaker: 2,485 posts
Model Shipwrights: 1,157 posts
Posted: Tuesday, June 21, 2016 - 07:12 AM UTC
She is FANTASTIC!

Great job on the paint & weathering...so subtle.

Cheers,
Joe
surfsup
Visit this Community
Queensland, Australia
Joined: May 20, 2010
KitMaker: 1,230 posts
Model Shipwrights: 1,212 posts
Posted: Tuesday, June 21, 2016 - 02:10 PM UTC
You have done a beautiful job on her......Cheers Mark
TRM5150
Visit this Community
Massachusetts, United States
Joined: January 03, 2010
KitMaker: 2,159 posts
Model Shipwrights: 1,400 posts
Posted: Tuesday, June 21, 2016 - 03:54 PM UTC
Thanks you Joe and Mark! I thought about changing the color of the stand to something like the yellow and blue from the ship's patch, but I think if I display her with all the little trinkets I have from the ship, it all balances out!
Lisec
Visit this Community
Croatia Hrvatska
Joined: September 13, 2006
KitMaker: 306 posts
Model Shipwrights: 1 posts
Posted: Tuesday, June 21, 2016 - 04:29 PM UTC
I really really love the weathering job you did, really brings the dull surface to life. Top notch work

But what i don`t like is the silvering on the decals
darn shame that
Aurora-7
#360
Visit this Community
Connecticut, United States
Joined: June 18, 2003
KitMaker: 1,020 posts
Model Shipwrights: 630 posts
Posted: Tuesday, June 21, 2016 - 08:34 PM UTC
Modern submarines are simple to build but a challenge to finish with giving depth to the subject. Really nice job with this one.
JJ1973
#345
Visit this Community
Niedersachsen, Germany
Joined: August 22, 2011
KitMaker: 1,835 posts
Model Shipwrights: 1,832 posts
Posted: Wednesday, June 22, 2016 - 09:30 AM UTC
Great job, Todd!!

I particularly like how you managed to create a very realistic looking 'waterline' with the green stuff...very nice touch! Looks pretty cool!

Cheers,
Jan
RussellE
#306
Visit this Community
Victoria, Australia
Joined: June 27, 2010
KitMaker: 3,959 posts
Model Shipwrights: 2,777 posts
Posted: Thursday, June 23, 2016 - 02:25 AM UTC
Great work Todd!

Good to see this one move from the bench to the display!

The waterline looks particularly good.
TRM5150
Visit this Community
Massachusetts, United States
Joined: January 03, 2010
KitMaker: 2,159 posts
Model Shipwrights: 1,400 posts
Posted: Thursday, June 23, 2016 - 03:36 AM UTC
Thanks Matija! The decals were a bit on silvery side. I used a couple different decal solvents but sometimes they respond the way they want!

Thanks Michael! Not too bad overall on the building is correct! Looking forward to seeing one of the underwater floatys you have kicking around ht the bench soon!

Thank you Jan! Most appreciated! I am thinking if and when I hit the Chicago from the kit, I might heavy up the weathering a little! Just for fun!

Thanks Russ! Always a good think to clear the shelf and fill the cabinet! Time to pick my next victim!!
 _GOTOTOP