

I got this gift set kit a few months ago, than...kinda forgot about it. I'm not sure why. I hadn't done much too it. (screwed the pooch on a few things as well) however as of today she is complete...mostly.
I'm not happy with the quality of this kit to be honest, and I love Airfix. the quality was horrible, critical pieces were broken from the sprue and even broken in half, ect.
I guess it isn't much of a build log, but I have plenty of pictures from when she was just a deck to her completed state.
https://imgur.com/aoaD4lg
This is where I was when I kind of put her in dry dock. She was deffinetly giving me the evil eye the last few months.
https://imgur.com/haeiv5f
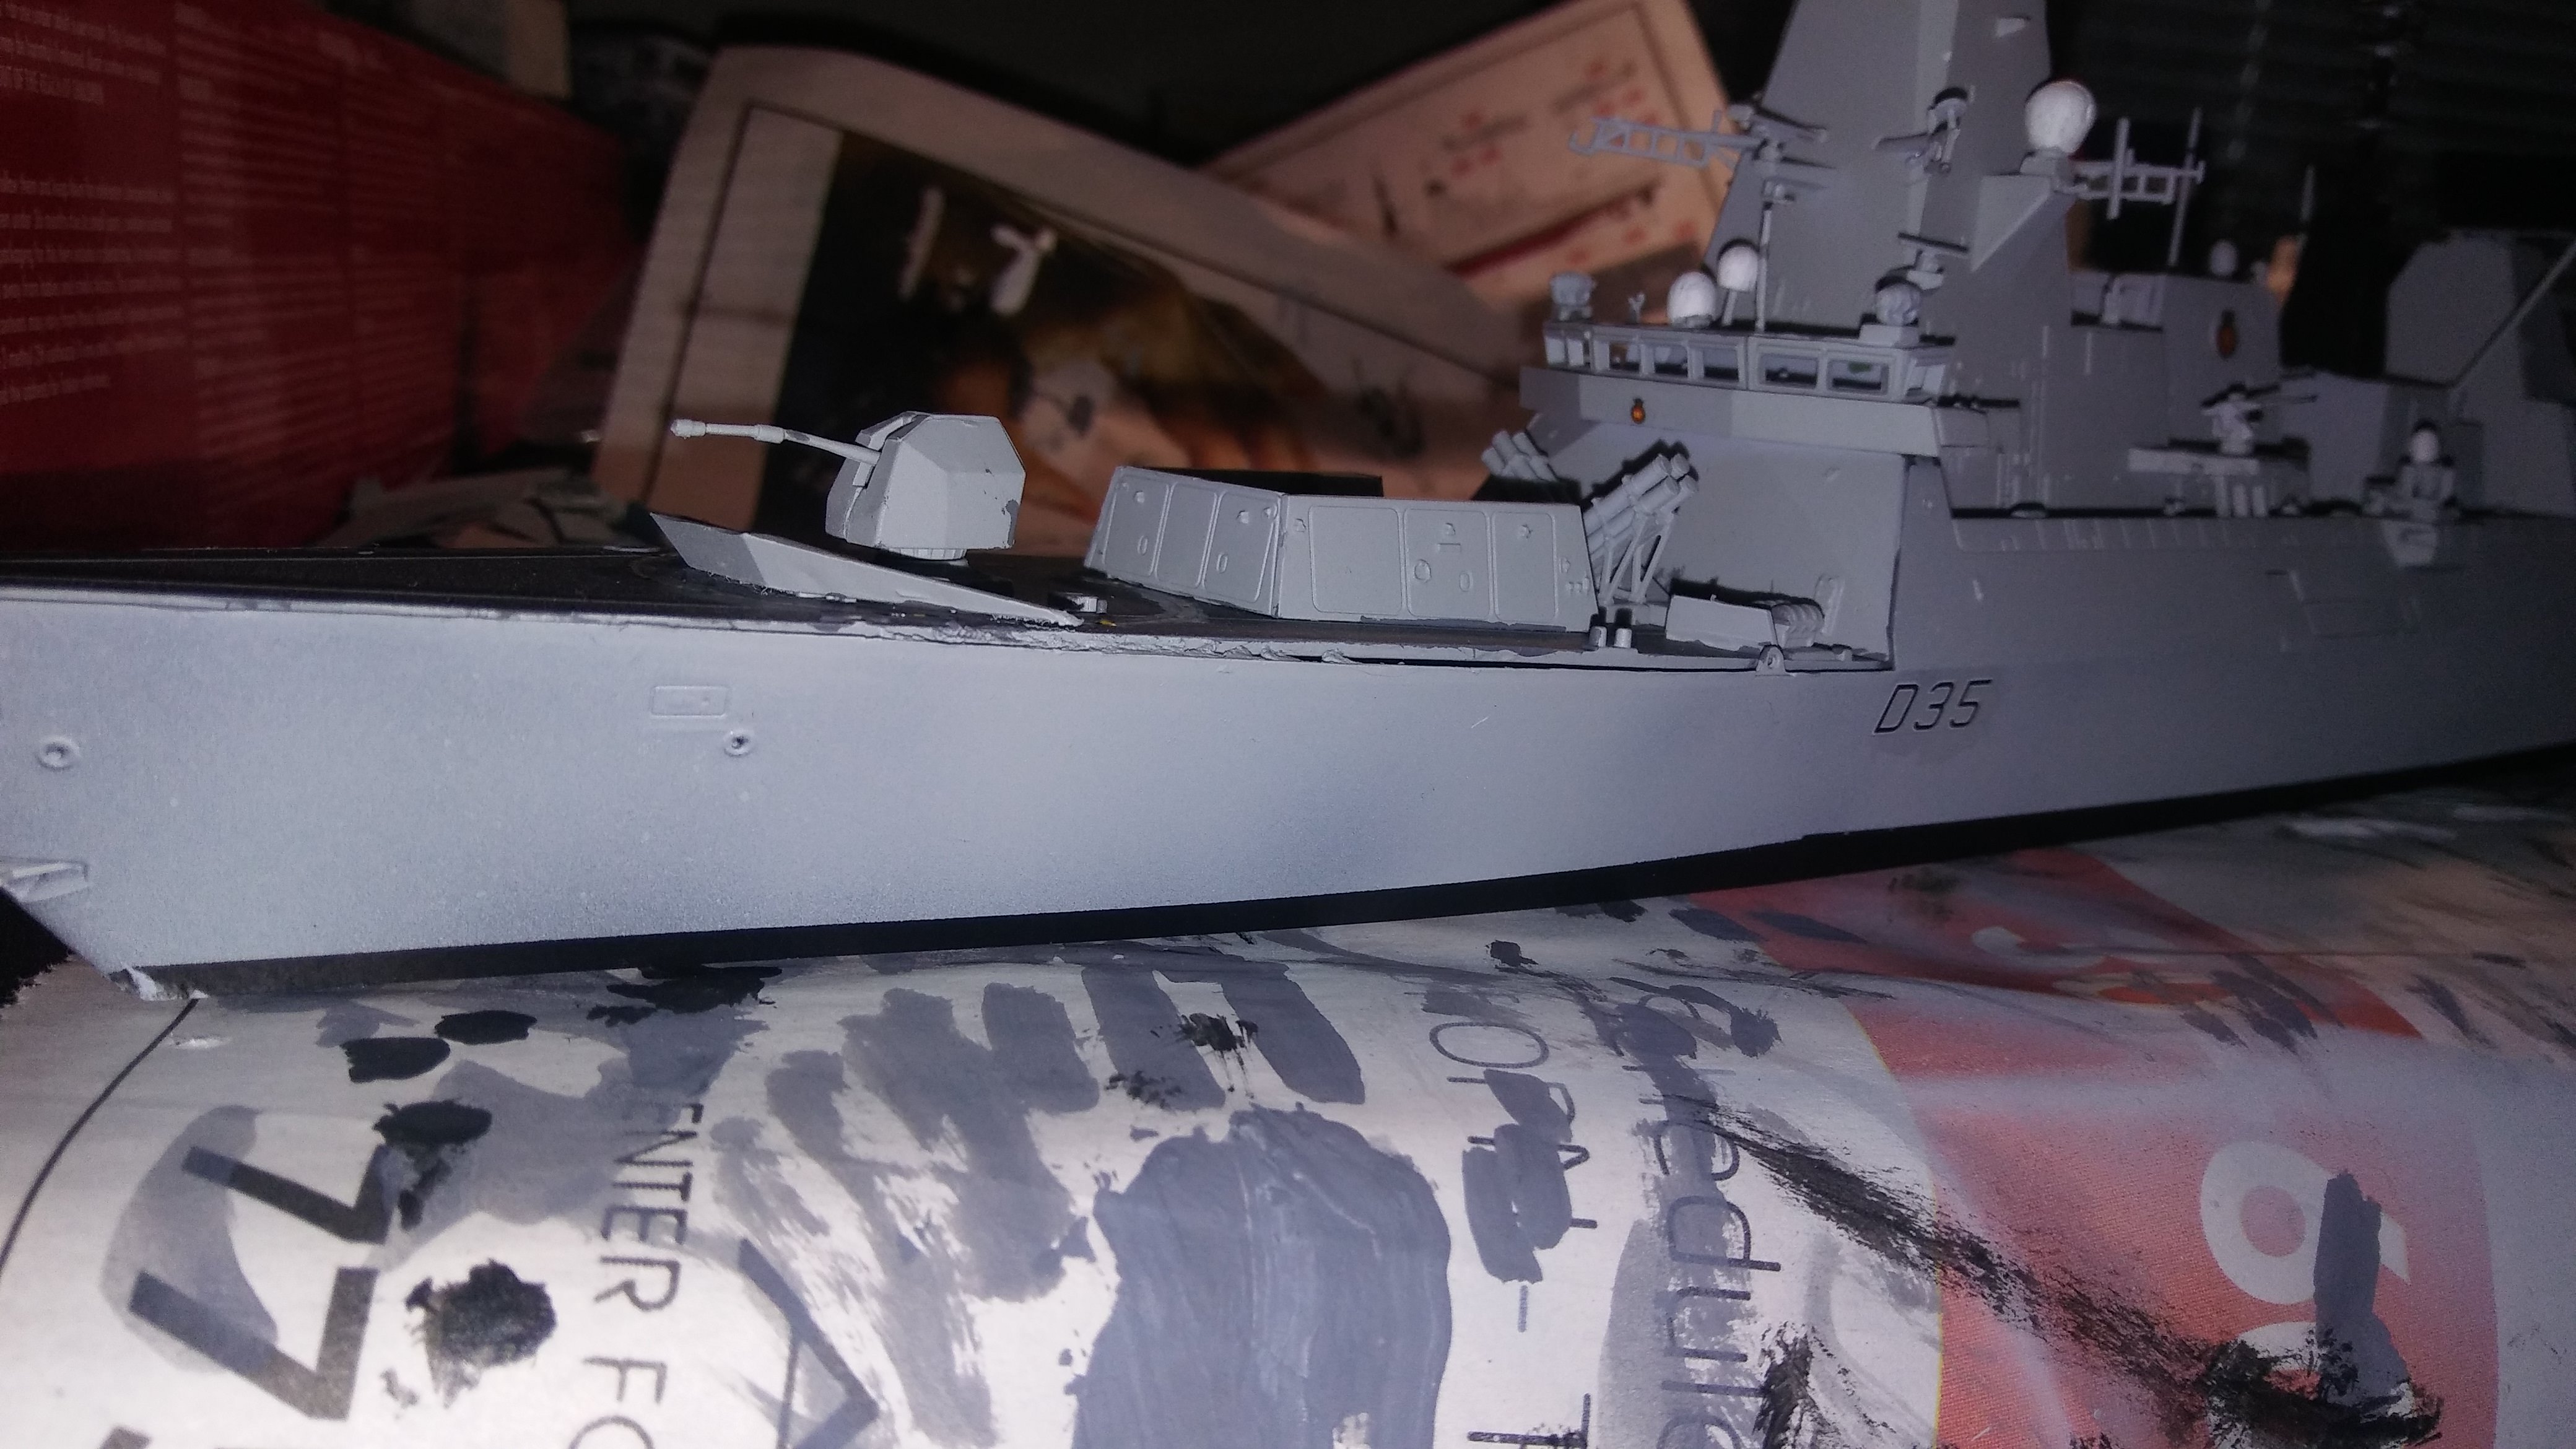
As of yesterday morning this is where she was, after that I was not looking forward to the small details. I have very shaky hands and tiny pieces are a daunting (sometimes frustrating) task.
https://imgur.com/hdHRU68
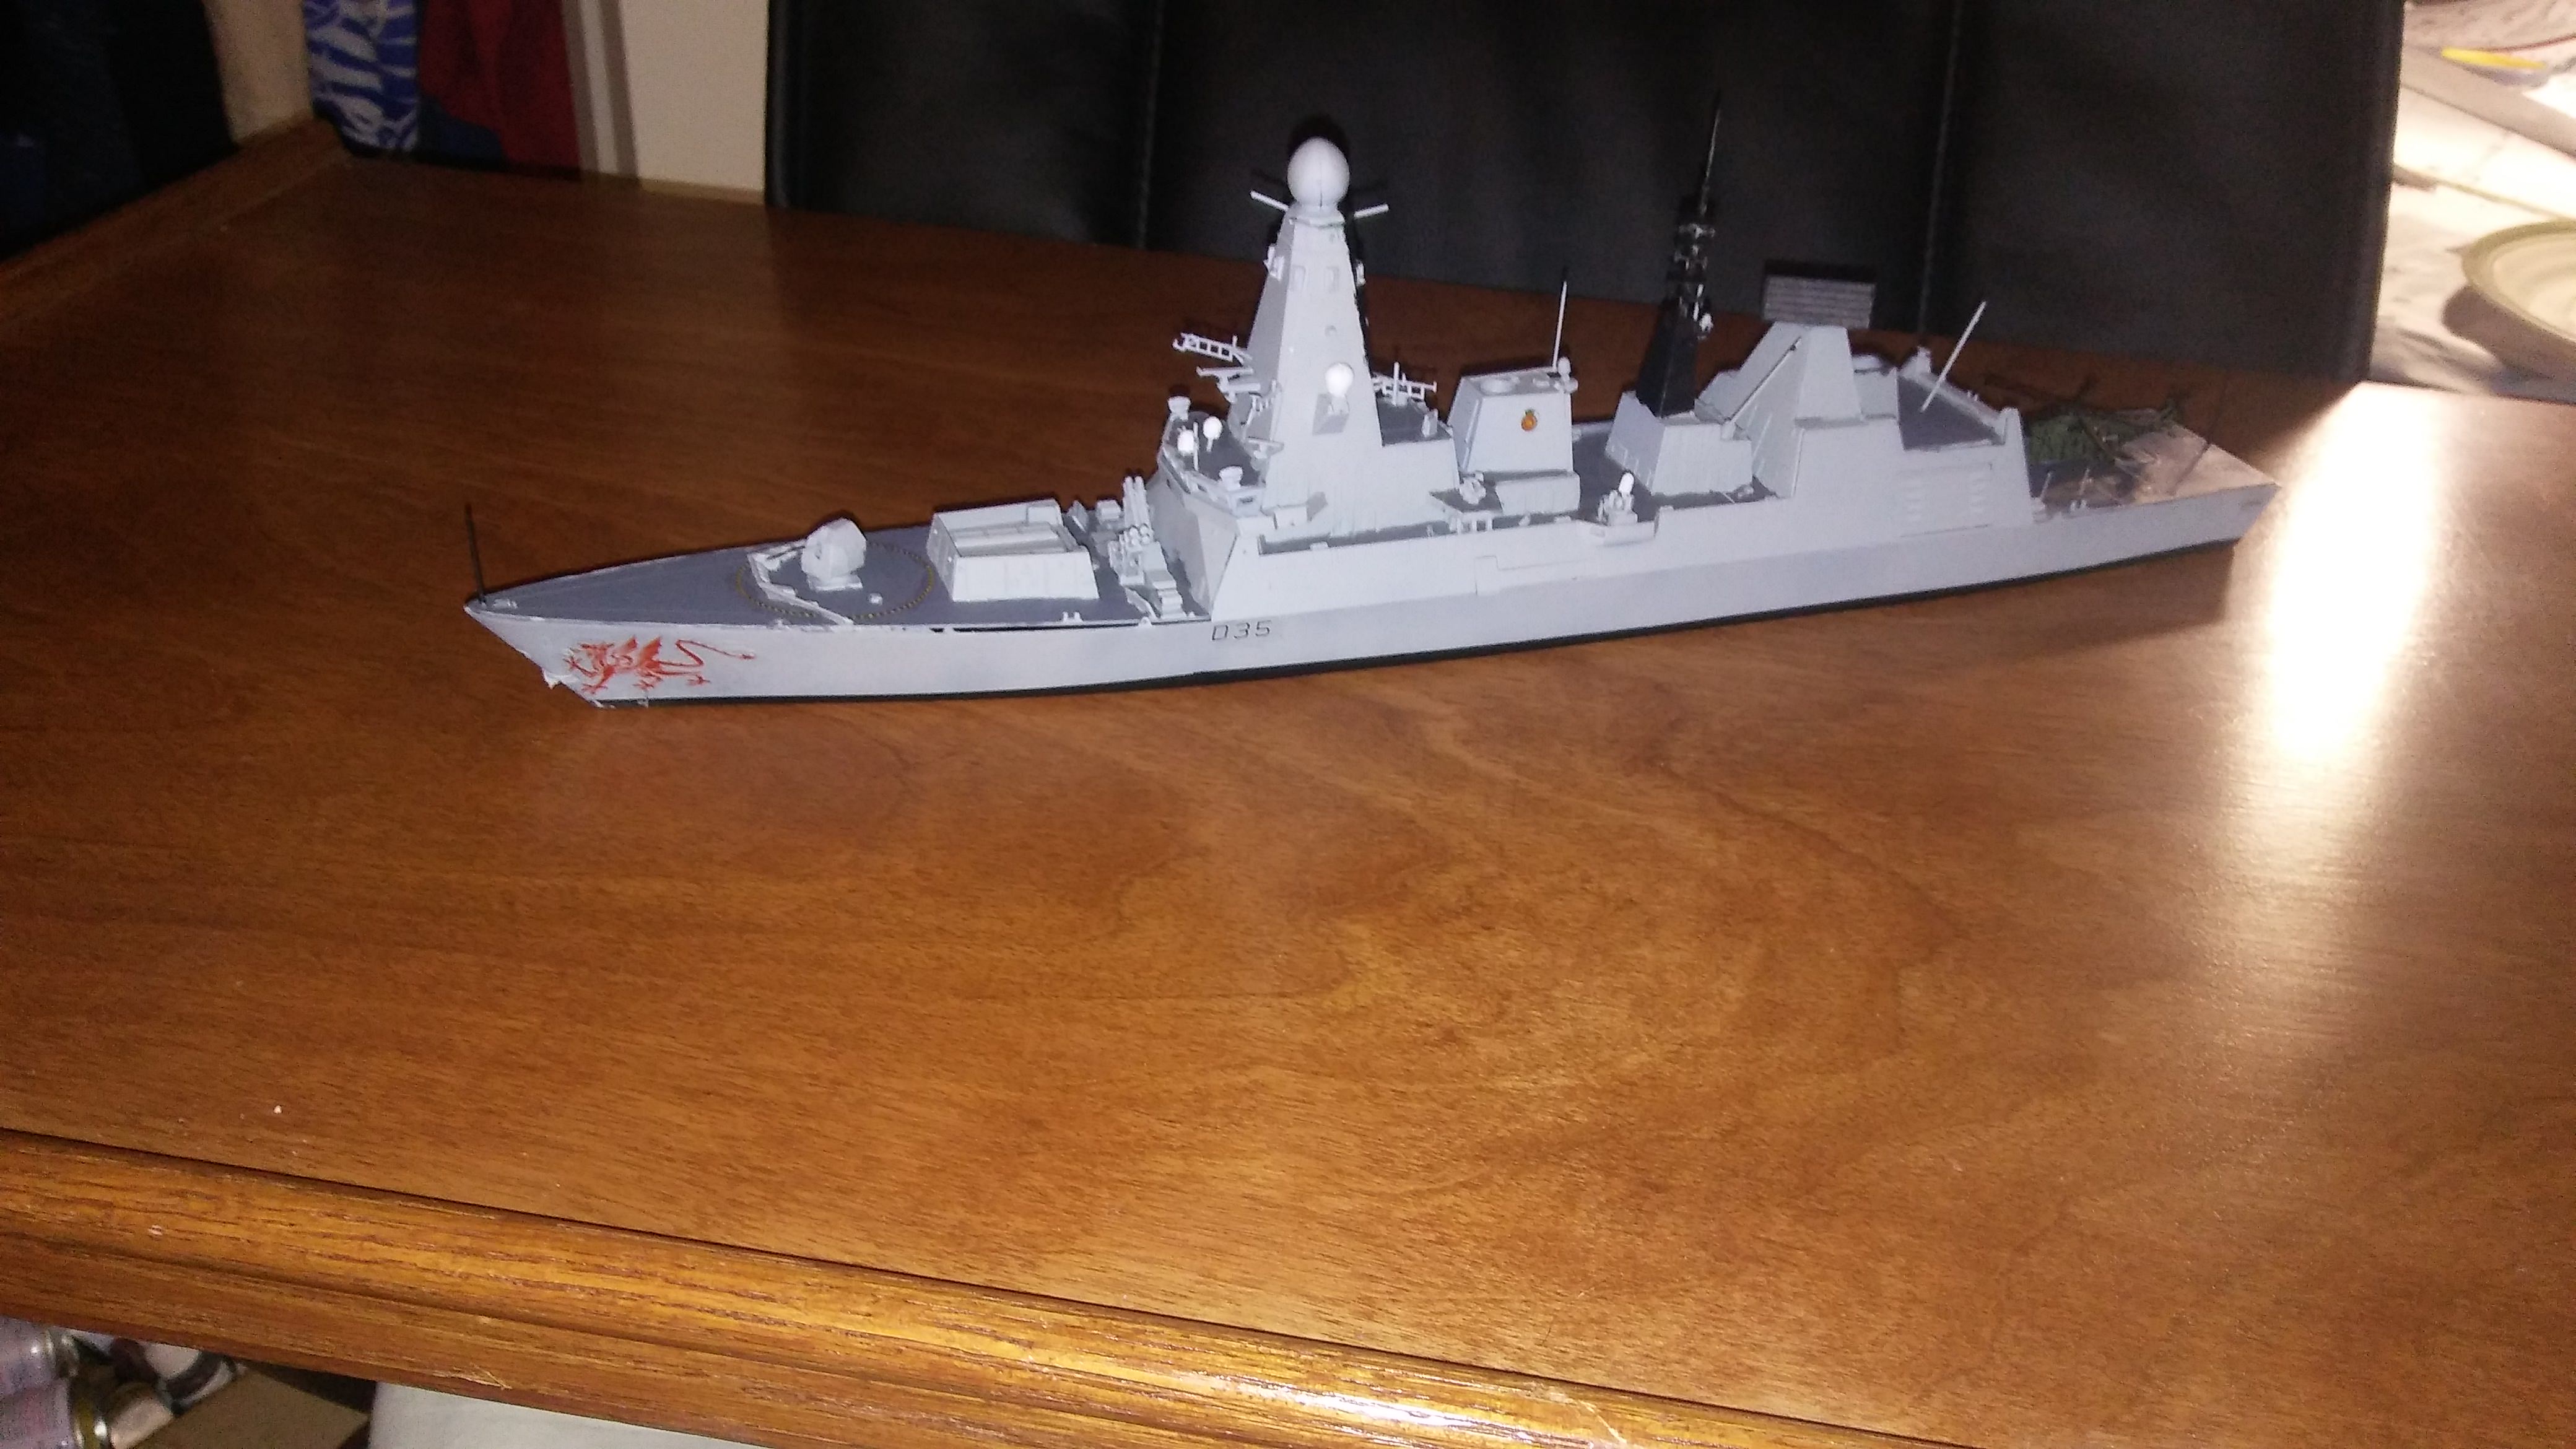
This is how she looked last night, after taking a break for a few hours, worked well into the night.
https://imgur.com/5JZnXlk
https://imgur.com/ajwsrq2
https://imgur.com/GvQlqTo
https://imgur.com/XjqqfPa
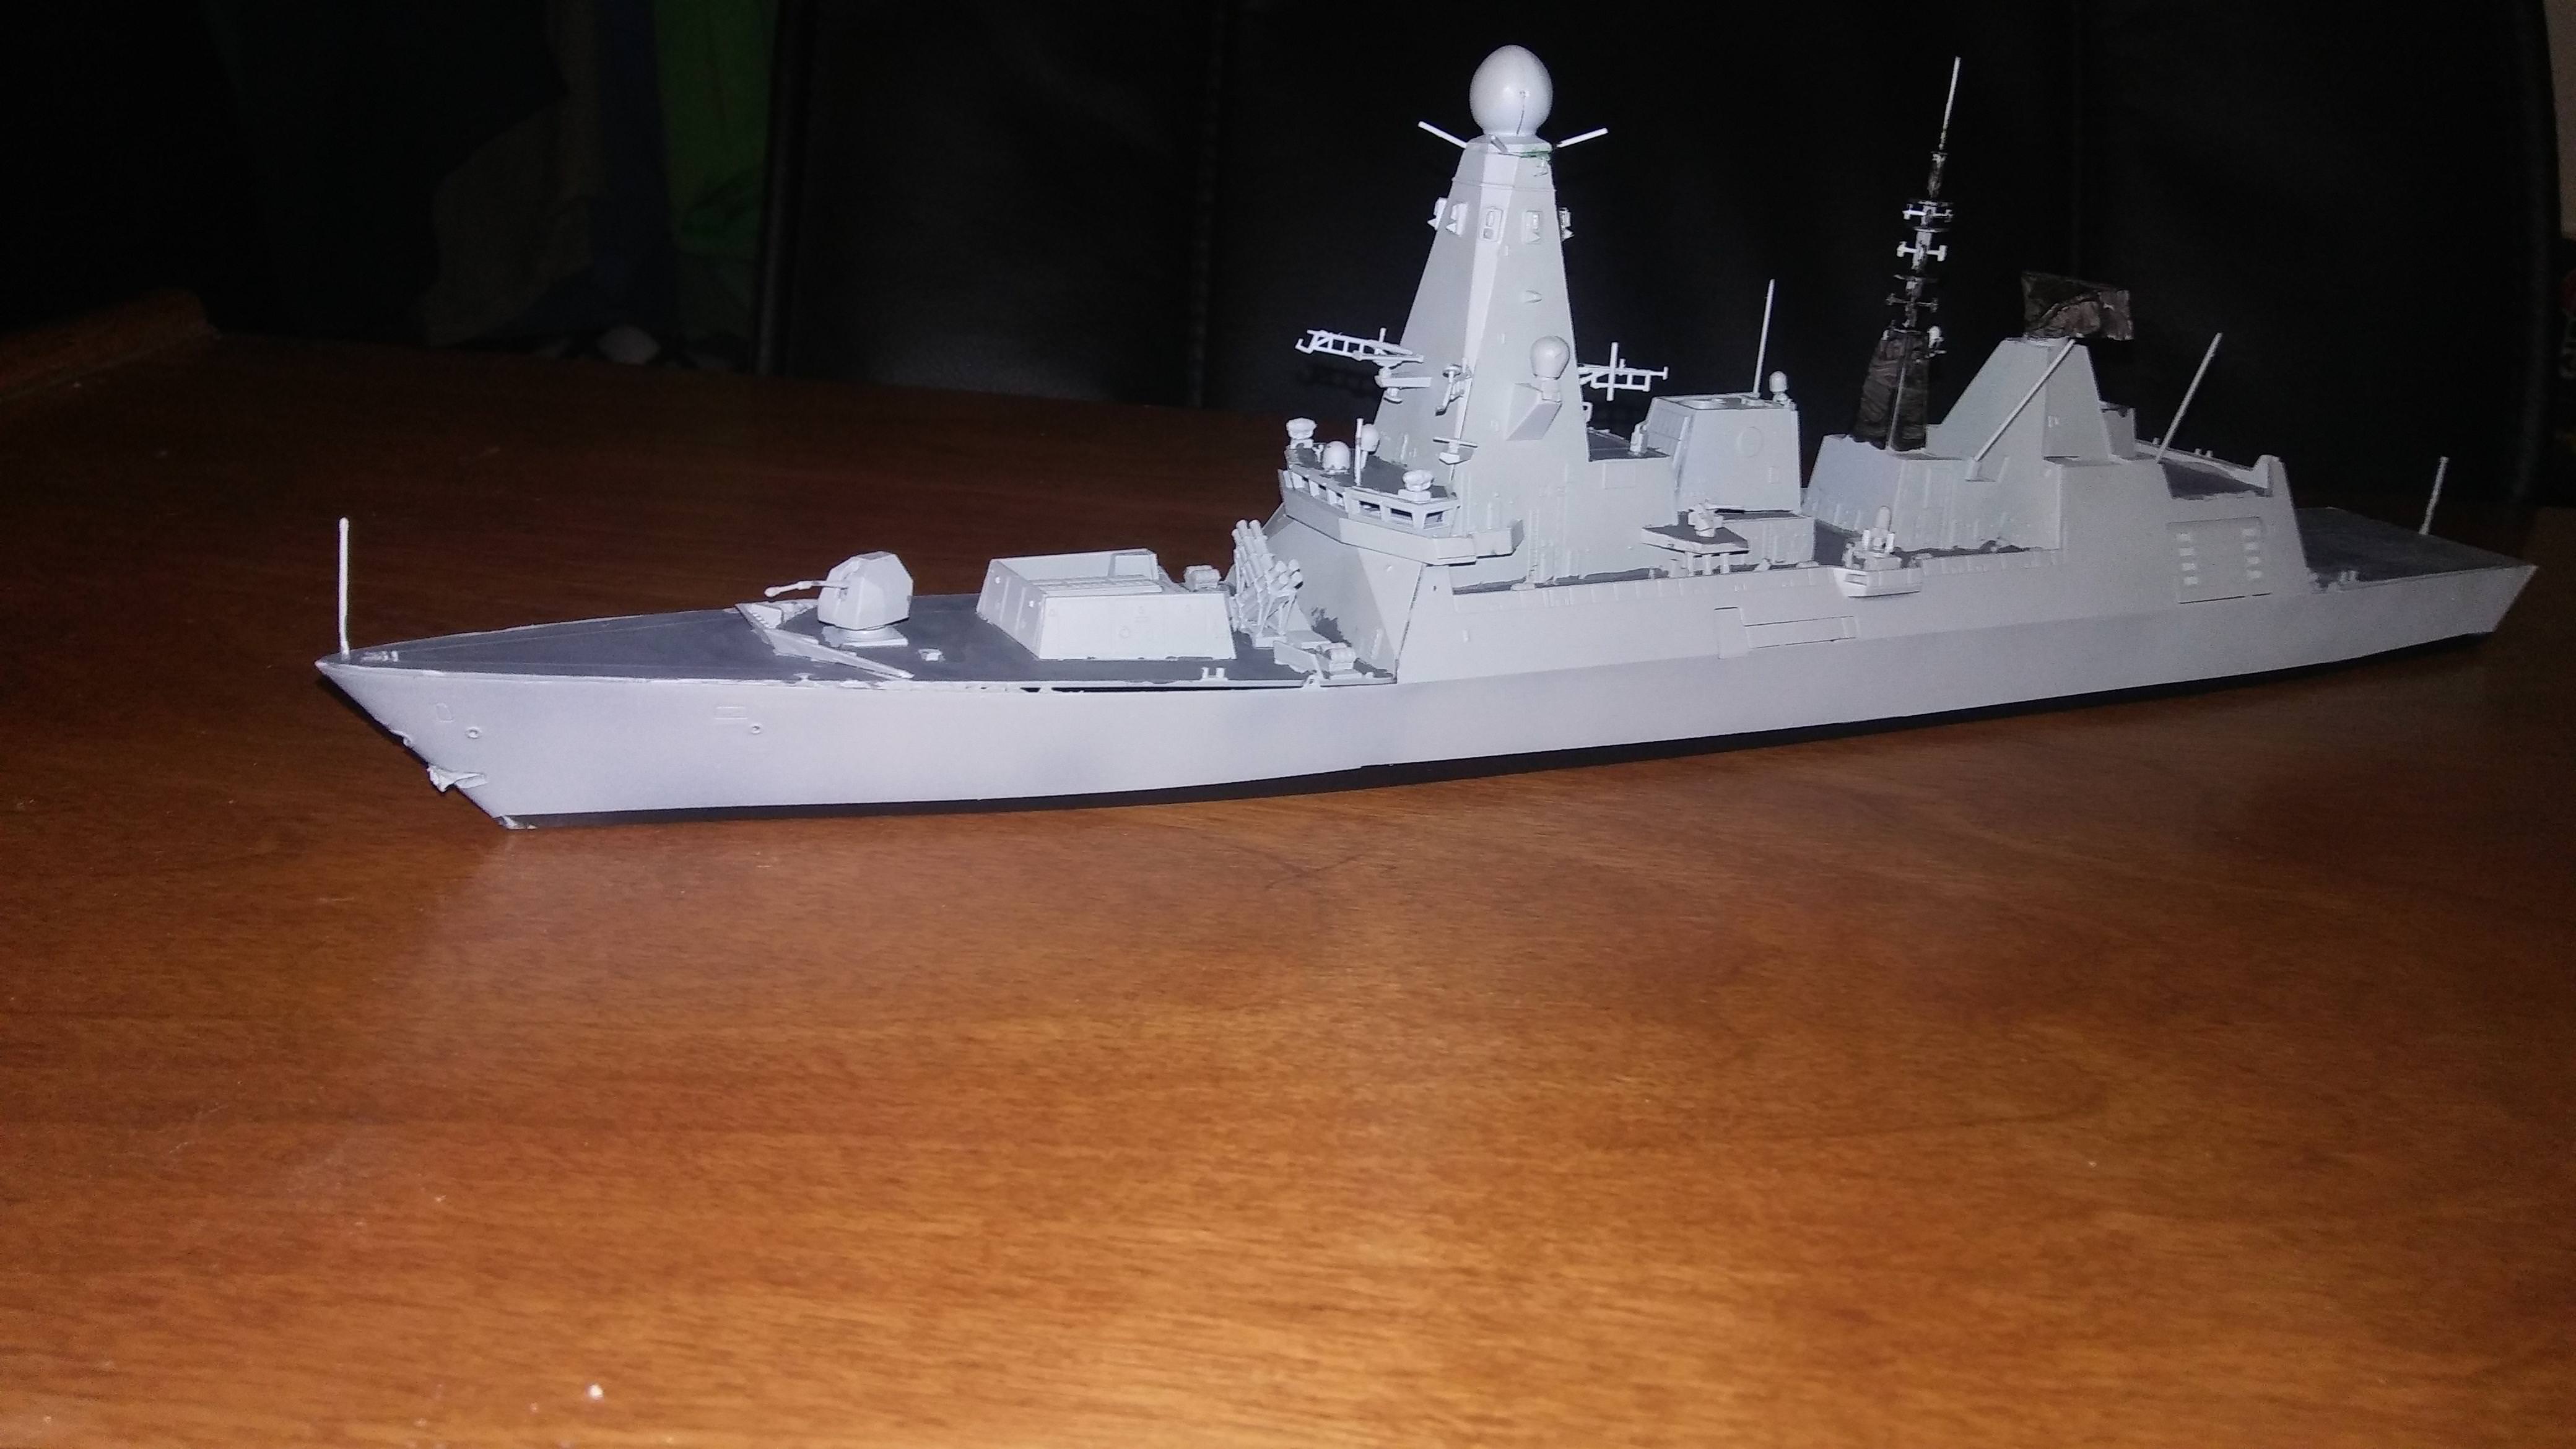
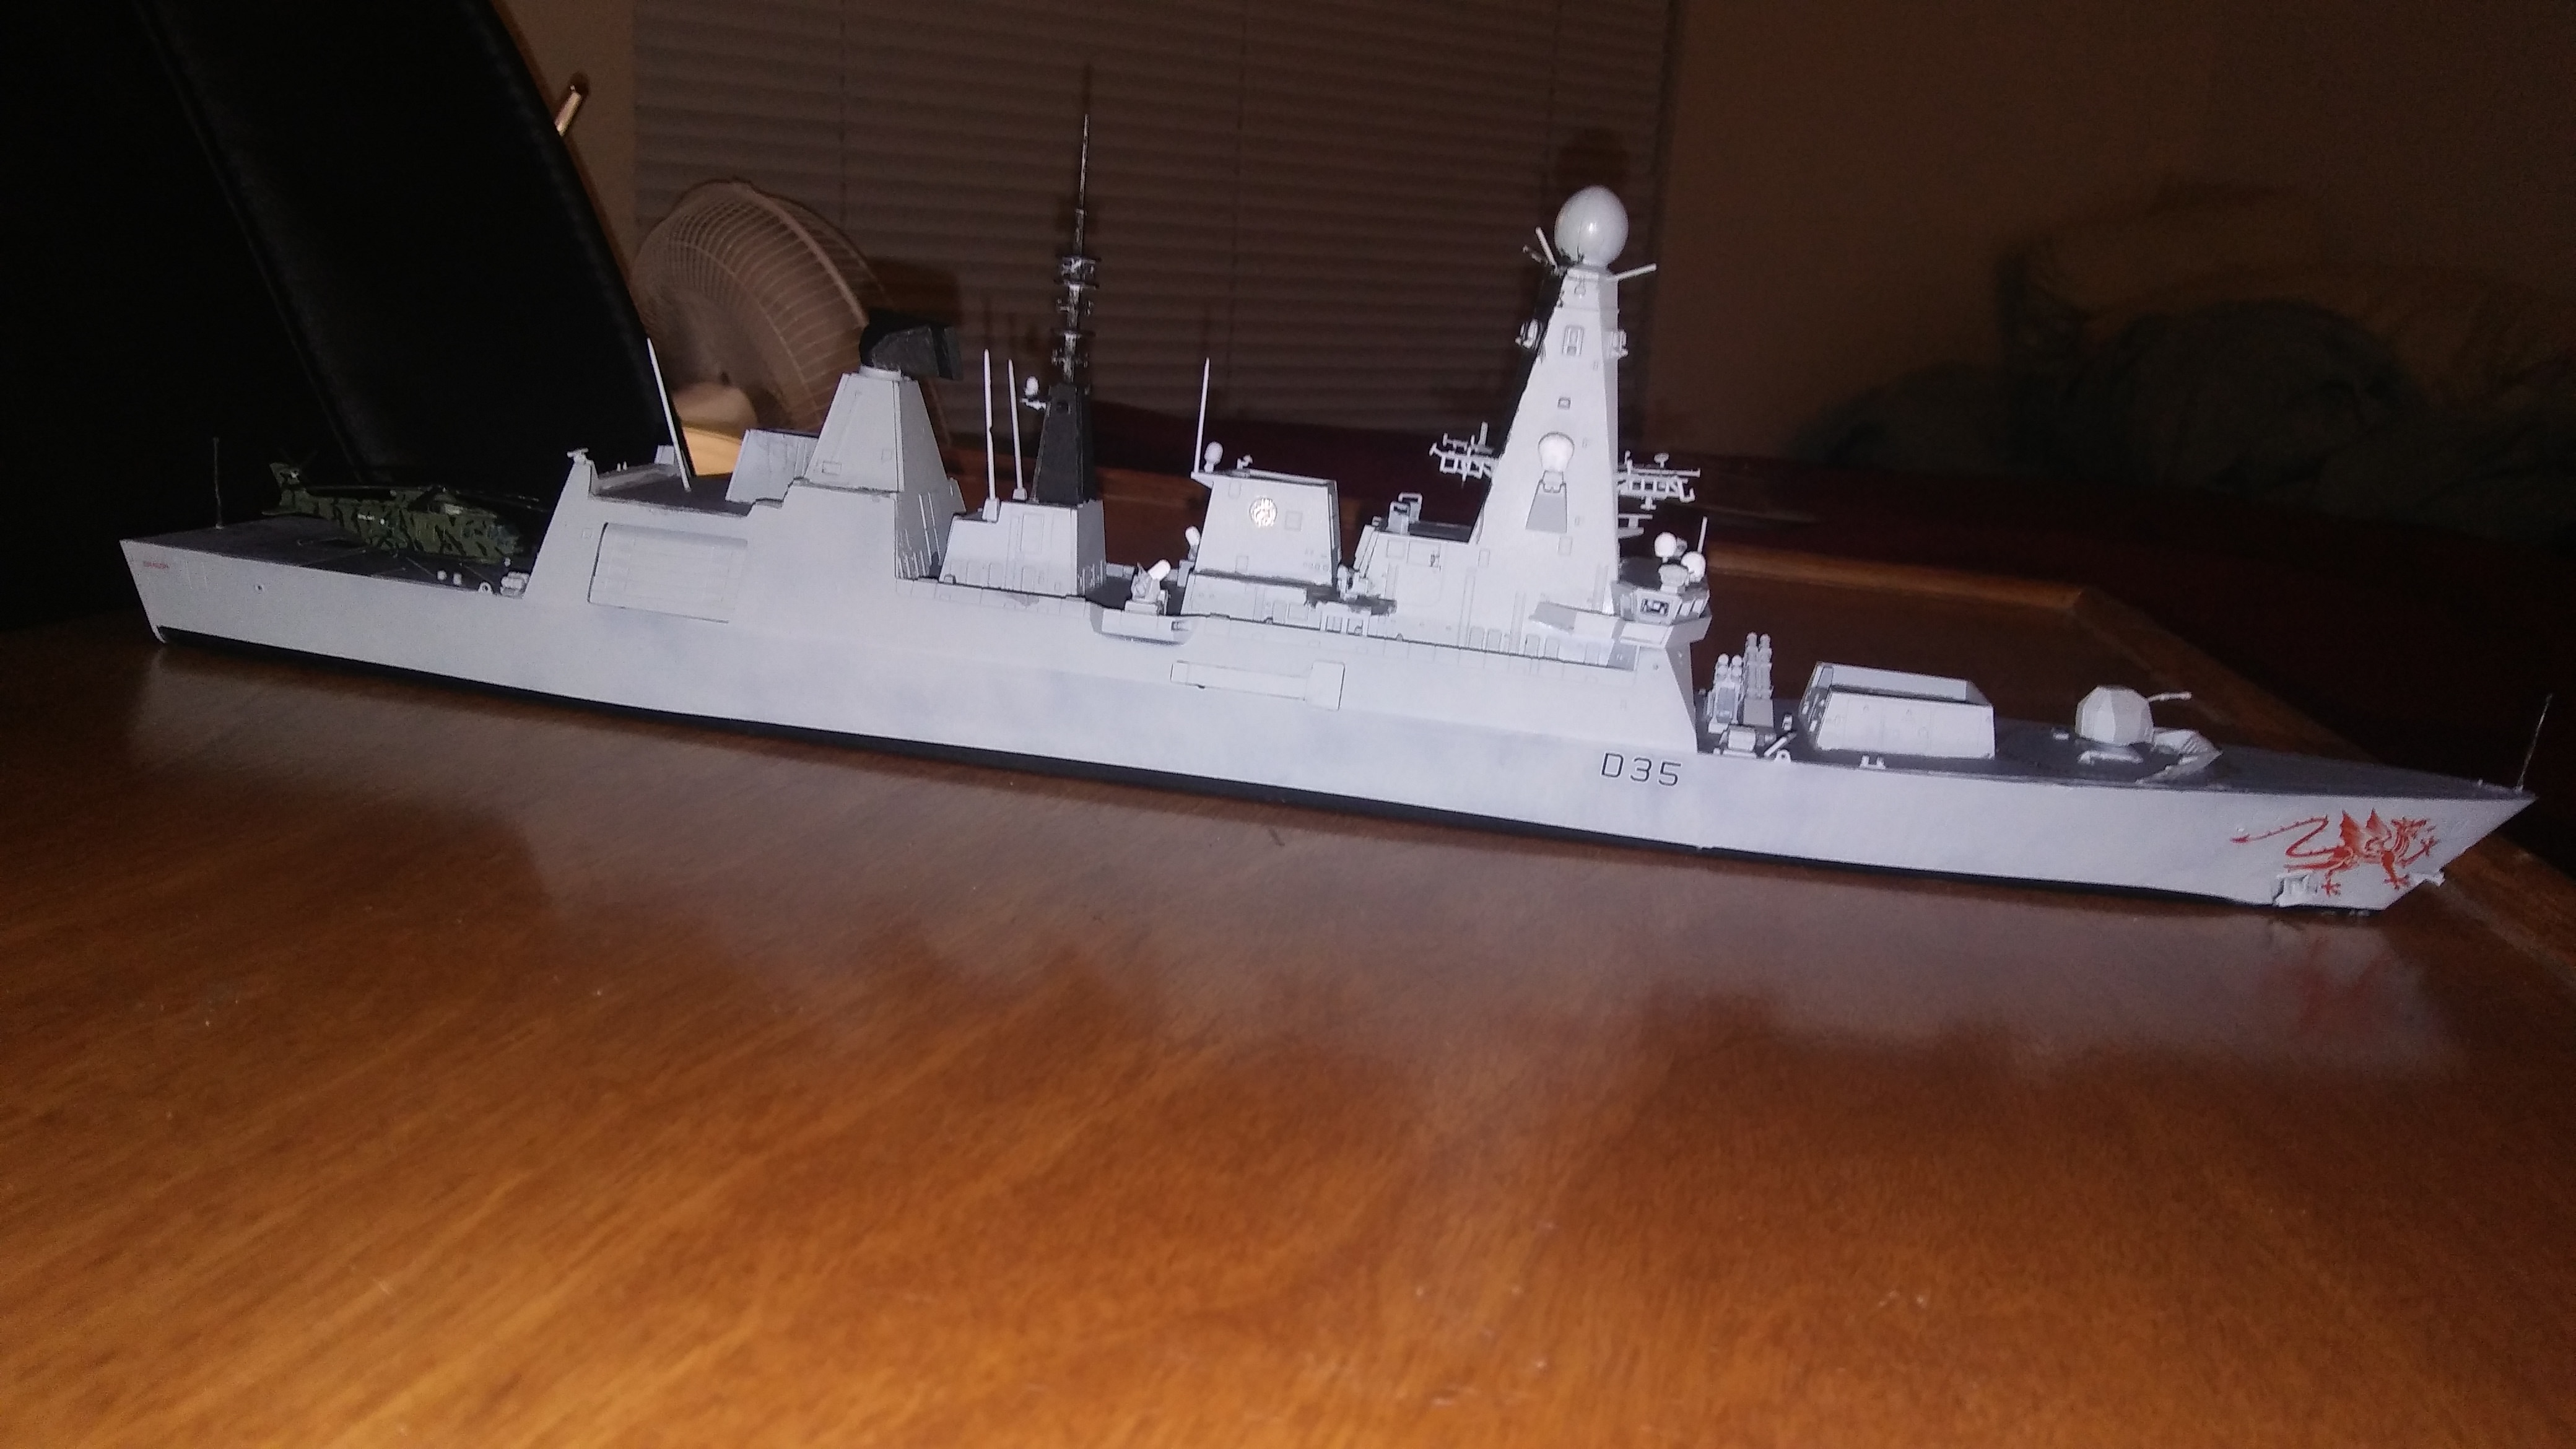
And here she is fully assembled (wish I could find some railings for the aft heli deck) and on the base I'm thinking of using. Now I have the task of painting her...but my airbrush wont spray out paint, so....I don't know whats wrong. But Ill update if I get it working.
Edit: oh I am planning to do HMS Dragon, as I do love the art she has on her bow.
(I hope this is in the right spot, pls dont ban me)


Go to modelshipwrights.com for the current dynamic site!
General Ship Modeling
Discuss modeling techniques, experiences, and ship modeling in general.
Discuss modeling techniques, experiences, and ship modeling in general.
Hosted by Jim Starkweather
1/350th Airfix Type 45 class Destroyer

Jettail

Joined: November 01, 2017
KitMaker: 50 posts
Model Shipwrights: 33 posts

Posted: Sunday, November 05, 2017 - 05:42 AM UTC

RussellE

#306

Joined: June 27, 2010
KitMaker: 3,959 posts
Model Shipwrights: 2,777 posts

Posted: Tuesday, November 07, 2017 - 03:43 AM UTC
Hi Cameron
Welcome to MSW! (PS you won't get banned for posting in the wrong section )
)
would love to see the pics but they're not coming up on my browser. Maybe if you could check the links?
BTW I too love Airfix and this is my favorite modern navy vessel. I have the kit in my stash and am really looking forward to building it. You're correct in saying Airfix need to improve their packaging-this is where most of the trouble starts in any kit from any brand
Welcome to MSW! (PS you won't get banned for posting in the wrong section
)would love to see the pics but they're not coming up on my browser. Maybe if you could check the links?
BTW I too love Airfix and this is my favorite modern navy vessel. I have the kit in my stash and am really looking forward to building it. You're correct in saying Airfix need to improve their packaging-this is where most of the trouble starts in any kit from any brand

Jettail
Joined: November 01, 2017
KitMaker: 50 posts
Model Shipwrights: 33 posts
Posted: Tuesday, November 07, 2017 - 05:47 AM UTC
Quoted Text
Hi Cameron
Welcome to MSW! (PS you won't get banned for posting in the wrong section
would love to see the pics but they're not coming up on my browser. Maybe if you could check the links?
BTW I too love Airfix and this is my favorite modern navy vessel. I have the kit in my stash and am really looking forward to building it. You're correct in saying Airfix need to improve their packaging-this is where most of the trouble starts in any kit from any brand
Thanks, It seems they wouldnt work for me so I just posted the links.
Just beware, the packaging may have broken off some pieces or snapped them in twain. So I reccommend looking it over just to make sure. And I hope it fits better than mine did. However I will just make due, hopefully make it look cool in the diorama I want to put it in.
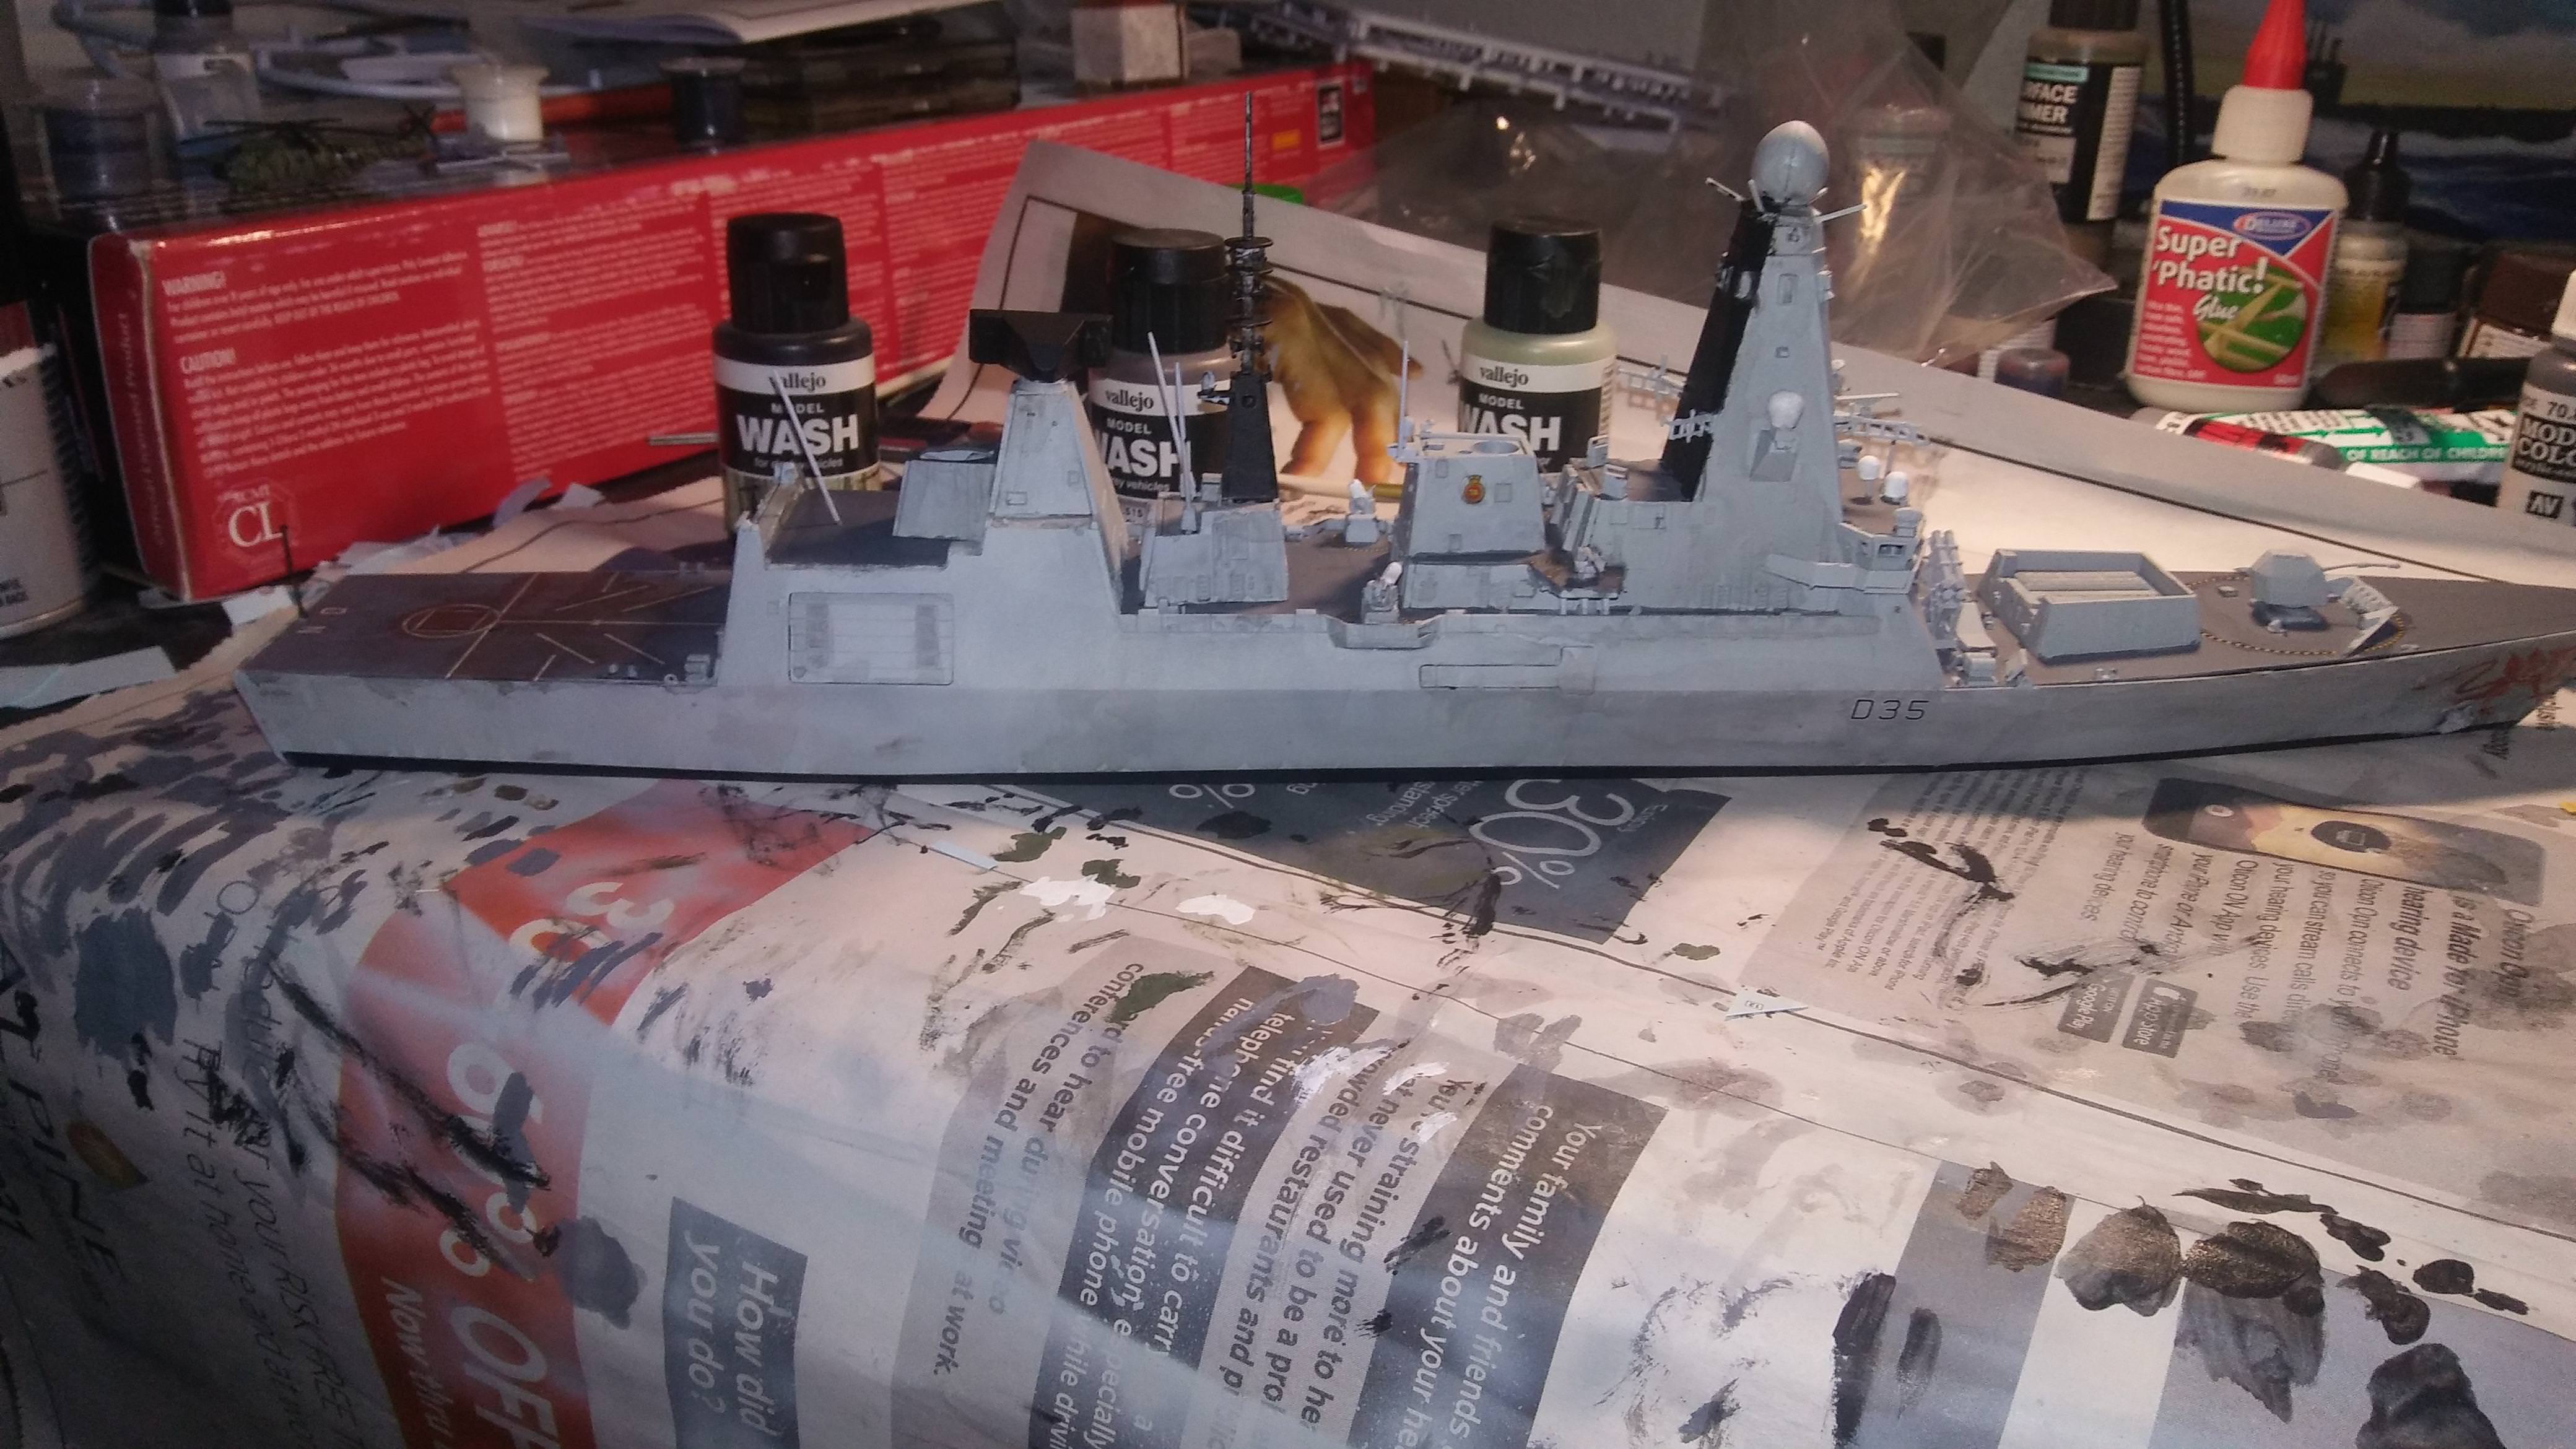
So I managed to get the airbrush working (my skills are lacking and due to the aformentioned shaky hand there are plenty of spots I kinda messed up on) and I am actually quite happy with how it turned out.

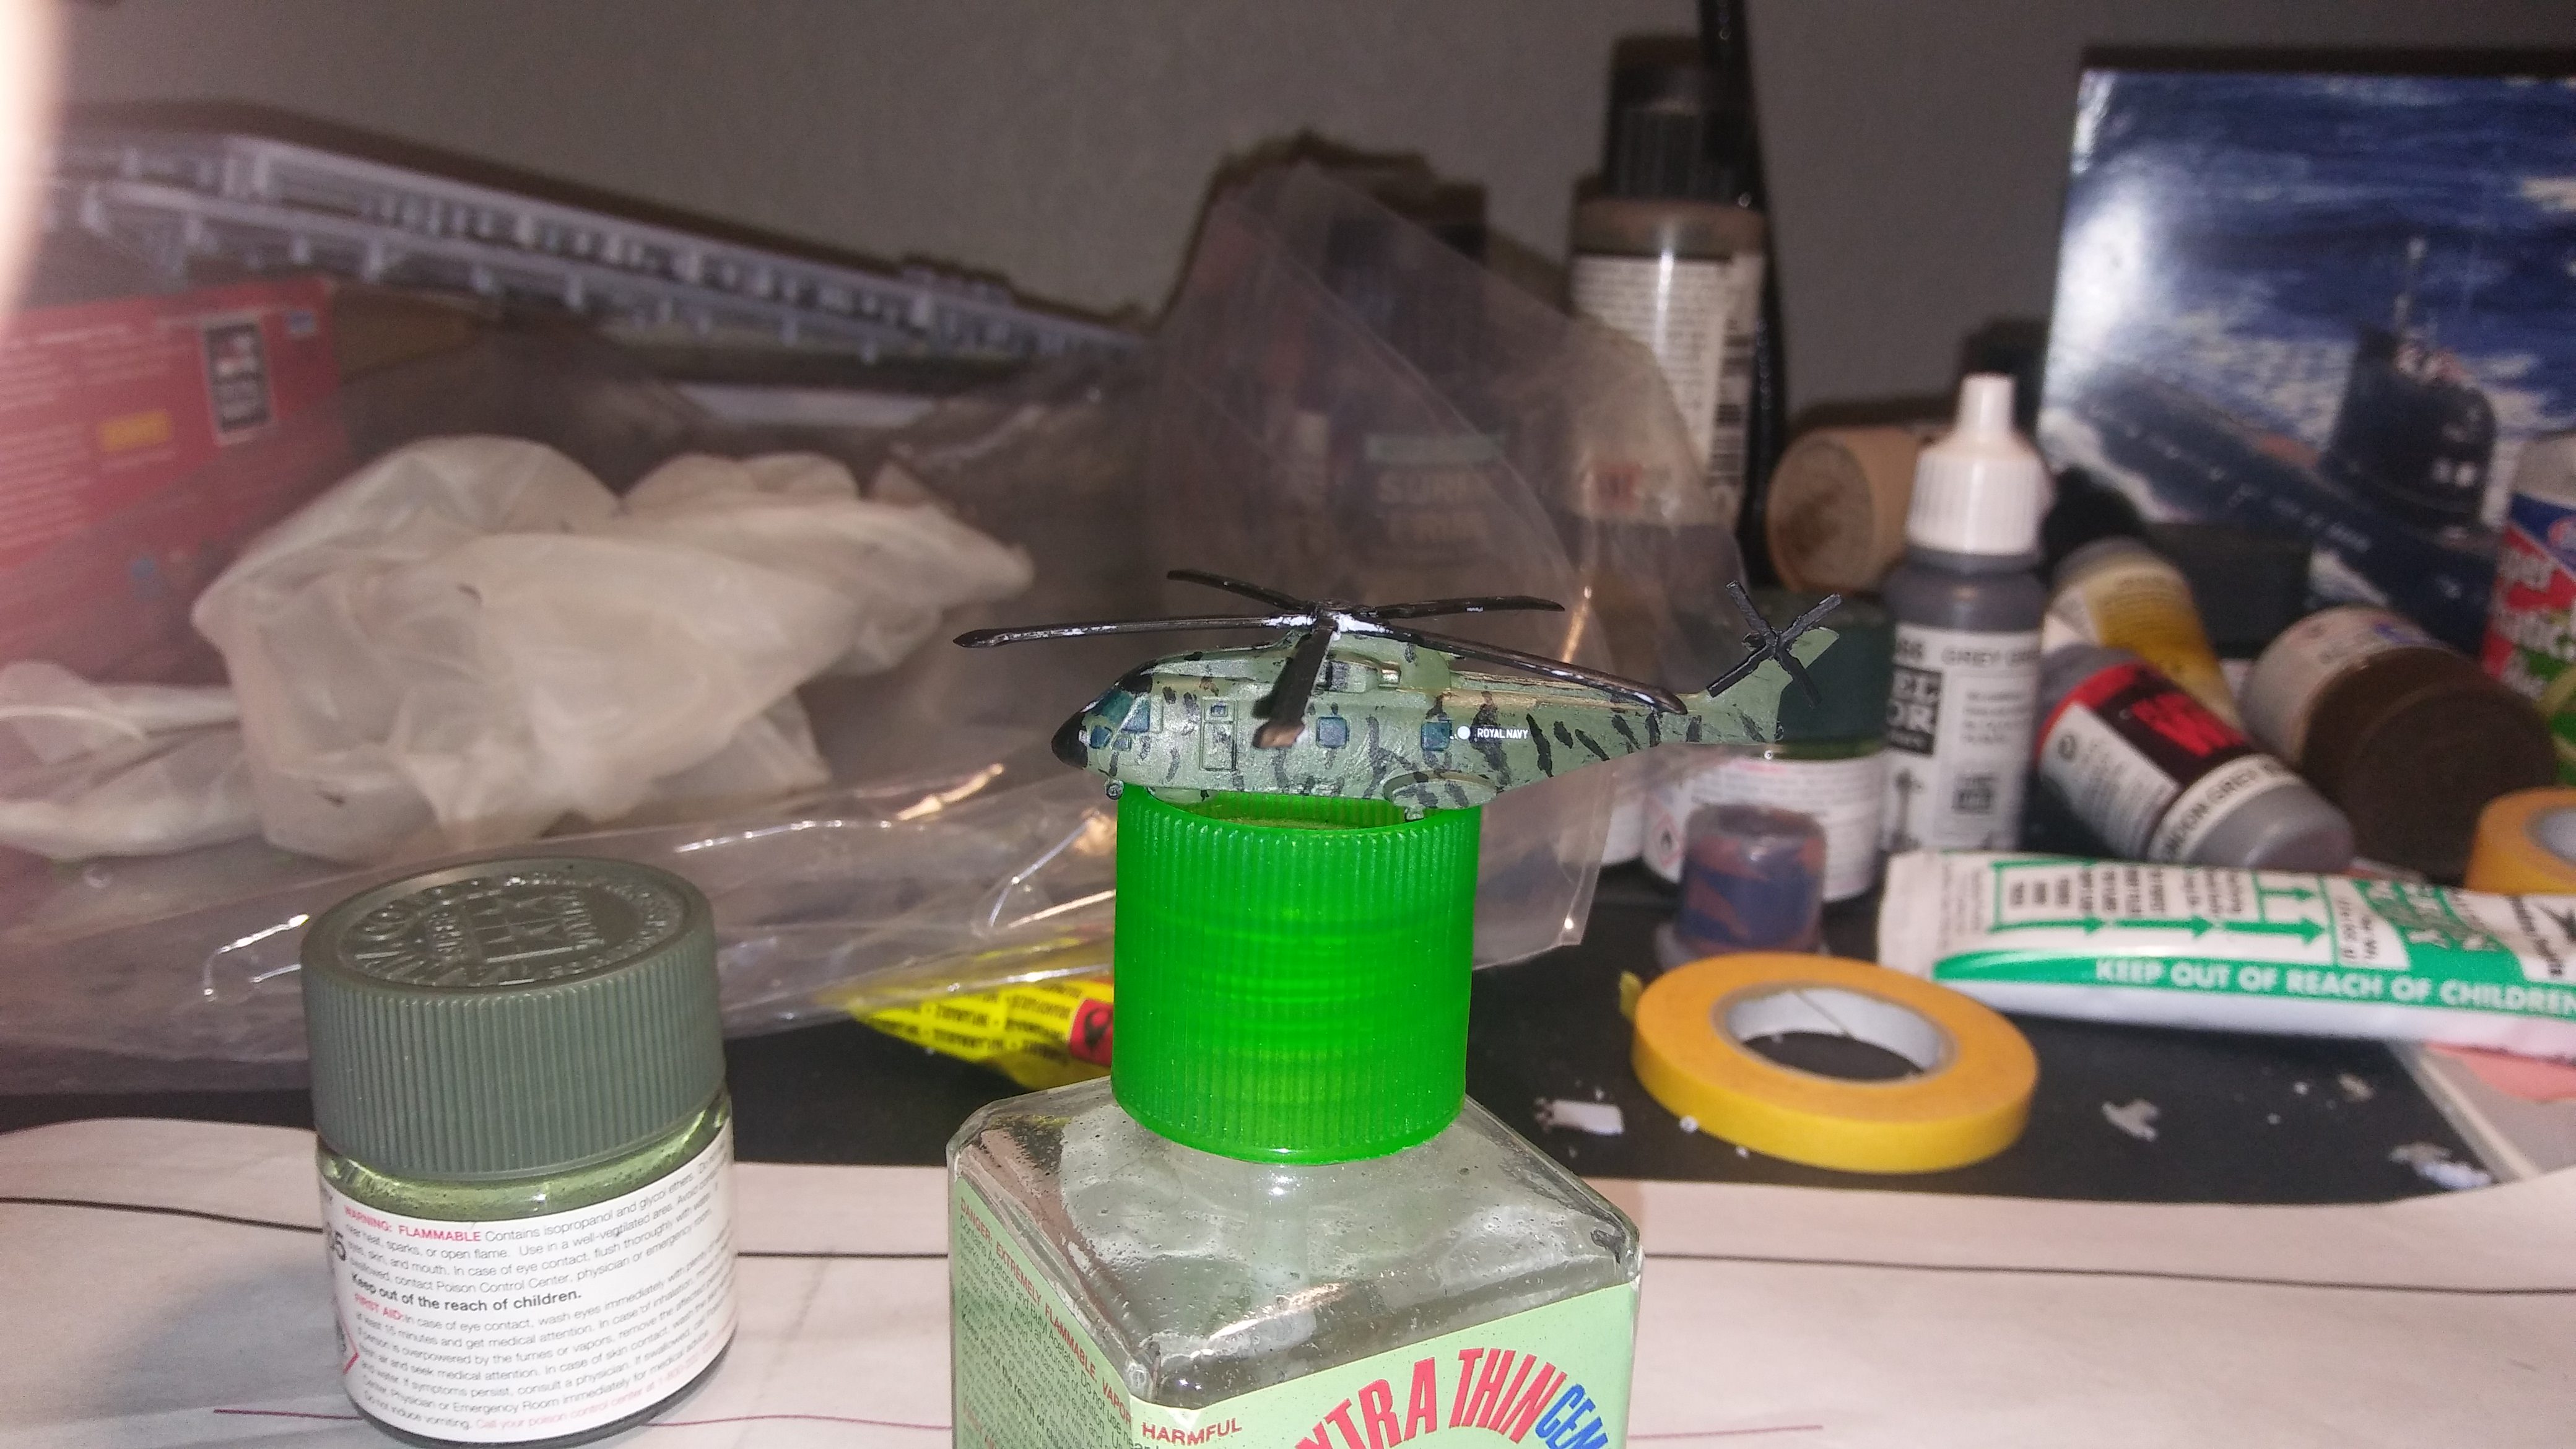
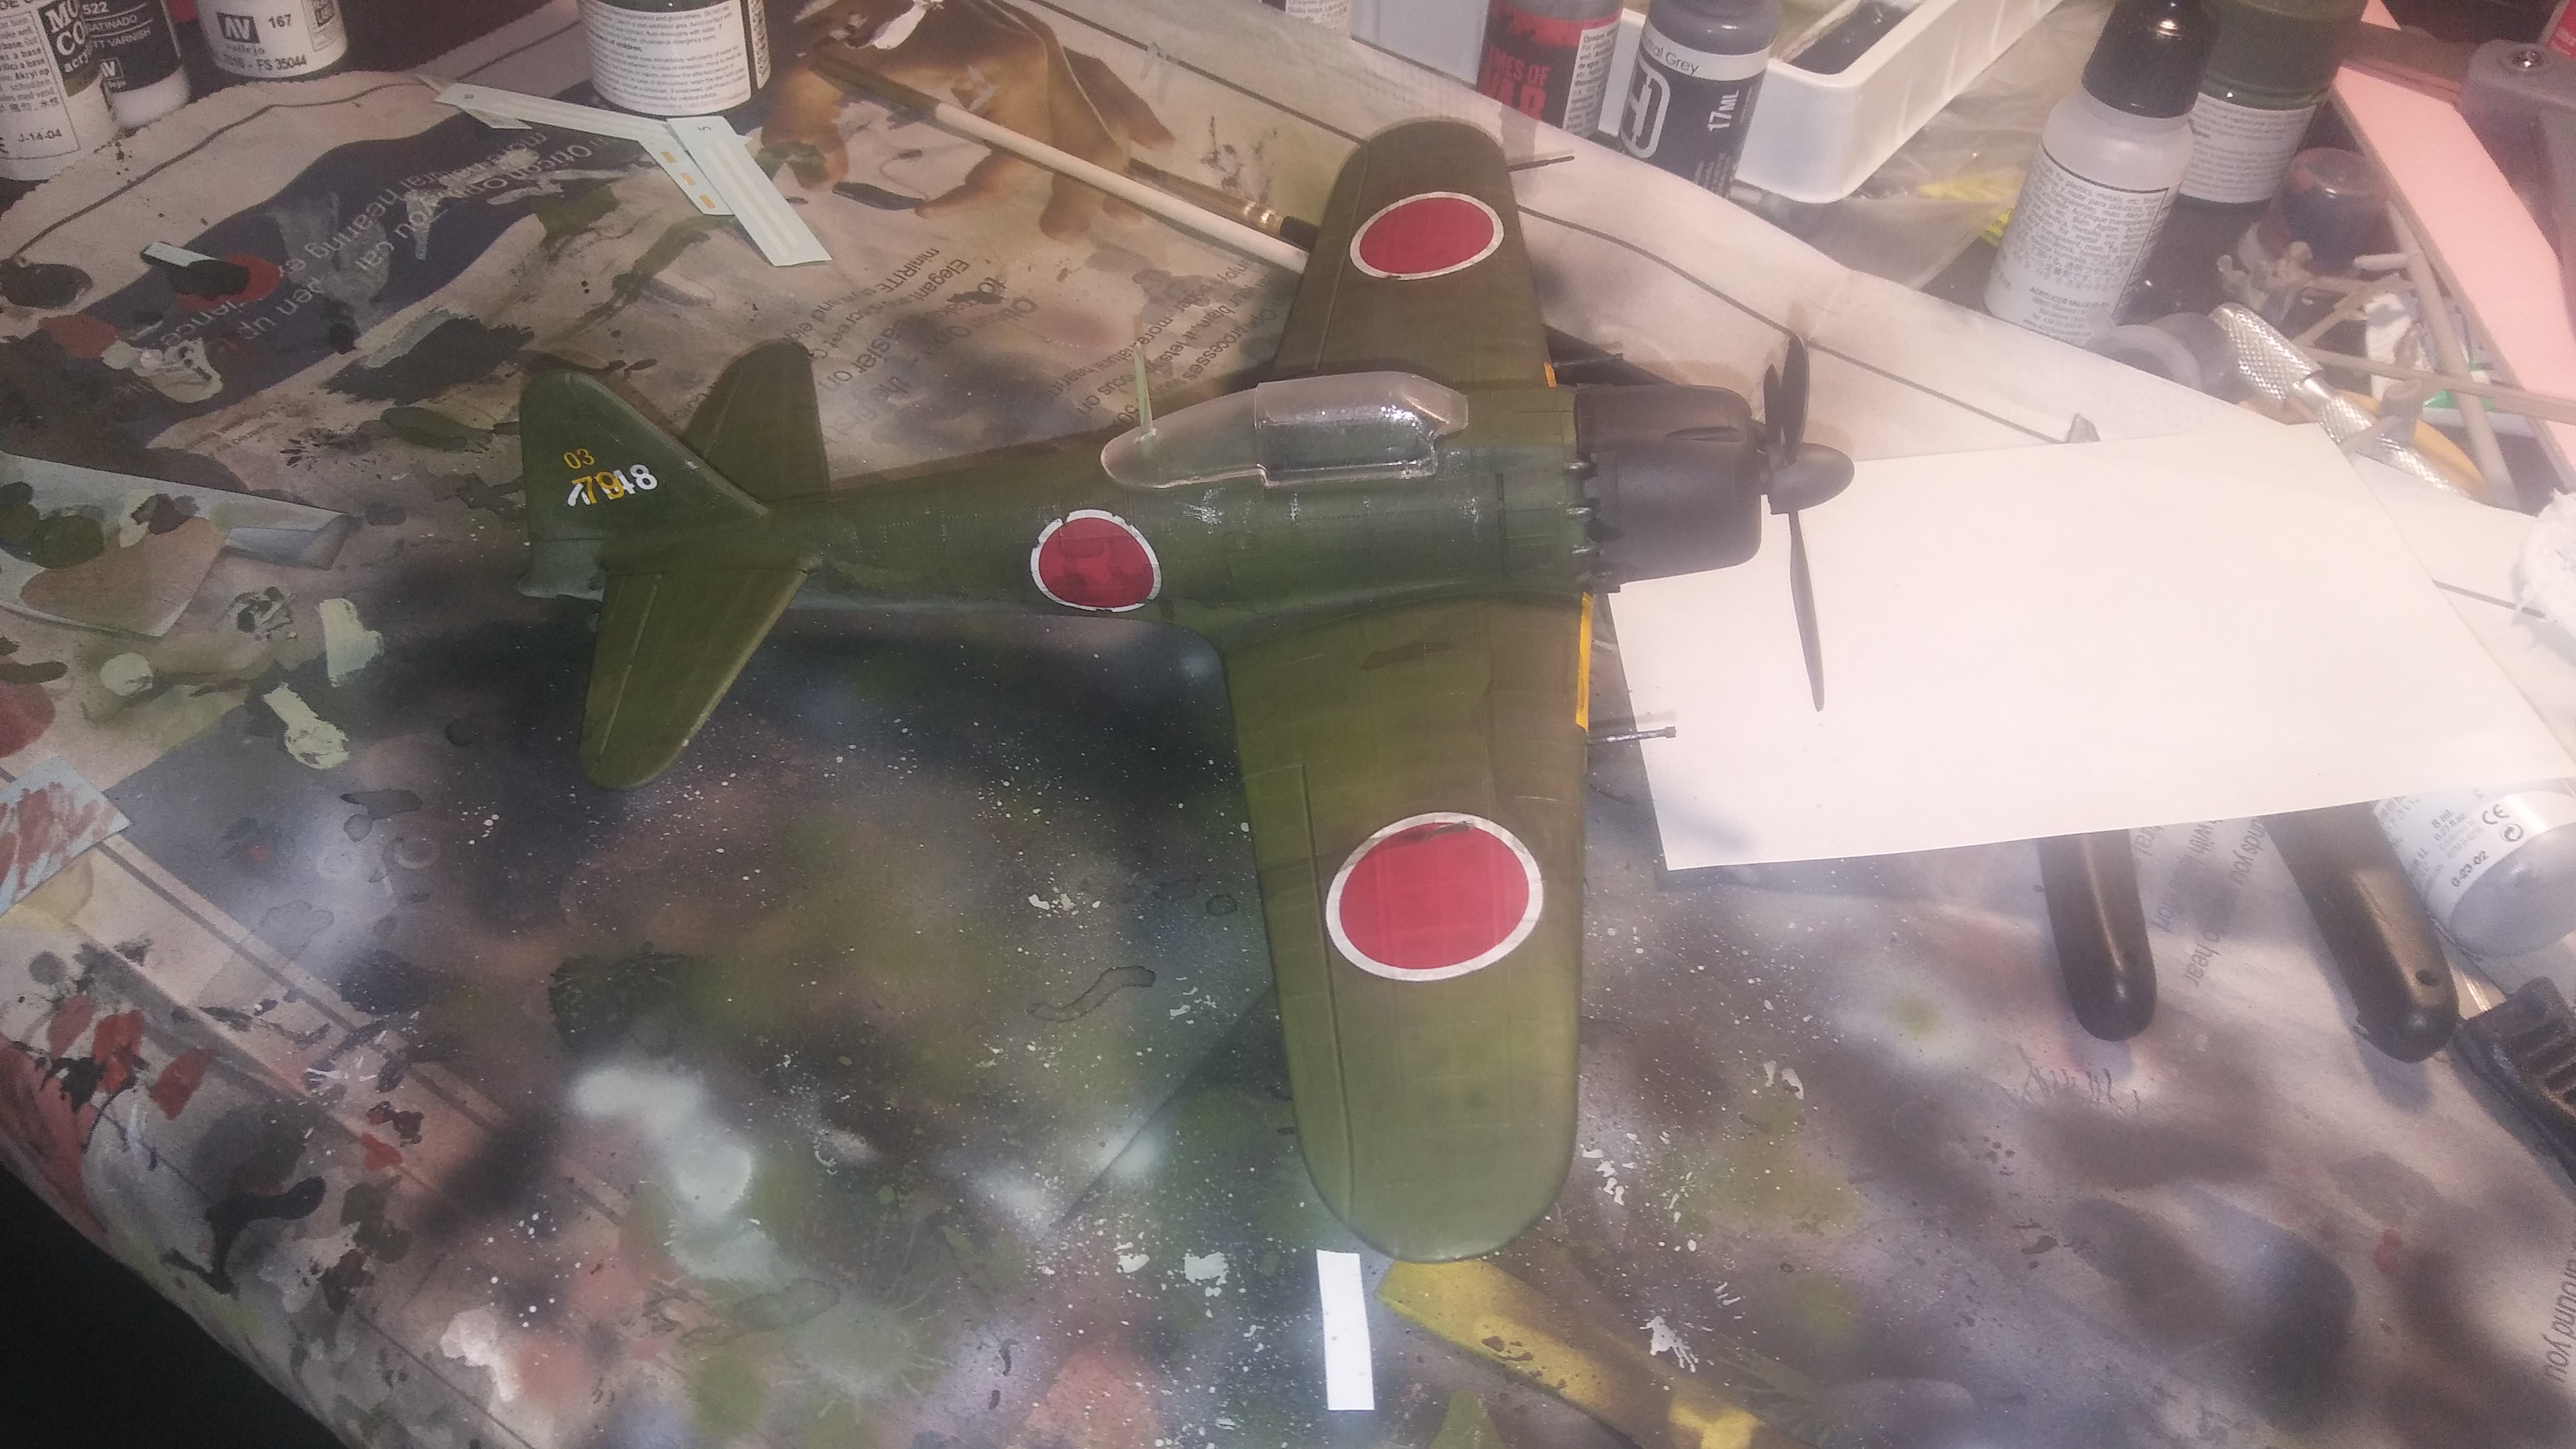
And while that dried I decided to take a crack at the merlin I based it off this picture:

I know this is probably not what a merlin stationed on board the Dragon looks like...but screw it, I love how it came out!

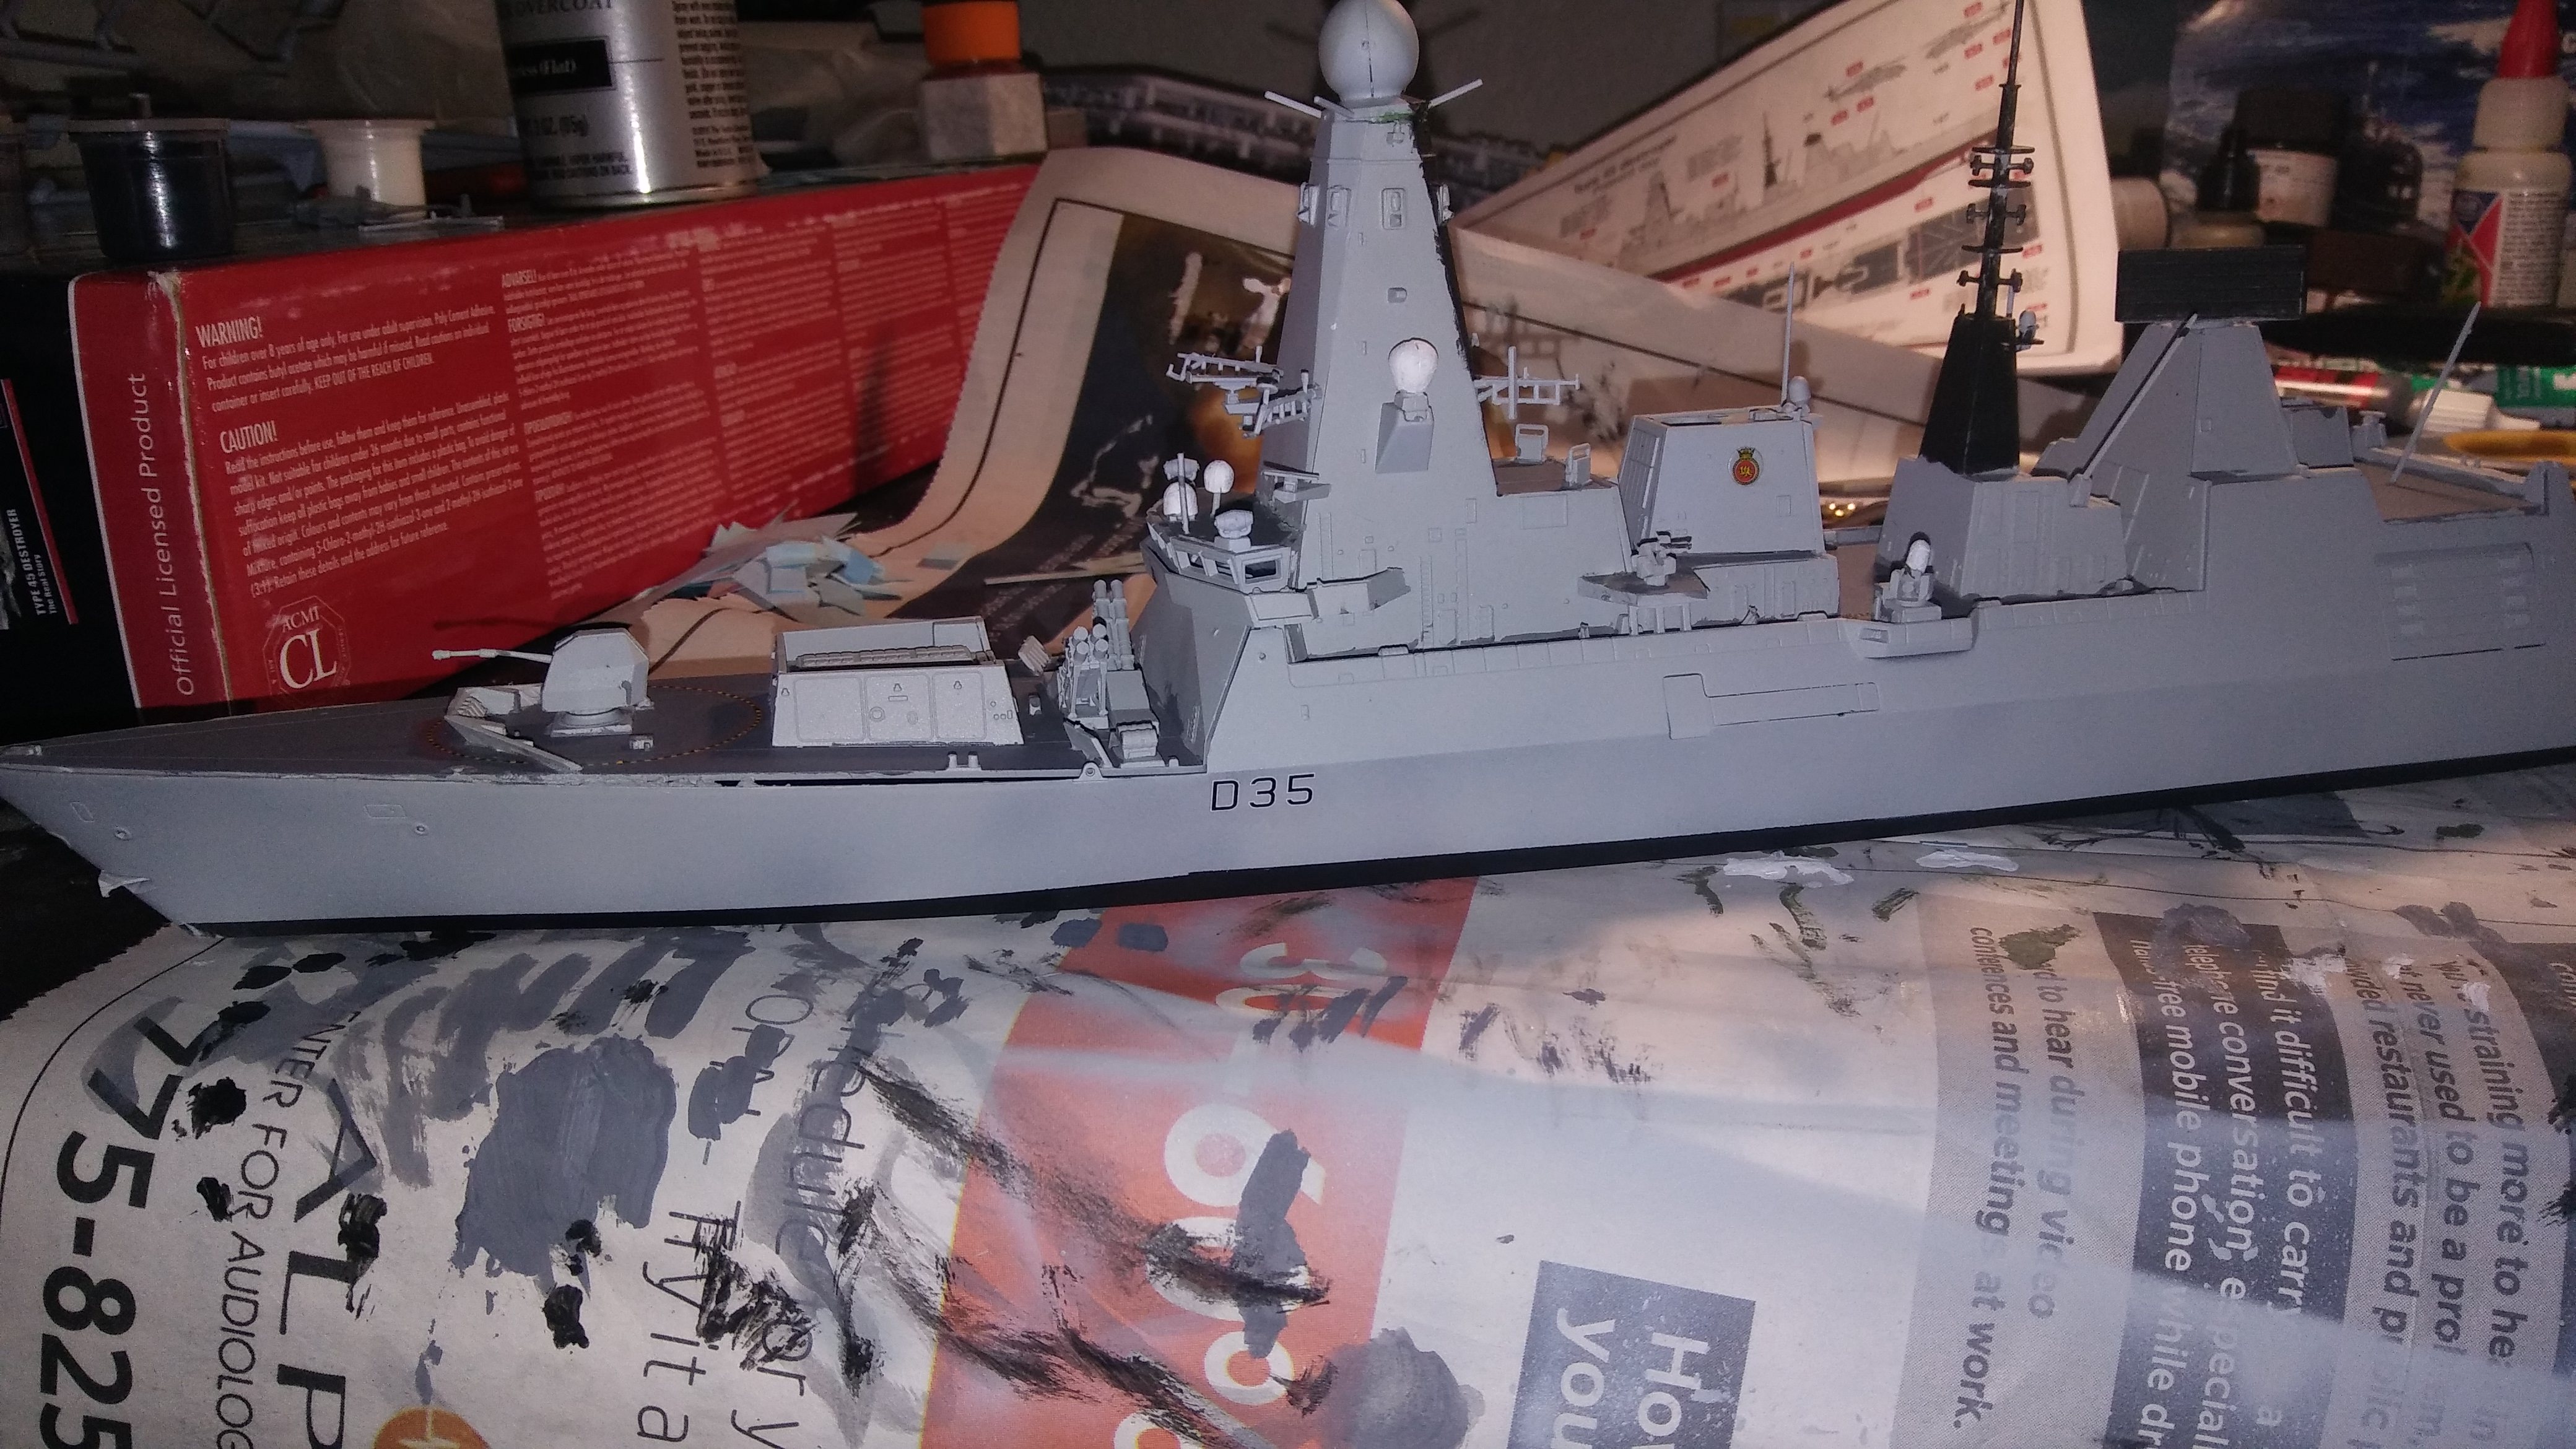
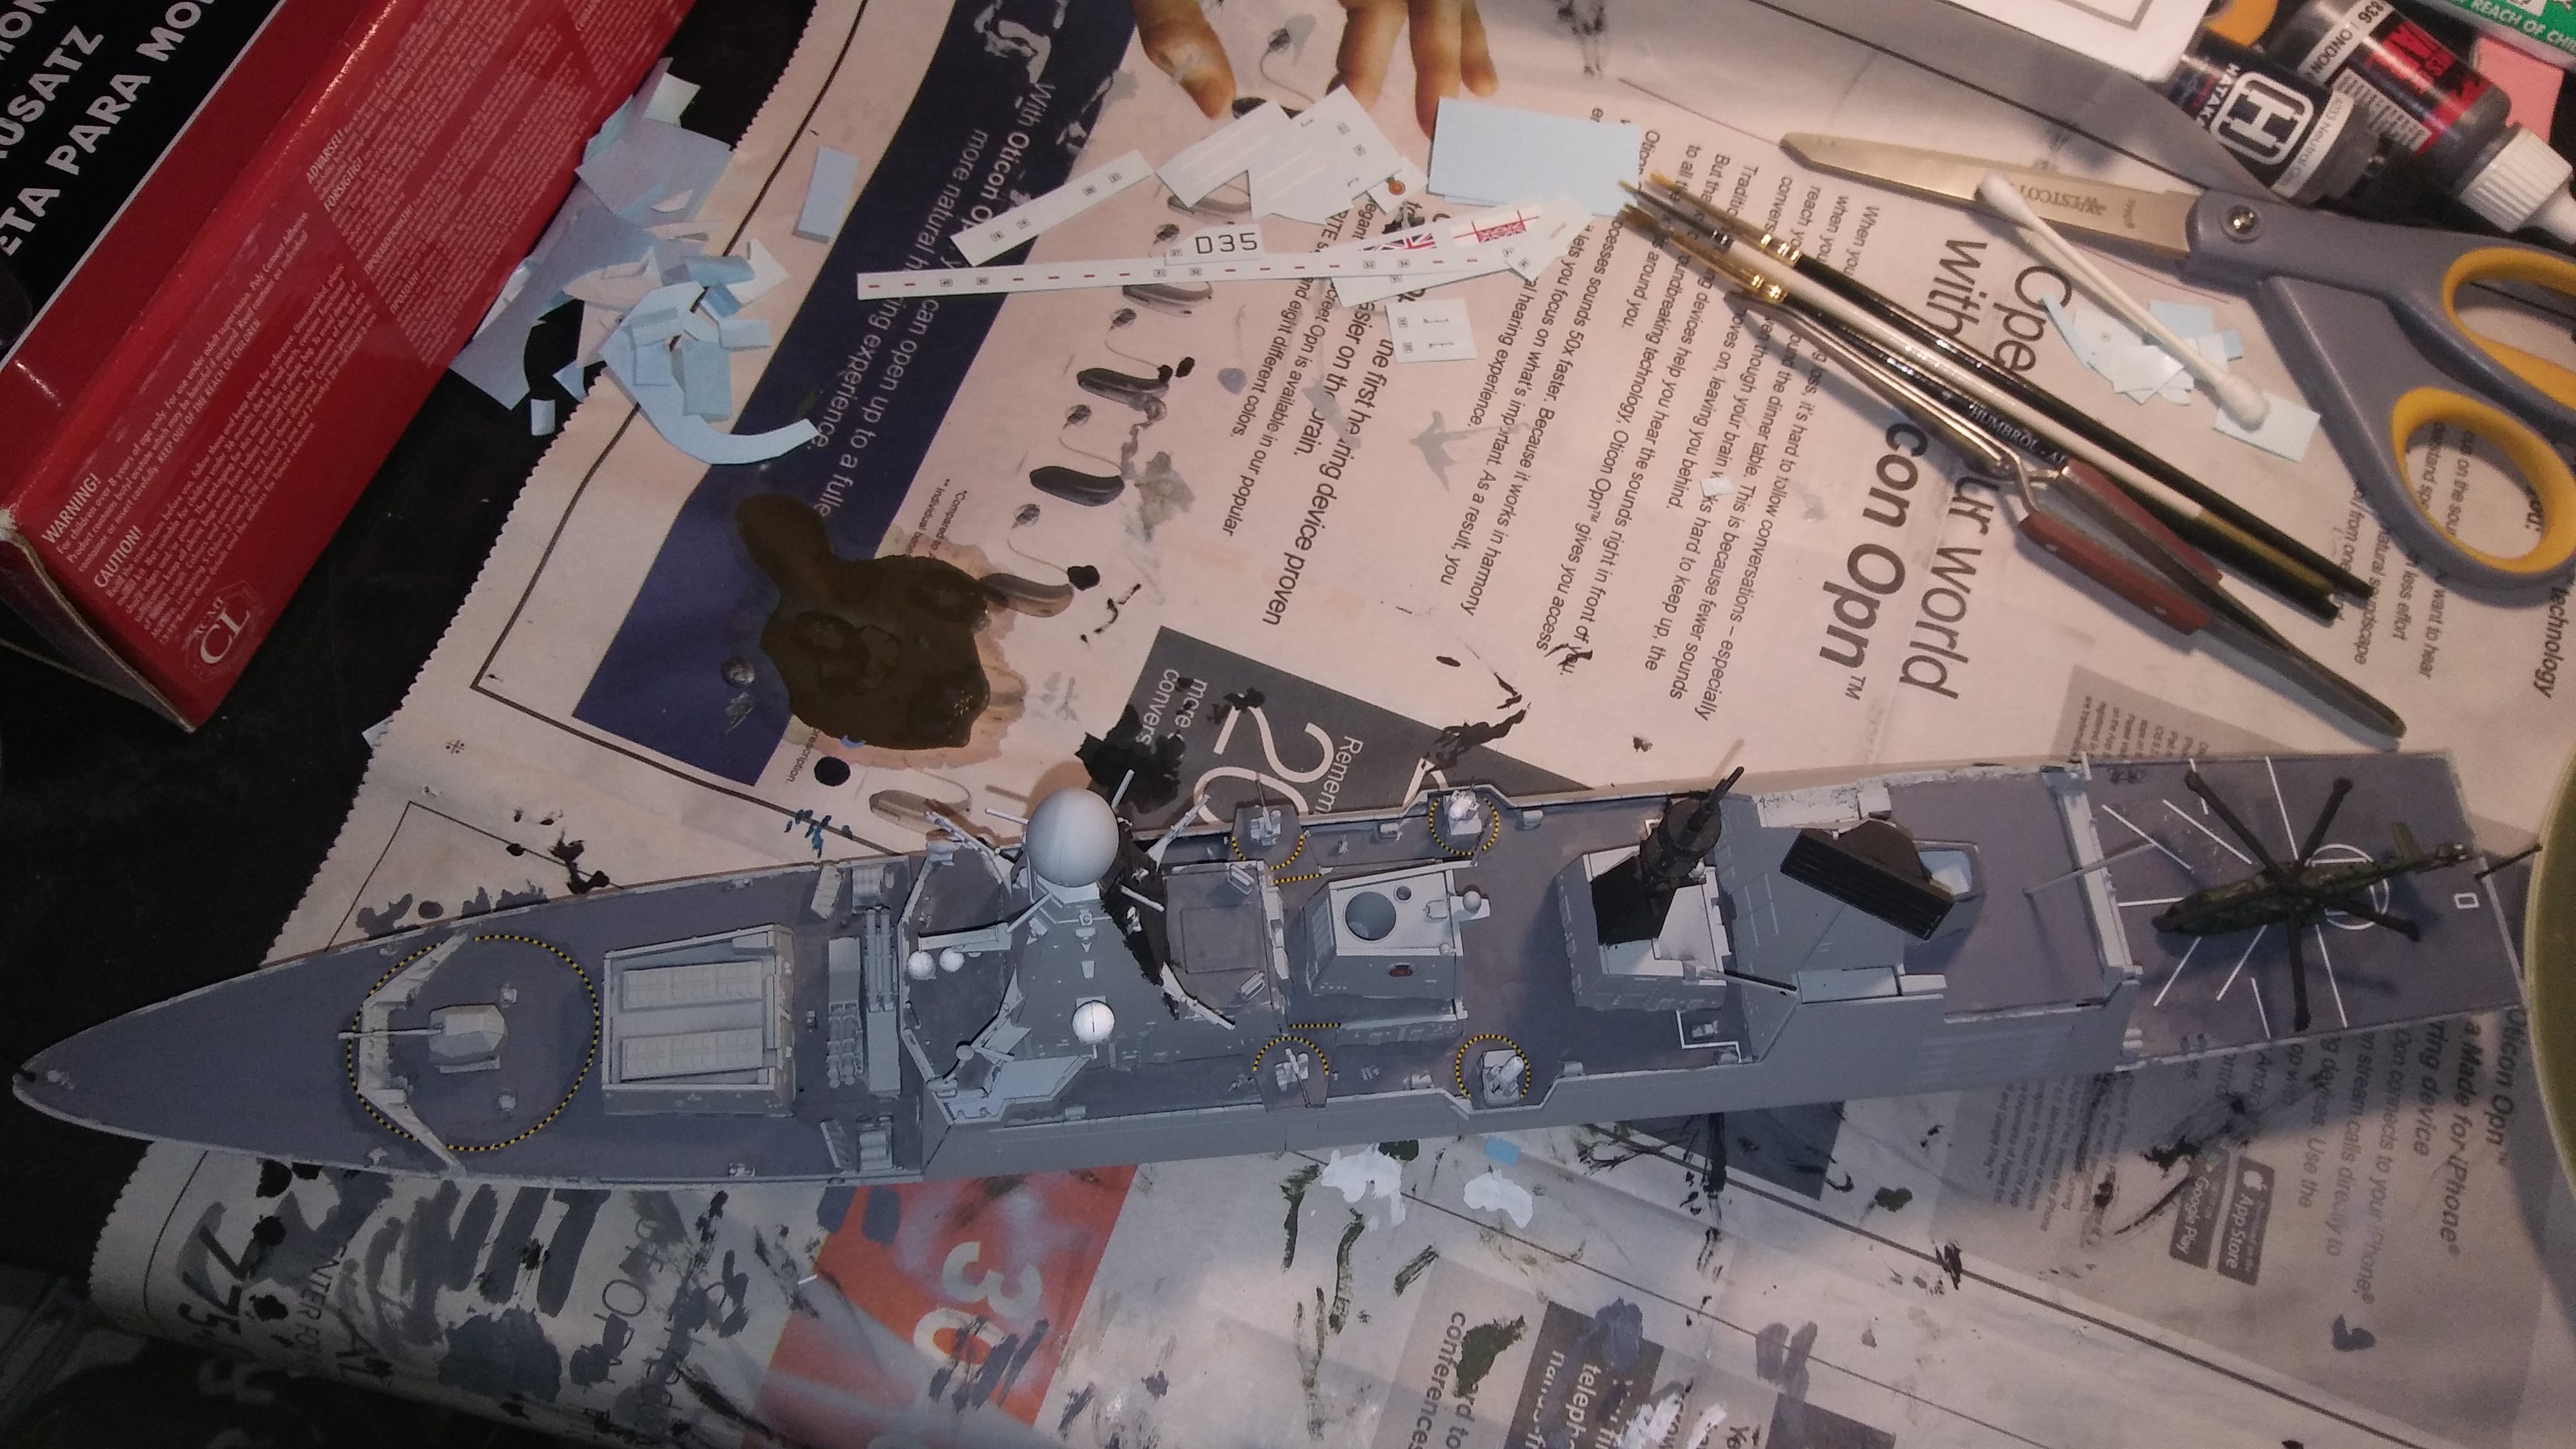
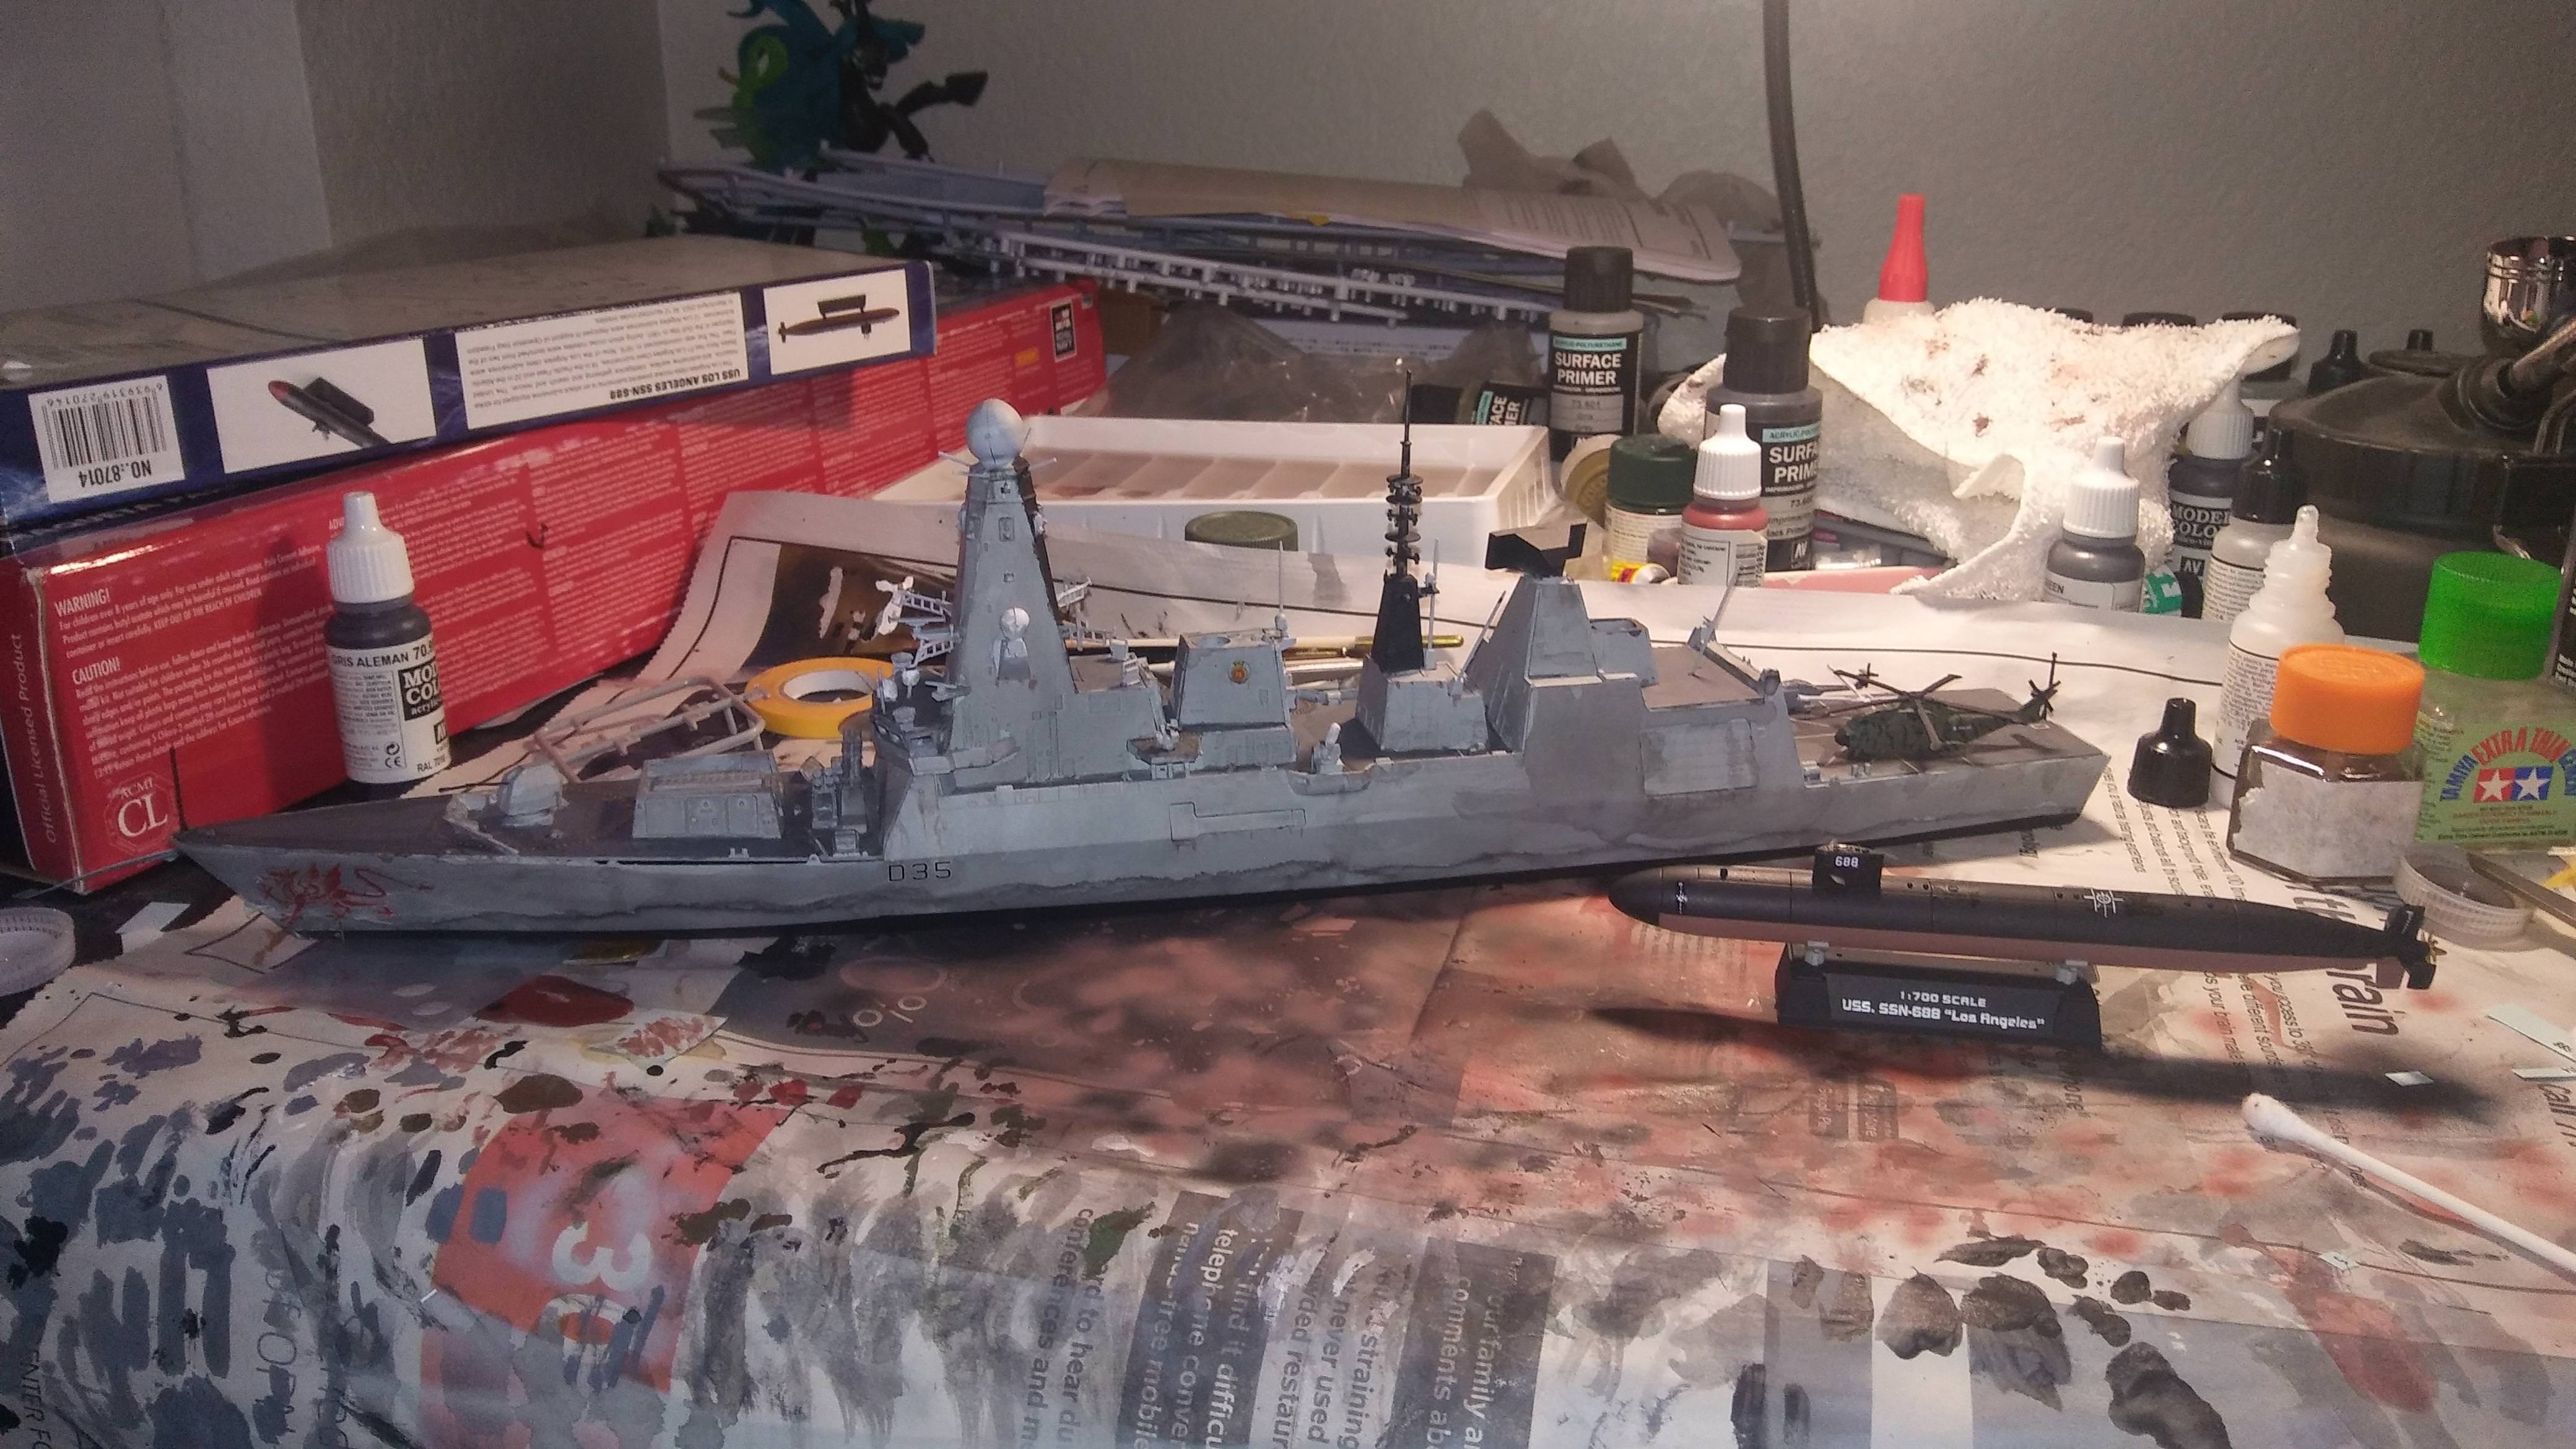
And this is what she looks like as of today, on one side, I still have decals to put on and such...but I am actually quite happy. And in the end, thats why this hobby is about right?
(Yes I know the barrel is bent on the main gun...but I cant really fix that..its already snapped off once.
 )
)Jettail
Joined: November 01, 2017
KitMaker: 50 posts
Model Shipwrights: 33 posts
Posted: Tuesday, November 07, 2017 - 09:01 AM UTC
Well, As of tonight, the ship itself is done, She doesn't look as good as I hoped, however, she also doesn't look as bad as I feared. Now I need to figure out where Im going to get a base and the supplies I need to do her real world counterpart justice out on the ocean.
(I realize weathering is still needing to be done, but the hardest parts are finished. Now....should I give it a clear flat coat then weather it, or weather it then give it the clear coat...)
(I realize weathering is still needing to be done, but the hardest parts are finished. Now....should I give it a clear flat coat then weather it, or weather it then give it the clear coat...)
RussellE
#306
Joined: June 27, 2010
KitMaker: 3,959 posts
Model Shipwrights: 2,777 posts
Posted: Thursday, November 09, 2017 - 01:40 AM UTC
These pics look really great, Cameron!
Thanks for sharing-always good to see one of these kits built up.
The Merlin looks great too!
Heartily agree: the one area Airfix need to work on is better packaging to protect parts in transit. Still, their spares department is quite good if you need replacement parts.
You could always ask them for a new gun barrel, or alternatively get an aftermarket brass replacement.

TRM5150
Joined: January 03, 2010
KitMaker: 2,159 posts
Model Shipwrights: 1,400 posts

Posted: Thursday, November 09, 2017 - 03:48 AM UTC
Hi Cameron! Welcome aboard! Congrats on getting the Destroyer across the finish line! Well done! Fine job on the wee Merlin!
As for the pics...for some reason the pic links were missing the ".jpg" at the end...otherwise they would have worked with adding the img brackets [ ] and [/] with img inside. I added them to your last two posts and the pics showed up. Let me know if you have any questions moving forward!
As for the pics...for some reason the pic links were missing the ".jpg" at the end...otherwise they would have worked with adding the img brackets [ ] and [/] with img inside. I added them to your last two posts and the pics showed up.
Let me know if you have any questions moving forward! Jettail
Joined: November 01, 2017
KitMaker: 50 posts
Model Shipwrights: 33 posts
Posted: Thursday, November 09, 2017 - 04:09 AM UTC
Quoted Text
Hi Cameron! Welcome aboard! Congrats on getting the Destroyer across the finish line! Well done! Fine job on the wee Merlin!
As for the pics...for some reason the pic links were missing the ".jpg" at the end...otherwise they would have worked with adding the img brackets [ ] and [/] with img inside. I added them to your last two posts and the pics showed up.
Thank you very much!
As for how she looks now....well, It turns out the Royal Navy keeps their vessels really freaking clean. And I didn't know this so one side of the ship is....pretty oily looking
And it may not look as good as I hoped it would, However I just like to think she has been at sea for a good while, (I dunno, WW3 or something) and its also my first time weathering (and building) a vessel in a long time, so Im learning something new every day!
Thank you all, And I will keep the replacement parts in mind next time I build an Airfix (wish I had known about it earlier would have helped me when the landing gear snapped on my Harrier Gr1)
I dont deal with criticisim very well, but I really need it in this case. So tell me...how does it look?
TRM5150
Joined: January 03, 2010
KitMaker: 2,159 posts
Model Shipwrights: 1,400 posts
Posted: Thursday, November 09, 2017 - 05:33 PM UTC
Cameron,
I think this might say it all..."its also my first time weathering (and building) a vessel in a long time, so Im learning something new every day!"
I for one think that this being your first model in a while and your first attempt at weathering, you nailed it. I think just about everyone of the guys here on MSW will agree with me when I say that no one learns this stuff overnight. The best part of your statement is the "I'm learning something new everyday"! It take practice and many models to get to a level in the hobby "that you are happy with"! Yes, British ships are notoriously clean (for the most part...anyone who ever served on one would tell you they do get dirty)but you are after learning the skills of weathering a well as working on perfecting the construction part. Each model will bring you that much closer.
So, in a completely helpful constructive manner, when it comes to construction, it is always a help to build in large sub assemblies when you can; i.e. hull, main deck, superstructures, rather than work from the hull up putting all of the pieces together and then paint. With some ships, this is not always possible, but it ensure parts fits cleanly before assembly and that things like painting and some weathering will be easier for you. "Dry-fitting" is another valuable point. Take these sub assemblies and dry fit them to make sure they sit well with corresponding parts. Such is the case with the forward deck on your destroyer. There is a small gap along the bow where it looks as if the deck is risen above the hull leaving a gap. Without the main superstructure parts installed, this is simple to correct. Probably most of this is due to the parts themselves...you mentioned this having fit issues. Somethings can and will be out of out control sometimes...LOL
As for weathering, go nuts! LOL The only way to pick it up is to do it. I use old models as test beds for trying new things out. Slap a coat of paint on them and just try stuff. More often than not, a simple filter, which is basically a thinned down is a great place to start the weathering process. This will make details pop and give you a good idea of the areas you want to add more too. Weathering is something that is done in layers. With ships, or anything else for that matter, there is a balance between weathering and creating an abandoned vehicle or ghost ship...lol! Some areas, no matter how proficient the navy is, will always have some wear and tear...like around the hawse
pipes. There will always be some sort of streaking and rust in these areas due to use.
In the end, you did a fine job my friend! Keep going....keep learning and above all, keep having fun!!
Jettail
Joined: November 01, 2017
KitMaker: 50 posts
Model Shipwrights: 33 posts
Posted: Friday, November 10, 2017 - 12:36 AM UTC
If I can get my diorama started I thought about covering up the area where the deck rises up with the smoke from a few missile launches. But thank you for the advice, Ill keep it in mind on my next builds.
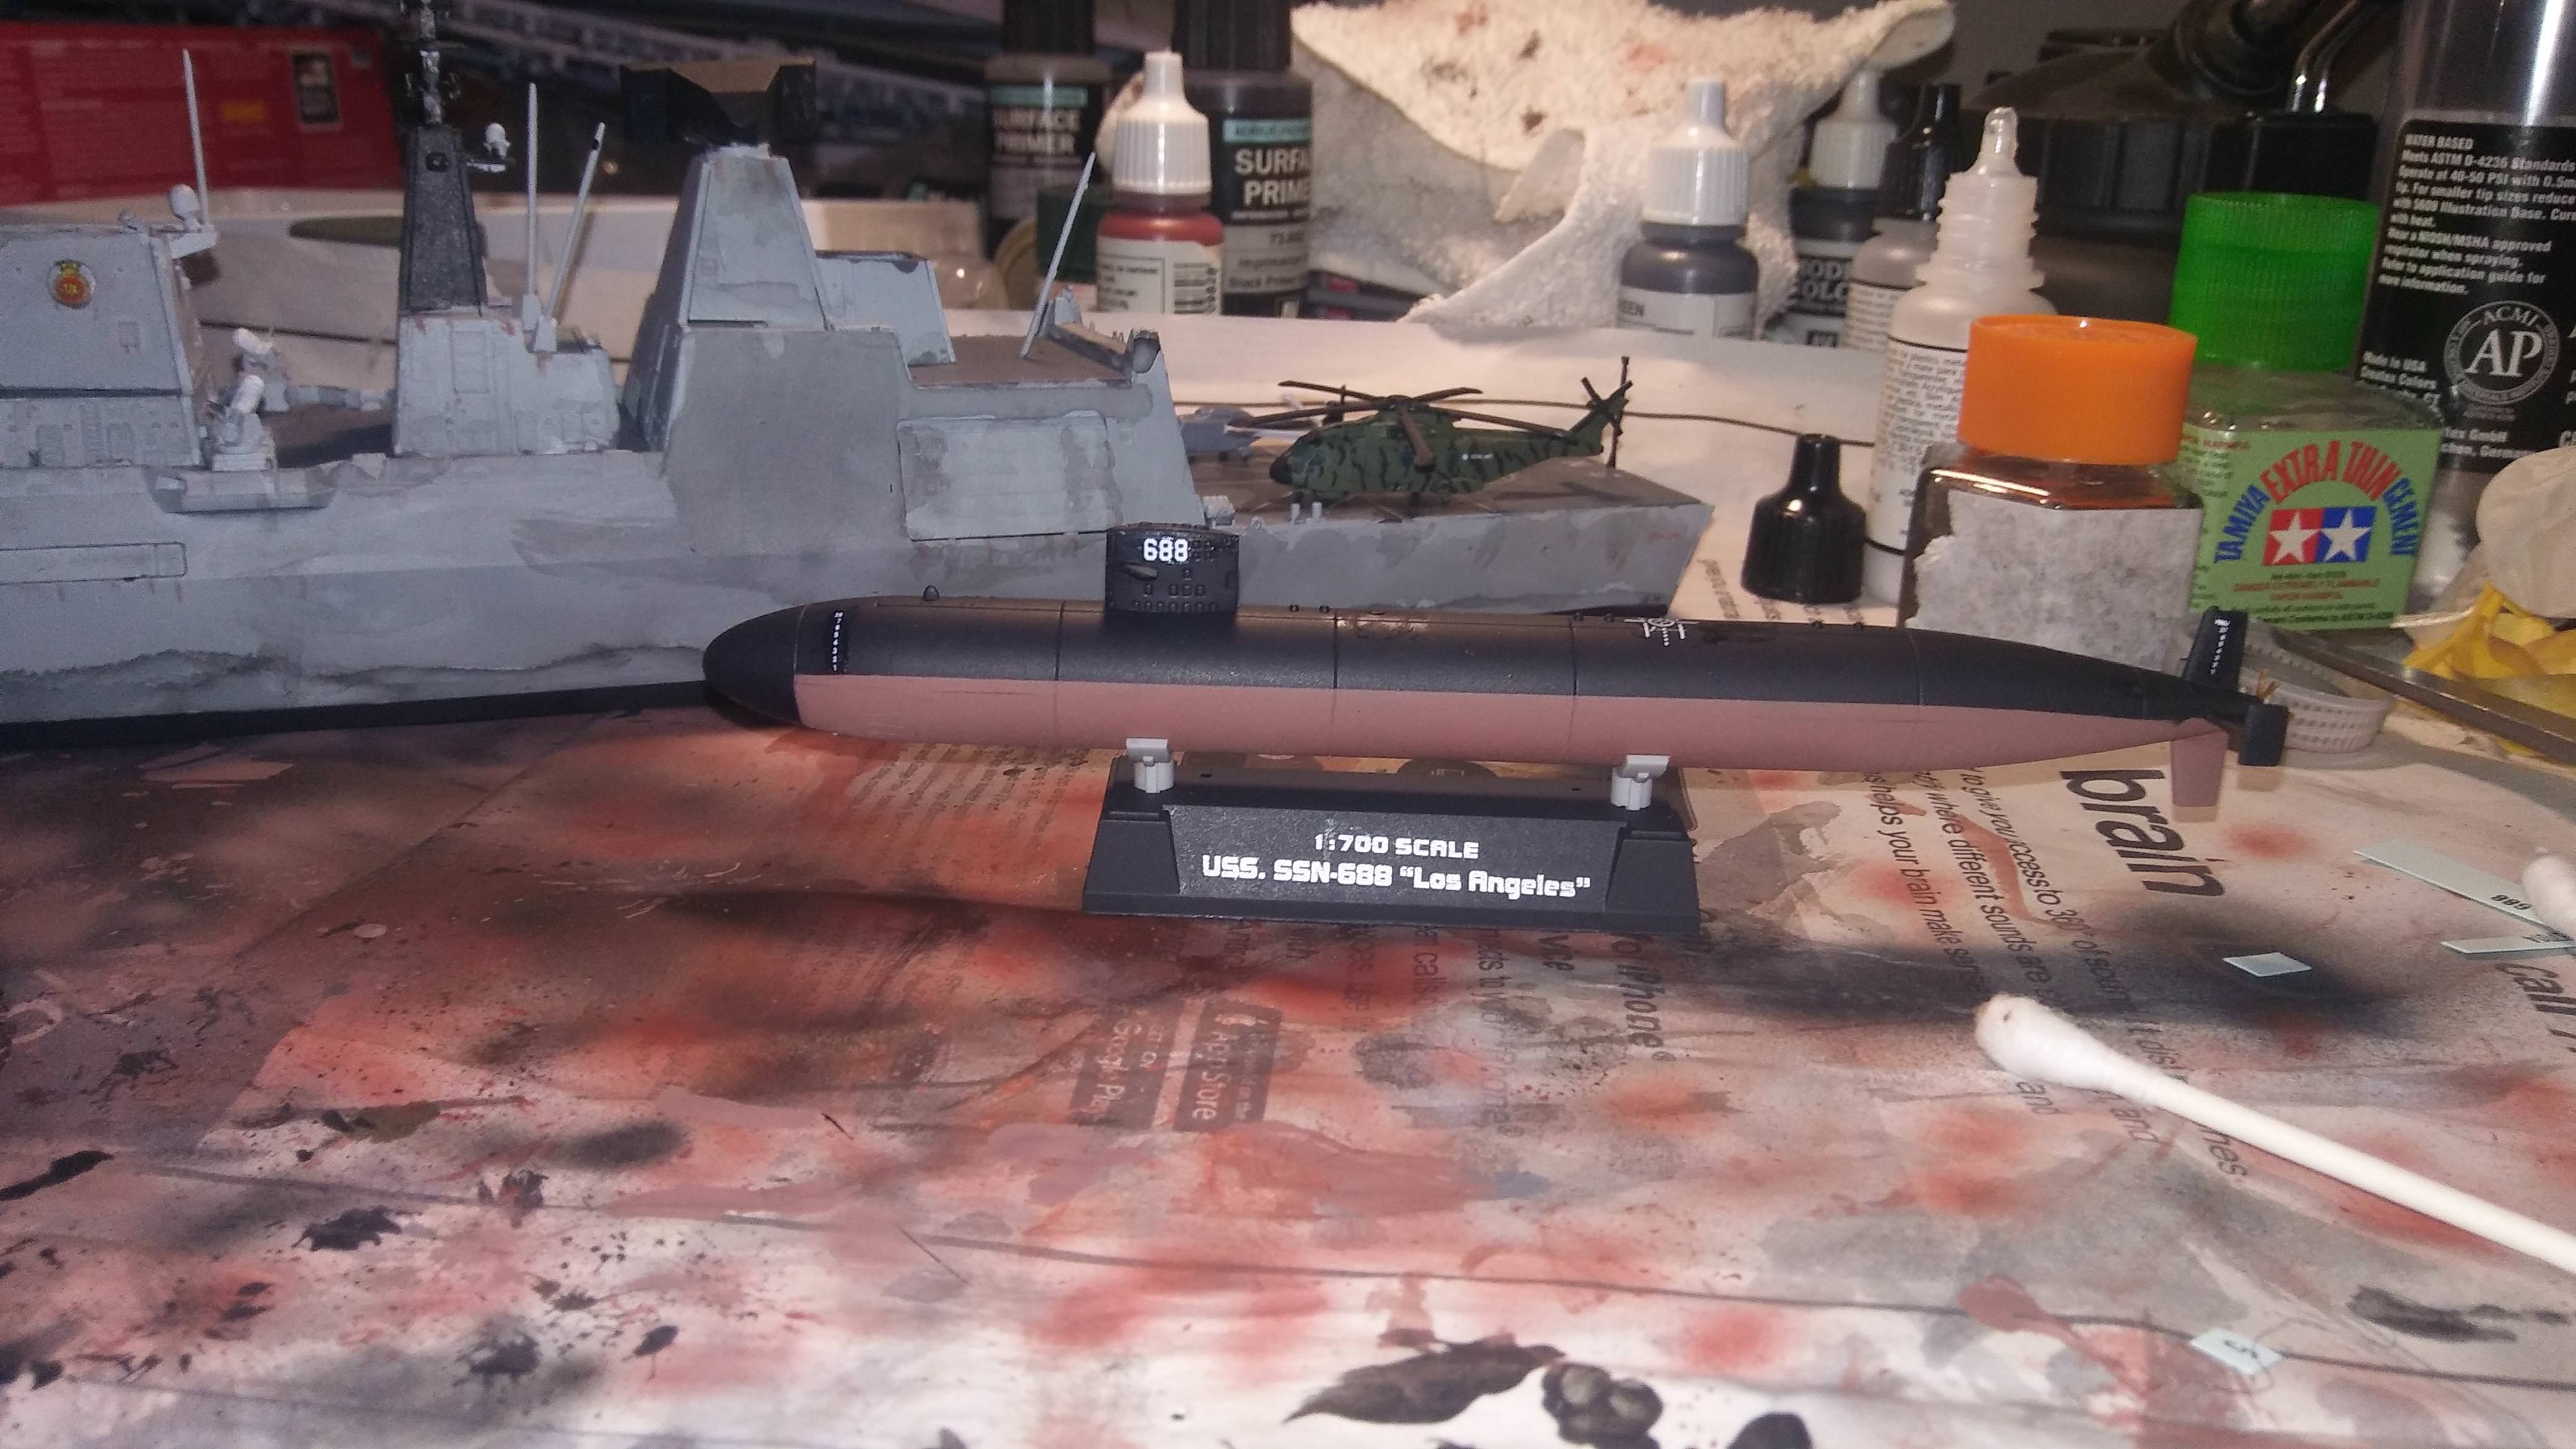
I have the USS Los Angeles SSN-688 in 1/700th to do, then I cant decide on what to do next, I really want to do a Typhoon (my favorite submarine in the world), a Kirov class battle cruiser,Kuznetzov class Aircraft carrying cruiser, or an aircraft carrier of some description.
Ah well, focus on what I'm doing for now, think about that stuff later. Will update when she is...fully weathered, then I get to figure out how to make a diorama.
Edit: I just got an Idea while weathering it...quite heavily with black it seems...Its HMS Dragon in some future (or not so future considering current events) war. And shes in the middle of a massive naval engagement, and the reason why she looks so Oily on the hull, is she has sailed through some areas where other ships have sunk. Possibly even a convoy of tankers, its in rough seas so the oil is being washed away but some of it has stuck.
Jettail
Joined: November 01, 2017
KitMaker: 50 posts
Model Shipwrights: 33 posts
Posted: Sunday, November 12, 2017 - 06:03 AM UTC
Welp, here she is, Still dont have a diorama just yet (special guest star USS Los Angeles SSN-688

TimReynaga
Joined: May 03, 2006
KitMaker: 2,500 posts
Model Shipwrights: 1,830 posts
Posted: Sunday, November 12, 2017 - 06:50 AM UTC
I like it, Cameron -
The helicopter is my favorite part!
The helicopter is my favorite part!

Jettail
Joined: November 01, 2017
KitMaker: 50 posts
Model Shipwrights: 33 posts
Posted: Sunday, November 12, 2017 - 10:15 AM UTC
Quoted Text
I like it, Cameron -
The helicopter is my favorite part!
Thank you, Its my favorite part too ^^
Jettail
Joined: November 01, 2017
KitMaker: 50 posts
Model Shipwrights: 33 posts
Posted: Sunday, November 19, 2017 - 05:10 AM UTC
Just as an update I finally got some stuff to start attempting dioramas with water, mod podge and liquitex for the water effects. so....we will see what happens. in the interim I was doing something else. Not ship related, but it is Navy, and Im kinda proud of it.

RussellE
#306
Joined: June 27, 2010
KitMaker: 3,959 posts
Model Shipwrights: 2,777 posts
Posted: Sunday, November 19, 2017 - 03:34 PM UTC
Quoted Text
Just as an update I finally got some stuff to start attempting dioramas with water, mod podge and liquitex for the water effects. so....we will see what happens. in the interim I was doing something else. Not ship related, but it is Navy, and Im kinda proud of it.
As you should be Cameron. Very nice.

Jettail
Joined: November 01, 2017
KitMaker: 50 posts
Model Shipwrights: 33 posts
Posted: Tuesday, November 21, 2017 - 12:21 PM UTC
Well...I hope I'm doing her justice, First ocean Diorama, theres still some things to be done, so its not QUITE finished yet. but...yeah criticism is appreciated, again I don't do well with it, but I need to learn.
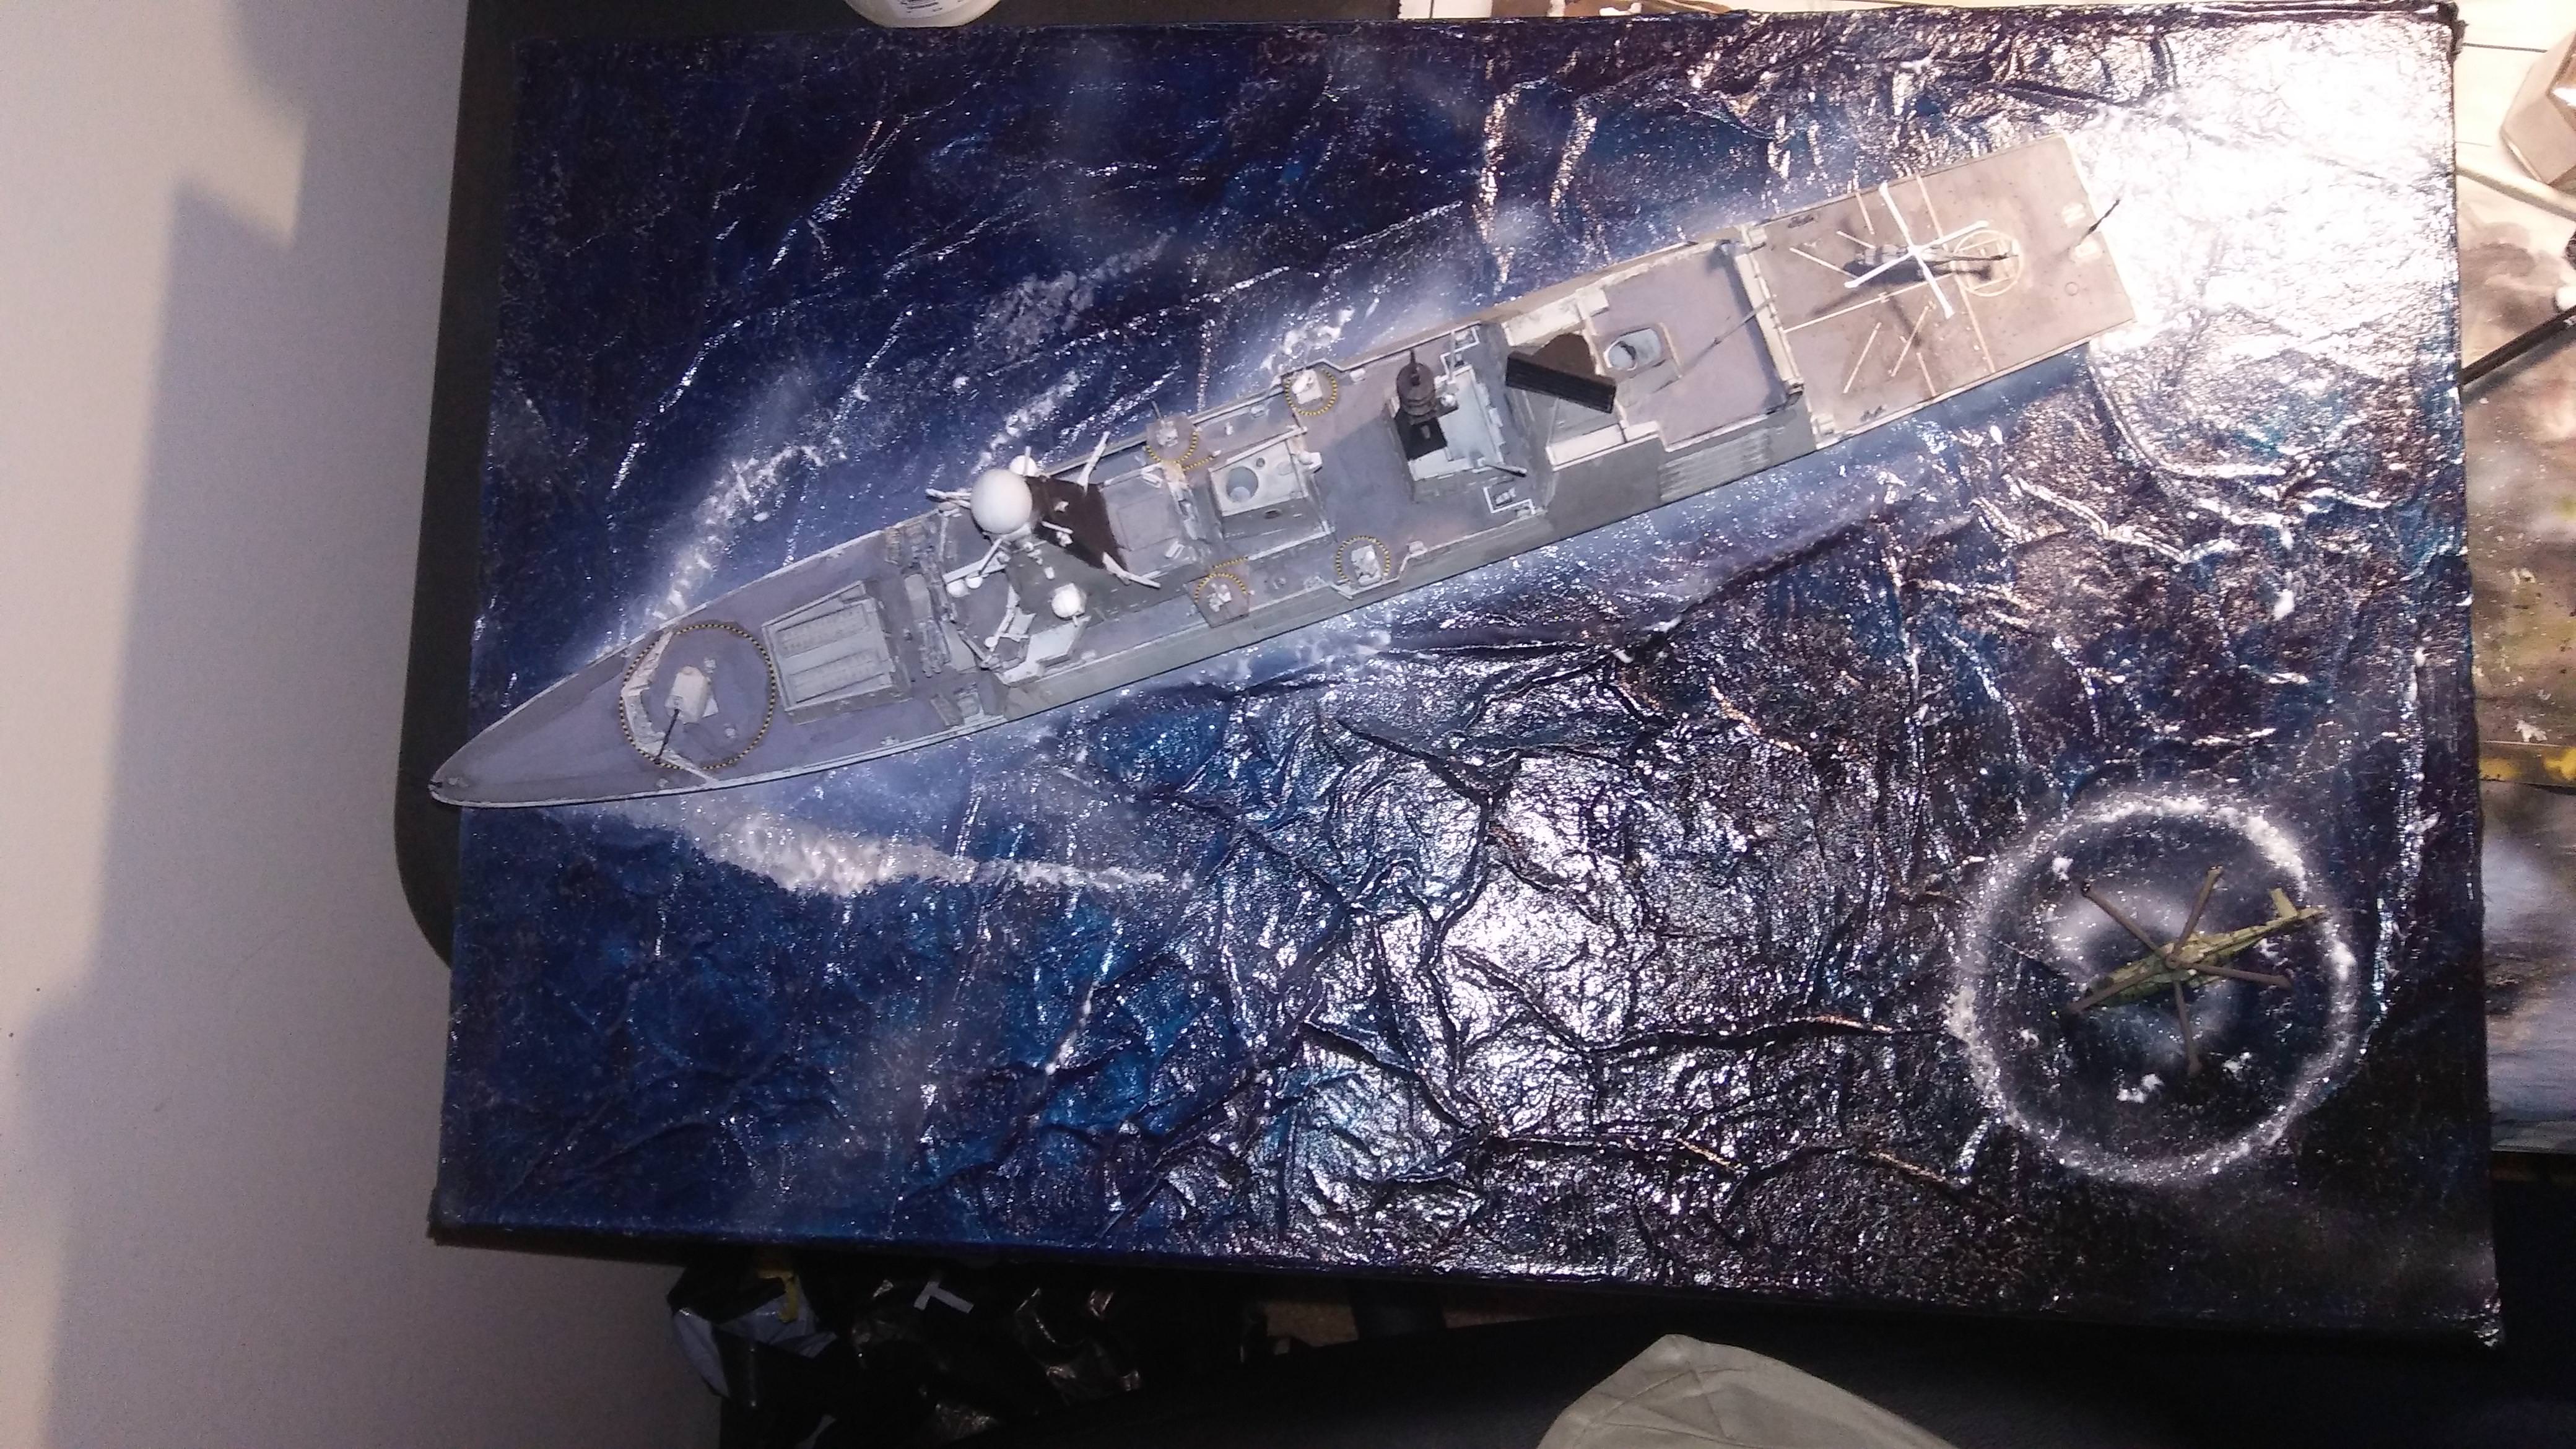
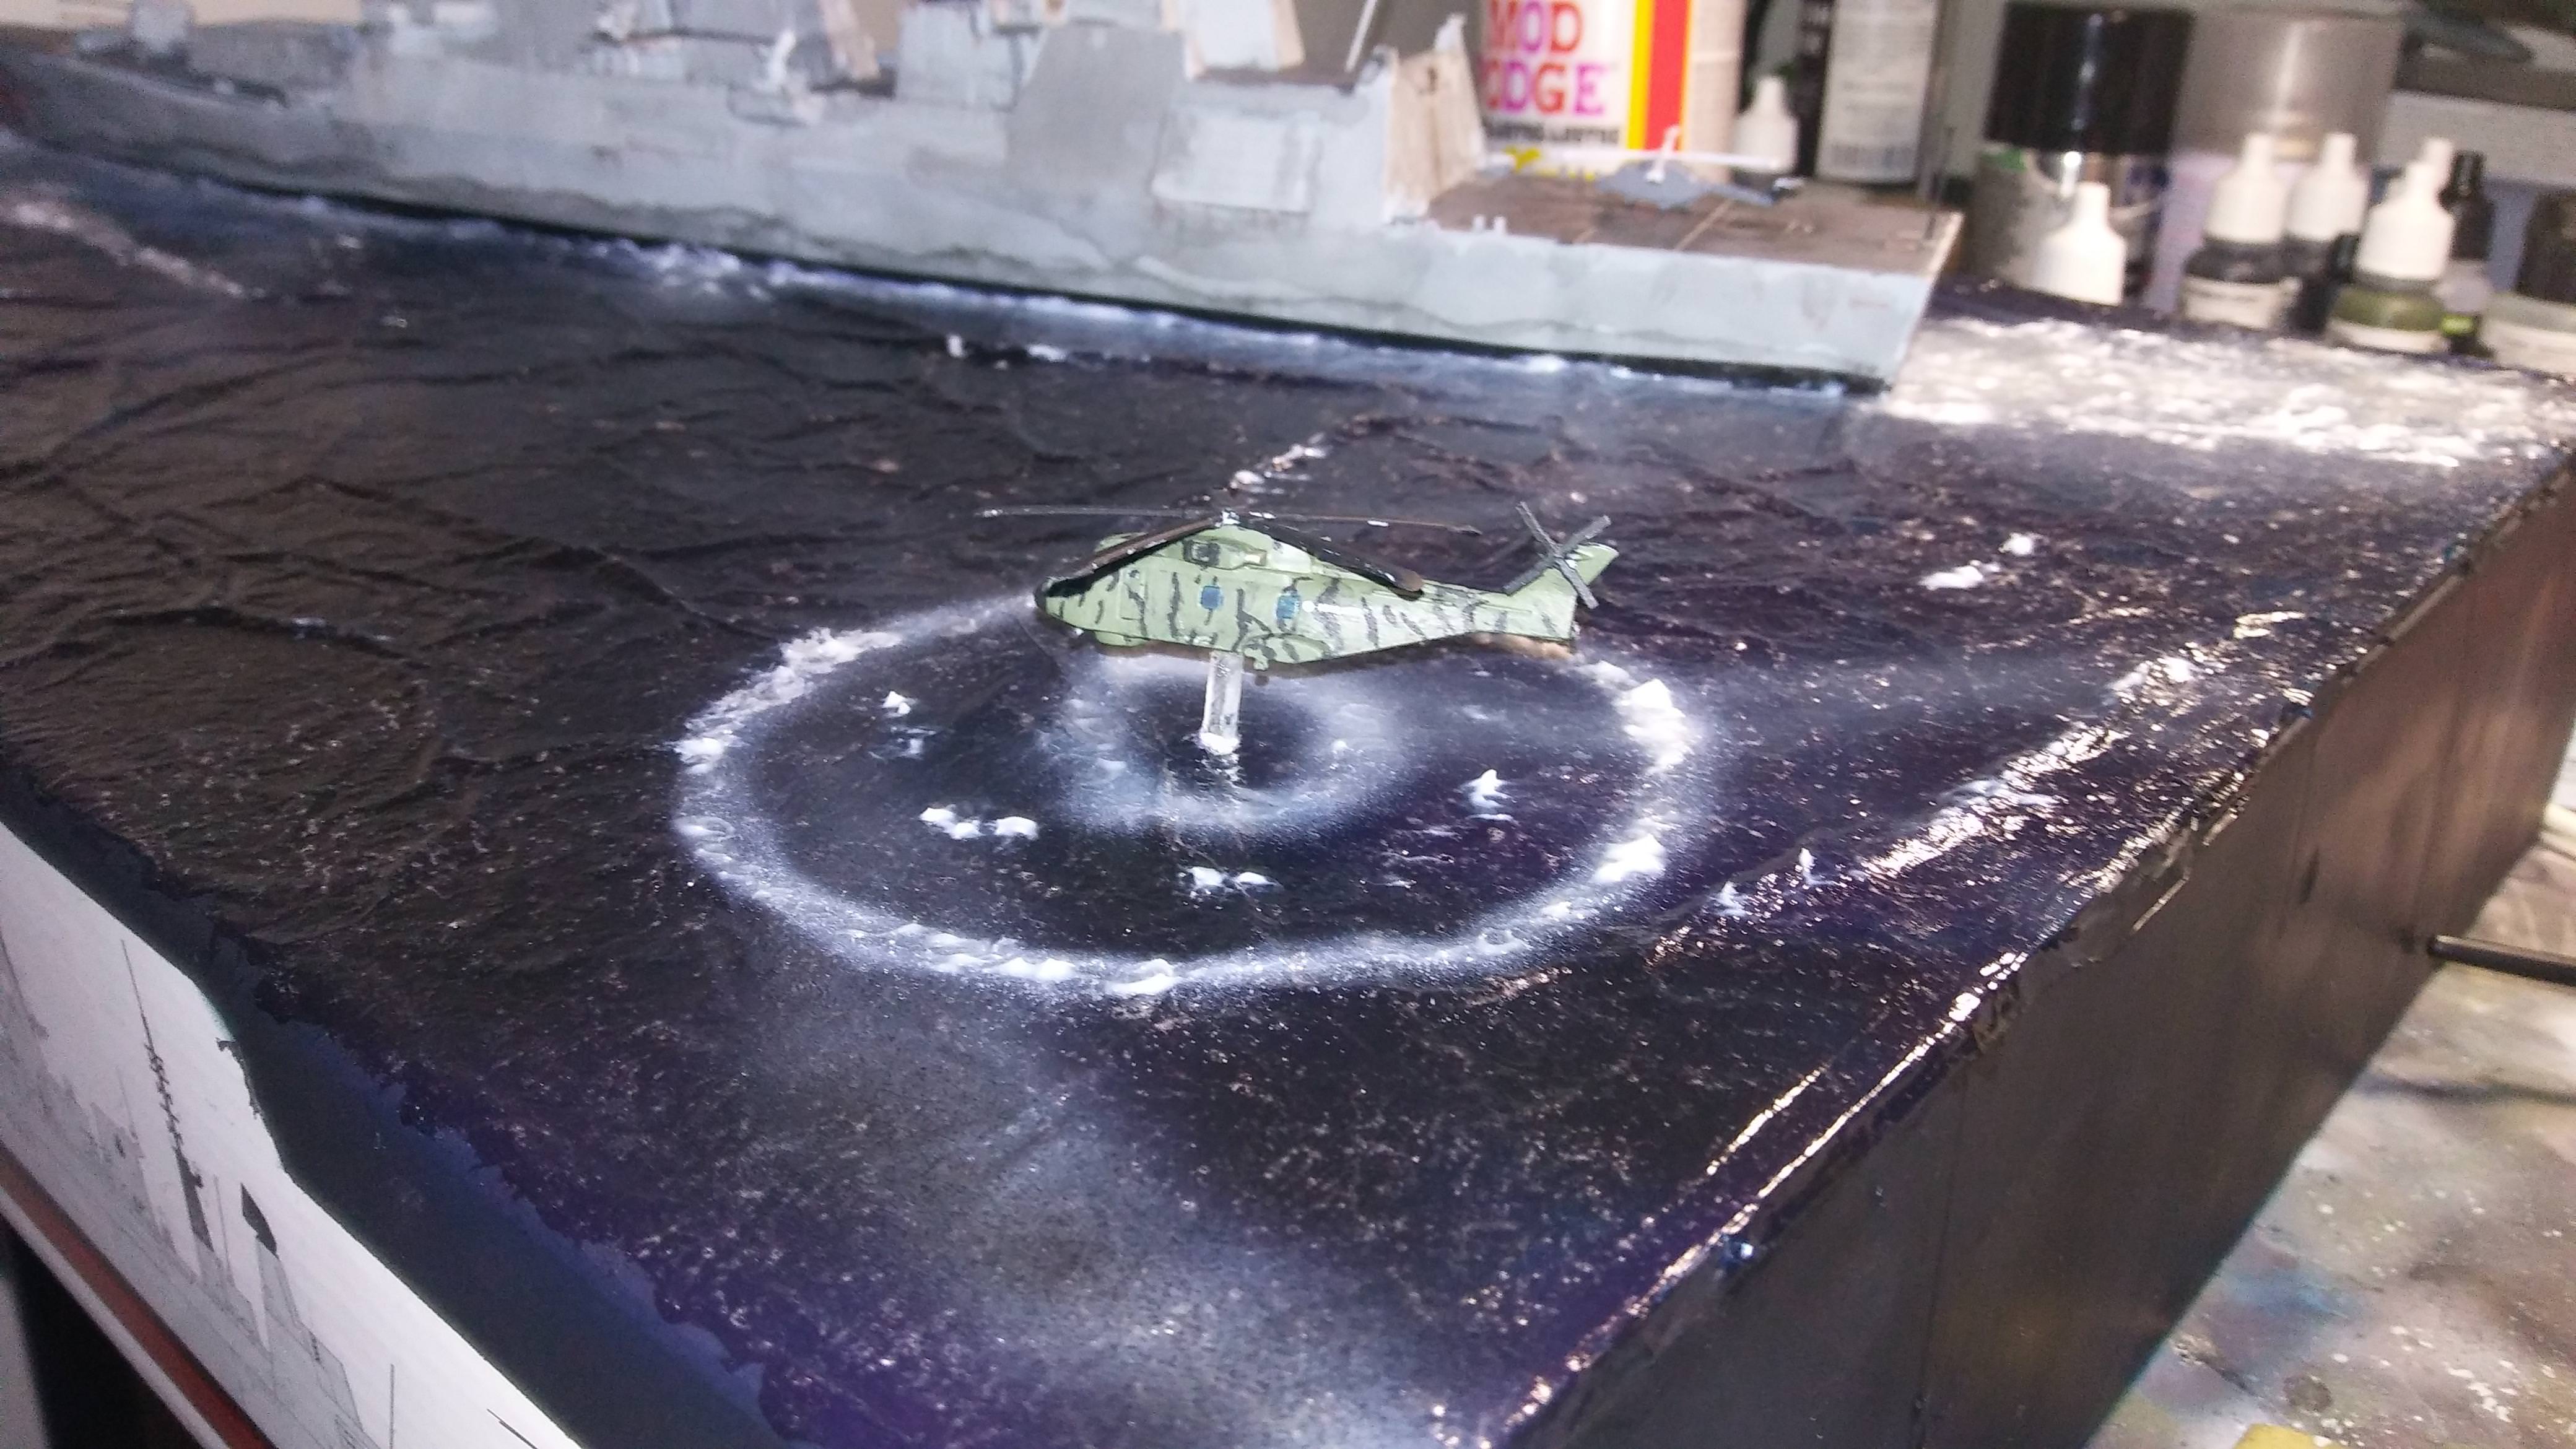
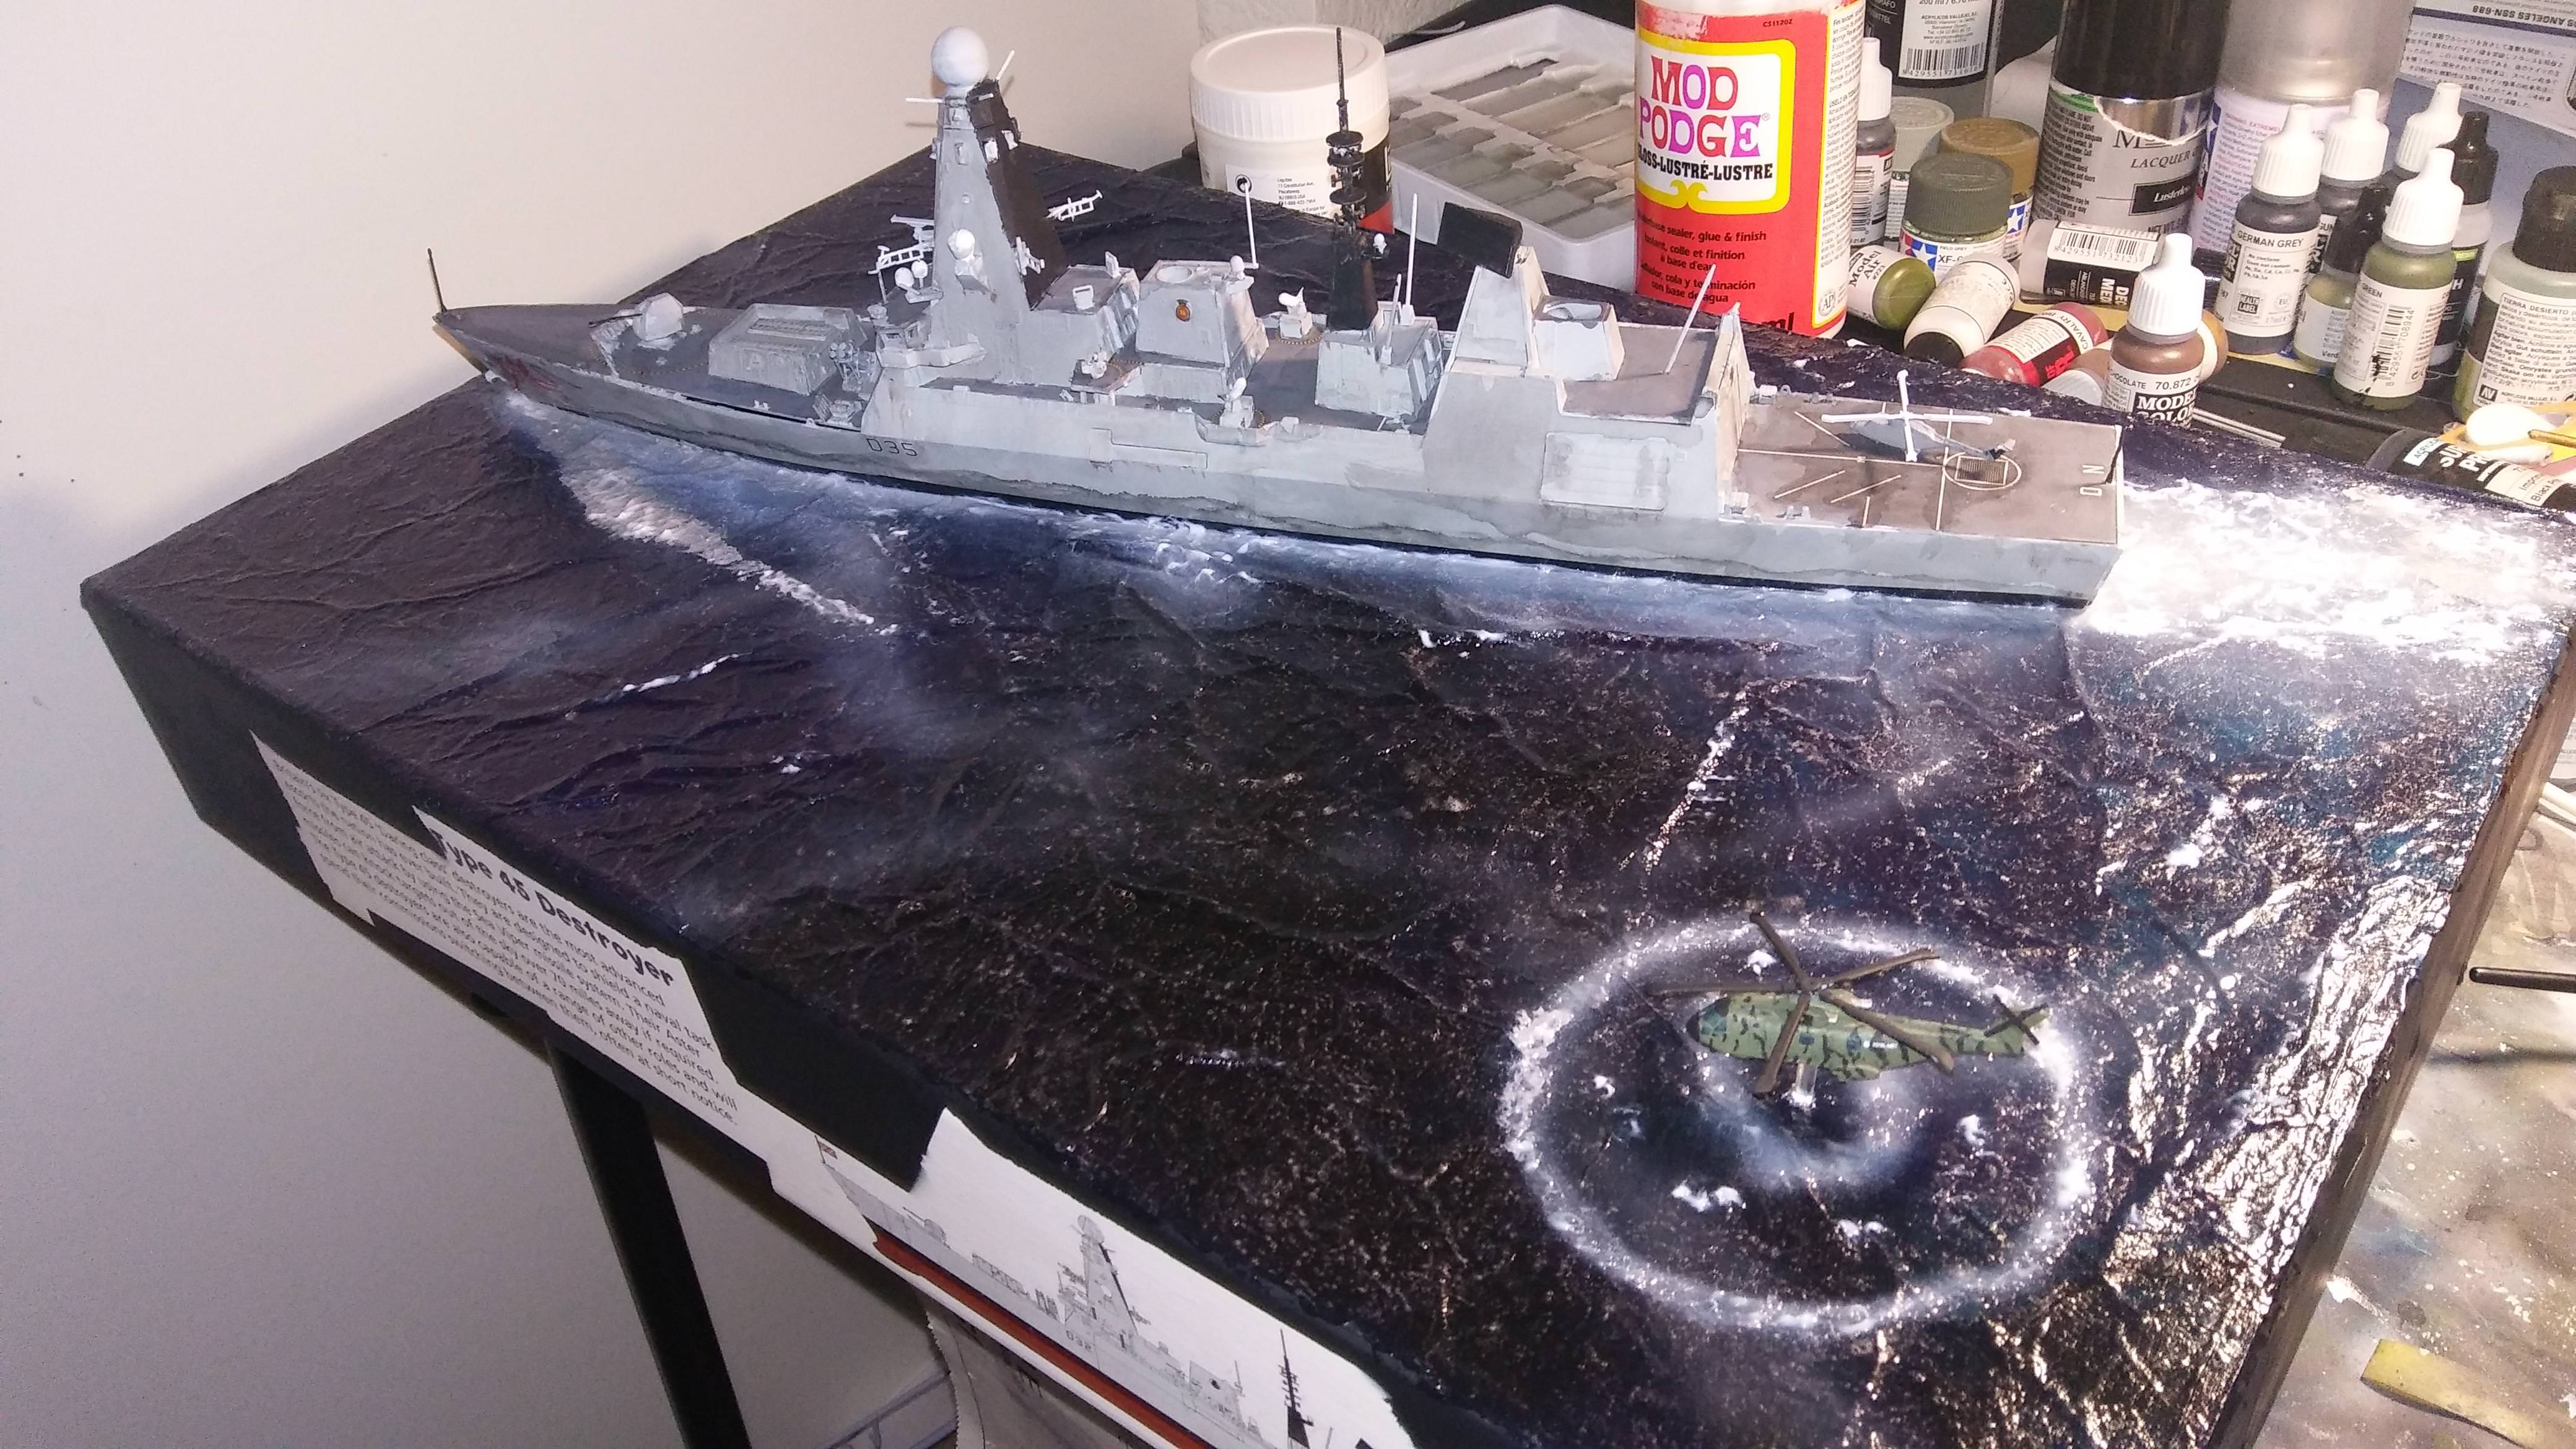
I imagine shes going through a modern war zone, where a tanker was just sunk, and her Merlin is out looking for surviviors (as well as any subs that might be in the area)
I imagine shes going through a modern war zone, where a tanker was just sunk, and her Merlin is out looking for surviviors (as well as any subs that might be in the area)
RussellE
#306
Joined: June 27, 2010
KitMaker: 3,959 posts
Model Shipwrights: 2,777 posts
Posted: Thursday, November 23, 2017 - 03:42 PM UTC
Cameron, for a first time effort, this is looking mighty fine!

TracyWhite
Joined: January 18, 2005
KitMaker: 527 posts
Model Shipwrights: 464 posts

Posted: Thursday, November 23, 2017 - 07:14 PM UTC
Quoted Text
I dont deal with criticisim very well, but I really need it in this case. So tell me...how does it look?
Quoted Text
So I managed to get the airbrush working (my skills are lacking and due to the aformentioned shaky hand there are plenty of spots I kinda messed up on)
One piece of advice that is actually two or one-and-a-half depending on how you look at it.....
You don't HAVE to cover the model with paint in one session. In fact, in many cases it works better if you thin your paint more and do thin coats and then do multiple thin coats over the space of hours or days to completely cover the model. This allows you to cover the areas that you didn't get 100% the first time without getting runs or orange peel in the paint (car modelers use this a lot for their really glossy paints). But (here's the half advice), paint on a ship isn't even to begin with - it frequently is touched up in sections and you get what is commonly termed "modulation" of color and tone. Having more or less paint on the model can also provide a similar modulation that is a good start to weathering.
Or, as Peewee Herman said, "I meant to do that!"
One more thing that just occurred to me. I'm not sure "how" you are airbrushing. I generally will change directions between coats (even in the same session) because I can't "mow the lawn" perfectly. I will, for example, spray down the length of the hull lengthwise, and then do the next coat up and down from deck to keel. This helps compensate for my less than perfect hands and technique.
Jettail
Joined: November 01, 2017
KitMaker: 50 posts
Model Shipwrights: 33 posts
Posted: Saturday, November 25, 2017 - 02:57 AM UTC
I do small spirals on the first coat, probably not the best method, but it works for me. then I go lengthwise, but those are perfect suggestions, Ill have to try them out on the Frunze. Thanks!

RedDuster

Joined: March 01, 2010
KitMaker: 7,078 posts
Model Shipwrights: 6,649 posts

Posted: Sunday, November 26, 2017 - 12:30 AM UTC
Very nice job Cameron,
Considering the issues with the kit going together she has turned out very well, like the dio too, works well.
Cheers
Si
Considering the issues with the kit going together she has turned out very well, like the dio too, works well.
Cheers
Si
 |

WEB HOSTING BY


Copyright ©2021 Model Shipwrights and Kitmaker Network, a subsidiary of Silver Star Enterprises
All Rights Reserved. Please read our Conditions of Use and Privacy Policy.
All Rights Reserved. Please read our Conditions of Use and Privacy Policy.