_GOTOBOTTOM
General Ship Modeling
Discuss modeling techniques, experiences, and ship modeling in general.
Issuues with Future™
ChurchSTSV
Visit this Community
Arizona, United States
Joined: September 20, 2017
KitMaker: 350 posts
Model Shipwrights: 175 posts
Posted: Monday, September 24, 2018 - 03:21 AM UTC
Ok so I have some questions about using Future on muh ships. I applied a generous coat and allowed 24 hours to get nice and set. I then attempted to use some enamels to weather and this happened:


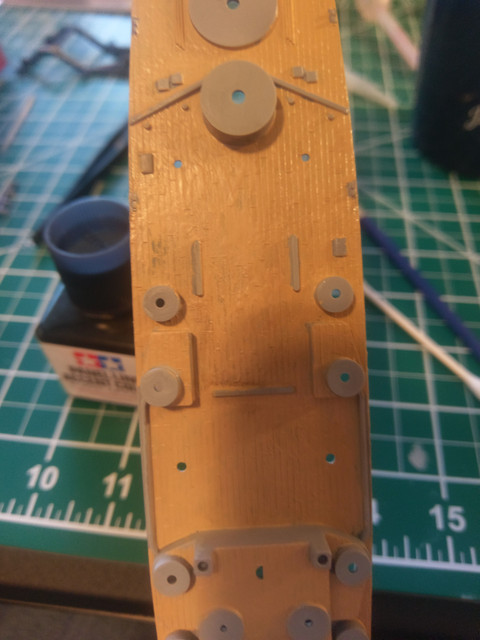
I thought to myself, "Self, this is probably from the enamel thinner being Testors and not Tamiya. No big deal, I can repaint this." So I touched it up and no big deal.

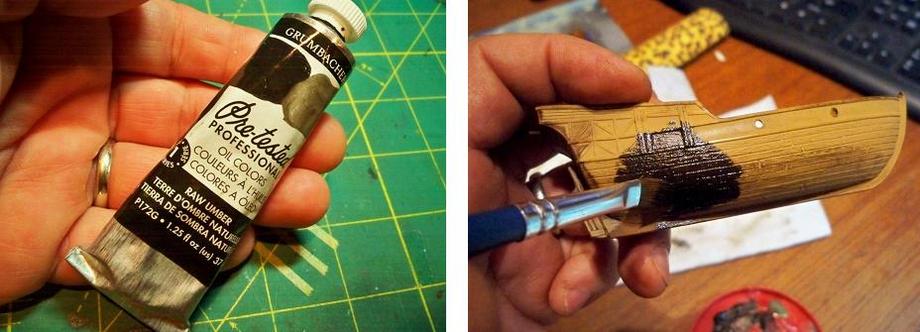
So at this point, I figures I needed to thin it out some more and I tried my hand at some light weathering on the hull:


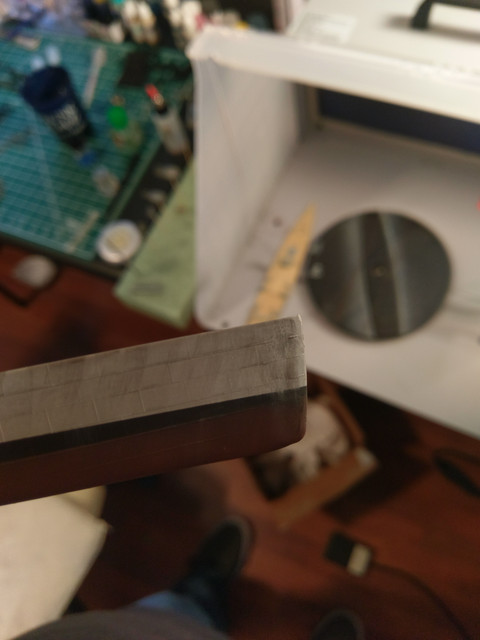
And the Future didn't stand a chance. So as awesome as the paint melting is at this point, I grabbed my Windex:


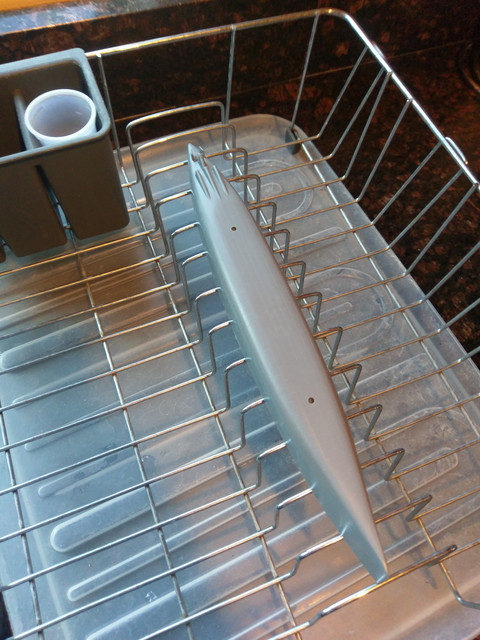
We are back to naked hull. Which is kind of good as I didn't like my boot stripe and wanted some more red in the Hull Red. So my questions is: Would I be better off getting some Krylon Fusion and using that, or should I try Future again?
Kevlar06
Visit this Community
Washington, United States
Joined: March 15, 2009
KitMaker: 3,670 posts
Model Shipwrights: 173 posts
Posted: Monday, September 24, 2018 - 05:04 AM UTC
So-- here's the deal. Future is an Acrylic, and as such, enamel thinners are often a little too hot for it. I'd suggest using Turpenoid or a like product which is a little more forgiving. But why are you weathering over a gloss coat? It would be better to flat coat over the Future with something like Testor's Dullcoat, which is laquer based, then use your enamel wash after its thoroughly dry. A good rule of thumb is never to brush enamels over acrylics, as the thinner can disturb the paint beneath. But you can lightly spray a clearcoat over the Acrylic paint to protect the base coat. Also, go easy on the thinner wash you are using, a little can go a long way. You might also try some of the newer washes that are Acrylic based. I'm not sure Krylon Fusion is a good choice, as it's enamel (might even be a lacquer-- I'm not sure) and spray cans are hard to control, which might also disturb the Future. Another issue us how you applied the Future-- was it a heavy enough coat?
VR, Russ
ChurchSTSV
Visit this Community
Arizona, United States
Joined: September 20, 2017
KitMaker: 350 posts
Model Shipwrights: 175 posts
Posted: Monday, September 24, 2018 - 09:16 AM UTC

Quoted Text

So-- here's the deal. Future is an Acrylic, and as such, enamel thinners are often a little too hot for it. I'd suggest using Turpenoid or a like product which is a little more forgiving. But why are you weathering over a gloss coat? It would be better to flat coat over the Future with something like Testor's Dullcoat, which is laquer based, then use your enamel wash after its thoroughly dry. A good rule of thumb is never to brush enamels over acrylics, as the thinner can disturb the paint beneath. But you can lightly spray a clearcoat over the Acrylic paint to protect the base coat. Also, go easy on the thinner wash you are using, a little can go a long way. You might also try some of the newer washes that are Acrylic based. I'm not sure Krylon Fusion is a good choice, as it's enamel (might even be a lacquer-- I'm not sure) and spray cans are hard to control, which might also disturb the Future. Another issue us how you applied the Future-- was it a heavy enough coat?
VR, Russ


It is my firs attempting to weather anything and sometimes the layers of different paint needed can be confusing. So I can see where I messed up. The enamel thinner 'cooked' the Future. I was under the impression that Future would seal the acrylic so the enamel could be painted over it. I will be getting a can of dull coat and trying it again.

I applied the Future via AB and went through multiple cups of the stuff and made everything all shiny and smooth. That part was nice.
U-mark
Visit this Community
Michigan, United States
Joined: January 04, 2017
KitMaker: 128 posts
Model Shipwrights: 3 posts
Posted: Monday, September 24, 2018 - 09:48 AM UTC
Tamiya's gloss, semi gloss and flat clear cote spray cans work well too.
ChurchSTSV
Visit this Community
Arizona, United States
Joined: September 20, 2017
KitMaker: 350 posts
Model Shipwrights: 175 posts
Posted: Monday, September 24, 2018 - 10:14 AM UTC
Ok, so help me out. Google is confusing me:

Step process:

1. Prime (If needed)
2. Paint
3. ???
4. ???

Looking for the steps up to and after weathering
Kevlar06
Visit this Community
Washington, United States
Joined: March 15, 2009
KitMaker: 3,670 posts
Model Shipwrights: 173 posts
Posted: Monday, September 24, 2018 - 11:13 AM UTC

Quoted Text

Ok, so help me out. Google is confusing me:

Step process:

1. Prime (If needed)
2. Paint
3. ???
4. ???

Looking for the steps up to and after weathering


1)Prime
2)Paint
3)Future ( or other gloss clear coat if you are applying decals)
4)Flat Clearcoat (or gloss depending on the desired finish)
5)Weathering (followed by a flat coat, again depending on the desired finish— but normally weathering is “a damaged finish, and it’s hard to imagine it on a gloss)

Future is normally used for undercoating for decals (to eliminate “silvering”), achieving a glossy clear topcoat (as in cars), and for coating canopies and other clear parts to give them a crystal clear glass-like shine.Other than that, there really is no need to overcoat the entire model. It doesn’t make a very good base for weathering, as acrylic washes tend to bead up on it, and you’ve already seen what enamel washes do to it. Oil washes (as in diluted oil paints work better over Future, but they normally are used with Turpinoid (synthetic turpentine). The step you’ve missed is the clear, flat, Lacquer spray finish, which can be used over acrylics or enamels. But enamel washes need to be applied sparingly. I prefer painting in enamels and lacquers, and washing in acrylics— which have milder solvents.
VR, Russ

ChurchSTSV
Visit this Community
Arizona, United States
Joined: September 20, 2017
KitMaker: 350 posts
Model Shipwrights: 175 posts
Posted: Monday, September 24, 2018 - 11:18 AM UTC

Quoted Text


Quoted Text

Ok, so help me out. Google is confusing me:

Step process:

1. Prime (If needed)
2. Paint
3. ???
4. ???

Looking for the steps up to and after weathering


1)Prime
2)Paint
3)Future ( or other gloss clear coat if you are applying decals)
4)Flat Clearcoat (or gloss depending on the desired finish)
5)Weathering (followed by a flat coat, again depending on the desired finish— but normally weathering is “a damaged finish, and it’s hard to imagine it on a gloss)

Future is normally used for undercoating for decals (to eliminate “silvering”), achieving a glossy clear topcoat (as in cars), and for coating canopies and other clear parts to give them a crystal clear glass-like shine.Other than that, there really is no need to overcoat the entire model. It doesn’t make a very good base for weathering, as acrylic washes tend to bead up on it, and you’ve already seen what enamel washes do to it. Oil washes (as in diluted oil paints work better over Future, but they normally are used with Turpinoid (synthetic turpentine).
VR, Russ


Now that makes sense. I am trying to make use of this Tamiya panel wash and was getting confused as to which step I would use it. I tried it after the Future, but the enamel thinner ate it away. So Paint, Future, Decals, Future, Flat coat, weathering.

Got it.

I hope.
Kevlar06
Visit this Community
Washington, United States
Joined: March 15, 2009
KitMaker: 3,670 posts
Model Shipwrights: 173 posts
Posted: Tuesday, September 25, 2018 - 02:54 AM UTC
I think the Tamiya panel wash in the square bottle uses thier Acrylic lacquer thinner as a base, which is why you've experienced the "Future melting" problem you've described. Many folks believe Tamiya paints are water or Ammonia based acrylics, but that's not true, they use an Acrylic lacquer for thinner. They can be thinned with plain old lacquer thinner as well. I prefer using thier proprietary "yellow cap" thinner. Once you have finished with the weathing, it's always best to give it a coat of clear flat, just to make sure it stays put-- this is especially true if you are using Acrylic weathering over enamel, or any of the "dry" powder types of weathering like Tamiya or Mig.
VR, Russ
ChurchSTSV
Visit this Community
Arizona, United States
Joined: September 20, 2017
KitMaker: 350 posts
Model Shipwrights: 175 posts
Posted: Tuesday, September 25, 2018 - 04:57 AM UTC

Quoted Text

I think the Tamiya panel wash in the square bottle uses thier Acrylic lacquer thinner as a base, which is why you've experienced the "Future melting" problem you've described. Many folks believe Tamiya paints are water or Ammonia based acrylics, but that's not true, they use an Acrylic lacquer for thinner. They can be thinned with plain old lacquer thinner as well. I prefer using thier proprietary "yellow cap" thinner. Once you have finished with the weathing, it's always best to give it a coat of clear flat, just to make sure it stays put-- this is especially true if you are using Acrylic weathering over enamel, or any of the "dry" powder types of weathering like Tamiya or Mig.
VR, Russ


I have seen the stuff used in videos to add details and weathering to ships, I guess I should pick up some Tamiya X20 so it all stays in the same family. Just wish they sold the stuff local.

I am gonna have to watch more weathering tutorials on the YouTube.
ChurchSTSV
Visit this Community
Arizona, United States
Joined: September 20, 2017
KitMaker: 350 posts
Model Shipwrights: 175 posts
Posted: Monday, October 01, 2018 - 09:30 AM UTC
So I got some Testors Dullcote™ at the HB this weekend. I really wanted to use it this weekend, but it is hurricane Maria weather outside and I dare not spray it indoors with a pregnant woman in the vicinity.

So I will see if I can seal up that paint jerb this week, give it a good 24 hours to set, and try weathering. AGAIN.
TimReynaga
Staff MemberAssociate Editor
MODEL SHIPWRIGHTS
Visit this Community
California, United States
Joined: May 03, 2006
KitMaker: 2,500 posts
Model Shipwrights: 1,830 posts
Posted: Tuesday, October 02, 2018 - 07:08 AM UTC
Another alternative you may try for weathering over Tamiya acrylics is artist’s oils. I like to use Grumbacher or Windsor and Newton brands painted directly over the Tamiya acrylic base, then wipe off with a paint thinner-dampened towel.


Simple Home Depot paint thinner works best, since turpentine and other more aggressive solvents are too “hot” and may attack the acrylics. As for a final flat coat, the artist’s oils dry flat and are very durable, so you won’t really need one.


However, if you still want to go that route “flat Future” is always compatible and works well. This is Future with Tamiya acrylic “flat base” added to it. Some suggested ratios:

1 part flat base to 3 parts Future = very flat
1 part flat base to 10 parts Future = flat
1 part flat base to 15 parts Future = satin

If you get too much flat base on the surface of your model you run the risk of making it all go white, but this can be fixed by applying another coat with less flat base added to the mix.
d6mst0
#453
Visit this Community
Texas, United States
Joined: August 28, 2016
KitMaker: 1,925 posts
Model Shipwrights: 1,298 posts
Posted: Tuesday, October 02, 2018 - 02:06 PM UTC
I have only use Future to coat my models before weathering and never had a problem. I used MIG, Vallejo, AK washes without any issues. Made my own washes using oil paints, plus dot filtering using oil paints with no problem.

The only thing I don't like about Future is that I have to clean my airbrush twice. Once with Windex and again with plain water.

Mark
j76lr
Visit this Community
New Jersey, United States
Joined: September 22, 2006
KitMaker: 1,081 posts
Model Shipwrights: 2 posts
Posted: Thursday, October 04, 2018 - 07:17 AM UTC
Question ? do you thin the future or not ?
d6mst0
#453
Visit this Community
Texas, United States
Joined: August 28, 2016
KitMaker: 1,925 posts
Model Shipwrights: 1,298 posts
Posted: Thursday, October 04, 2018 - 09:15 AM UTC
No, spray it right out of the bottle. I set my airbrush at 20psi and it spray just fine. Your AB needle should be at least 3 - 5 mm in size.

Mark
 _GOTOTOP