

The detail painting is really making her pop Tim,
Your microscopic work is outstanding,
Cheers
Si


Go to modelshipwrights.com for the current dynamic site!
Hosted by Jim Starkweather
IJN Ryujo 1942 - 1/2400 Scale

RedDuster

Joined: March 01, 2010
KitMaker: 7,078 posts
Model Shipwrights: 6,649 posts

Posted: Tuesday, April 02, 2019 - 08:34 AM UTC

TimReynaga

Joined: May 03, 2006
KitMaker: 2,500 posts
Model Shipwrights: 1,830 posts

Posted: Tuesday, April 02, 2019 - 02:26 PM UTC
To complete the paint job, I added a thin dark gray oil wash (Winsor & Newton Lamp Black & Flake White) over the Kure Naval Arsenal Grey to outline details and deepen recesses.


This was kept subtle since the Ryujos paintwork would have been fresh at the time of her loss as she had just gone through a yard period in the weeks before her final battle.
This was kept subtle since the Ryujos paintwork would have been fresh at the time of her loss as she had just gone through a yard period in the weeks before her final battle.


d6mst0

#453
Joined: August 28, 2016
KitMaker: 1,925 posts
Model Shipwrights: 1,298 posts

Posted: Tuesday, April 02, 2019 - 11:51 PM UTC
Tim,
Nice effect the wash has, the detail still stands out under the bright light.
Mark
Nice effect the wash has, the detail still stands out under the bright light.
Mark

RussellE
#306

Joined: June 27, 2010
KitMaker: 3,959 posts
Model Shipwrights: 2,777 posts
Posted: Wednesday, April 03, 2019 - 08:26 AM UTC
Tim, you are the master of micro engineering!
It still astounds me how tiny these kits are!
It still astounds me how tiny these kits are!

RedDuster
Joined: March 01, 2010
KitMaker: 7,078 posts
Model Shipwrights: 6,649 posts
Posted: Wednesday, April 03, 2019 - 08:51 AM UTC
What Mark & Russ said,
Very subtle, but adds so much depth.
Cheers
Si
Very subtle, but adds so much depth.
Cheers
Si
TimReynaga
Joined: May 03, 2006
KitMaker: 2,500 posts
Model Shipwrights: 1,830 posts
Posted: Sunday, April 07, 2019 - 01:02 AM UTC
Thanks guys. The GHQ kit is small but pretty complete, although there are a few details that should be added. One of these is the pair of the wing-like platforms which most Japanese aircraft carriers had at the aft end of their flight decks.
Heres Ryujo in 1935:

These structures were actually the ends of a transverse gantry crane used to deploy the ships boats from the fantail.
The GHQ kit doesnt include these, so I replicated them with lengths of .010 X .060 inch plastic strip.

The unused alternate flight deck decal yielded the red and white stripes.


These seemingly odd markings were a landing aid for pilots; unlike the U.S. and British navies, the Japanese did not use landing signal officers. They had instead "chakkan shidoto," or "landing guidance light" apparatus, a precursor to the Fresnel Lens Optical Landing System still in use by the U.S. Navy today.
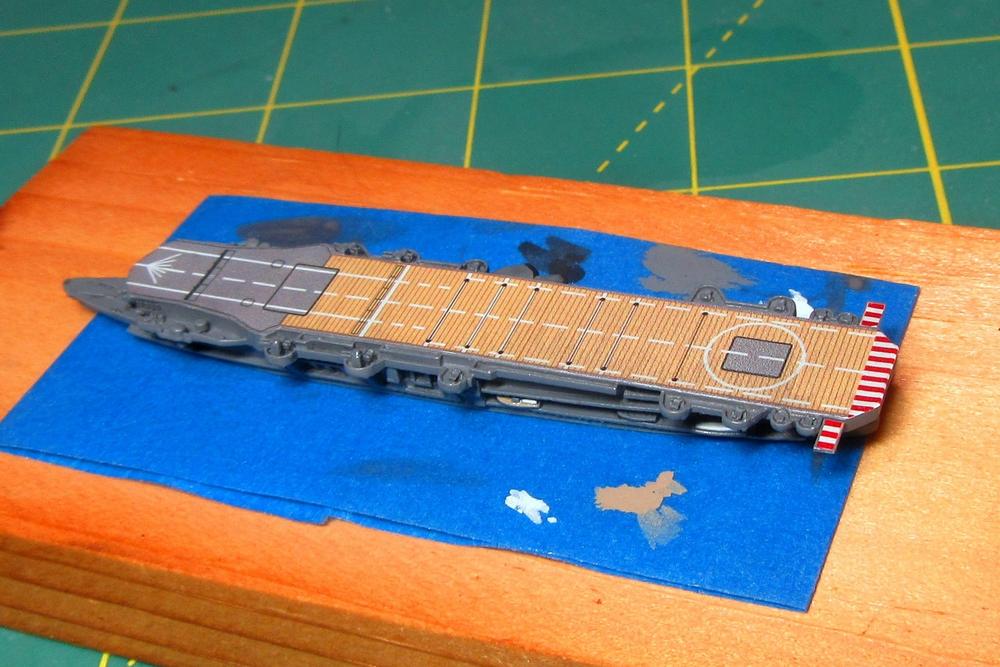
The red and white stripes were a supplement to this system to help the pilot establish that he was on the correct glide path for a safe landing.
Heres Ryujo in 1935:
These structures were actually the ends of a transverse gantry crane used to deploy the ships boats from the fantail.
The GHQ kit doesnt include these, so I replicated them with lengths of .010 X .060 inch plastic strip.
The unused alternate flight deck decal yielded the red and white stripes.
These seemingly odd markings were a landing aid for pilots; unlike the U.S. and British navies, the Japanese did not use landing signal officers. They had instead "chakkan shidoto," or "landing guidance light" apparatus, a precursor to the Fresnel Lens Optical Landing System still in use by the U.S. Navy today.
The red and white stripes were a supplement to this system to help the pilot establish that he was on the correct glide path for a safe landing.
d6mst0
#453
Joined: August 28, 2016
KitMaker: 1,925 posts
Model Shipwrights: 1,298 posts
Posted: Sunday, April 07, 2019 - 04:26 AM UTC
Tim,
Nice touch adding the landing aids. I found it amazing that the pilot was the only one responsible for landing his craft.
Mark
Nice touch adding the landing aids. I found it amazing that the pilot was the only one responsible for landing his craft.
Mark
RedDuster
Joined: March 01, 2010
KitMaker: 7,078 posts
Model Shipwrights: 6,649 posts
Posted: Sunday, April 07, 2019 - 06:17 AM UTC
Very nice Tim,
It's little touches like the landing aids that add so much.
Cheers
Si
It's little touches like the landing aids that add so much.
Cheers
Si
TimReynaga
Joined: May 03, 2006
KitMaker: 2,500 posts
Model Shipwrights: 1,830 posts
Posted: Monday, April 08, 2019 - 02:49 PM UTC
Quoted Text
Tim,
Nice touch adding the landing aids. I found it amazing that the pilot was the only one responsible for landing his craft.
Mark
I agree, Mark! At least they had a hikochô (flagman) on the bridge who would wave a red flag at the approaching aircraft to signal a waveoff if things got really bad...
The IJN was famously hard core, but I guess they made it work!

TimReynaga
Joined: May 03, 2006
KitMaker: 2,500 posts
Model Shipwrights: 1,830 posts
Posted: Thursday, April 11, 2019 - 10:11 AM UTC
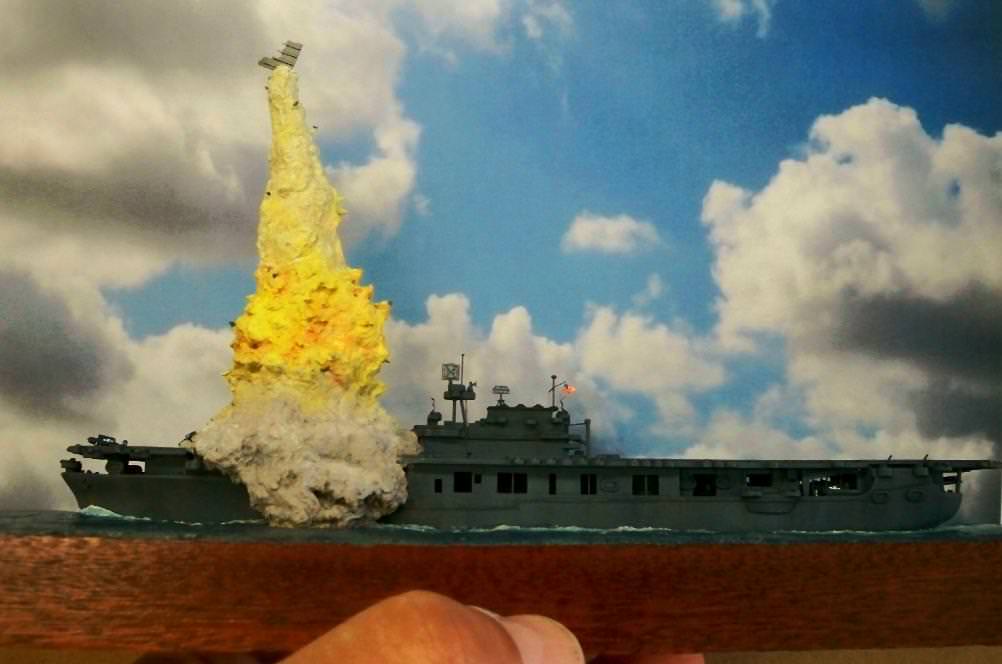
I used a flat Future clear coat (Future acrylic plus Tamiya Flat Base) to matte down the model - which fortunately went on without any problems. The ship has now been attached to the ocean base with Golden brand Soft Gel Medium (Gloss).


The Gel Medium is a clear viscous polymer used by artists as a thickener for acrylic paints, but it works great as an adhesive, too. It also served to blend ship into the wake and to heighten the painted wave tops for a bit of dimension. Next up: masts and rigging.
The Gel Medium is a clear viscous polymer used by artists as a thickener for acrylic paints, but it works great as an adhesive, too. It also served to blend ship into the wake and to heighten the painted wave tops for a bit of dimension. Next up: masts and rigging.

YellowHammer

#513
Joined: March 28, 2006
KitMaker: 554 posts
Model Shipwrights: 219 posts

Posted: Thursday, April 11, 2019 - 01:09 PM UTC
Tim,
This is really coming together nicely. It really looks like your wartime photo when viewed from above. Looking forward to your next update.
John
This is really coming together nicely. It really looks like your wartime photo when viewed from above. Looking forward to your next update.
John
RedDuster
Joined: March 01, 2010
KitMaker: 7,078 posts
Model Shipwrights: 6,649 posts
Posted: Thursday, April 11, 2019 - 07:41 PM UTC
Looks great Tim,
I don't know how you work in microscope scale.
agree with John's comment, also would be good to see the model alongside the photograph.
Cheers
Si
I don't know how you work in microscope scale.
agree with John's comment, also would be good to see the model alongside the photograph.
Cheers
Si
d6mst0
#453
Joined: August 28, 2016
KitMaker: 1,925 posts
Model Shipwrights: 1,298 posts
Posted: Thursday, April 11, 2019 - 11:46 PM UTC
Quoted Text
Looks great Tim,
I don't know how you work in microscope scale.
agree with John's comment, also would be good to see the model alongside the photograph.
Cheers
Si
Ditto!
TimReynaga
Joined: May 03, 2006
KitMaker: 2,500 posts
Model Shipwrights: 1,830 posts
Posted: Friday, April 12, 2019 - 12:05 AM UTC
Thanks guys, she's almost there! The overhead photo from 1935 shows the Ryujo at anchor, and in the 1942 one she's dead in the water after the USN attacks (you can see the starboard gantry crane "wing" has been blown off), while the model depicts the ship still undamaged and maneuvering - 
- but I'll post a comparison shot when the model is finished!
- but I'll post a comparison shot when the model is finished!
TimReynaga
Joined: May 03, 2006
KitMaker: 2,500 posts
Model Shipwrights: 1,830 posts
Posted: Saturday, April 13, 2019 - 03:54 AM UTC
As with all Imperial Japanese Navy aircraft carriers, the Ryujo carried multiple masts to support communication antenna wires.

These masts rotated down to horizontal during combat or flight operations, which is how I want to depict the model.

Matching the dimensions of a scaled down drawing of the ship, I began by cutting the three smaller units from 34 gauge (.16mm) brass wire.
The masts with their diminutive yards were attached to the ship with polyvinyl acetate (PVA). PVA glue, in this case Elmers Glue-All, is intended for porous materials like paper, wood, leather, or cloth, so it makes a solid but relatively weak bond with these metal pieces. Still, it is non-toxic and easy to work with, and it is strong enough for these tiny assemblies.


Ill paint and attach aerial wires to them after fabricating and installing the more complex mainmast at the port bow.
These masts rotated down to horizontal during combat or flight operations, which is how I want to depict the model.
Matching the dimensions of a scaled down drawing of the ship, I began by cutting the three smaller units from 34 gauge (.16mm) brass wire.
The masts with their diminutive yards were attached to the ship with polyvinyl acetate (PVA). PVA glue, in this case Elmers Glue-All, is intended for porous materials like paper, wood, leather, or cloth, so it makes a solid but relatively weak bond with these metal pieces. Still, it is non-toxic and easy to work with, and it is strong enough for these tiny assemblies.
Ill paint and attach aerial wires to them after fabricating and installing the more complex mainmast at the port bow.

Quincannon
Joined: June 22, 2018
KitMaker: 275 posts
Model Shipwrights: 273 posts

Posted: Saturday, April 13, 2019 - 05:20 AM UTC
You are a far better man than I, in masting and rigging that little fellow. I work mostly in 1/1200 scale twice the size, and while I don't shy away from making or enhancing a mast, I draw the line at rigging.
I really do like you base and how with paint you simulated wood. Excellent work, and it really shows the model off very well.
Now while you are roaming around a tiny town Eastern Solomons I do expect to see Enterprise, Shokaku, and Zuikaku, maybe even Saratoga if you can manage the differences in the Micro Nauts model, which I think is Sara in 45.
Splendid work. Drive on.
RussellE
#306
Joined: June 27, 2010
KitMaker: 3,959 posts
Model Shipwrights: 2,777 posts
Posted: Saturday, April 13, 2019 - 12:32 PM UTC
Tim it's amazing how you can take simple game piece kits and turn them into exquisite displays
Astounding!
Astounding!
TimReynaga
Joined: May 03, 2006
KitMaker: 2,500 posts
Model Shipwrights: 1,830 posts
Posted: Sunday, April 14, 2019 - 07:02 AM UTC
Quoted Text
Tim it's amazing how you can take simple game piece kits and turn them into exquisite displays
Astounding!
Thank you Russ. Those GHQ game pieces may be simple (a mere three pieces in the case of Ryujo), but the detail they pack is phenomenal!
Quoted Text
You are a far better man than I, in masting and rigging that little fellow. I work mostly in 1/1200 scale twice the size, and while I don't shy away from making or enhancing a mast, I draw the line at rigging.
I really do like you base and how with paint you simulated wood. Excellent work, and it really shows the model off very well.
Now while you are roaming around a tiny town Eastern Solomons I do expect to see Enterprise, Shokaku, and Zuikaku, maybe even Saratoga if you can manage the differences in the Micro Nauts model, which I think is Sara in 45.
Splendid work. Drive on.
Thanks Chuck! I too build in 1/1200 scale from time to time. Havent done many of the other Eastern Solomons players yet, although I did do a 1/1200 Enterprise a while back
Tiny 1/2400 can actually be easier, though, since in that smaller scale you can get away with a lot more simplification that is if I can keep myself from going nuts with masts, rigging, flags...
Quincannon
Joined: June 22, 2018
KitMaker: 275 posts
Model Shipwrights: 273 posts
Posted: Sunday, April 14, 2019 - 10:00 AM UTC
Very nice. Unless I am very mistaken that is E in 1945, taking her final damage of the war. Is it not?
What was your base kit?
What was your base kit?
TimReynaga
Joined: May 03, 2006
KitMaker: 2,500 posts
Model Shipwrights: 1,830 posts
Posted: Sunday, April 14, 2019 - 10:33 AM UTC
Quoted Text
Very nice. Unless I am very mistaken that is E in 1945, taking her final damage of the war. Is it not? What was your base kit?
Yes. The base kit was the old 1/1200 Casadio Snap-tite Enterprise; I did a blog on its construction here, if you are interested.
RedDuster
Joined: March 01, 2010
KitMaker: 7,078 posts
Model Shipwrights: 6,649 posts
Posted: Monday, April 15, 2019 - 07:12 AM UTC
Aerial masts look great Tim,
Rigging in 1/2400th, that I am looking forward to seeing.
Cheers
Si
Rigging in 1/2400th, that I am looking forward to seeing.
Cheers
Si

surfsup
Joined: May 20, 2010
KitMaker: 1,230 posts
Model Shipwrights: 1,212 posts

Posted: Monday, April 15, 2019 - 11:22 AM UTC
For the scale you have done some wonderful work.....Cheers mark
TimReynaga
Joined: May 03, 2006
KitMaker: 2,500 posts
Model Shipwrights: 1,830 posts
Posted: Tuesday, April 16, 2019 - 01:11 PM UTC
The mainmast fitted at Ryujos port bow was larger and more complex than the other masts.

To replicate the masts lattice structure, I repurposed a type 13 radar from a 1/700 scale Japanese destroyer photoetch set.

First I removed the dipoles,

Then I cut the piece in half and attached it to a 34 gauge wire cut to the appropriate length. Yards and antennae spreaders from the 34 gauge brass were added as well.
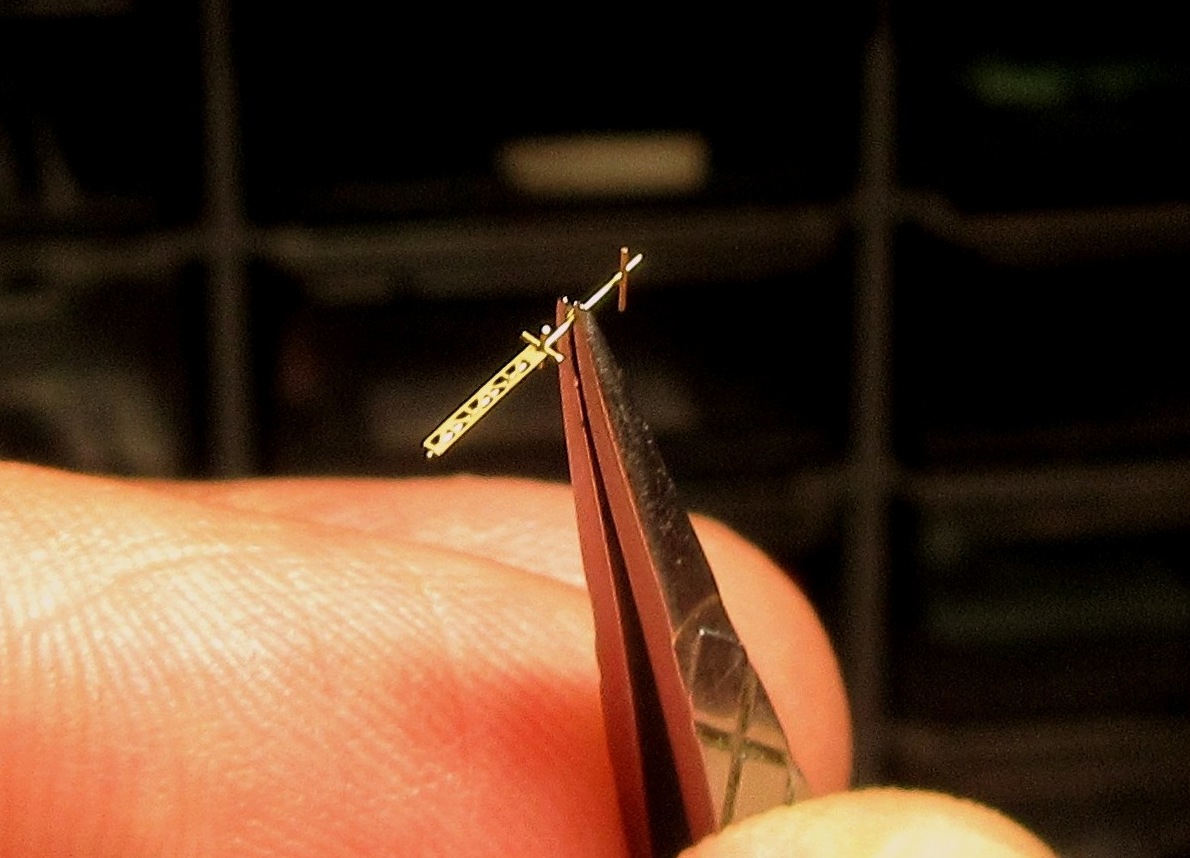

Before attaching the mast to the ship I found that I had some even finer wire on hand, so I replaced the all the yards and the spreader with the copper material.
Now for that rigging...!

To replicate the masts lattice structure, I repurposed a type 13 radar from a 1/700 scale Japanese destroyer photoetch set.
First I removed the dipoles,
Then I cut the piece in half and attached it to a 34 gauge wire cut to the appropriate length. Yards and antennae spreaders from the 34 gauge brass were added as well.
Before attaching the mast to the ship I found that I had some even finer wire on hand, so I replaced the all the yards and the spreader with the copper material.
Now for that rigging...!
d6mst0
#453
Joined: August 28, 2016
KitMaker: 1,925 posts
Model Shipwrights: 1,298 posts
Posted: Tuesday, April 16, 2019 - 11:53 PM UTC
Tim,
Very nice scratch build work on the main mast, really adds the detail to the ship.
Mark
Very nice scratch build work on the main mast, really adds the detail to the ship.
Mark
TimReynaga
Joined: May 03, 2006
KitMaker: 2,500 posts
Model Shipwrights: 1,830 posts
Posted: Thursday, April 18, 2019 - 03:16 PM UTC
Quoted Text
Tim,
Very nice scratch build work on the main mast, really adds the detail to the ship.
Mark
Thanks, Mark. After all the masts were installed I painted them the hull color and added some copper wire rigging from an old coil.

This stuff is about as fine as human hair, but even so it is fairly heavy for 1/2400 scale. I added just a representative sampling of the ships rig to keep from overwhelming the little model.

The tiny IJN Battle Ensign is a Peddinghaus decal from their 1/1250 scale Marineflaggen Japan set.


And done!
 |

WEB HOSTING BY


Copyright ©2021 Model Shipwrights and Kitmaker Network, a subsidiary of Silver Star Enterprises
All Rights Reserved. Please read our Conditions of Use and Privacy Policy.
All Rights Reserved. Please read our Conditions of Use and Privacy Policy.