_GOTOBOTTOM
Ships by Class/Type: Carriers
Topics on all types of carriers from the early 20th century to today.
Regia Nave Aquila 1/2400
TimReynaga
Staff MemberAssociate Editor
MODEL SHIPWRIGHTS
Visit this Community
California, United States
Joined: May 03, 2006
KitMaker: 2,500 posts
Model Shipwrights: 1,830 posts
Posted: Friday, May 10, 2019 - 01:44 AM UTC
Mussolini's only aircraft carrier, Aquila (Eagle), was nearing completion when Italy surrendered to the Allies on 8 September 1943. Germany then seized the ship and placed it under guard. Aquila was later damaged on 16 June 1944 during an Allied air attack, and on 19 April 1945 Italian "co-belligerent" government sent divers from the former Decima Flottiglia MAS, who partially scuttled Aquila to prevent the ship being used by the Germans. The ship was never completed, and the hulk was broken up after the war.

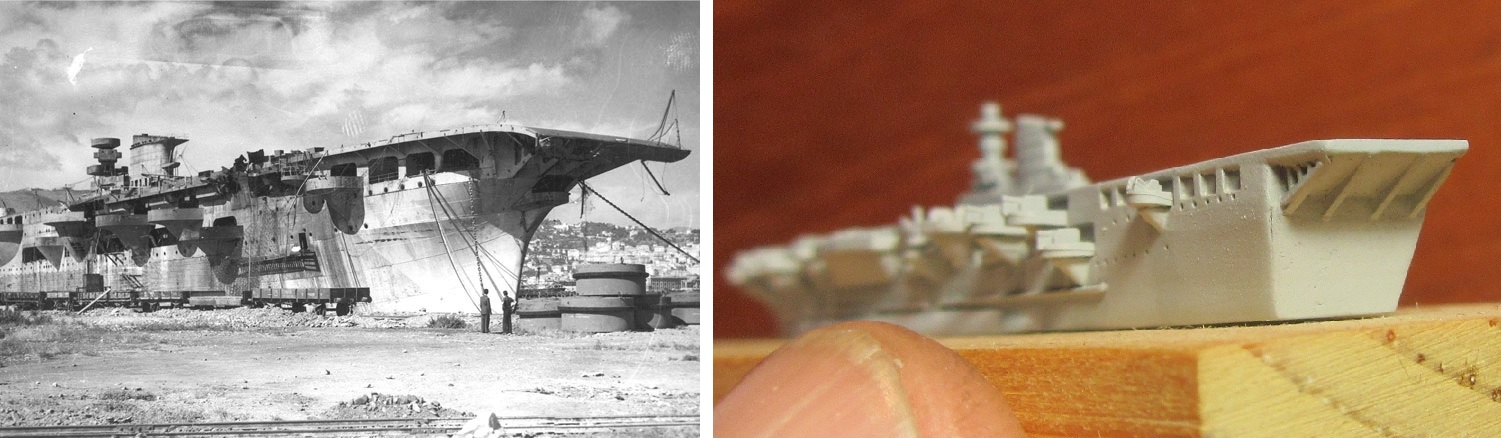
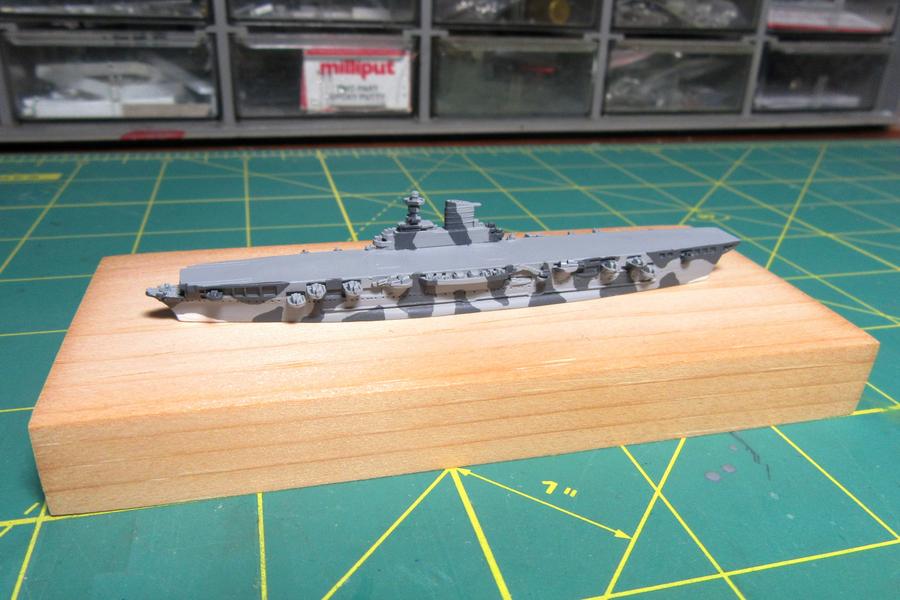
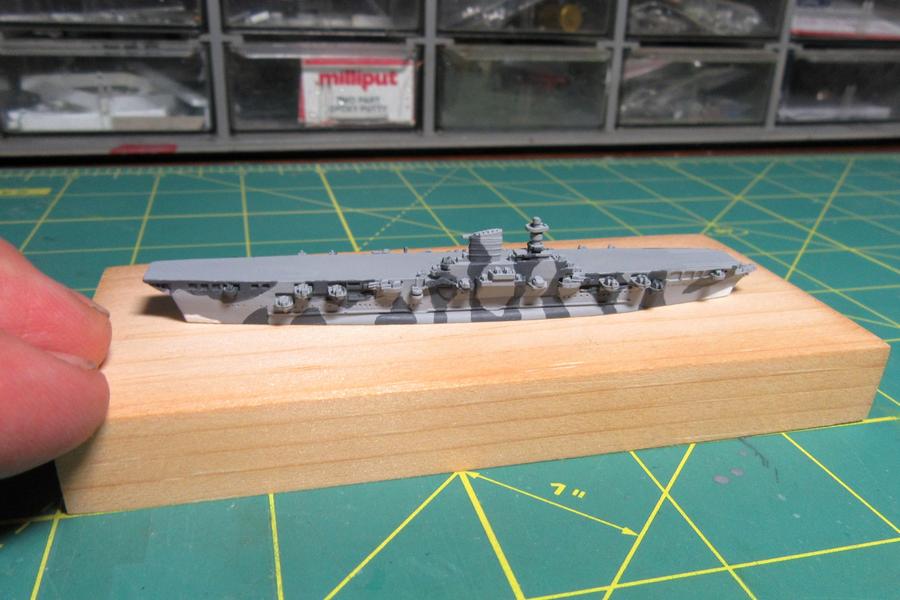
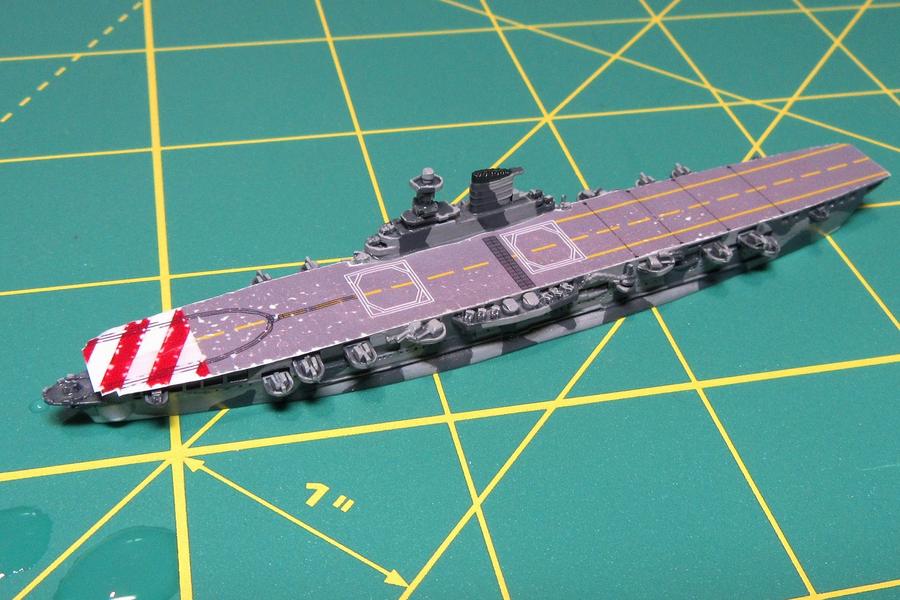
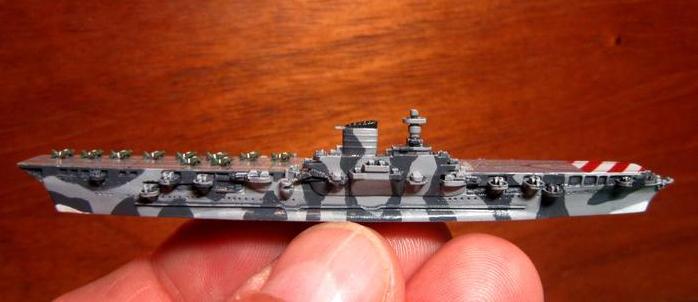
I thought I'd build the ship as she might have appeared in service, so here is GHQ’s all-metal 1/2400 scale Italian Aircraft Carrier Aquila !

The little 3¾ inch long carrier, intended as a wargaming counter, is presented in GHQ’s usual style with relatively few parts in beautifully sharp metal castings.

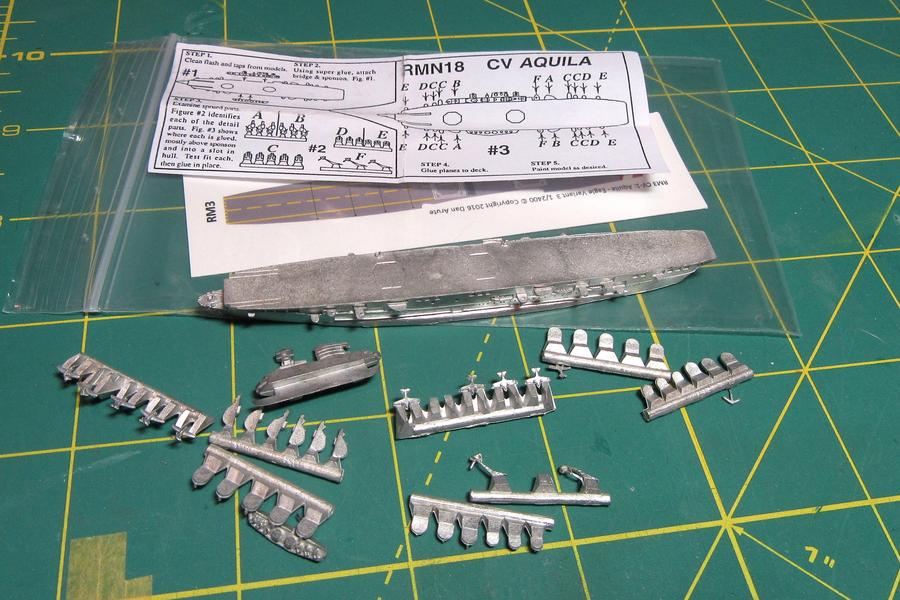
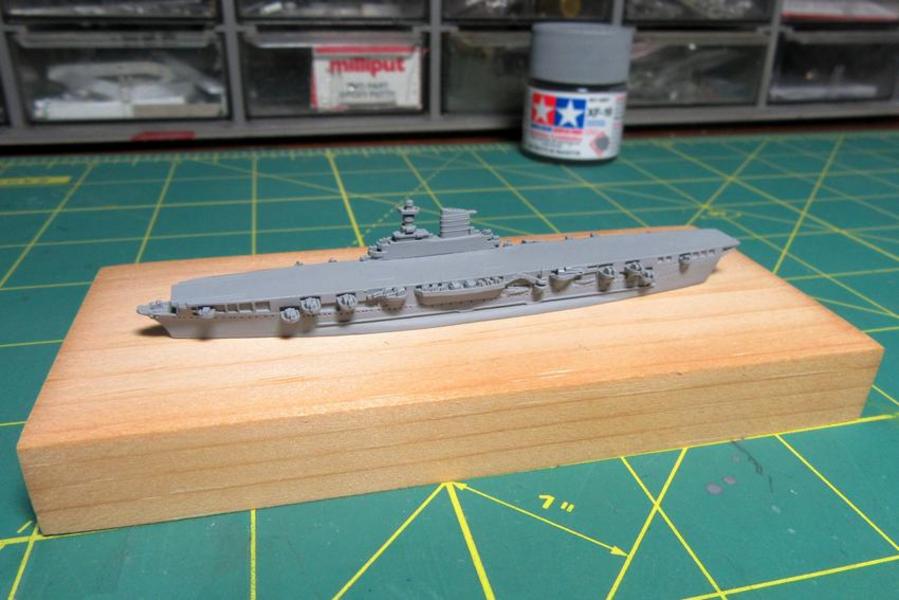
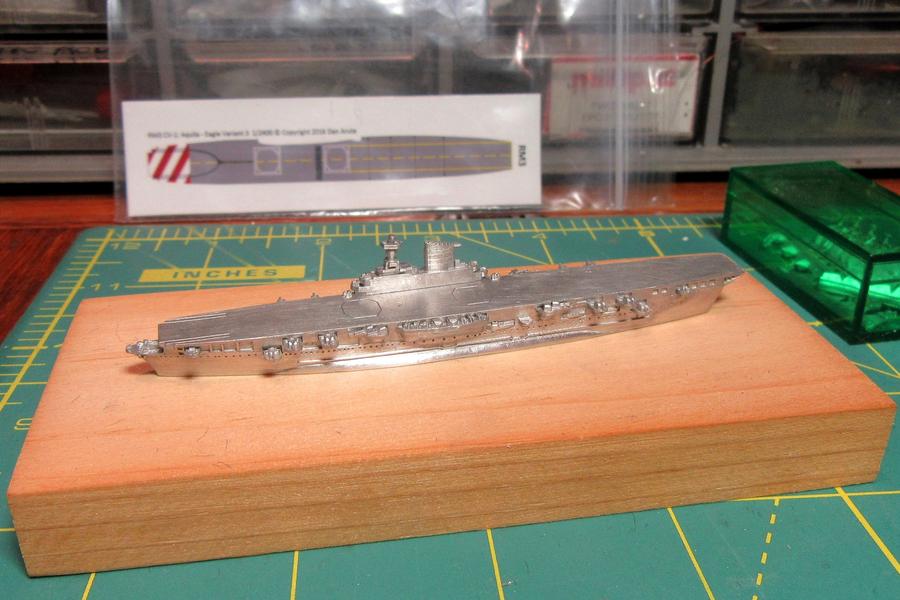
This one is slightly more complicated than some of their others with 25 parts for the ship itself (hull, island, 2 cranes and 21 weapons sponsons) plus 10 aircraft, but the parts fit is excellent and things go together pretty quickly.
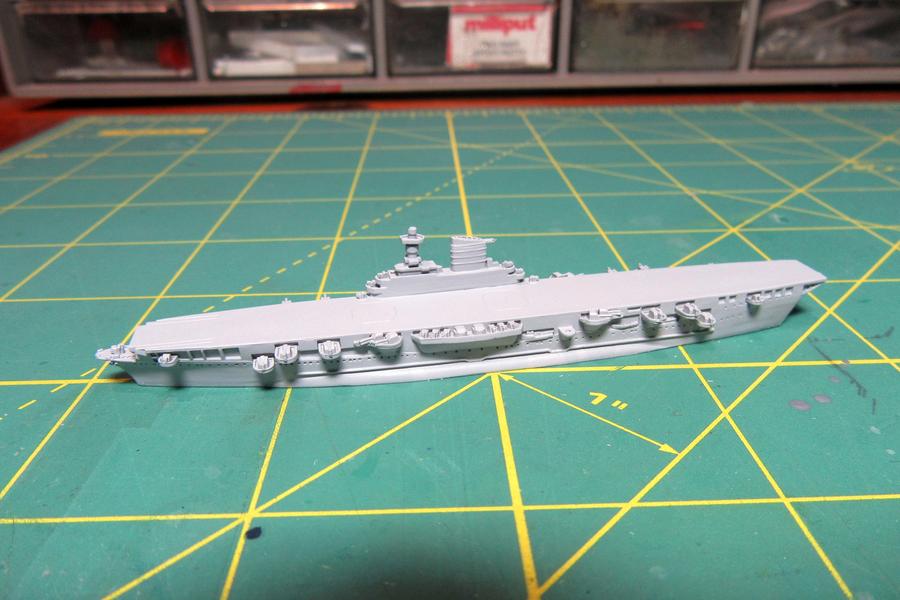

Assembled and primed, she’s ready for paint in no time!

ChurchSTSV
Visit this Community
Arizona, United States
Joined: September 20, 2017
KitMaker: 350 posts
Model Shipwrights: 175 posts
Posted: Friday, May 10, 2019 - 04:08 AM UTC
Another baby carrier!!

Gotta admit, you must save a ton of room building in 1/2400.
bwiber
Visit this Community
Washington, United States
Joined: August 03, 2008
KitMaker: 436 posts
Model Shipwrights: 31 posts
Posted: Friday, May 10, 2019 - 07:16 AM UTC
Already the educational aspect of the build has started as I had never heard of this one before. Looking forward to what you do with this one.

Bob
YellowHammer
#513
Visit this Community
Alabama, United States
Joined: March 28, 2006
KitMaker: 554 posts
Model Shipwrights: 219 posts
Posted: Friday, May 10, 2019 - 01:47 PM UTC
Another interesting subject Tim. I'll be watching you work your magic again.
John
TimReynaga
Staff MemberAssociate Editor
MODEL SHIPWRIGHTS
Visit this Community
California, United States
Joined: May 03, 2006
KitMaker: 2,500 posts
Model Shipwrights: 1,830 posts
Posted: Saturday, May 11, 2019 - 03:51 AM UTC
Thanks guys!

GHQ’s Aquila is in most respects fully up to their typically high standards, but for some reason the designers gave this model a COMPLETELY INACCURATE flat stern!


This flub would be a massive effort to correct, and unless seen from the rear it isn’t that obvious... so I decided to just live with it.
TimReynaga
Staff MemberAssociate Editor
MODEL SHIPWRIGHTS
Visit this Community
California, United States
Joined: May 03, 2006
KitMaker: 2,500 posts
Model Shipwrights: 1,830 posts
Posted: Sunday, May 12, 2019 - 01:58 PM UTC
So moving forward without fixing that funky stern, I gave the Aquila a coat of Tamiya Sky Grey (XF-19) acrylic. Comparing it with the Italian Navy WWII Ship Colors paint samples from Snyder and Short Enterprises, this paint looks to be a reasonable representation of the Italian Navy’s standard Grigio Chiaro (Light Grey).


One of the greatest threats to the Italian Navy in the confined waters of the Mediterranean was British submarines, so to break up the outline of their ships, the Italians often added blotches of Grigio Scuro (Dark Grey) over the lighter base grey.


These patterns showed quite a bit of variety; I chose to apply a blotch pattern inspired by that of the cruiser Fiume.


Tamiya Dark Grey (XF-24) matches Grigo Scuro fairly well, and Bianco Sporco Opaco (Matt Foul White) false bow and stern waves compete the hull camouflage.

Cosimodo
#335
Visit this Community
Auckland, New Zealand
Joined: September 03, 2013
KitMaker: 1,808 posts
Model Shipwrights: 871 posts
Posted: Sunday, May 12, 2019 - 07:33 PM UTC
Hi Tim,
This looks like another of your great little builds, though i think things maybe slightly overstated to describe a build of just 25 parts to assemble a carrier as "complicated"
Does it have the red and white striped deck like the cruisers and battleships?

cheers
Michael
TimReynaga
Staff MemberAssociate Editor
MODEL SHIPWRIGHTS
Visit this Community
California, United States
Joined: May 03, 2006
KitMaker: 2,500 posts
Model Shipwrights: 1,830 posts
Posted: Monday, May 13, 2019 - 12:59 AM UTC

Quoted Text

Hi Tim,
This looks like another of your great little builds, though i think things maybe slightly overstated to describe a build of just 25 parts to assemble a carrier as "complicated"
Does it have the red and white striped deck like the cruisers and battleships?

cheers
Michael


Michael, you're right, 25 parts doesn't seem like much for an aircraft carrier... but the last one of these tiny ships I did, Ryujo, had only three parts!

As for the barber shop pole markings, well, who could resist those?!
TimReynaga
Staff MemberAssociate Editor
MODEL SHIPWRIGHTS
Visit this Community
California, United States
Joined: May 03, 2006
KitMaker: 2,500 posts
Model Shipwrights: 1,830 posts
Posted: Tuesday, May 14, 2019 - 01:16 PM UTC
Now for the part of the build I’ve been looking forward to – the flight deck decal. Dan Arute at Flight Deck Decals 2400 offers some beautiful aftermarket decals for the flight decks of these tiny ships, and for the Aquila there is even a choice of three different styles.


Of course I had to choose one with the red and white “barber shop pole” on the bow!

With all that careful hull camouflage these highly visible markings might seem odd, but perhaps an even bigger threat than British submarines to the Italian Navy in World War Two was the Italian Air Force – so the prominent aerial identification markings do make sense!


I’ve glossed the model with Future, and given the featureless, flat expanse of the flight deck the decal should go on smoothly without the need for any setting solution.
TimReynaga
Staff MemberAssociate Editor
MODEL SHIPWRIGHTS
Visit this Community
California, United States
Joined: May 03, 2006
KitMaker: 2,500 posts
Model Shipwrights: 1,830 posts
Posted: Tuesday, May 14, 2019 - 10:16 PM UTC
AAAARRRRRRRGHH!

Having carefully trimmed the Alps-printed decal from its white background, I placed it in warm water... and the damned thing started to disintigrate! I’ve used these decals with perfect results before, but I noticed that this one had a skein of micro cracks, and tiny bits just started falling off even before I slid it from the backing paper. I applied it to the deck anyway, but it looked so sad I immediately took it off.


I’ve written for a replacement...
ChurchSTSV
Visit this Community
Arizona, United States
Joined: September 20, 2017
KitMaker: 350 posts
Model Shipwrights: 175 posts
Posted: Wednesday, May 15, 2019 - 02:53 AM UTC
Aw, Tim! That sucks!! That deck decal looked amazing too!!
TimReynaga
Staff MemberAssociate Editor
MODEL SHIPWRIGHTS
Visit this Community
California, United States
Joined: May 03, 2006
KitMaker: 2,500 posts
Model Shipwrights: 1,830 posts
Posted: Saturday, May 18, 2019 - 12:57 PM UTC
Dan Arute of Flight Deck Decals responded to my plea about the defective Aquila deck marking with a free replacement decal - much appreciated! I applied it yesterday evening with the utmost care... soaked it in warm distilled water just long enough to loosen it from the backing, slid it off gently with a soft, wide brush to the glossed surface. As before, it fit perfectly so no adjustment was required. I didn’t use any setting solution.


It was definitely better this time, but those nasty little white spots still appeared on the new deck!


Both decals had started out perfectly printed, but I noticed that the water compromised the delicate inks which started to wrinkle, crack, and flake away almost immediately when immersed.

I am experimenting with remnants of the first failed decal, cutting out little squares of the undamaged areas. I’ll try tonight to use them as patches to improve this second deck. I sure hope it works, because despite difficulties, I really love the look of the deck!
Cosimodo
#335
Visit this Community
Auckland, New Zealand
Joined: September 03, 2013
KitMaker: 1,808 posts
Model Shipwrights: 871 posts
Posted: Saturday, May 18, 2019 - 07:48 PM UTC
Tim,
The deck looks amazing and I have to say I thought the gaps were some sort of distressed effect. Hard, I know for a ship that didn't operate but put a few planes on deck and I don't think you would notice.

cheers
Michael
TimReynaga
Staff MemberAssociate Editor
MODEL SHIPWRIGHTS
Visit this Community
California, United States
Joined: May 03, 2006
KitMaker: 2,500 posts
Model Shipwrights: 1,830 posts
Posted: Tuesday, May 21, 2019 - 01:39 AM UTC

Quoted Text

Tim,
The deck looks amazing and I have to say I thought the gaps were some sort of distressed effect. Hard, I know for a ship that didn't operate but put a few planes on deck and I don't think you would notice.

cheers
Michael


Success! My efforts to patch the dings on the Aquila’s flight deck with parts of the first decal worked just fine with the colors matching precisely and the seams nearly invisible. Yes! The remaining small white dots are almost imperceptible. And you are right, Michael; I can pass them off as the wear marks of a well-used flight deck. With the aircraft aboard they will be unnoticeable.

Speaking of aircraft, the kit came with ten airplanes, which are miniscule but still clearly recognizable as Reggiane Re.2000 fighters. Go GHQ!


I painted them Tamiya Field Grey with Gull Grey canopies. The fuselage bands were tiny strips sliced from the white sections of some spare decals.

Next step: clear coat, aircraft aboard, and done!

RussellE
#306
Visit this Community
Victoria, Australia
Joined: June 27, 2010
KitMaker: 3,959 posts
Model Shipwrights: 2,777 posts
Posted: Wednesday, May 22, 2019 - 11:38 AM UTC
Just amazing what you do with these micro scale kits Tim
TimReynaga
Staff MemberAssociate Editor
MODEL SHIPWRIGHTS
Visit this Community
California, United States
Joined: May 03, 2006
KitMaker: 2,500 posts
Model Shipwrights: 1,830 posts
Posted: Wednesday, May 22, 2019 - 12:05 PM UTC

Quoted Text

Just amazing what you do with these micro scale kits Tim


Thanks Russ, but in this case... UGH

Unbelievably, after having gingerly applied the second deck decal and painstakingly patched it to an almost perfect appearance, it all went wrong again – this time under the airbrushed Future clear coat.


As I gently misted the clear coat to protect the deck, pale green cracks appeared as the decal inks apparently reacted to the acrylic Future – the same which I had used successfully on the Ryujo build using another of Dan Arute’s decals.

What is strange is that it appears to be a wholly different issue from the earlier experience of the ink flaking away leaving white spots. In any event, this time the problem is even worse and the decal cannot be retrieved.

Oh, well. Seen from a low angle, the little carrier still looks good.


RussellE
#306
Visit this Community
Victoria, Australia
Joined: June 27, 2010
KitMaker: 3,959 posts
Model Shipwrights: 2,777 posts
Posted: Friday, May 24, 2019 - 10:39 PM UTC
Oh no, Tim!

That's too bad about the decal!

Can you disguise it somehow with some weathering?
Naseby
Visit this Community
Slovakia
Joined: October 15, 2010
KitMaker: 825 posts
Model Shipwrights: 97 posts
Posted: Sunday, May 26, 2019 - 06:31 PM UTC
Thanks for hinting to this thread over at the aeroscale forum. Man You have nerves and hands of steel. I havent attempted build anything smaller than 1/360 in two decades. This is just crazy. Hope you will come up with a solution for the decal issue, althou I have to say it might not be that visible. Maybe small wash with some grey-ish vallejo paint or chipping with extra thin brush ? Or if the deck was actualy made of wood like on US carriers, maybe a few "lines" would hide the most obvious places ? Good Luck
JJ1973
#345
Visit this Community
Niedersachsen, Germany
Joined: August 22, 2011
KitMaker: 1,835 posts
Model Shipwrights: 1,832 posts
Posted: Thursday, May 30, 2019 - 06:57 AM UTC
Tim,

just catching up with your fine build here - you're doing absolutely amazing microscopic work once again!!

However, those setbacks are really bad - I can feel your pain after capsizing my Hood so close to the finish line...

Your carrier looks awesome non the less!

Cheers,
Jan
TimReynaga
Staff MemberAssociate Editor
MODEL SHIPWRIGHTS
Visit this Community
California, United States
Joined: May 03, 2006
KitMaker: 2,500 posts
Model Shipwrights: 1,830 posts
Posted: Thursday, June 06, 2019 - 01:37 AM UTC
Russ, Jacob, and Jan, thanks... but the odd green color and fracture pattern of the latest decal debacle would make altering it to resemble any kind of weathering next to impossible. I wrote Dan again, received a second replacement decal (for try number three.) He wrote that this one is “guaranteed not to chip” – but unfortunately, it hardly matters as this new one has an entirely new problem: it is poorly printed with a rough, pixilated appearance!

Compared with a fragment of the first failed deck decal at the bottom, the new one is clearly not at all sharp. I wrote yet again for a possible fourth try, but frankly I’m getting a bit discouraged.

The Flight Deck Decals deck for my recent Ryujo project was perfect, and when printed properly the Aquila decals too are magnificent... but simple quality control issues have made this build a frustrating experience.


For now I think I’ll set this one aside and move on to other projects. It still looks ok from a low angle view...


d6mst0
#453
Visit this Community
Texas, United States
Joined: August 28, 2016
KitMaker: 1,925 posts
Model Shipwrights: 1,298 posts
Posted: Thursday, June 06, 2019 - 09:29 AM UTC
Tim,

It looks great from the low angle view. Another fine build at 2400.

Mark
RussellE
#306
Visit this Community
Victoria, Australia
Joined: June 27, 2010
KitMaker: 3,959 posts
Model Shipwrights: 2,777 posts
Posted: Thursday, June 06, 2019 - 10:52 PM UTC
Sorry to see this slip away from you Tim... Your work on it so far, as always, has been nothing short of amazing.

Unfortunately sometimes the raw materials we have to work with let us down and we need to move on to greener pastures.

Looking forward to see what next crosses your work bench

 _GOTOTOP