Pennsylvania, United States
Joined: June 06, 2005
KitMaker: 1,602 posts
Model Shipwrights: 665 posts
Posted: Sunday, November 05, 2006 - 08:46 PM UTC
As promised here are the pictures I have so far of my attempt at doing this water base using Vallejos Water Effects. (This is there Atlantic Blue version of the stuff)
First layer (still wet)
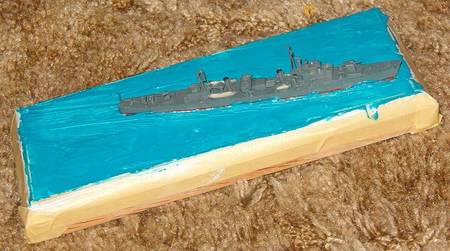
and then dry.
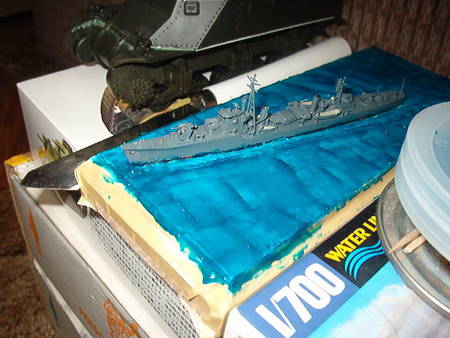
2nd layer
3rd layer

4th layer
Ill post more shots when I get farther.
So far I started by using a painting knife to created a bit of a wave pattern. Once dry I used toothpicks to add more along the top edge of the wave. Now Im using the knife to fill in the back sides of the waves up to the ridge.
For the ships wake Ive been building it up by dabbing the stuff on with a cheap brush and using a soft brush to wile off any that got on the ship.
The tools are easily cleaned off under the tap (havent even used soap.) And the good brush seems to be softer now. (Dont know if its from the water effects or not but Ive now noticed it with 2 brushes.)
Pennsylvania, United States
Joined: July 13, 2004
KitMaker: 6,705 posts
Model Shipwrights: 4,704 posts
Posted: Sunday, November 05, 2006 - 09:17 PM UTC
Looking good, Jacob!
I do believe that I will try this product next waterline, for sure!
Thanks for sharing, so far, and keep up the updates!
~Gunny

"And all I ask is a tall ship and a star to steer her by..."
Pennsylvania, United States
Joined: June 06, 2005
KitMaker: 1,602 posts
Model Shipwrights: 665 posts
Posted: Sunday, November 05, 2006 - 10:07 PM UTC
Just edited the post to include the correct picture of the 4th layer and not a repeat of the previous one.

Mark just watch out opening the bottle. I have just started to master pulling the plug out without getting the stuff all over the place.
Another piece of advise for anyone using it is not to use a red oak base. When looked at from up close the little holes in the wood are very noticeable under the water.
Pennsylvania, United States
Joined: July 13, 2004
KitMaker: 6,705 posts
Model Shipwrights: 4,704 posts
Posted: Sunday, November 05, 2006 - 10:13 PM UTC
Thanks for the tips, Jake, I will remember them, mate. . .
~Gunny
"And all I ask is a tall ship and a star to steer her by..."

#027
Louisiana, United States
Joined: April 13, 2005
KitMaker: 5,422 posts
Model Shipwrights: 5,079 posts
Posted: Sunday, November 05, 2006 - 10:27 PM UTC
Wow Jacob! That looks really good. Are you going to drybrush some white on a few of the wave tops? Boy, that would really set that dark blue off.
later...Gator
"Hark, now hear the sailors cry
Smell the sea and feel the sky
Let your soul and spirit fly into the mystic
Kansas, United States
Joined: April 11, 2005
KitMaker: 417 posts
Model Shipwrights: 89 posts
Posted: Sunday, November 05, 2006 - 10:52 PM UTC
Jacob,
Looks great!
Very nice depth in the water.
Gary
The road goes on forever and the party never ends!
Better to have and not need than need and not have!
IPMS # 6640
Pennsylvania, United States
Joined: June 06, 2005
KitMaker: 1,602 posts
Model Shipwrights: 665 posts
Posted: Sunday, November 05, 2006 - 11:31 PM UTC
Thanks guys.
Kenny Ill be adding the white to the tops of the waves and across the rough area in the ships wake.
Rhone, France
Joined: November 04, 2005
KitMaker: 1,845 posts
Model Shipwrights: 502 posts
Posted: Monday, November 06, 2006 - 02:49 PM UTC
Interesting pics really! You write about a red oak base, i guess you covered it with a coat of white paint before pouring the paint otherwise your water would have look errr, purple or so? When the stuff dries completely, how is it when you touch it? very strong or still a bit jelly like?
i wish you good luck with the end of your dio Jacob!
"too much colour distracts the viewer"
Jacques Tati
Pennsylvania, United States
Joined: July 13, 2004
KitMaker: 6,705 posts
Model Shipwrights: 4,704 posts
Posted: Monday, November 06, 2006 - 03:13 PM UTC
Quoted Text
Interesting pics really! You write about a red oak base, i guess you covered it with a coat of white paint before pouring the paint otherwise your water would have look errr, purple or so? When the stuff dries completely, how is it when you touch it? very strong or still a bit jelly like?
i wish you good luck with the end of your dio Jacob!
JB,
No, he didn't paint the base first, mate. . .there are two very distinct oaks used here in woodworking, white oak, and red oak. Both very hard, strong grained woods, and yes, one is distinctly paler than the other, but both appear pale until the grain and true color of the wood is brought out by some method of
wetting the wood, such as a clear poly or varnish coating. . .then the true color and grain of the oak is made distinct, as well as the overall beauty.
So until Jacob clear coats his base, it will appear much lighter than it really is.
~Gunny
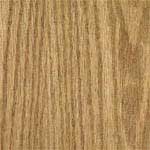 Red Oak
"And all I ask is a tall ship and a star to steer her by..."
Pennsylvania, United States
Joined: June 06, 2005
KitMaker: 1,602 posts
Model Shipwrights: 665 posts
Posted: Monday, November 06, 2006 - 05:39 PM UTC
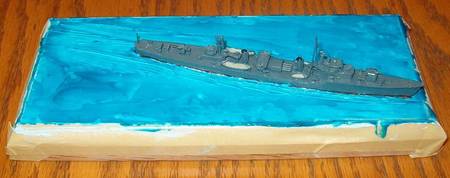
Thanks Mark but i have to prove you wrong. The top of the base was painted first as you can see here.
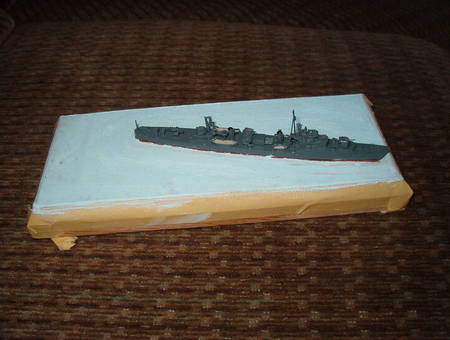
I used light blue oilpaints to cover it but many of the small holes remained open and I didnt think to fill them.
I did this to keep the wood from adding color to the water. (my tests on pine came out with a greenish tint)
Red oak has more noticeable holes in the grain then white does. And depending on the deferent ways the woods cut and the grain runs you will have more or less holes in the face.
As for how it is after drying it holds its shape well. Ive been adding the backs to the waves by pushing on it with a painters knife and it hasnt deformed or moved the lower layers.
Ive been waiting over night (or working in the morning and then again in the evening) for it to dry.
Rhone, France
Joined: November 04, 2005
KitMaker: 1,845 posts
Model Shipwrights: 502 posts
Posted: Monday, November 06, 2006 - 06:01 PM UTC
Thanks for the answers Jacob and Mark!
-as you noticed i know few things about woodwork, your wetting technique has got its small dwelling in my exercised memory from now on

"too much colour distracts the viewer"
Jacques Tati
Pennsylvania, United States
Joined: July 13, 2004
KitMaker: 6,705 posts
Model Shipwrights: 4,704 posts
Posted: Monday, November 06, 2006 - 06:38 PM UTC
Quoted Text
Thanks Mark but i have to prove you wrong. The top of the base was painted first as you can see here.
I used light blue oilpaints to cover it but many of the small holes remained open and I didnt think to fill them.
I did this to keep the wood from adding color to the water. (my tests on pine came out with a greenish tint)


OOPS!
Thanks for the clarification, Jacob!!
I had NO IDEA that you painted it white first, just thought it was showing up white on the pics from the flash. . . :-)
"And all I ask is a tall ship and a star to steer her by..."
Pennsylvania, United States
Joined: June 06, 2005
KitMaker: 1,602 posts
Model Shipwrights: 665 posts
Posted: Monday, November 06, 2006 - 07:29 PM UTC
No problem Mark.
It does look a bit flashy there along the bottom of the ship where I painted the hull. (Didnt really worry to much as it would be covered with water.)
Kansas, United States
Joined: April 11, 2005
KitMaker: 417 posts
Model Shipwrights: 89 posts
Posted: Tuesday, November 07, 2006 - 06:37 AM UTC
Jacob,
Can you post a close-up pic of the water?
Anxious to see the texture of the waves you sculpted.
Gary
The road goes on forever and the party never ends!
Better to have and not need than need and not have!
IPMS # 6640
Pennsylvania, United States
Joined: June 06, 2005
KitMaker: 1,602 posts
Model Shipwrights: 665 posts
Posted: Tuesday, November 07, 2006 - 06:48 AM UTC
Ill give it a try in the morning. (Cant guarantee anything with this camera.) Of course there not completed yet that backs arent built up like they will be.
Pennsylvania, United States
Joined: June 06, 2005
KitMaker: 1,602 posts
Model Shipwrights: 665 posts
Posted: Thursday, November 09, 2006 - 11:36 PM UTC
Sorry for taking so long. Ive been very busy lately. Ill try to get those pictures up as sone as I can along with some more progress on the water.
#027
Louisiana, United States
Joined: April 13, 2005
KitMaker: 5,422 posts
Model Shipwrights: 5,079 posts
Posted: Friday, November 10, 2006 - 12:15 AM UTC
No worries mate. Get it when you get the time.
Gator
"Hark, now hear the sailors cry
Smell the sea and feel the sky
Let your soul and spirit fly into the mystic
Pennsylvania, United States
Joined: June 06, 2005
KitMaker: 1,602 posts
Model Shipwrights: 665 posts
Posted: Monday, November 13, 2006 - 02:42 AM UTC
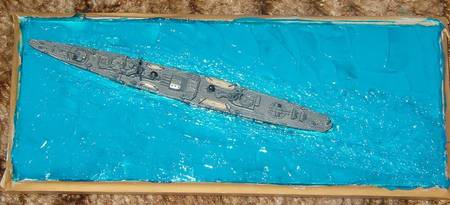
Finally got a close up. The rest of them came out blurry but heres 1.
Pennsylvania, United States
Joined: June 06, 2005
KitMaker: 1,602 posts
Model Shipwrights: 665 posts
Posted: Sunday, November 19, 2006 - 10:38 PM UTC
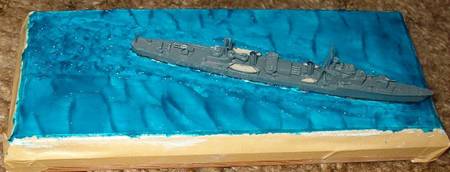
Finally some ne pictures.
I think Im done with the waves and have added the white.
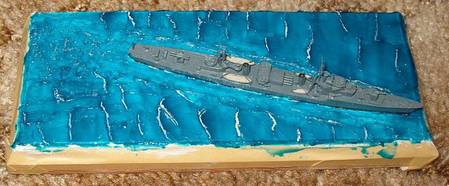

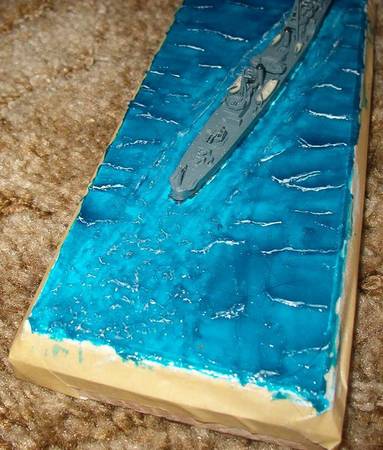
Let me know what you guys think of it.
I think Ive added to much white to the topes of the waves and need more white in the wake. What do you think?
Pennsylvania, United States
Joined: July 13, 2004
KitMaker: 6,705 posts
Model Shipwrights: 4,704 posts
Posted: Sunday, November 19, 2006 - 11:45 PM UTC
Good job, Jacob!
Personally, I'd leave the white that ya got on the wave tips, and create a little more foam in the wake, as you said. . .looks great for a first attempt! I got a couple bottles of that stuff coming in from GMW for my next waterline. Thanks for the update!
~Gunny
"And all I ask is a tall ship and a star to steer her by..."
#027
Louisiana, United States
Joined: April 13, 2005
KitMaker: 5,422 posts
Model Shipwrights: 5,079 posts
Posted: Sunday, November 19, 2006 - 11:49 PM UTC
Great job Jake! That looks really good!
Great Models, huh? I'll have to get some too.
Gator
"Hark, now hear the sailors cry
Smell the sea and feel the sky
Let your soul and spirit fly into the mystic
Pennsylvania, United States
Joined: June 06, 2005
KitMaker: 1,602 posts
Model Shipwrights: 665 posts
Posted: Monday, November 20, 2006 - 12:46 AM UTC
Got mine from there to.
Mark if you got a few bottles it will probably last for a few ships. I know this ones small and all but still dont think Ive used a quarter of it yet. (Hard to tell as the stuff doesnt lay flat in there.)
Ill be sure to add more white in the wake then. I just drybrushed it there but then on the waves I used a thin brush to paint the crest.