I first saw the Fender Bender and its demonstration at this years AMPS Convention in Hubbard, Ohio, thanks to Jeff Herne (AngryEnsign). He introduced me to the boys from Ausfwerks and we talked about the tool to great lengths, discussing the capabilities and construction. As soon as I saw the tool I immediately realized that these guys were on to something; mainly because I have a background in the sheet metal industry, and I have used and know the capabilities of the full sized machine that the Fender Bender is modeled after
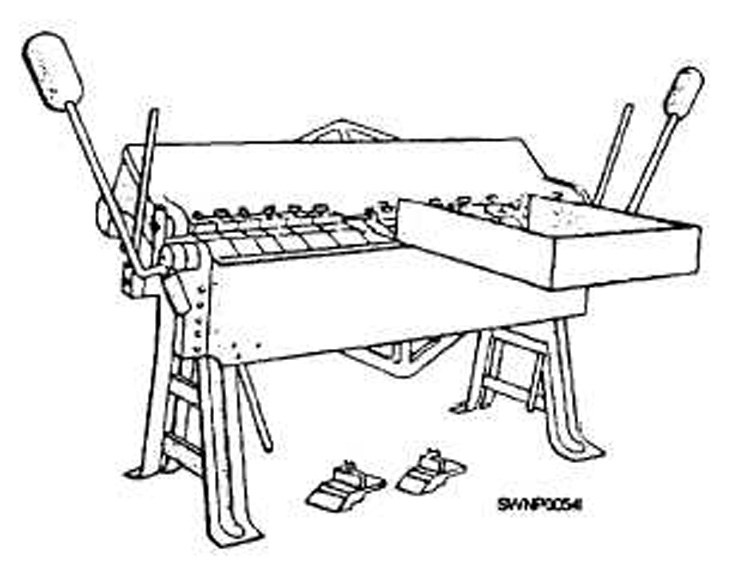
This machine is known as a Finger Brake, or Box and Pan Brake (see drawing).
The upper jaw is made of a number of blocks, referred to as fingers. They are various widths and can easily be positioned or removed to allow all four sides of a box to be bent.
Looking a little closer...
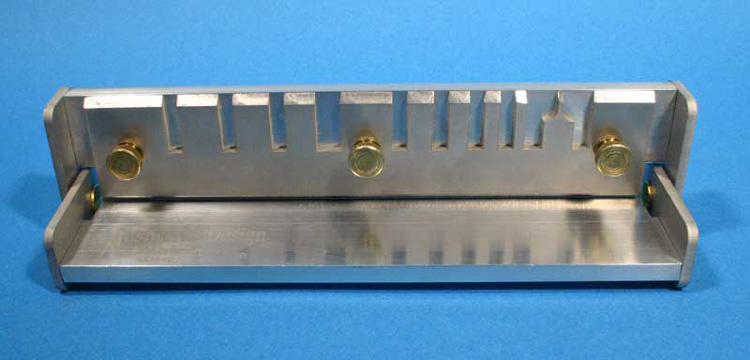
Upon first examination of the Fender Bender you will notice a feeling of quality, especially if you are familiar with using precision instruments, thats exactly what the Fender Bender is; a precision instrument
When you hold the tool, you will recognize immediately the solidness and weight of the tool, weighing in at 1.06 pounds, there is a bit of beef here. The main body is made from finely machined, brushed aluminum plate, with two solid pieces, each measuring 7.5 in length X 1.5 in width and ¼ in thickness. These two pieces are machined and notched on each end to accommodate the hinge mechanisms. The hinge mechanisms are made from stainless steel that is specially formulated and treated for strength and durability. The hinges are attached at the center point with heavy brass mated union screws, and the hinge assembly is attached to the aluminum base plates with stainless steel button head cap screws...quality.
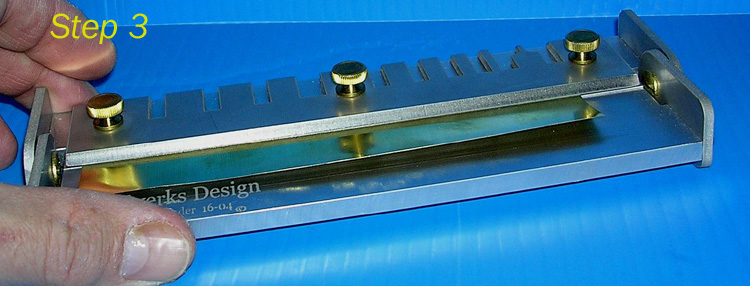
The two base plate halves match perfectly in a blind hinge fashion, which is one of the most important points in making the precise bends that this tool will make. The company logo is etched onto the front half of the two base-plates, along with the tool name and model number.
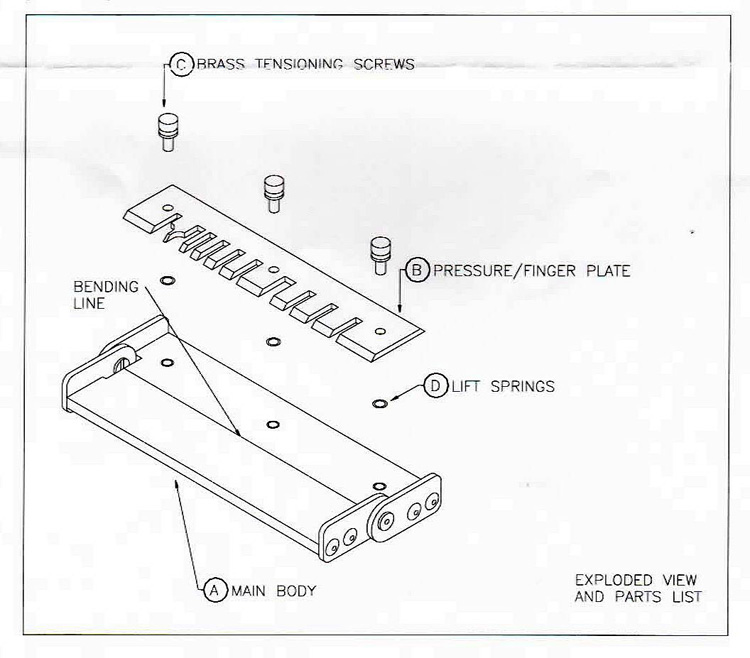
Next, we have the pressure/finger plate, which is also constructed from the same specially treated stainless steel as the side hinge plates. Measuring in at 7 long, X 1 ½ wide, by 1/8 thick, one side features a solid, uniform flat face for long bends, while the reverse side features precision cut fingers of various inside depths for forming complex/detailed bends. The Fender Bender is capable of accommodating brass or aluminum stock to a maximum thickness of 0.020 inches (0.5mm) and a minimum thickness of 0.001 inches (0.03mm). Using materials outside of these tolerances may result in damage to the machine itself as well as the materials the user is attempting to bend and is not recommended. The Fender Bender is capable of forming uniform bends from 0 to 120 degrees. As a rule of thumb, minimum flange width is equal to 3 times the material thickness. Absolute minimum width is .020.
In addition to forming long bends, the Fender Bender is capable of forming complex/detailed bends using the various Finger Brakes to the following inside depths:
1. 1/16 (1.5mm)
2. 1/8 (3.2mm)
3. 3/16 (4.8mm)
4. 1/4"(6.4mm)
5. 5/16 (7.9mm)
6. 6. 3/8 (9.5mm)
7. 7/16 (11.1mm)
8. 1/2 (12.7mm)
9. 5/8 (15.9mm)
10. 3/4 (19.1mm)
11. 1 (25.4mm)
Operational Similarities with the 1:1 machine
The full size machine is operated as follows: 1. Scribe a line on the surface of the sheet metal to show where the bend will be. 2. Raise the upper jaw with the clamping handle and insert the sheet in the brake, bringing the scribed line into position even with the front edge of the upper jaw. 3. Clamp the sheet in position. Ensure that the scribed line is even with the front edge of the upper jaw. The locking motion will occasionally shift the work piece. 4.Once you are satisfied that the metal is clamped correctly, lift the bending leaf to the required angle to form the bend. If you are bending soft and/or ductile metal, such as copper, the bend will be formed to the exact angle you raised the bending leaf. If you are bending metal that has any spring to it, you will have to raise the bending leaf a few degrees more to compensate for the spring in the metal. The exact amount of spring depends on the type of metal you are working with. 5. Release the clamping handle and remove the sheet from the brake
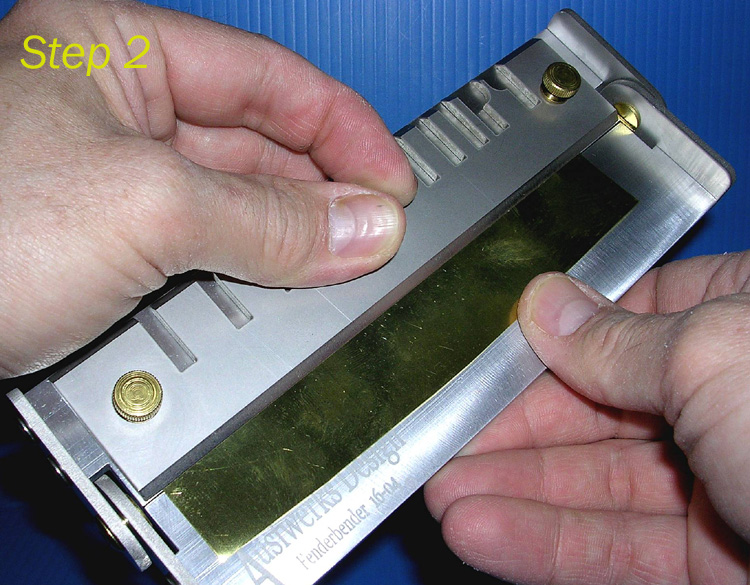
The Fender Bender is operated in almost the exact same manner. Now, lets go over the steps required to operating the Fender Bender... Long/Continuous Bends: This type of bend is common for large pieces such as fenders, gun-shields, mud-guards, etc. First, carefully remove the 3 Brass Tensioning Screws (Part C) by unscrewing them from the Pressure/Finger Plate (Part B) and lift the plate from the base.
Beneath the plate are 3 Lift Springs (Part D), one for each Tensioning Screw, located in counter bores in the Main Body (Part A). Be careful of these tiny rings, dont lose them.
Rotate the Pressure/Finger Plate (Part B) 180 degrees so that the long edge is adjacent to the bending line on the Main Body (A). Reinstall the three Brass Tensioning Screws and youre ready to bend and fold.
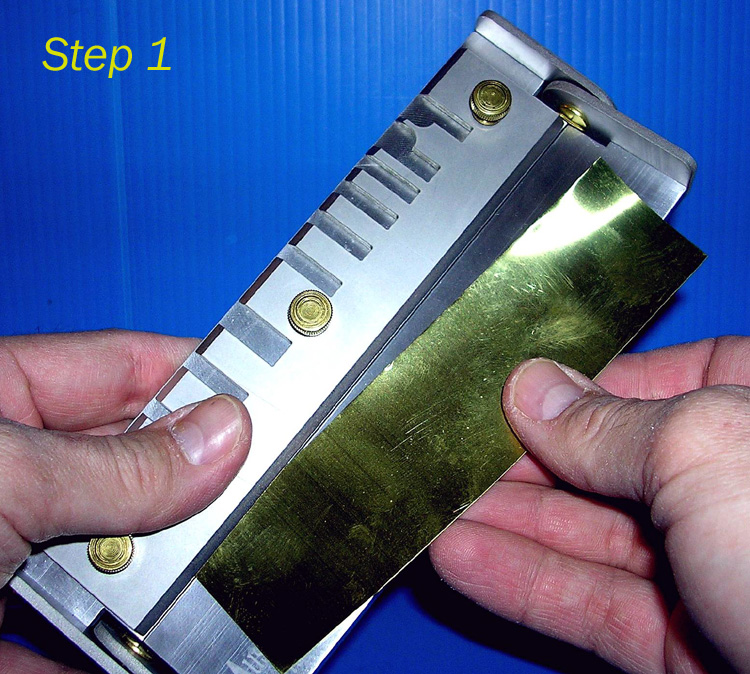
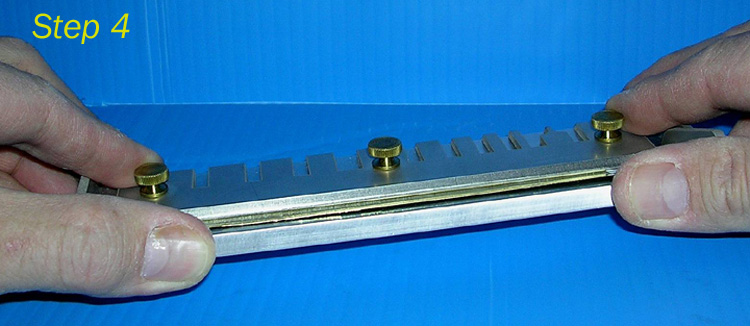
After positioning the plate in the desired direction, perform the following steps to begin the bending process: 1:Loosen the 3 Tensioning Screws (Part C). Do not loosen more than you need to slide the stock under the Pressure Plate (Part B). 2:The Manufacturer recommends using your thumb to depress the opposite side of the Pressure Plate (Part B). 3:Slide the part you desire to bend under the Pressure Plate (Part B), and reverse pressure with your thumb on the plate to capture the part after aligning the brake line with the line n the main body. 4:Tighten the Tensioning Screws (Part C) using only finger pressure. You may cause serious damage using anything else. 5:Now, holding each half of the Main Body (Part A) in each hand, bend the halves to the desired angle.
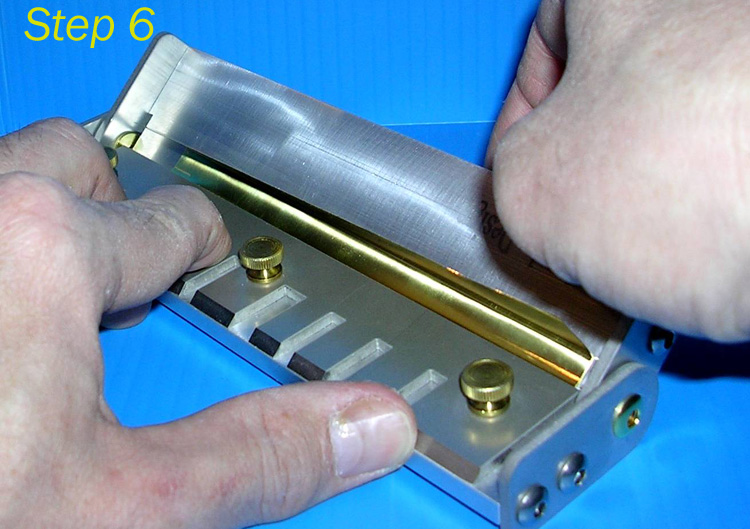
6:Flatten the Main Body (Part A) and verify that your bend is at the desired angle. 7.Loosen the Tensioning Screws (Part C) and apply pressure to the backside of the Pressure Plate (Part B) with your thumb and remove the bent part.
Detail/Complex Bends :This type of bend is more common for smaller pieces and those requiring multiple bends to form 3D objects such as storage boxes, brackets, etc. To perform these types of bends, perform the same procedure as above for the Long/Continuous Bend except you must position the Pressure Plate (Part B) so that the individual finger face is adjacent to the bending line on the Main Body (Part A).
Decide what fingers you will use to form your part. This is an especially critical step. Experimentation and experience will tell you which finger will be the best. Think about what youre going to be doing before you begin, because there is nothing worse than bending yourself into a corner! When you have made your forming strategy, perform the same steps to begin the bending process as outlined above
Notice the similarities in the operations and results of these two machines...If you think about this concept, and its correlation to making repetitive bends of the same type and angle (such as a continuous railing on a ship model) you will quickly see the beauty of this tool. Ausfwerks has designed a tool thats totally self contained, that will allow you to make continuous folds, complex bends, and inside bends, with an element of ease/consistency in its mechanics to both hold the piece in place and also perform the bend unaided by an "extra" tool, or surface
The Test
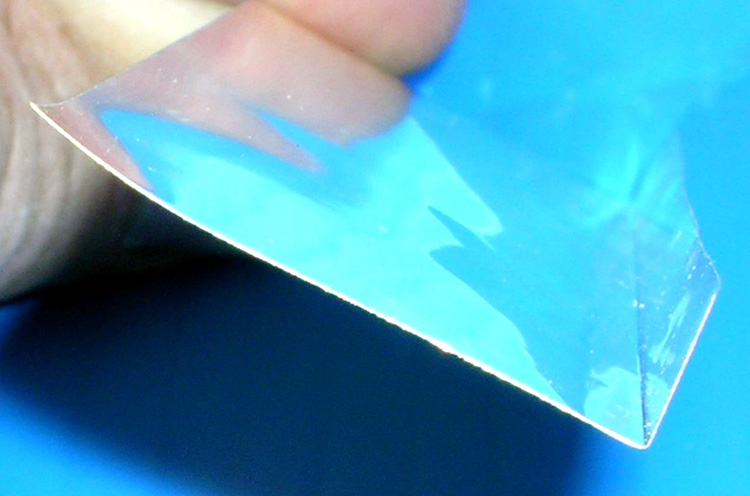
Enough about the mechanics of the tool, and what it is designed to do...does it work? The answer is quite simply, yes. The Fender Bender does exactly what it was designed to do, which is to make perfectly consistent folds in brass, aluminum, or sheet-metal stock, all in a self contained tool....
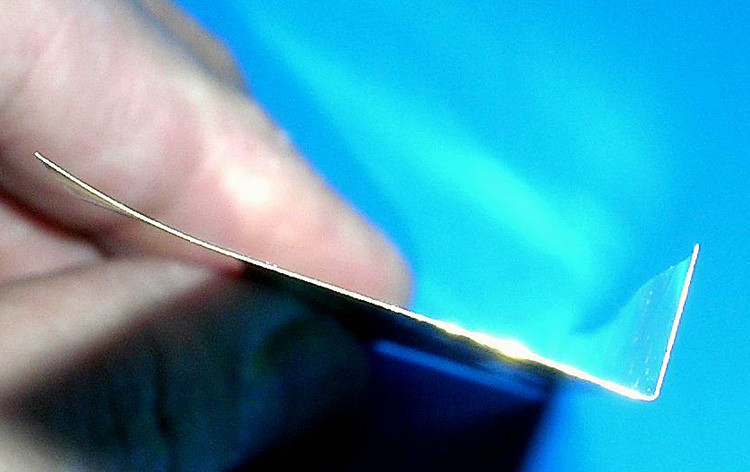
I tested the tool bending and forming various gauges of brass sheet stock from .001 foil to .010 heavy, and the results were equally as good regardless of the gauge. I also tried out some .005 aluminum, which bent nicely, with a good clean edge.
Shipbuilding is my true forte, and I can see myself using this tool exclusively for making the continuous folds required in a long run of PE railing, and other scratching on my kit subjects. I had a few sections of 1/700 railing left over from my most recent builds. I experimented folding these at various angles, lengths, and degrees, and the process works great. Even with the minute size of the 1/700 railing compared to the machines bulk, I formed some tiny, intricate bends at many angles. The only thing that I would suggest to the manufacturer would be the addition of some type of built in degree/measuring marks on the hinge sides of the tool. After switching the Pressure/Finger Plate around to the finger side, I proceeded to fold some 1/700 lifting cranes and various platforms. Although the tool worked perfectly for this job, it just seemed a bit of overkill for 1/700 scale intricate folding.
Ill be completely honest with you and tell you, I will most likely never use the tool for any intricate bends on tiny PE even though it does the job well. As I said, I will use the tool for longer bends and folds. This is really where this tool has an advantage. Trying to get a 1/8" bend at a consistent angle for longer lengths using other methods can be a problem. Its a problem because there is either not enough stock being held in place, or the bend itself is too short for a razor blade to make the fold safely and efficiently.
Take note, there is a disadvantage with the design of this tool, in that the length capacity of the fold cannot exceed the length of the Pressure/Finger Plate (max. length of 7 -177.8mm). If you refer to the photograph(s), and look at the hinge plates on the sides of the tool, you will understand exactly what Im talking about. Your stock cannot extend past these hinge plates. For normal modeling in common scale ranges, this wont be much of a problem, but for large scale or for the model railroaders making very long bends, there may be a bit of an issue.
The tool worked smoothly, with consistent results each time. The lower jaw lifts easily with one hand, except with heavier stock, then a two handed bend is necessary. Also note, that the Fender Bender can continue its bend radius beyond the standard 90 degree, going through to a full 120 degree bend, which is a definite plus. The brass tensioning screws worked easily, held their position without loosening, and loosened easily with your fingers. Be very careful when you are working with these screws, behind each one is a tiny ring of spring steel, which are the lifting springs, and are easy to lose. Do yourself a favor and work over a bench-top when you are changing position of the Pressure/Finger Plate. Although these little springs are replaceable, losing one (or more) will reduce the ease in lifting the finger plate with just one thumb.
The only real maintenance is to keep the surfaces clean and free from paint, etc, and a wipe down occasionally with some light machine oil is recommended. Ausfwerks offers a 5 year replacement of any component of the tool used under normal circumstances.
Final thoughts, conclusions, and closings
I looked at this tool very objectively, as a former sheet-metal worker first, and then as a modeler second. I used my experiences and knowledge of working with metal to my advantage and to help me to evaluate this tool, and its true use to the modeler in general. Honestly, this new tool from Ausfwerks is a high quality precision tool, built to work and to hold up. Under normal usage it should last a lifetime with proper care. If you follow the manufacturers instruction and heed the gage tolerances of the metal that youre trying to bend, there is no reason why this tool wouldnt be a one time investment.
I put the tool through a battery of bending and folding tests (and so did my co-workers) and the Fender Bender did exactly what it is supposed to do. Entering a market where there is already two industry favorites should not be a problem for the Fender Bender.
Although the tool does the same job as the others, it achieves its result in a different manner. I stated earlier that I will more than likely only use this tool utilizing the continuous side of the Pressure/Finger Plate, and keep using my other PE folding tools in conjunction with this one. If you use a lot of PE in your modeling subjects, with long repetitive bends then this tool will pay for itself many times over in no time at all.
Heres something to remember when shopping for any PE bending tool. Although cost is most definitely an issue; try not to think of the dollar amount of the machine. Now, Im just like the rest of you guys, and tools such as this often get put on the back burner in importance because of cost. But trust me, and especially with precision tools, you only get what you pay for.
The Fender Bender works and it works well. Time will tell if Ausfwerks will make adjustments to handle longer bends. But aside from this, I found nothing else really to nit pick about with this tool...Its a good tool, it does what its supposed to do. This tool provides reliable results, quality engineering and manufacturing, and definitely built to last. Recommended for every serious modelers toolbox, from this modelers (and former sheet-metal workers) point of view.
Many thanks are given to Ted and Jeff from Ausfwerks for providing this pre production review sample.
SUMMARY
Hinging upon a concept that is centuries old is Ausfwerks new addition to the modeling tool market, The Fender bender. It promises to bend and fold flat metal stock and Photo-etch products smoothly and efficiently. Another PE forming tool .no big deal; this one has a difference. Anyone who truly knows the value of a tool like this to the metal-worker and its real importance will immediately realize what this means to the modeler who demands consistency in their bends and folds, in a self contained package
About Mark R. Smith (Gunny) FROM: PENNSYLVANIA, UNITED STATES
I have been building models of all sorts all of my life, concentrating mainly on the coolest one's when I was younger, but now I focus directly on all military subjects, from armor to warships. After years of counting rivets, I put away the calipers, dial indicators, and micrometers and now just ha...