The real Type XXIII U-boats
U-boats of the Type XXIII belong to the Electro Boats (E.B.) generation of late WWII German u-boats. There were the Type XXI Ocean going and the coastal version this one. This could be called the midget brother, mainly because of his dimensions: 34.68 meters long, beam 3.00 meters and 7.70 meters height!
It carried a crew of 16, two forward torpedo tubes, with no reloads, had one of the late war improvements, the schnorkel and as the other E.B, had a submerged speed higher than the surfaced: 12.5 knots versus 9.7 knots.
After the war, Russians, British and French navies had several examples for evaluation.
German navy recovered U-2365 and U-2367 in 1956, to became Hai (S 170) and Hecht (S 171) beginning a new era of German submarines.
The Model
According to Vom Original Zum Model: Uboottyp XXIII by Eberhard Rössler and Fritz Köhl (Bernard & Graefe Verlag ISBN: 3-7637-6007-5) and to my own measurements the model dimensions and proportions are accurate. This is a good starting point! The plastic details are very fine and with appropriate scale thickness.
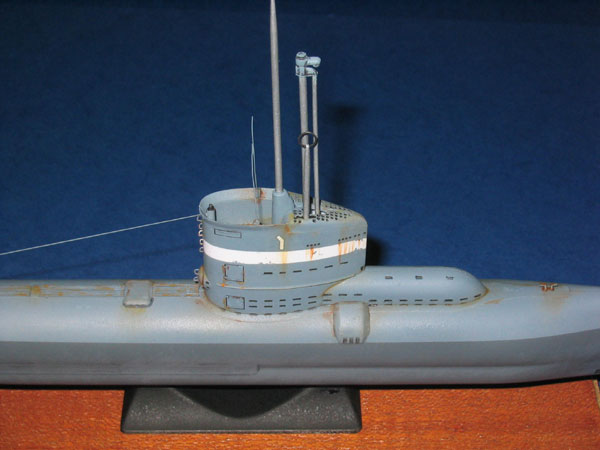
On the Köhl & Rössler book there are several pictures of U-2322, the version I decided to built, and verified that there where several different arrangements on Type XXIII u-boats: 5 steps on the sail or holes for the feet on the side of sail, wooden catwalk in front of the sail where the main differences that I noticed. The U-2322 had those two features and the model didnt, but considering that ICM produced a generic Type XXIII u-boat I think they did a great job!
Although I know that the finished model isnt 100% correct, I didnt have the courage to alter the sail that much and made a mix version but I am aware of it!
I started by making a chequered wooden floor for the interior of the sail (if I wasnt such a boring person I could have made this a weekend project, but
. ) using evergreens stripstyrene 0.4 x 1mm (0.015 x 0.040) and made a pattern not entirely perfect but convincing for the purpose.
After this, the rest of the building is very straight forward, but attention must be taken since the hull halves dont have locating pins, so a little dry fit test is needed and when satisfied with it, tape and glue it! I use tamyia liquid cement. Once the glue set, I removed the steps on the sail using a new 11 x-acto blade, and used a little putty to fill in the little misalignment on the sail front, as well as in the big block on the deck, minor flaws easily solved with putty and sandpaper.
For the new steps I used fine wire, like the wire that you can find inside the small electric motors
3 mm of wire, tweezers and good hands and eyes, times five and the steps are made. Used CA glue to fix them to the sail and this is a simple operation with great results. Theres also a hand rail on both sides of the sail, but since this have some impact on the scribed details (hatch on the starboard side) I let it stay that way
maybe on the next Type XXIII Ill tackle this and the other problems mentioned. The antennas were replaced with wire, only because I broke one when removing it from sprue. So, in a question of a couple of hours, the model is ready for the painting job, with no real problems encountered!
Painting and decaling:
I primed the u-boat with Tamiya Fine Primer (the white one) and after cured, I painted the outside of the sail with WEM Schnellbootweiss for the white band around it.
The rest of the paints used where Revell Color Matt 57 for upper works and Matt 77 bellow the waterline. The propeller was painted using Vallejo Brass colour.
At the right time two coats of Future Floor Polish where applied, and decals where placed, with no need for any agents after all it was a flat surface!!
Decals where sealed with another coat of Future.
The Weathering:
I must confess that this is the part that I prefer most! I think that this is the author signature that will make a model different from any other.
The first step was applying a black wash to all the holes on the hull. While the wash was drying, I mixed 1/1 ratio white to the brass colour, and using an old toothbrush I sprinkled the propeller. Try this several times, and see that the propeller only gets the smallest drops of paint. This will break the brass colour and simulate the salt corrosion on the propeller.
Now back to the fun part! Cleaned the excess on the washes and started making some scratched and patches of a lighter shade of the Matt 57 paint, with a mix of 4 to 1 with Schnellbootweiss. Using a small paintbrush (00) little dots and dabs where applied almost randomly. Almost, because you have to think where to apply these scratches. Take your time and look at lots of pictures of similar submarines (or any subject that you are building) and youll find out that theres a kind of a pattern
The place where these scratches are most noticeable is on the white band around the sail, for obvious reasons.
Bellow the waterline, I simply dry brushed the area with the same colour, since theres the future floor polish effect on the paint.
The Rust:
This is the final personal touch and, as I mentioned earlier, my signature!
Before you start making rust everywhere, consider this:
- Rust start because:
o The area got hit, paint chipped and the oxidation process started, this could happen anywhere;
o Areas of heavy duty, with periods of no activity, like in Submarines;
o Still areas, like corners and angled areas, from inside;
o The weather effect (temperature differences, salt, sun, water, snow, ice, and so on);
o The quality of the materials.
o Recent rust have a lighter colour, yellow or orange;
o Old rust has a darker colour and broader streaks;
o Rust streaks stop at the waterline.
I use artists oils Burnt Sienna and Yellow Ochre. I use it pure and mixed, to make several shades. In this case since the scale was too small, I only used two mixes, making a total of four colours.
Having this is mind, I started applying a small dot using a brush (again the 00) and with a dry flat brush (number 5) gently made several vertical downward strokes. Pay attention when you start another stroke, not to go upper the initial stoke you dont want to have rust streaks going upwards, not even on a sub!
Also clean the big brush after making the streaks, and make sure it is dry of the cleaning agent when streaking again.
This process is then replicated on the needed areas, with care, not to overdone this effect. On some streaks, some dots of the same colour or even the darker shade can be applied to the initial rust streak dot, to make it more convincing.
After the artists oils dried (two days), I airbrushed the model with a flat coat. Glued the propeller and this is it!
I opted not to include the flag, because it missed the swastika and also (mainly) because subs dont use flags while underwater!
And I have got the Finished U-2322 in 1/144th scale!
Conclusion:
Armoramas Dive! Dive! Dive! Campaign was a good excuse to built this little gem. Good little model, accurate, easy, and interesting subject.
A good value for the money (9.00)
Online Information:
http://www.uboat.net/types/xxiii.htm
http://www.uboat.net/boats/u2322.htm