Ships by Class/Type: Military Small Craft
For topics on PT boats, landing craft, Vietnam riverine, etc.
M.A.S. 568 4a Serie
Dannyd
Visit this Community
England - North West, United Kingdom
Joined: March 27, 2007
KitMaker: 803 posts
Model Shipwrights: 6 posts
Posted: Monday, July 15, 2013 - 09:31 AM UTC

Quoted Text

Hi,

Anyone any suggestions as to where I might get some photo etch valve wheels and instrument bezels.


Evening Kev,

Verlinden made a set of 35th scale valve wheels in photo etch, i think its still in the current range from historex Agents, as for the bezels i know reheat models did a set in 32nd scale but i think these are now out of production? You could try David Parkin over at flightpath, i'm pretty sure he does a set of WWII instrument bezels in PE.

Good to see the build shaping up, the engines are looking the part Kev.


Regards

Dan
Longshanks8
Visit this Community
England - South West, United Kingdom
Joined: July 04, 2013
KitMaker: 430 posts
Model Shipwrights: 390 posts
Posted: Wednesday, July 17, 2013 - 01:19 AM UTC
Been working on engineroom deck today.

Don't mean to teach you to suck eggs but I thought I'd put some pics on as to how I do this with templates.

The key is don't try and do it all in one go....


Hope this helps

Kev
Longshanks8
Visit this Community
England - South West, United Kingdom
Joined: July 04, 2013
KitMaker: 430 posts
Model Shipwrights: 390 posts
Posted: Wednesday, July 17, 2013 - 03:03 AM UTC
Here is one I'd prepared earlier

This is for one of the bulkheads. Same principle, scribe one section at a time and glue sections together.

If its a more rounded hull displacement type hull / shape use several pieces to follow the curve.

When you have the shape transfer it to your chosen material.

Trust me it makes a difficult job easy


TAFFY3
Visit this Community
New York, United States
Joined: January 21, 2008
KitMaker: 2,531 posts
Model Shipwrights: 1,244 posts
Posted: Wednesday, July 17, 2013 - 05:41 AM UTC
Don't mean to teach you to suck eggs but I thought I'd put some pics on as to how I do this with templates. [Quote]

Post away, what may be 'old hat' to you may not have occurred to someone else viewing this thread. I remember talking to someone at a model show who'd never heard of using stretched sprue for A/C antennae, or how to do it. Very nice scratch-building, particularly the engines. Following along with interest. Al
Dannyd
Visit this Community
England - North West, United Kingdom
Joined: March 27, 2007
KitMaker: 803 posts
Model Shipwrights: 6 posts
Posted: Thursday, July 18, 2013 - 07:22 PM UTC
The engine room is really starting to take shape Kev
loving your attention to detail.


Dan
surfsup
Visit this Community
Queensland, Australia
Joined: May 20, 2010
KitMaker: 1,230 posts
Model Shipwrights: 1,212 posts
Posted: Thursday, July 18, 2013 - 07:31 PM UTC
Really like the work you are putting into this one.....Cheers mark
Longshanks8
Visit this Community
England - South West, United Kingdom
Joined: July 04, 2013
KitMaker: 430 posts
Model Shipwrights: 390 posts
Posted: Friday, July 19, 2013 - 12:29 AM UTC
Thanks guys
Longshanks8
Visit this Community
England - South West, United Kingdom
Joined: July 04, 2013
KitMaker: 430 posts
Model Shipwrights: 390 posts
Posted: Friday, July 19, 2013 - 04:18 AM UTC
Engineroom fitters have been in today


AlanL
Visit this Community
England - East Anglia, United Kingdom
Joined: August 12, 2005
KitMaker: 14,499 posts
Model Shipwrights: 1,919 posts
Posted: Friday, July 19, 2013 - 04:30 AM UTC
Hi Kev,

Nice progress, On your earlier question, you can see through the portholes side to side, but not side/down as the torpedoes block looking down that way.

Cheers

Alan
Longshanks8
Visit this Community
England - South West, United Kingdom
Joined: July 04, 2013
KitMaker: 430 posts
Model Shipwrights: 390 posts
Posted: Friday, July 19, 2013 - 09:24 AM UTC
Cheers Al
Longshanks8
Visit this Community
England - South West, United Kingdom
Joined: July 04, 2013
KitMaker: 430 posts
Model Shipwrights: 390 posts
Posted: Tuesday, July 23, 2013 - 04:35 AM UTC
Fired up the engines on one side today


Some facts you may well find amusing..

I have to date glued together SIX pieces of the MAS boat kit !

The kit consists of approx. 250 pieces !

So far I have assembled nearly SIX HUNDRED bits of wire, plastic, brass, aluminium & wood in producing the engines & engineroom !

Does this mean the kits good value or I'm nuts

Dannyd
Visit this Community
England - North West, United Kingdom
Joined: March 27, 2007
KitMaker: 803 posts
Model Shipwrights: 6 posts
Posted: Tuesday, July 23, 2013 - 08:26 AM UTC
Sterling work Kev, i'm looking forward to seeing this one in the flesh later this year fella.

Keep the updates coming

Cheers

Dan
Longshanks8
Visit this Community
England - South West, United Kingdom
Joined: July 04, 2013
KitMaker: 430 posts
Model Shipwrights: 390 posts
Posted: Tuesday, July 23, 2013 - 06:07 PM UTC
Cheers mate
Longshanks8
Visit this Community
England - South West, United Kingdom
Joined: July 04, 2013
KitMaker: 430 posts
Model Shipwrights: 390 posts
Posted: Friday, July 26, 2013 - 08:09 PM UTC
Found some etched valve wheels

http://www.historexagents.com/images/aber/absv-07.jpg

Can get on with engine room now

Longshanks8
Visit this Community
England - South West, United Kingdom
Joined: July 04, 2013
KitMaker: 430 posts
Model Shipwrights: 390 posts
Posted: Tuesday, July 30, 2013 - 10:48 PM UTC
Made some more progress with engine room


No pics available so I'm afraid its all a figment of my imagination.

Compressor, air bottles for torpedo launch, batteries, electrical board etc

Thanks for looking, enjoy

TAFFY3
Visit this Community
New York, United States
Joined: January 21, 2008
KitMaker: 2,531 posts
Model Shipwrights: 1,244 posts
Posted: Wednesday, July 31, 2013 - 02:45 AM UTC
air bottles for torpedo launch, [Quoted]

First, let me say it all looks terrific. As to the air bottles, the torpedoes weren't launched in the conventional sense. It was more like the simple roll-off racks used later on by US PT boats. The torpedo was started, those rams extended it outboard on the rails, and it was released to drop into the water. Still, it's plausible and looks good to me. Al
Longshanks8
Visit this Community
England - South West, United Kingdom
Joined: July 04, 2013
KitMaker: 430 posts
Model Shipwrights: 390 posts
Posted: Wednesday, July 31, 2013 - 04:33 AM UTC
Hi Al,

Thanks for your comments.

Re torpedo launch I think I may have phrased it incorrectly.
I believe the torpedo racks were pushed to the side by compressed air.

I welcome any further correction/information

Gremlin56
Joined: October 30, 2005
KitMaker: 3,897 posts
Model Shipwrights: 3,301 posts
Posted: Thursday, August 01, 2013 - 04:36 PM UTC
That is amazing work Kev, I am wondering how much of this will still be visible when you get the deck on though.
cheers,
Julian
Longshanks8
Visit this Community
England - South West, United Kingdom
Joined: July 04, 2013
KitMaker: 430 posts
Model Shipwrights: 390 posts
Posted: Friday, August 02, 2013 - 08:31 AM UTC
Thanks Julian,

Valid point about visibility.

Hence the reason I'm only doing outline detail except immediately under a viewing point. It is also my intention to light the interior space!

Not sure whether to use LEDs or rice bulbs, anyone any thoughts.

Cheers for looking

Kev
Gremlin56
Joined: October 30, 2005
KitMaker: 3,897 posts
Model Shipwrights: 3,301 posts
Posted: Friday, August 02, 2013 - 04:19 PM UTC
I used Led's on my USS Wasp build. Need quite a few to be able to see anything
Cheers,
Julian
Longshanks8
Visit this Community
England - South West, United Kingdom
Joined: July 04, 2013
KitMaker: 430 posts
Model Shipwrights: 390 posts
Posted: Friday, August 02, 2013 - 08:28 PM UTC
Cheers Julian,

Your input is appreciated
Longshanks8
Visit this Community
England - South West, United Kingdom
Joined: July 04, 2013
KitMaker: 430 posts
Model Shipwrights: 390 posts
Posted: Sunday, August 04, 2013 - 03:12 AM UTC
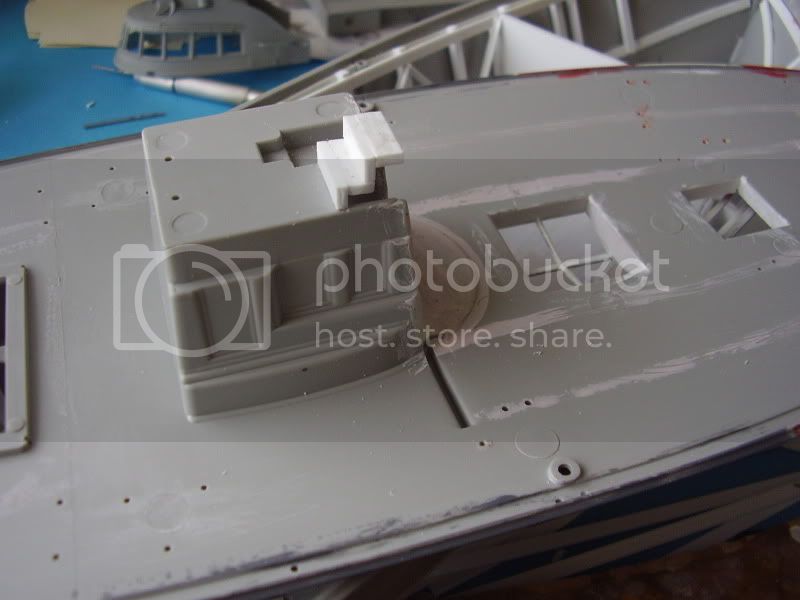
I've been doing a bit of research...... it seems the wheelhouse/cockpit area is all wrong and may have to be rebuilt

.... these are the plans I'm working from as provided by Al Ross on the earlier thread.


Which I have interpreted as this...


The dimension on the kit are right at the top of the cockpit but slope in towards the bottom.


Errors

The steps down into officers wardroom missing

The side cupboards are depicted as going straight up to the deckhead, there is clearly worktop above. The section drawing shows on the right a deeper drawing which I would take to be for charts, chart table above?

The ladder down from the deck is to wide and the deck hatches from each side are missing. The width of the cockpit at the bottom is 37mm rather than 50mm meaning if they tried to portray the hatches they would be ridiculously small !

The depth of the cockpit is excessive, a normal guy would be on tip toe to peer over the bottom of the window !

I feel at least one of the cupboards / lockers should be portrayed as a flag locker.

Although the plans do not show a door at the forward end into the wardroom I find this very strange. I'm ex Merchant Navy and this seems very poor seamanship. If any of the windows were smashed water would have free access to a large compartment.

That ends my ramble for today.

Please don't think I'm an expert or rivet counter, I just happen to have the information and I'm enjoying the build, so I might as well get as close as I can with the detail.

Thanks for looking

Cheers Kev

Gremlin56
Joined: October 30, 2005
KitMaker: 3,897 posts
Model Shipwrights: 3,301 posts
Posted: Sunday, August 04, 2013 - 05:51 AM UTC
Looks like another "Thunderbox" there on starboard Kev, should be a fun detail
Julian
surfsup
Visit this Community
Queensland, Australia
Joined: May 20, 2010
KitMaker: 1,230 posts
Model Shipwrights: 1,212 posts
Posted: Monday, August 05, 2013 - 07:04 PM UTC
Love the work you have done in the Engine Room. Looks fantastic.....Cheers mark
AlanL
Visit this Community
England - East Anglia, United Kingdom
Joined: August 12, 2005
KitMaker: 14,499 posts
Model Shipwrights: 1,919 posts
Posted: Tuesday, August 06, 2013 - 04:14 AM UTC
Hi Kev,

Fine work on the engine room; looking good.

This was my thoughts from Als plans on the crew quarters.

http://modelshipwrights.kitmaker.net//features/3854&page=3

The rifle rack should be on the forward bulkhead. I didn't add any doors either to the head or into the compartment. To get things to fit I also altered the step down to the officers quarters


I bow to your nautical wisdom regarding layouts etc, mine is but a layman's interpenetration and probably not a great one at that. If you are going to use LEDs then adding the Officers quarters might be a good option as you would get a partial view through the open door way and the roof hatches.

Excellent work.

Al