

Go to modelshipwrights.com for the current dynamic site!


Hosted by Jim Starkweather
1/200 Nichimo Hatsuzuki build

GazzaS

#424

Joined: April 23, 2015
KitMaker: 4,648 posts
Model Shipwrights: 249 posts

Posted: Sunday, August 23, 2020 - 04:03 PM UTC
Nice rew0rk, Tim!

RussellE
#306
Joined: June 27, 2010
KitMaker: 3,959 posts
Model Shipwrights: 2,777 posts

Posted: Sunday, August 23, 2020 - 11:14 PM UTC
Quoted Text
Cleaned up and test fitted with the vertical frames in place, the assembly captures the look of the Hatsuzukis windows much more successfully than my first attempt!
Absolutely!


d6mst0
#453

Joined: August 28, 2016
KitMaker: 1,925 posts
Model Shipwrights: 1,298 posts

Posted: Monday, August 24, 2020 - 02:53 AM UTC
Quoted Text
Nice rew0rk, Tim!
Ditto.

Kevlar06
Joined: March 15, 2009
KitMaker: 3,670 posts
Model Shipwrights: 173 posts

Posted: Monday, August 24, 2020 - 03:12 AM UTC
Tim,
I knew youd overcome the window issue. Spectacularly I might add now onward and forward!
VR, Russ
I knew youd overcome the window issue. Spectacularly I might add now onward and forward!
VR, Russ

RedDuster

Joined: March 01, 2010
KitMaker: 7,078 posts
Model Shipwrights: 6,649 posts

Posted: Tuesday, August 25, 2020 - 09:06 AM UTC
Great job on the bridge windows Tim,
They look the business.
Cheers
Si
They look the business.
Cheers
Si

rdt1953
Joined: February 06, 2015
KitMaker: 1,098 posts
Model Shipwrights: 34 posts

Posted: Tuesday, August 25, 2020 - 01:04 PM UTC
Well done Tim - really looks better - keep it coming !

TimReynaga
Joined: May 03, 2006
KitMaker: 2,500 posts
Model Shipwrights: 1,830 posts
Posted: Wednesday, August 26, 2020 - 01:59 AM UTC
Thanks guys!
The bridge structure is mostly done for now - I just have to go back and do some minor touch ups (the fender racks have gone missing) and then it is on to the next step.
The bridge structure is mostly done for now - I just have to go back and do some minor touch ups (the fender racks have gone missing) and then it is on to the next step.


Ripster

Joined: June 01, 2005
KitMaker: 970 posts
Model Shipwrights: 446 posts

Posted: Wednesday, August 26, 2020 - 02:09 AM UTC
Beautiful work!
TimReynaga
Joined: May 03, 2006
KitMaker: 2,500 posts
Model Shipwrights: 1,830 posts
Posted: Thursday, August 27, 2020 - 01:01 AM UTC
Thanks Graham - almost done with the bridge!
The pilothouse vertical window frames are attached only to the lower bridge to allow the roof to be removed for later installation of the interior parts and for painting.

This is how things look at the moment with the roof removed.

Just for fun, I added a basic support structure to the pilothouse overhead from Evergreen .010X.030 strip.

It wont be easy to see, but the structure is in there for anyone who cares to look!
The pilothouse vertical window frames are attached only to the lower bridge to allow the roof to be removed for later installation of the interior parts and for painting.
This is how things look at the moment with the roof removed.
Just for fun, I added a basic support structure to the pilothouse overhead from Evergreen .010X.030 strip.
It wont be easy to see, but the structure is in there for anyone who cares to look!
d6mst0
#453
Joined: August 28, 2016
KitMaker: 1,925 posts
Model Shipwrights: 1,298 posts
Posted: Thursday, August 27, 2020 - 02:57 AM UTC
Tim,
Nice finish on the bridge. Of course I thought you would at least add a coffee bar for the crew...LOL.
Mark
Nice finish on the bridge. Of course I thought you would at least add a coffee bar for the crew...LOL.
Mark
TimReynaga
Joined: May 03, 2006
KitMaker: 2,500 posts
Model Shipwrights: 1,830 posts
Posted: Thursday, August 27, 2020 - 04:25 AM UTC
Quoted Text
Tim,
Nice finish on the bridge. Of course I thought you would at least add a coffee bar for the crew...LOL.
Mark
Funny you would mention that... in Gakken Reikishi-Gunzo's Pacific War Series Volume 23 IJN Akizuki-class Destroyers, their 1/100 scale model seems to show a little table with a teapot on it:

maybe the IJN version of a coffee bar?

RedDuster
Joined: March 01, 2010
KitMaker: 7,078 posts
Model Shipwrights: 6,649 posts
Posted: Thursday, August 27, 2020 - 04:58 AM UTC
Really like the structure on the bridge deckhead, even painted I think it will stand out more than you think Tim.
great job,
Cheers
Si
great job,
Cheers
Si
Kevlar06
Joined: March 15, 2009
KitMaker: 3,670 posts
Model Shipwrights: 173 posts
Posted: Thursday, August 27, 2020 - 06:52 AM UTC
Tim,
Again, fabulous work on all the little details. Just out of curiosity, how are you going to do the window treatment? Or do we have to wait and see?
VR, Russ
Again, fabulous work on all the little details. Just out of curiosity, how are you going to do the window treatment? Or do we have to wait and see?
VR, Russ

Black_sheep

Joined: December 11, 2009
KitMaker: 823 posts
Model Shipwrights: 551 posts

Posted: Thursday, August 27, 2020 - 07:06 AM UTC
Stunning work Tim, simply stunning! 
rdt1953
Joined: February 06, 2015
KitMaker: 1,098 posts
Model Shipwrights: 34 posts
Posted: Thursday, August 27, 2020 - 02:39 PM UTC
In the words of Oliver Twist - Please sir - more !
TimReynaga
Joined: May 03, 2006
KitMaker: 2,500 posts
Model Shipwrights: 1,830 posts
Posted: Friday, August 28, 2020 - 02:56 AM UTC
Thanks guys!


All that handling and reshaping while fitting the window frames caused some collateral damage, but after re-applying the little round roof vent hatches and replacing the damaged radar room supports and fender racks, the bridge is good to go.
All that handling and reshaping while fitting the window frames caused some collateral damage, but after re-applying the little round roof vent hatches and replacing the damaged radar room supports and fender racks, the bridge is good to go.
TimReynaga
Joined: May 03, 2006
KitMaker: 2,500 posts
Model Shipwrights: 1,830 posts
Posted: Saturday, August 29, 2020 - 10:00 AM UTC
Quoted Text
Tim,
Again, fabulous work on all the little details. Just out of curiosity, how are you going to do the window treatment? Or do we have to wait and see?
VR, Russ
Hi Russ,
I guess it is a wait and see because I dont really know myself! My first thought was to fit individual glass panes from acetate, but this may not happen as I now hesitate to add anything that might obscure all that detail added inside the pilothouse. It is hard to see inside there as it is. Plus, windows without glass would be authentic as Japanese navy ships had window sashes that slid down into the lower frames for better visibility/ventilation. You can just see this on the bridge of Yukikaze with one front window completely open and another halfway down:

Then again, most observers would expect to see glass panes there... so I dunno.

Kevlar06
Joined: March 15, 2009
KitMaker: 3,670 posts
Model Shipwrights: 173 posts
Posted: Saturday, August 29, 2020 - 02:35 PM UTC
Tim,
I think something like Microscale Crystal Clear would work, but will obscure the detail. How about very thin clear acetate, bent to curve around the inside of the frames, maybe even with some gaps for open windows? I once saw a large model of the USS San Francisco, and the builder used microscope slip cover glass (which is very thin) to replicate the bridge windows. I asked him how he cut such material, and his reply was very carefully! Later he told me he etched the glass slip covers on a flat surface with a razor saw, and snapped the glass at the etch, but also said he went through about 100 slip covers to get 30 good windows. Just a thought!
VR, Russ
TimReynaga
Joined: May 03, 2006
KitMaker: 2,500 posts
Model Shipwrights: 1,830 posts
Posted: Sunday, August 30, 2020 - 12:14 AM UTC
Thanks for the ideas Russ. Not quite there yet, but I'll give it some thought as I prep the other areas.
Weapons next!
Weapons next!
rdt1953
Joined: February 06, 2015
KitMaker: 1,098 posts
Model Shipwrights: 34 posts
Posted: Sunday, August 30, 2020 - 06:21 AM UTC
Hi Tim - once again my compliments.
For my 2 cents I think the bridge needs glazing at this large scale .
Russ idea on slide covers seems worth looking into.
Acetate seem like it would be fine also - you could leave a sash open here and there for viewing.
Whats next - weapons?
Cheers - RT
For my 2 cents I think the bridge needs glazing at this large scale .
Russ idea on slide covers seems worth looking into.
Acetate seem like it would be fine also - you could leave a sash open here and there for viewing.
Whats next - weapons?
Cheers - RT
TimReynaga
Joined: May 03, 2006
KitMaker: 2,500 posts
Model Shipwrights: 1,830 posts
Posted: Sunday, August 30, 2020 - 07:55 AM UTC
Quoted Text
Hi Tim - once again my compliments.
For my 2 cents I think the bridge needs glazing at this large scale .
Russ idea on slide covers seems worth looking into.
Acetate seem like it would be fine also - you could leave a sash open here and there for viewing.
Whats next - weapons?
Cheers - RT
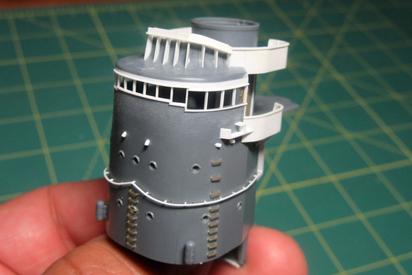
Thanks Richard, I suppose you are right; no glass in the windows at this scale would probably seem odd. Ill likely use bits of acetate when the time comes. As for the weapons, yes, they are next except I first need to adjust the funnel footrails.

I had liked the look of the brass footrails the on the funnel, but since I changed the style of the bridge footrails, the funnel rails really should be changed as well to match.

d6mst0
#453
Joined: August 28, 2016
KitMaker: 1,925 posts
Model Shipwrights: 1,298 posts
Posted: Monday, August 31, 2020 - 12:57 AM UTC
Really, those look amazing.
Mark
Mark

bwiber
Joined: August 03, 2008
KitMaker: 436 posts
Model Shipwrights: 31 posts
Posted: Tuesday, September 01, 2020 - 09:42 AM UTC
Something you might consider for the windows is UV cured resin. You could make it as thick, or thin, as you want, and with a bit of work you can make a mold that will make it just the size you want.
Just a thought.....
Just a thought.....
TimReynaga
Joined: May 03, 2006
KitMaker: 2,500 posts
Model Shipwrights: 1,830 posts
Posted: Tuesday, September 01, 2020 - 12:02 PM UTC
Quoted Text
Something you might consider for the windows is UV cured resin. You could make it as thick, or thin, as you want, and with a bit of work you can make a mold that will make it just the size you want.
Just a thought.....
Thanks bob, that's an interesting idea... but I'll probably just go low-tech with acetate

TimReynaga
Joined: May 03, 2006
KitMaker: 2,500 posts
Model Shipwrights: 1,830 posts
Posted: Friday, September 04, 2020 - 03:05 PM UTC
Quoted Text
Really, those look amazing.
Mark C
Thanks Mark. I too thought the brass footrails were attractive, but they definitely clashed with the different style plastic footrails applied to the bridge.

I wasnt all that happy about doing these rails all over again, but the finer plastic footrail supports would clearly be more accurate, as this picture of IJN Oboro shows... so I bit the bullet and pulled out the wires, removed the 21 brass support fittings, and filled in all the holes.


Another look at my references also showed the need to add additional supports with closer spacing as well as another row along the funnel cap. To make the changes I drilled out 50 new holes (using scrap 1/400 railing for spacing) and cemented .010 plastic rods into them as had been done on the bridge structure.


I again used my handy homemade tool (a bit of .015 sheet with a .018 hole punched in it) to help trim the supports to a uniform .015 length.


As on the bridge structure, the footrails were attached to the supports with Tamiya Extra Thin cement.

Im definitely not fond of rework, but the footrails are now more accurate and the bridge and funnel structure details match!

 |

WEB HOSTING BY


Copyright ©2021 Model Shipwrights and Kitmaker Network, a subsidiary of Silver Star Enterprises
All Rights Reserved. Please read our Conditions of Use and Privacy Policy.
All Rights Reserved. Please read our Conditions of Use and Privacy Policy.