

Go to modelshipwrights.com for the current dynamic site!


1⁄35Backdating 1/350 IJN Yamato
4
Comments
Backdating IJN Yamato
I have always had a love affair with ships. When I was 5 or 6 my favorite song was Sink the Bismarck by Johnny Horton. The second model I ever built was the Revell USS Arizona at 8. By 11 I had read Day of Infamy by Walter Lord and the Sinking of the Bismarck by William Shirer. I discovered the Yamato at 13 while reading a US Naval History book. I went to my LHS the next day and found a 1200 scale Yamato. It was in its initial configuration and it was the most beautiful ship I had ever seen.
Since then I have built many different scales of the Yamato. Yet, the common thread in all of them was that they depicted the ship in her final configuration. Fujimi recently released a series of Yamato / Musashi kits that had the version I so loved. The problem was it came out in 700 scale and I am a B-I-G ship kind of guy preferring the 350 scale giants..
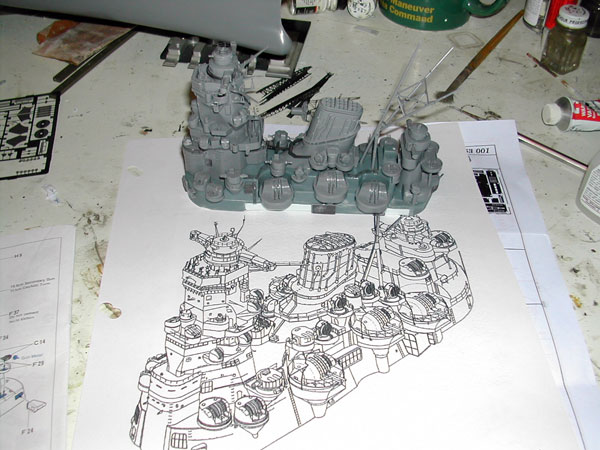
Enter today, thanks to Kenny Loups generosity, and some good luck on ebay, I now posses 2 of the 350 scale Yamato kits. I utilized a few web sites and thanks to another friend who allowed me to Xerox some pages from his Anatomy of a Ship series on the Yamato, I had a good idea what I was up against. I decided the easiest way to do this project was to simply cut away a large portion of the deck, cut out the foundation of the superstructure and glue it onto a piece of sheet styrene to replace the deck.
Cutting out the superstructure was simple. Using a mototool, I gave around an eight of an inch excess I cut the superstructure piece away from the deck. I also had to cut the rear 6-inch mount away. I then sanded it down to the actual shape. One thing to remember is to cut away part of the bottom of the pieces to account for the original decking. A good tip is the front portion of the superstructure, which overlaps a bit to glue over the forward decking piece. I was able to line it up and cut it using a razor saw and just worked my way backward. OK, this all sounds well and good, but you really really need to have those great drawings of the different superstructures from the Anatomy of a ship book. They changed out the 3 sets of antiaircraft guns on each side. The late version of the Yamato used both, so you just need to make sure you use the correct ones. There are several instances of this in the superstructure so just take your time and double check.
To replace the deck with its planking I found that Evergreens sheet of N Scale Siding was perfect. A bit thin, I backed it with another piece of thicker sheet styrene. Getting this piece trimmed and fitted took a while, so be patient. There is also some 20mm gun circles that will have to be carefully cut off. The two near the forward main guns and the 4 at the rear where they join up with the flight deck. There are approximately 2 dozen small holes that have to be filled where the 20mm guns went as these were added late and also not on the original ship. This was easy I just took a small piece of tube styrene and put a little glue on the tip and sniped it flush with the deck.
I had to replace some of the sections of the superstructure that had to be cut away with more sheet styrene. I then glued this onto my new deck section. One more special thing had to be done. I had to make 2 of the triple 6 gun turrets to go on either side. The kit had the two that remained one in the front and one in the rear, so this made the task simple. Make a mold and cast them in resin. My friend Keith Magee is an expert at this, and I was quite pleased with he results. The triple gun tubes didnt want to work. But this was relatively easy to fix. I matched up a couple of pieces of small round styrene pieces and cut out what I needed and cemented them together. I then drilled a tiny hole in the casting to mount each new tube. This was kind of cool, because I didnt have to use putty to fil it in like I did with the kit pieces.
So, as for kit completion, I purchased a set of Lionroar main gun barrels and the Eduard photo etched set for the kit. After that it was read the directions of the kit and the pe set and build accordingly. Of course, this requires some more cutting and you now have to coordinate two sets of directions, but the PE set is marvelous and has a 4 page instruction sheet. So here is my beautiful initial version of the Yamato. The most gorgeous warship ever built as well as the biggest guns ever mounted on a seagoing warship.


About the Author


FROM: TEXAS, UNITED STATES
I'm one of those folks that is on the other side of 50. I have built models since I was 7. Mainly airplanes and cars. I had a brief stint with 35th scale armor back in mid 70's until I discovered 700 scale ships and 48th scale Armor. Bought Tony Greenlands book on modeling Armor and went out a...
Comments


Very interestingly. I never realized how much difference there was between the early and late superstructures. I envy Steve his display room, I wouldn't have room for one, let alone two 1/350 Yamatos.
Nice article.
MAY 22, 2007 - 09:14 PM

I hope everyone enjoys reading the article and seeing the pictures. The only comment I'll make is.....if a bumble fingers like me can do it any of you can do it too and probably even better. But ain't she one gorgeous ship like that. So sleek....she almost looks like a yacht to me. Oh thanks Kenny for providing me with the kit. I guess this sort of qualifies as my Leyte Gulf participation even though she was later modified.
MAY 22, 2007 - 11:13 PM

Copyright ©2021 by Steve Joyce. _OPINIONS Model Shipwrights, KitMaker Network, or Silver Star Enterrpises. Images also by copyright holder unless otherwise noted. Opinions expressed are those of the author(s) and not necessarily those of Model Shipwrights. All rights reserved. Originally published on: 2007-05-23 00:00:00. Unique Reads: 23490

WEB HOSTING BY


Copyright ©2021 Model Shipwrights and Kitmaker Network, a subsidiary of Silver Star Enterprises
All Rights Reserved. Please read our Conditions of Use and Privacy Policy.
All Rights Reserved. Please read our Conditions of Use and Privacy Policy.