

Go to modelshipwrights.com for the current dynamic site!


1⁄700Wet Your Ships!
18
Comments
Painting
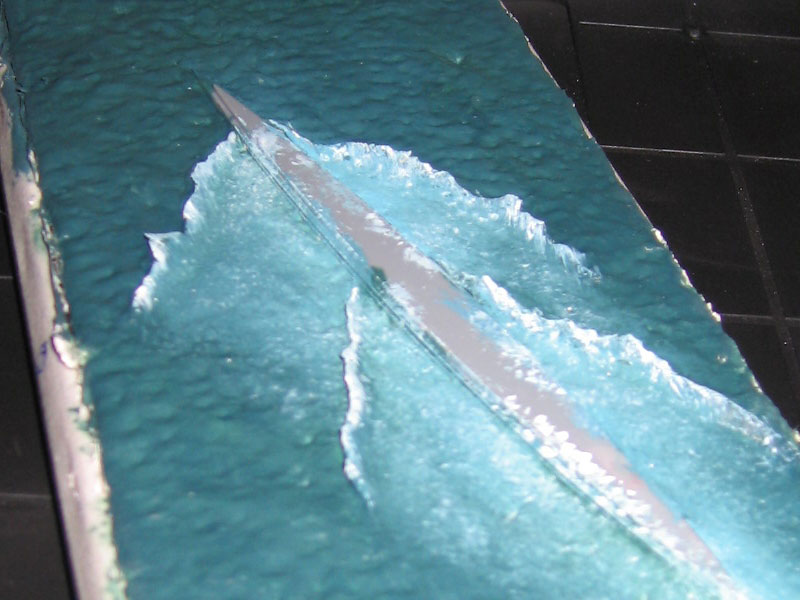
On this and the previous projects I have used acrilic paints over the wet base. I also have made seascapes with enamel paints and I must say that I don't know which I prefer... Actually, it was more a choice of available colours than the type! I started by mixing Ultramarine Blue with SS Camouflage Bright Green to obtain the colour I was looking for - inspired by the box art! Aplied this as the base colour, and while it was still wet, joined some dabs of Deep Sky Blue and pure SS Camouflage Bright Green in the wave areas, making it kind of small patched (see the photos). In the wave edges and wake area, started to aply small White areas, simulating the foam - I guess that it is needed to practice a little - but this is relatively simple! In my case, and as I have pointed out earier, since I have done the painting job after making the waves, when it got dry I got some holes in three or four places, and when I repaired them I couldn't match the right colour and that is why there are patches of greenish sea in this base! That is why I have advise you to do the painting only after the base is dry - live and learn!
At this point you have your sea mostly done! You can add some more whites or blues to your taste and accordingly to your references - we are almost there!
Note:If you are making a collection of models, and if you have coloured pictures of ships, you will notice that the sea don't have always the same colour! Again, it's important to see some references, and after that, make your own sea colour. There's no need to have always the same colour - it also would make your "ship showcase" kind of dull :)
Varnish Coat
I have used different types of gloss varnishes on other projects: Future Floor Polish, Humbrol Gloss Coat and it always gave me the impression of something missing! Because of some works here in the living room, I have "discovered" the perfect thing to apply to my seascapes: Incolour Gloss Varniss for Wood. Although it could have the problem of ageeing and turn yellow with the passing of time, I like the effect and to prevent this, my last white paint touches where applied after this coat and then given the top coat with Humbrol Gloss Coat, just in case!
You have now your base ready to place the finished model! You can always blend it better or make some final touches with the model already fixed to the base.


About the Author


FROM: LISBOA, PORTUGAL
Hi all Crew Members!
Rui Matos, 39 years old (in 2006), married, former Portuguese Navy Fire Control Radar Operator , and "owned" by two cats - James, Stripes (Riscas in portuguese, now deceased) and Moon (Lua)!
I've been modeling since I was 6, but only have turned to Submarines in 1991 o...
Comments

Thanks Skip,
Great feature, I will use your advice soon as I have a diorama in the planning. South Atlantic 93 years ago
One question for you though, in the dio I will be doing I will have two ships both pushing their engines to the limit, and the larger over taking the smaller. How would you show this speed and get across the dense clouds of coal smoke produced by these ships?
Hope you can offer some advice.
Ciao
Luciano
MAY 25, 2007 - 04:22 PM

Skipper,
Great article. After I get the hang of modeling I may try a Dio with water and it will be your article I'll use as a reference.
MAY 25, 2007 - 06:40 PM

Ciao Luciano
Glad I could help
About your question:
- to show the difference in the speed, with the bigger subject overtaking the smallest, make the waves produced be the big ship, higher - and you can make the small ship a little bit tilted (perhaps not very real, but you could add a little dramatism). For the smoke... I have seen good results with painted cotton balls, but also have seen terrible results - it's a technique very hard to master, so I always left it off. Also, if you are making one of this smoke clouds, think also in having a display case to prevent the dust to gather there
Cheers,
Skipper
MAY 26, 2007 - 07:41 PM
Thanks Skipper,
I will have a bit of practice with some cotton wool and the airbrush and see what happens.
As for the sizes of ships the larger is the Battlecruiser HMS Invincible doing 25kt while the smaller is the Armoured Cruiser HMS Kent doing 20kt.
Both where going flat out to catch the German Asia squadron.
Ciao
Luciano
MAY 26, 2007 - 10:23 PM
Hi Luciano
Another way of making speed noticed, is the amount of white you put into it.
Check some references, just to check the amount needed
Looking forward to see your future project
Cheers,
Skipper
MAY 27, 2007 - 04:17 PM
Litorio
Another thing on the cotton wool:
Try to tint it first (in a small water container), black or dark grey, let it dry and then use it "thorn" (I am not remembering the apropriate word in english!!!!!) and sparingly... in order to have a feeling of smoke and not a cloud
Just a thought
Skipper
MAY 27, 2007 - 08:24 PM
Hi Skipper been having a look around the net a came upon this pic which best shows what I need to try a show.
Although this is HMS Canada but also of WWI vintage.
 Ciao
Luciano
Ciao
Luciano
Ciao
LucianoMAY 28, 2007 - 04:52 PM
Littorio,
I don't know if it's just my comp but the pic didn't work.
MAY 28, 2007 - 08:39 PM
http://www.worldwar1.co.uk/battleship/canada.jpg
Here's a working link
Luciano,
I think that this is "easily" achieved - the worst part will be the rigging
Cheers,
Skipper
MAY 28, 2007 - 10:06 PM
Copyright ©2021 by Rui Matos. _OPINIONS Model Shipwrights, KitMaker Network, or Silver Star Enterrpises. Images also by copyright holder unless otherwise noted. Opinions expressed are those of the author(s) and not necessarily those of Model Shipwrights. All rights reserved. Originally published on: 2007-05-24 00:00:00. Unique Reads: 20300

WEB HOSTING BY


Copyright ©2021 Model Shipwrights and Kitmaker Network, a subsidiary of Silver Star Enterprises
All Rights Reserved. Please read our Conditions of Use and Privacy Policy.
All Rights Reserved. Please read our Conditions of Use and Privacy Policy.