

Go to modelshipwrights.com for the current dynamic site!


1⁄700Wet Your Ships!
18
Comments
Wet Your Ship!
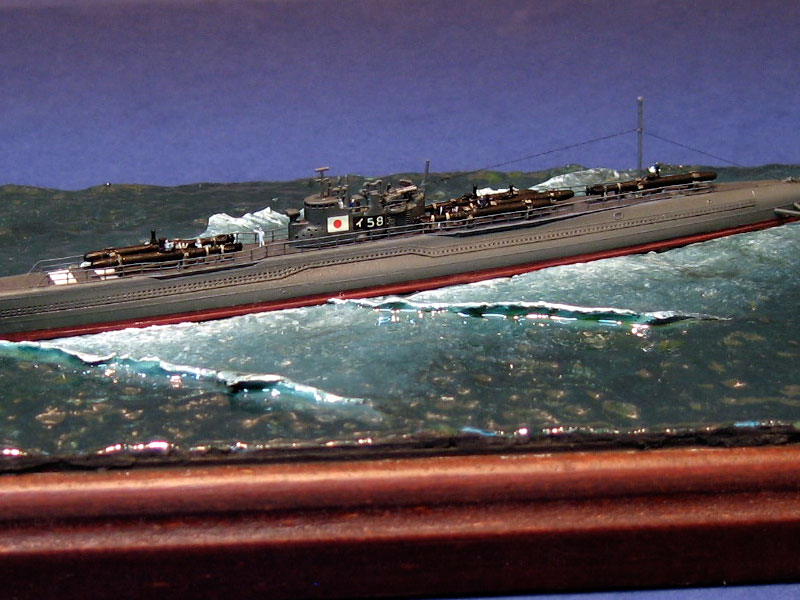
Several times I've been asked how I make the water for my ship models, and now I explain in a simple way, what I have been doing and making. There are more ways to do it, using Acrilic Gel, Maskol, Watercolour paper, but with this one I can control it and, most of all, I feel comfortable with it I hope that this can be helpfull to you, but have in mind that this technique should be used for small scale ships (1/350 and smaller).
grab your model
Once you have decided what you are going to build next, and that you have decided to give it a go with a seascape, before you build anything (this is the way I do it) grab your base and a pen or pencil and decide how it is going to be placed there! From left to right, showing the bow or stern, it's now that you must make the decisions on how you're going to display it. You have to be able to see the model fully assembled and visualize the "best angle" or most dramatic shot you want to show! Place the base or hull of the model and play around with it... step back and enjoy, go back and place it differently until you find the right position. Another place were you can go and get inspired, is the box art of your model or any picture of the subject you could have on a book - it's always good to make your homework!let's start...
Now that you decided how it is going to lay on the base, using a pen or a pencil, mark the outline of the hull and using references, draw the waves that the ship will do while sailling. Don't forget the propelers wake, and if you are making water for a sail ship: don't make this wake! This is made by the revolutions of the propeler(s). This will be your guide in the built and it's also helpfull to copy the hull/wake drawn on paper - for reference. Also bear in mind that different ships have different wakes! Tamiya's 1/700 Waterline Series Guide Book (although mostly writen in Japanese) has very good graphics showing it. It's cheap and you'll get a lot of information.Making the Sea
Using white glue (for wood) spread a thin coat over the base. This will make the seascape bonded with the wooden base (or any other material). While it is still wet, start spreading a 2 or 3mm thin coat of Das Pronto or any other modeling paste. This paste is paper based, white, water soluble and air dryes in a relatively small amount of time (depending on how thick it's your work). It is available throughout Europe at LHS, Craft stores and Art departments. Cheap and very usefull! After the base is coated with the paste, you can smooth it with your wet finger and give some depressions at your will... Get a small water container (I used a bottle cap) and a cotton swab and start make small depressions with it. Start on one point of the base and progress to the other end, making those small impressions/depressions close to eachother - this will make your small sea waves. You also should make them always in the same direction, or this small detail will ruin your work! Believe me... At this point you should impress the hull on the wavy base, in the place and position you have decided. This is why it's better to make this before the modle is assembled (for obvious reasons). Now it's time to make the wake.
Making the Wake
Make a couple of small rolls of Das Pronto and aply them as waves on the predefined areas you have marked (use the paper drawn reference mentioned above). You now have to blend them into the seabed. This should be made with a toothpick or similar tool. Remember that, if this area could be cut, it would have to be triangular in shape, with the top vertix pointing forward (see the photos) in the direction the ship is "moving". Once you have made the blending, you should pic your wet cotton swab and flatten a little bit the area imediatly after the wakes, and "loosing power" towards the stern. And to improve the looks of your waves, delicatly make small pinches on the edges of the waves, so that they will look irregular - not a perfect wave, but it looks good! For the propellers wake, make small beads with paste and make a relatively small pile after the ship. This pile should be fading. Than, using an old toothbrush or short hard haired paintbrush, dampened with water, verticaly make some strokes, so that the pile goes down a little and blend with the rest and it will be filled with little holes - this will simulate the turbulence in that area of the water.
Now you can dedicate yourself to the construction of the model. The paste will take about a day getting properly cured, and you will get the chance to correct some holes that may occur (it did to me - I'll explain later!!!), resulting of a small area with more water/white glue and less modeling paste!


About the Author


FROM: LISBOA, PORTUGAL
Hi all Crew Members!
Rui Matos, 39 years old (in 2006), married, former Portuguese Navy Fire Control Radar Operator , and "owned" by two cats - James, Stripes (Riscas in portuguese, now deceased) and Moon (Lua)!
I've been modeling since I was 6, but only have turned to Submarines in 1991 o...
Comments

Thanks Skip,
Great feature, I will use your advice soon as I have a diorama in the planning. South Atlantic 93 years ago
One question for you though, in the dio I will be doing I will have two ships both pushing their engines to the limit, and the larger over taking the smaller. How would you show this speed and get across the dense clouds of coal smoke produced by these ships?
Hope you can offer some advice.
Ciao
Luciano
MAY 25, 2007 - 04:22 PM

Skipper,
Great article. After I get the hang of modeling I may try a Dio with water and it will be your article I'll use as a reference.
MAY 25, 2007 - 06:40 PM

Ciao Luciano
Glad I could help
About your question:
- to show the difference in the speed, with the bigger subject overtaking the smallest, make the waves produced be the big ship, higher - and you can make the small ship a little bit tilted (perhaps not very real, but you could add a little dramatism). For the smoke... I have seen good results with painted cotton balls, but also have seen terrible results - it's a technique very hard to master, so I always left it off. Also, if you are making one of this smoke clouds, think also in having a display case to prevent the dust to gather there
Cheers,
Skipper
MAY 26, 2007 - 07:41 PM
Thanks Skipper,
I will have a bit of practice with some cotton wool and the airbrush and see what happens.
As for the sizes of ships the larger is the Battlecruiser HMS Invincible doing 25kt while the smaller is the Armoured Cruiser HMS Kent doing 20kt.
Both where going flat out to catch the German Asia squadron.
Ciao
Luciano
MAY 26, 2007 - 10:23 PM
Hi Luciano
Another way of making speed noticed, is the amount of white you put into it.
Check some references, just to check the amount needed
Looking forward to see your future project
Cheers,
Skipper
MAY 27, 2007 - 04:17 PM
Litorio
Another thing on the cotton wool:
Try to tint it first (in a small water container), black or dark grey, let it dry and then use it "thorn" (I am not remembering the apropriate word in english!!!!!) and sparingly... in order to have a feeling of smoke and not a cloud
Just a thought
Skipper
MAY 27, 2007 - 08:24 PM
Hi Skipper been having a look around the net a came upon this pic which best shows what I need to try a show.
Although this is HMS Canada but also of WWI vintage.
 Ciao
Luciano
Ciao
Luciano
Ciao
LucianoMAY 28, 2007 - 04:52 PM
Littorio,
I don't know if it's just my comp but the pic didn't work.
MAY 28, 2007 - 08:39 PM
http://www.worldwar1.co.uk/battleship/canada.jpg
Here's a working link
Luciano,
I think that this is "easily" achieved - the worst part will be the rigging
Cheers,
Skipper
MAY 28, 2007 - 10:06 PM
Copyright ©2021 by Rui Matos. _OPINIONS Model Shipwrights, KitMaker Network, or Silver Star Enterrpises. Images also by copyright holder unless otherwise noted. Opinions expressed are those of the author(s) and not necessarily those of Model Shipwrights. All rights reserved. Originally published on: 2007-05-24 00:00:00. Unique Reads: 20300

WEB HOSTING BY


Copyright ©2021 Model Shipwrights and Kitmaker Network, a subsidiary of Silver Star Enterprises
All Rights Reserved. Please read our Conditions of Use and Privacy Policy.
All Rights Reserved. Please read our Conditions of Use and Privacy Policy.