_GOTOBOTTOM
Ships by Class/Type: Battleships
Topics from the Dreadnaught era to modern day.
Hosted by Steve Joyce
Waterline 350th Nagato
Clanky44
Visit this Community
Ontario, Canada
Joined: September 15, 2005
KitMaker: 1,901 posts
Model Shipwrights: 934 posts
Posted: Friday, January 04, 2008 - 08:21 AM UTC
First off the line this year will be the Nagato. My reference on this ship is minimal, so please speak up if you have any suggestions, or can spot any errors/ommisions. All help will be welcome.

Wish me luck,
Frank

Week 1

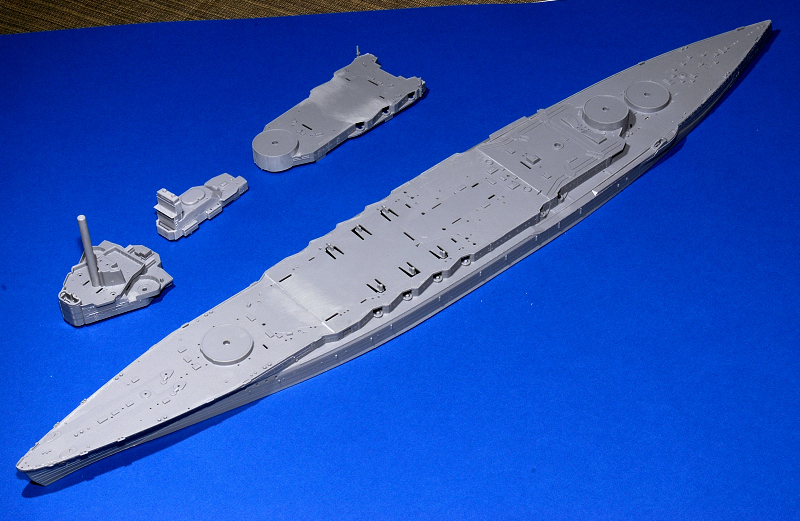
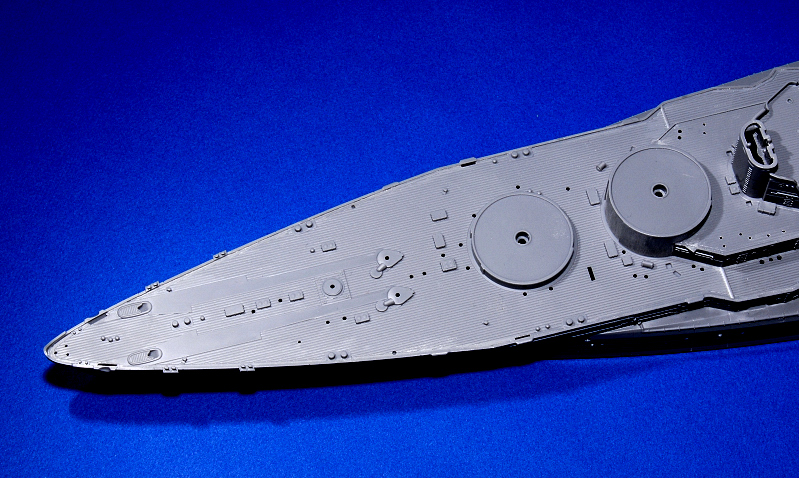
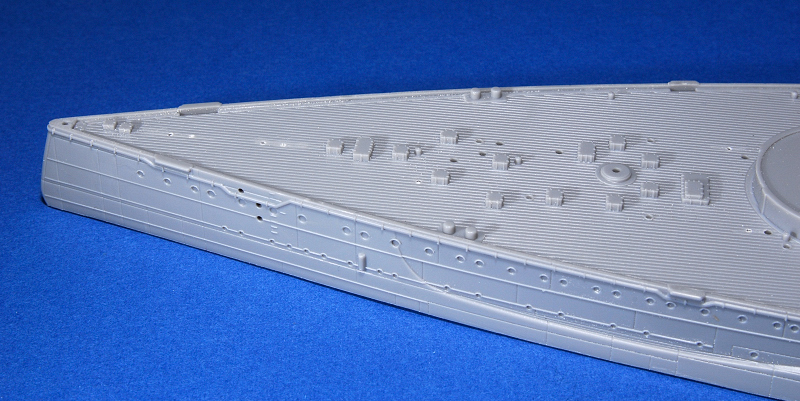
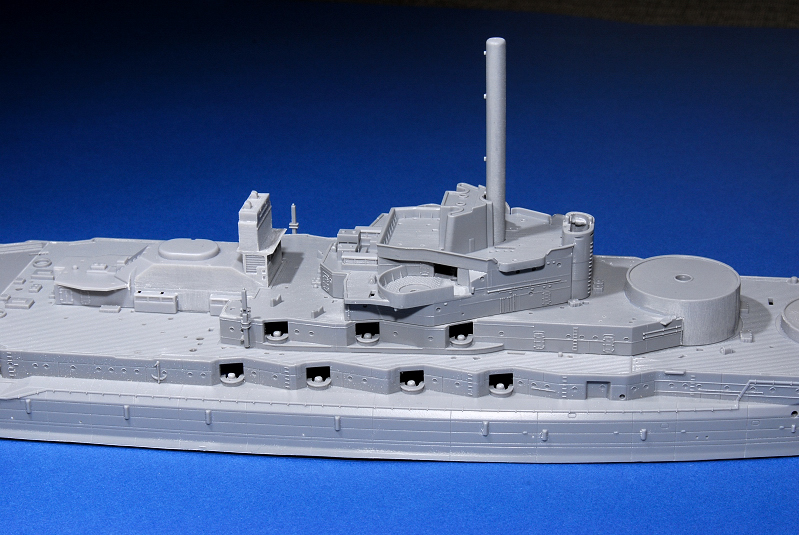
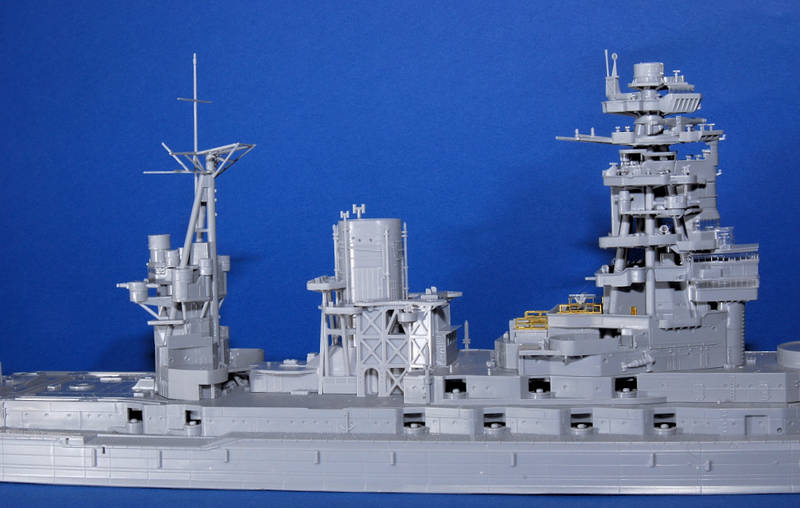
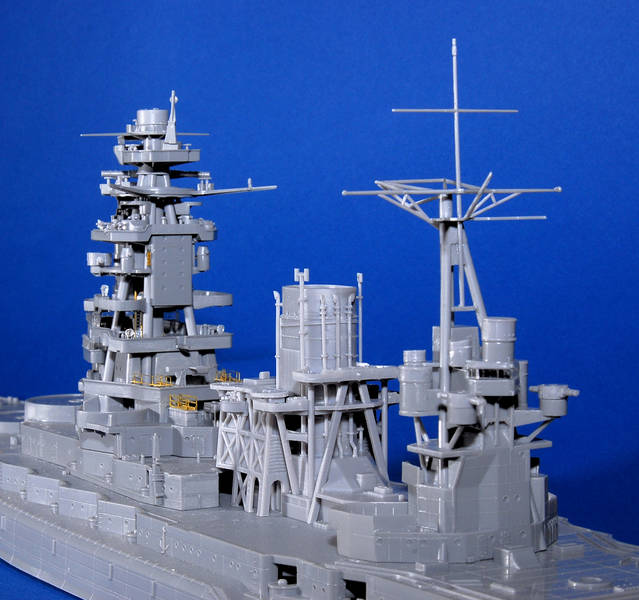
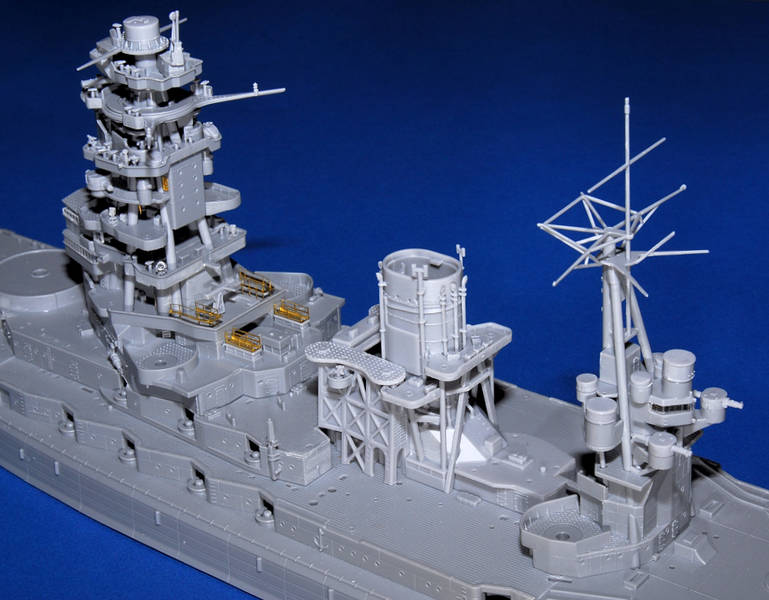
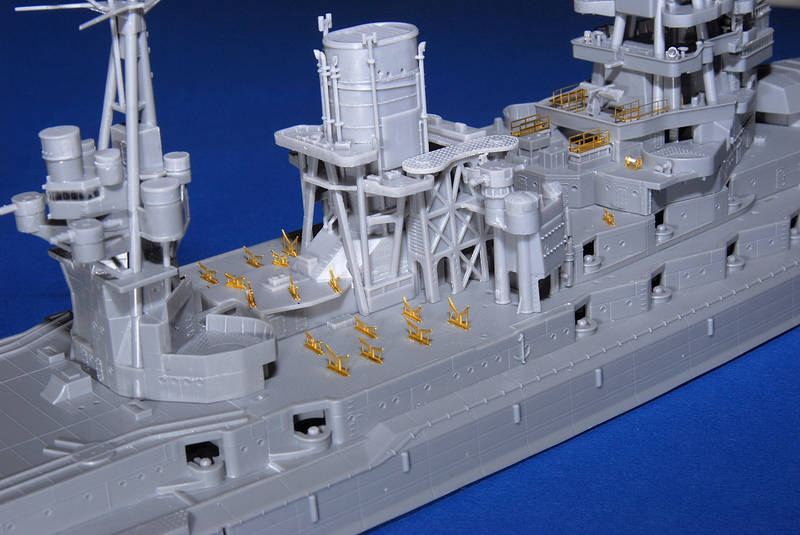
Mated the full hull to the deck using all the cross members for stability, once completed, used my dremel tool on it's slowest speed and cut through just below the water line. Once placed on a base, the water line should be about 2 to 3mm higher than the exsisting WL. A few gaps in the deck plates appeared, used some plastic card to fill in the seams.

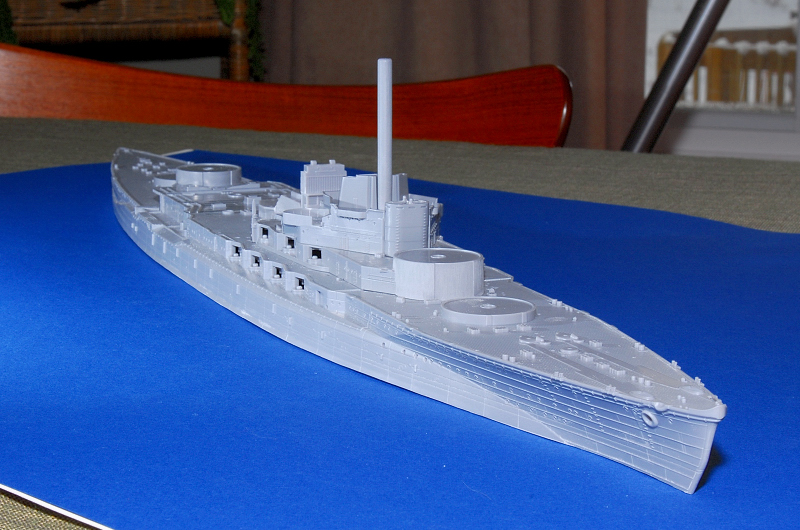
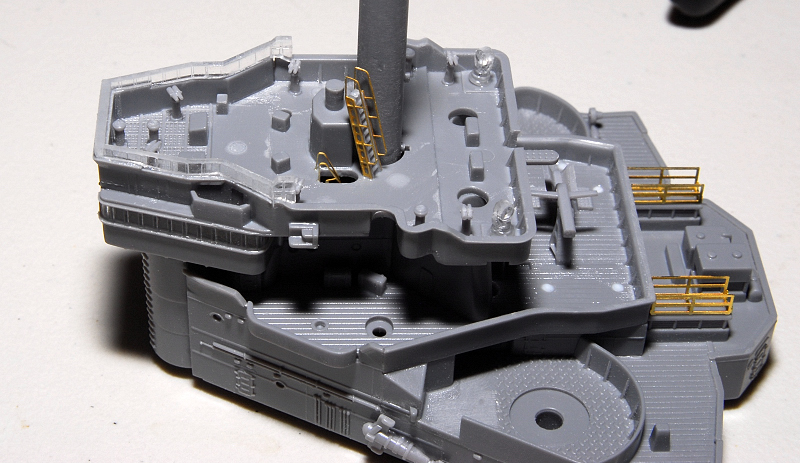
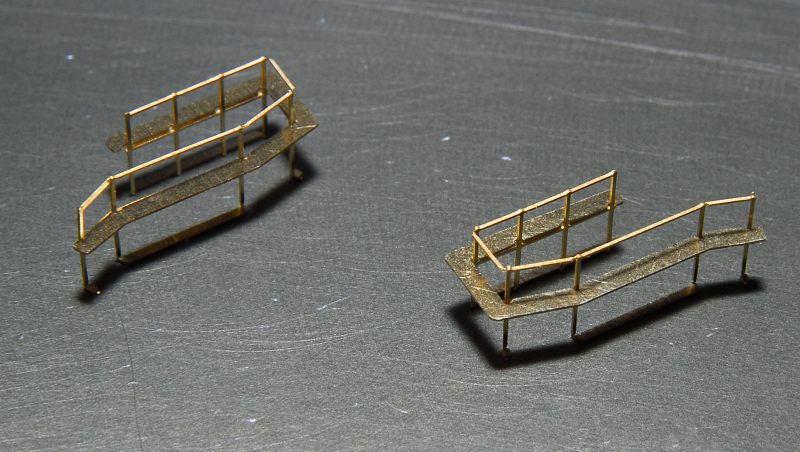
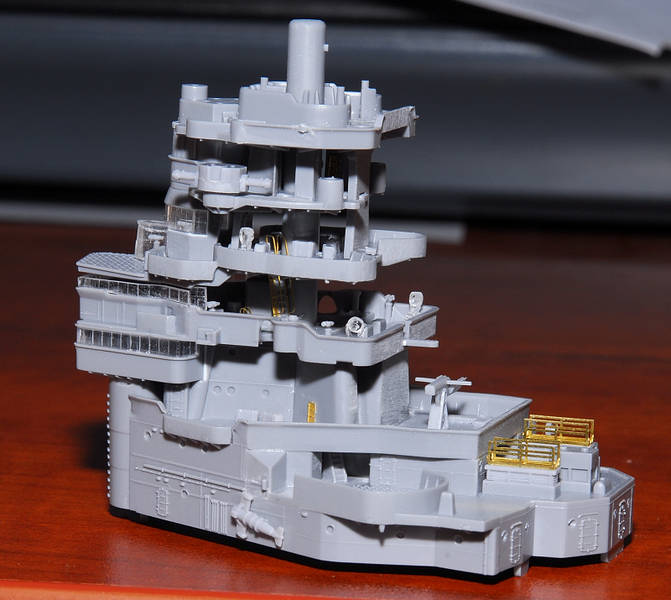
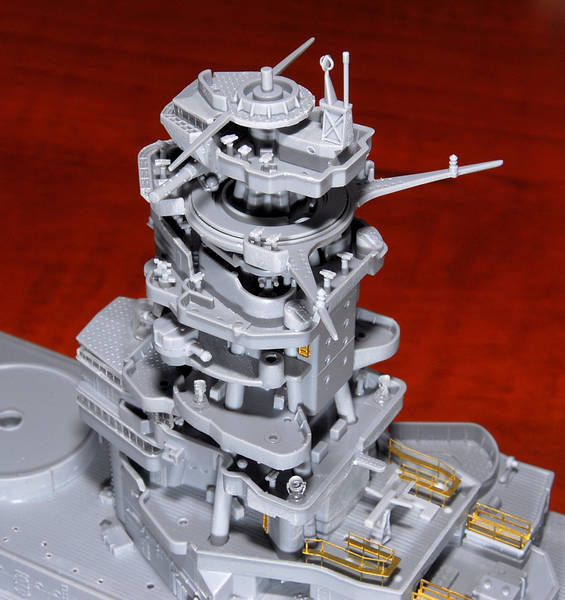
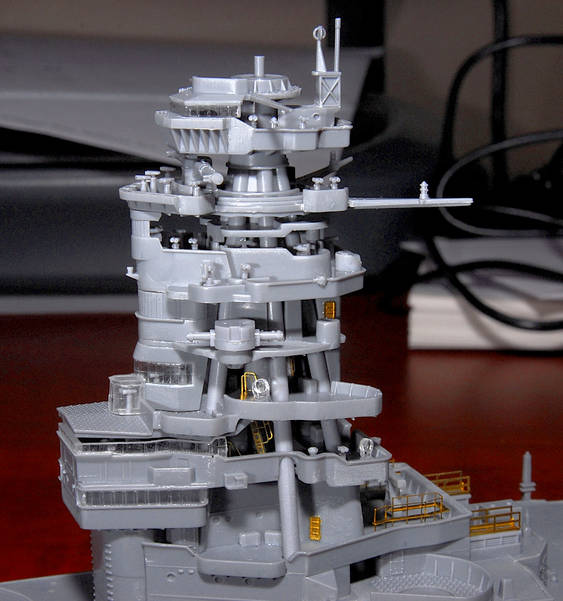
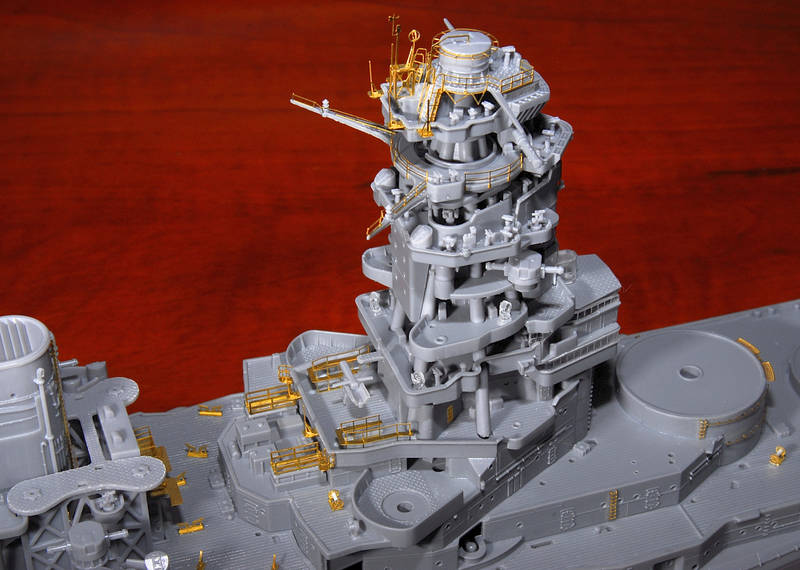
Part of the bridge has been built up, thankfully, not too much, as I failed to notice that Hasegawa's P.E. sets need to be used from the very beginning of construction. There are a few P.E. stair wells that will have to be shoe-horned in prior to any additional plastic parts.


MartinJQuinn
Visit this Community
New Jersey, United States
Joined: January 19, 2005
KitMaker: 574 posts
Model Shipwrights: 530 posts
Posted: Friday, January 04, 2008 - 09:15 AM UTC
You are a brave man, Frank!! That's an expensive piece of plastic to be chopping!! I like the looks of it, waterline, however!
Clanky44
Visit this Community
Ontario, Canada
Joined: September 15, 2005
KitMaker: 1,901 posts
Model Shipwrights: 934 posts
Posted: Friday, January 04, 2008 - 10:09 AM UTC

Quoted Text

You are a brave man, Frank!! That's an expensive piece of plastic to be chopping!! I like the looks of it, waterline, however!


I sat there with the dremel in my hands and eye protection on for what seemed like an eternity before plunging the dremel. What's the old adage, measure ten times, cut once!

Frank
#027
Visit this Community
Louisiana, United States
Joined: April 13, 2005
KitMaker: 5,422 posts
Model Shipwrights: 5,079 posts
Posted: Friday, January 04, 2008 - 03:43 PM UTC
Looking good so far Frank. I love the look of these older Japanese battleships.

Gator
Gunny
Visit this Community
Pennsylvania, United States
Joined: July 13, 2004
KitMaker: 6,705 posts
Model Shipwrights: 4,704 posts
Posted: Saturday, January 05, 2008 - 12:40 AM UTC
MmmHmmm, your chop job looks great Frank!

I have contemplated doing the same with mine, my friend, and your Blog here may just give me the push to do just that...this will be a MOST interesting build to follow, thanks mate!

Cheers,
~Gunny
blaster76
Visit this Community
Texas, United States
Joined: September 15, 2002
KitMaker: 8,985 posts
Model Shipwrights: 3,509 posts
Posted: Saturday, January 05, 2008 - 04:10 AM UTC
I envy you guys having the money to get this kit. Other than the goof with the lower hull and the scribing lines, I have heard nothing but raving for the kit. Just curious, did you also get a set of generic main deck railings? I saw those were not included in the 3 sets of PE Hasegawa was offering. I purchased a book called Anatomy of a ship Yamato. I undestand there is something similar out there for the Nagato. You might want to pick that up .
Clanky44
Visit this Community
Ontario, Canada
Joined: September 15, 2005
KitMaker: 1,901 posts
Model Shipwrights: 934 posts
Posted: Saturday, January 05, 2008 - 06:01 AM UTC

Quoted Text

Just curious, did you also get a set of generic main deck railings? I saw those were not included in the 3 sets of PE Hasegawa was offering. I purchased a book called Anatomy of a ship Yamato. I undestand there is something similar out there for the Nagato. You might want to pick that up .


Hi Steve,

Hasegawa has released 2 sets of P.E. QG15 and QG16. QG15 is set one and has the main deck railings. Hasegawa should have released both of these P.E. sheets together as both are essential to complete the kit.

I've seen the Nagato book, but I'm leery about spending $60 for reference, and not with the amount of on line reference available. I have purchased the Takao for $25, great book.

Frank

Edit: I missed Hasegawa's third set. I'ts their 'super set', comes with brass main barrels, resin boats, felt pads for the pedestals and additional P.E.
Clanky44
Visit this Community
Ontario, Canada
Joined: September 15, 2005
KitMaker: 1,901 posts
Model Shipwrights: 934 posts
Posted: Sunday, January 06, 2008 - 04:05 PM UTC
Had myself some free time today. Sat in front of the tube from 10am this morning straight through to 6pm. I thought for sure that I would get the front bridge assembly completed today, but after 8 hours, I'm only a third of the way there. I spent way too much time filling in injection marks with CA glue in areas that are going to be next to impossible to see without a magnifying glass... On the top deck in the first photo, you can see the injection pin holes that have been filled in with CA, and at the aft portion, white styrene plugs used to fill in the locator marks for plastic parts that are being replaced with P.E.


I found Hasegawa's P.E. to be very user friendly. I'm using sets QG15 (basic A set) and QG16 (basic B set). I started with the bridge deck benches that replace parts K4 and K5, comprised of two P.E. pieces that have to be bent in a total of 18 spots, it went relatively trouble free. One piece of advice I can give is to go back and forth constantly from the kit plastic instructions to the P.E. instructions, as both are a bit simplistic in the parts layout and positioning. I found myself having to use a fellow modeller's finished Nagato from a different site for reference (thank you PvB!)


The six decks that I do have in place are built up in 3 layers, allowing me to paint and detail the interior, all of the AA guns and directors will be painted seperately after the bridge is completed.


I'm placing in an order for l'arsenal's resin 350th scale sailors, I hope to incorporate them into the diorama I have in mind.

please feel free to comment/critique,

Frank
Clanky44
Visit this Community
Ontario, Canada
Joined: September 15, 2005
KitMaker: 1,901 posts
Model Shipwrights: 934 posts
Posted: Tuesday, January 08, 2008 - 04:42 PM UTC
Continuing with the front bridge. It has been built up in 7 layers which will hopefully ease the painting process. It's incredible the detail given to this model, I've glued over 160 parts on the bridge alone, that's more than most of the models I tend to build, and that's without the AA guns, directors and P.E. The fit is quite good, but contrary to other build blogs claiming to be spot on, I've found that there are parts that require a strip of styrene and most parts have a bit of flash. The external P.E. will not be attached until the interior is painted, hopefully limiting the damage to the fragile P.E. Some plastic parts seen in these photos will be snipped off and replaced with P.E.


On a negative note... I purchased the last of the P.E. sets today, the so called 'Super Set'.... Am I missing something here, what is so super about paying $70 to $80 for a set of turned barrels (main guns only, no secondary guns), resin rafts and a bit of P.E. that should have been incorporated into the other two P.E. sets?!? I hope Hasegawa is paying attention, IMO they are milking us dry. So far I've dropped $160 for the model, $55 for the main P.E. set, $25 for the second P.E. set and now $70 for their so called 'super set', and I still need P.E. stairs?!? I can just imagine what the damage will be for the Akagi.

Frank
Clanky44
Visit this Community
Ontario, Canada
Joined: September 15, 2005
KitMaker: 1,901 posts
Model Shipwrights: 934 posts
Posted: Friday, January 18, 2008 - 05:23 PM UTC
I have a few b&w photos from IJN carriers, showing the insides of the bridge as having light grey or white walls and a mid grey floor. Would the Nagato's open pagoda bridge have this same colour scheme? These photos also show the binocular stands as being white. With the binoculars being black. Any help would be appreciated before I put paint to plastic.

Frank
Clanky44
Visit this Community
Ontario, Canada
Joined: September 15, 2005
KitMaker: 1,901 posts
Model Shipwrights: 934 posts
Posted: Saturday, January 19, 2008 - 02:35 AM UTC
Here are a few more photos of the Nagato. I have a few more sub assemblies left to build and then the P.E. will start.

Frank


blaster76
Visit this Community
Texas, United States
Joined: September 15, 2002
KitMaker: 8,985 posts
Model Shipwrights: 3,509 posts
Posted: Saturday, January 19, 2008 - 07:23 AM UTC
Frank that ship is the end-all to the be-all form what I can see. I think if I get lucky financailly this year I'll pick one up. Right now I am still hoping for a lttle luck to pick up the Alabama. Glad for notes on the PE sets. I think I will look for a generic railing set and use ladders and all that I have left over from the two Yamatos I have. Thanks for the heads up on that PE stuff though but looking at what you have done, I don't think I would replace plastic pieces that well done for brass ones. I would probably need a 5x magniying glass to tell the difference.. I lke brass barrels, but Hasegawa went way overboard on the pricing for that. Hopefully some aftermarket folks will do a set of tubes for $25 or so or maybe $40 for a main set and a secondary one. Lionroar released some great small sets for the Yamato and put them all together in one huge superset. so you could go as deep as you wanted. I think Hasegawa kind of milked this one a bit. Yes and like you I am scared to see what they are going to come up with for a price on the Akagi. I'm sure it will see the other side of $200.
skipper
Visit this Community
Lisboa, Portugal
Joined: February 28, 2002
KitMaker: 5,182 posts
Model Shipwrights: 4,070 posts
Posted: Saturday, January 19, 2008 - 07:51 AM UTC
Hi Frank

I got this post only now... sorry
From what I have seen I have only two things of note to say:
- Drill the portholes (if not all, at least some of them)
- the structure that is a the top of the pagoda structure, with the two circles antennae, you could easily replace it scratchbuilt brass rod or streched sprue - it will improve the looks of the delicate structure.

Hope this helps,
Skipper
Clanky44
Visit this Community
Ontario, Canada
Joined: September 15, 2005
KitMaker: 1,901 posts
Model Shipwrights: 934 posts
Posted: Saturday, January 19, 2008 - 08:46 AM UTC
Hi Steve and Rui,

Thanks for the comments, it's always appreciated.

Steve,... Yes, the Hasegawa sets are very pricy, and the inclined ladders still have me in a mood! On the side, the Hasegawa dedicated P.E. sets fit like a glove, I'm working with the Soya and the Nagato sets currently and it's a lot easier than trying to premeasure a generic set of P.E. I hope they continue to release them, with small improvements , and with cheaper pricetags.

Rui,... Should I drill right through the portholes?, or partially through?... I know that on my 700th scale ships that I've drilled through the plastic, if you look at the model at waterline, you can see daylight right through to the other side! I'm afraid that on a 350th scale ship, this would even be more noticeable. An option, (since I have access from the bottom), would be to drill through and then to glue a piece of scrap plastic card on the back side, giving greater depth to the portholes. The part you mention on the top of the pagoda will not be on for very long, it is one of many that will be replaced with the dedicated Hasegawa P.E..

I'm in the process now of gluing P.E., so far so good, I'll post some photos of the carnage later on tomorrow!

Frank
skipper
Visit this Community
Lisboa, Portugal
Joined: February 28, 2002
KitMaker: 5,182 posts
Model Shipwrights: 4,070 posts
Posted: Saturday, January 19, 2008 - 10:07 AM UTC
Hi Frank


Curious, I am also working on a Soya - but in 1/700!
Back to the question:
I would prefer to see some of the portholes fully drilled, mainly on the hull and also in the pagoda and then randomly on other superstructures. The hull "look trough" problem can be solved as you say - and paint white the inside.
As a reference (cheaper than the previously mentioned) you could try to find:
Water Line Model Special 4 - Japanese battle ship "Nagato, Mutsu", by Model Art

Keep up

Skipper
Clanky44
Visit this Community
Ontario, Canada
Joined: September 15, 2005
KitMaker: 1,901 posts
Model Shipwrights: 934 posts
Posted: Saturday, January 19, 2008 - 11:43 AM UTC

Quoted Text

Curious, I am also working on a Soya - but in 1/700!

Skipper


Hi Rui,

Have you started your Soya? If you check out the 'No Guns Allowed' post, you'll see the beginning of my 350th Soya build and how I plan on displaying her. I look forward to seeing your build soon.

Frank
Clanky44
Visit this Community
Ontario, Canada
Joined: September 15, 2005
KitMaker: 1,901 posts
Model Shipwrights: 934 posts
Posted: Saturday, January 19, 2008 - 11:47 AM UTC
A couple of more hours this afternoon, here is the start of the photoetch . The stuff looks great when done right.... but to be honest, I loath the stuff!!

Frank


Gunny
Visit this Community
Pennsylvania, United States
Joined: July 13, 2004
KitMaker: 6,705 posts
Model Shipwrights: 4,704 posts
Posted: Saturday, January 19, 2008 - 12:54 PM UTC
Mr. Portela, fantastic (as expected) work, my friend, very nice PE fabrication, as well...you're making it very hard for me to not begin on my kit! Thanks for the updates and great progress images, my friend, please keep 'em coming!
goldenpony
Visit this Community
Zimbabwe
Joined: July 03, 2007
KitMaker: 3,529 posts
Model Shipwrights: 2,419 posts
Posted: Saturday, January 19, 2008 - 01:11 PM UTC
Very nice progress. The is one impressive kit.

#027
Visit this Community
Louisiana, United States
Joined: April 13, 2005
KitMaker: 5,422 posts
Model Shipwrights: 5,079 posts
Posted: Saturday, January 19, 2008 - 01:22 PM UTC
That is some awesome work Frank! The pe looks beautiful.

Gator
Clanky44
Visit this Community
Ontario, Canada
Joined: September 15, 2005
KitMaker: 1,901 posts
Model Shipwrights: 934 posts
Posted: Tuesday, January 22, 2008 - 05:12 PM UTC
Here's a few more photos. I've started the launch boat supports, provided in Hasegawa's super set. Spacing of these boat supports is aided by a set of P.E. guides for each of the boats, a great idea from Hasegawa. Each support you see is actually two P.E. pieces. I've found that gluing them individually to the deck is safer than trying to glue the P.E. halves together first, as the C.A. glue tends not to give too much play time.


Hasegawa has given you really nicely molded cable reels that do not need replacing, but for some strange reason, they decided to have 3 of the cable reels molded on to the deck!?! They tend to stand out in relation to the rest of them. So I've chopped them off and replaced them with WEM P.E. cable reels. Can anyone give me an idea of whether or not these reels where ever left without the hose? If not, I'll have no choice but to carefully thread some fine line.


Frank
Rab
Visit this Community
Queensland, Australia
Joined: October 03, 2006
KitMaker: 353 posts
Model Shipwrights: 207 posts
Posted: Tuesday, January 22, 2008 - 08:17 PM UTC
Frank, not sure if you said you were using all 3 of the P/E sets, but if so, you might want to double check the searchlight platform. There is a large piece (walkway) that fits in the middle of it plus a few doors and ladders. The one thing in building this kit with all the Hasegawa P/E is to carefully study all instructions when building subsections.
BTW, good job on the P/E so-far.
Clanky44
Visit this Community
Ontario, Canada
Joined: September 15, 2005
KitMaker: 1,901 posts
Model Shipwrights: 934 posts
Posted: Wednesday, January 23, 2008 - 12:16 AM UTC
Hi Kym,

Thanks for the comments! I've yet to tackle the search light assembly. There's alot of P.E. in that section, and as you've completed the kit yourself, you know it has to be done in sub-assemblies. I figure I'll do the walkway support first, and the inclined ladders beneath it, and then then attach the search light border hand rails. Once that is completed, then I'll tackle the stack walkways... it all looks very challenging... I have to commend you on how good and quick you build your ships!

Frank
Clanky44
Visit this Community
Ontario, Canada
Joined: September 15, 2005
KitMaker: 1,901 posts
Model Shipwrights: 934 posts
Posted: Saturday, January 26, 2008 - 05:14 PM UTC
Concentrating on the pagoda P.E. Removing some of the plastic details and replacing them with the dedicated P.E. I'm about 80% done with the pagoda. I'll leave the hanging P.E. parts off the pagoda, until the individual sections are all painted and glued together.

Hasegawa has to be commended for the fantastic fit, flexibility and durability of their P.E.


goldenpony
Visit this Community
Zimbabwe
Joined: July 03, 2007
KitMaker: 3,529 posts
Model Shipwrights: 2,419 posts
Posted: Monday, January 28, 2008 - 12:49 AM UTC
That is beautiful work.

 _GOTOTOP