

I just would like all of you to be aware of this;
Over the past two or three weeks, I've been closely working with my publisher on editing drafts of my MAS boat book. The draft which he sent to me late yesterday was also sent to an author who helped me greatly on the text and is one who I've grown to respect very much, and he said that it was an attractive work.
Additionally, Rear Admiral Maurizio Erteo assisted with the drafts as well as my writing and researching the text and getting me whatever data and photos for the book.
Whereas I cannot say it is the definitive work on the subject; that title can easily go to the books by CDR Erminio Bagnasco hands down and I will not put myself into his strata, I can say that you will be impressed by the work I've done.
Garth


Go to modelshipwrights.com for the current dynamic site!
Hosted by Jim Starkweather
M.A.S. 568 4a Serie

TGarthConnelly

Joined: August 03, 2008
KitMaker: 875 posts
Model Shipwrights: 872 posts

Posted: Friday, January 21, 2011 - 07:19 AM UTC

AlanL

Joined: August 12, 2005
KitMaker: 14,499 posts
Model Shipwrights: 1,919 posts
Posted: Saturday, January 22, 2011 - 01:10 AM UTC
Hi Garth,
New references are always welcome.
Al
New references are always welcome.
Al
AlanL
Joined: August 12, 2005
KitMaker: 14,499 posts
Model Shipwrights: 1,919 posts
Posted: Saturday, January 22, 2011 - 06:40 AM UTC
Hi Guys,
OK time for some questions, the parts have had a wash so I'm getting ready to get underway.
Would the internals of the cabine be in white?
Does anyone have a picture of any other parts of the internals, In thinking of what lies under the forward skylights/hatch.
I've scraped down the underside of the cabin roof to get rid of some pin marks and manufactuers stamps, so building has started.
Any recommendations for the light and dark grey, Tamiya paints preferably.
Thanks
Al

alross2
Joined: May 18, 2006
KitMaker: 317 posts
Model Shipwrights: 308 posts

Posted: Saturday, January 22, 2011 - 07:38 AM UTC
Quoted Text
Would the internals of the cabine be in white?
Does anyone have a picture of any other parts of the internals, In thinking of what lies under the forward skylights/hatch.
Al
White is a common interior color for small craft.
These are two sections looking forward, in the 4th series boats, from the original Baglietto plans
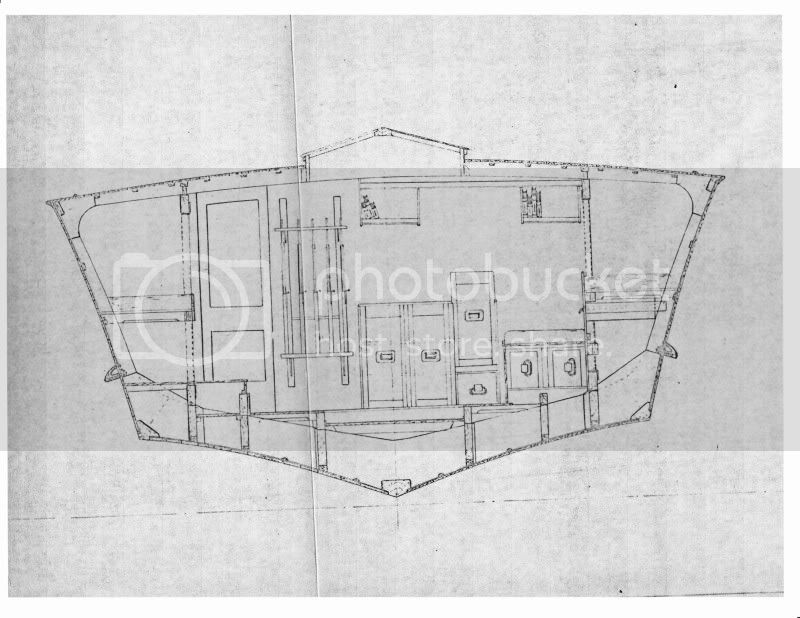
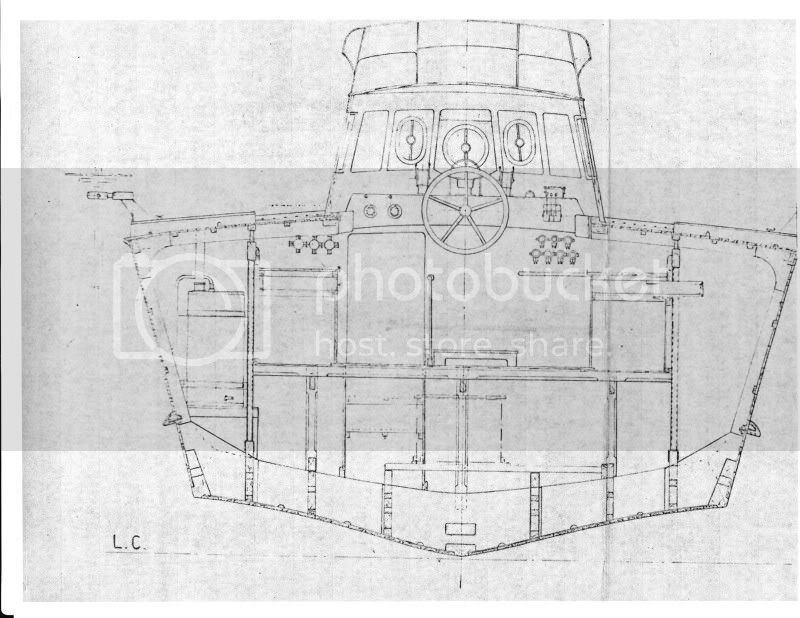
This is a color rendering from the Italian naval camo book by Bagnasco and Brescia:

The colors are representative. I don't use Tamiya colors, so can't provide any similarities. In the book, the colors are somewhat like FLOQUIL Reefer Gray and SP Lettering Gray.
Al Ross
AlanL
Joined: August 12, 2005
KitMaker: 14,499 posts
Model Shipwrights: 1,919 posts
Posted: Saturday, January 22, 2011 - 07:49 AM UTC
Many thanks for the speedy reply Al.
Alan
Edit
The photograph I have of MAS 558 shows most of the foredeck in red/white with the pattern running across the boat rather than diagonally. The stripes appear to come up to the start of the cabin.
Is 558 a 3a or 4a. It would seem to be a good candidate either that or 563 as supplied in the kit.
Thanks
Al
alross2
Joined: May 18, 2006
KitMaker: 317 posts
Model Shipwrights: 308 posts
Posted: Saturday, January 22, 2011 - 10:26 AM UTC
According to Bagnasco, 558 was a third series boat, built by Celli of Venice.
Third series - MAS 551-564
Fourth series - MAS 566-576
Interestingly, 551-554 were metal boats, so it's a bit curious they are included in the series. While they look generally similar to the wooden boats, there are outward physical differences and, of course, internal structure.
Third series - MAS 551-564
Fourth series - MAS 566-576
Interestingly, 551-554 were metal boats, so it's a bit curious they are included in the series. While they look generally similar to the wooden boats, there are outward physical differences and, of course, internal structure.
AlanL
Joined: August 12, 2005
KitMaker: 14,499 posts
Model Shipwrights: 1,919 posts
Posted: Saturday, January 22, 2011 - 11:32 AM UTC
Thanks Al.
Parts clean up continues.
Alan
Parts clean up continues.
Alan
alross2
Joined: May 18, 2006
KitMaker: 317 posts
Model Shipwrights: 308 posts
Posted: Saturday, January 22, 2011 - 11:44 AM UTC
Mine's still lost in the mail somewhere. 
Al
Al
AlanL
Joined: August 12, 2005
KitMaker: 14,499 posts
Model Shipwrights: 1,919 posts
Posted: Saturday, January 22, 2011 - 10:09 PM UTC
Hi Al,
Christmas Post lol, lol.
OK, I couldn't hold off any longer .
.
Interesting all my pics disappeared!
Try again
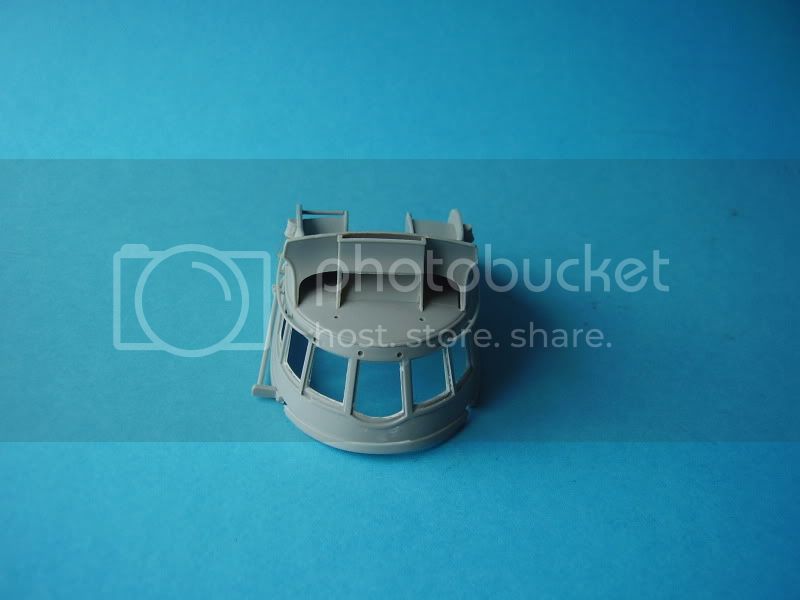
First the stand, this has some ejection marks on the inside that you might like to sand down and some seem lined to file off. A little filler will be needed here and there.

That's better things seem to be working again.
Next I looked at the cabin top. This has some ejection marks and manufactuers marks on the underside of the roof and I scrapped these off. Be careful here as the window braces are quite fragile and are easily snapped lol, lol.

Then I cleaned up some of the other main cockpit fittings. The joint between the part and the spure is quite thick so again be careful you don't twist the part when cutting it off if you know what I mean. The sliding hatch also has some ejection marks to clean off underneath.
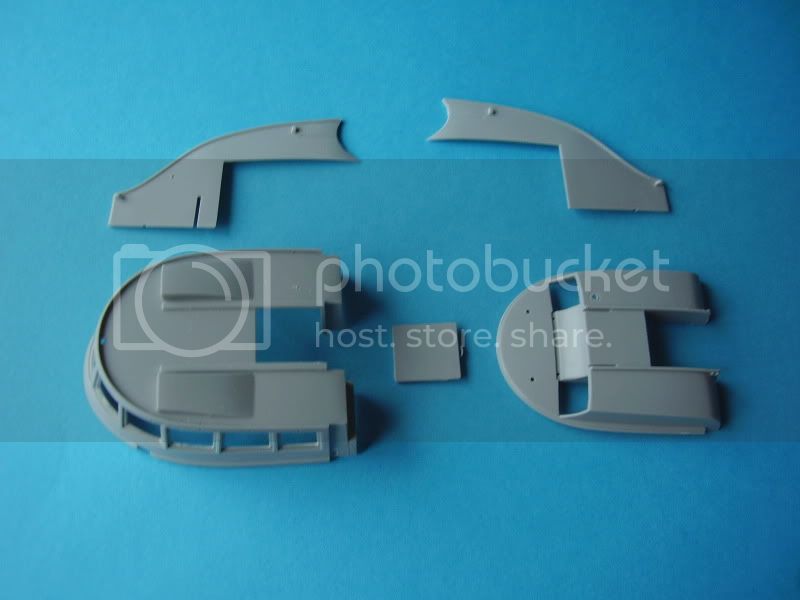
Then a dry fit.

The rear plate fits nicely with only two small joint spikes to remove.

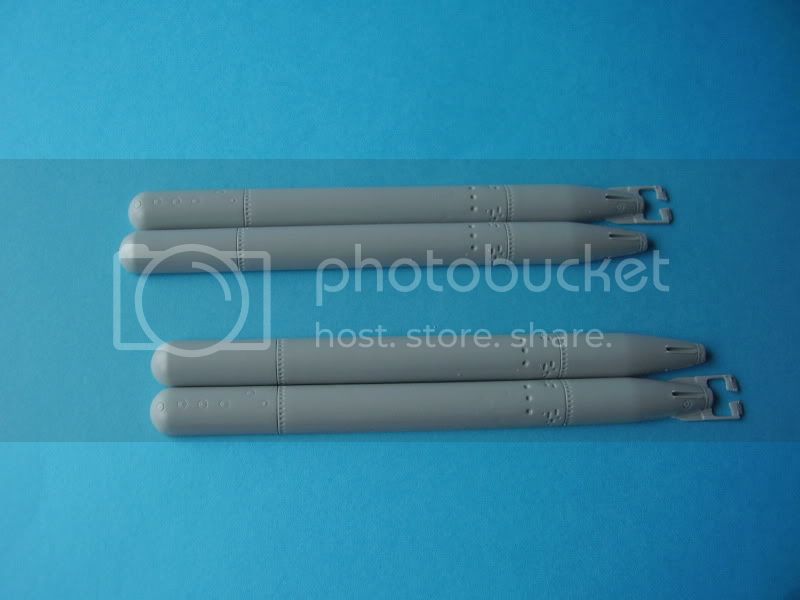
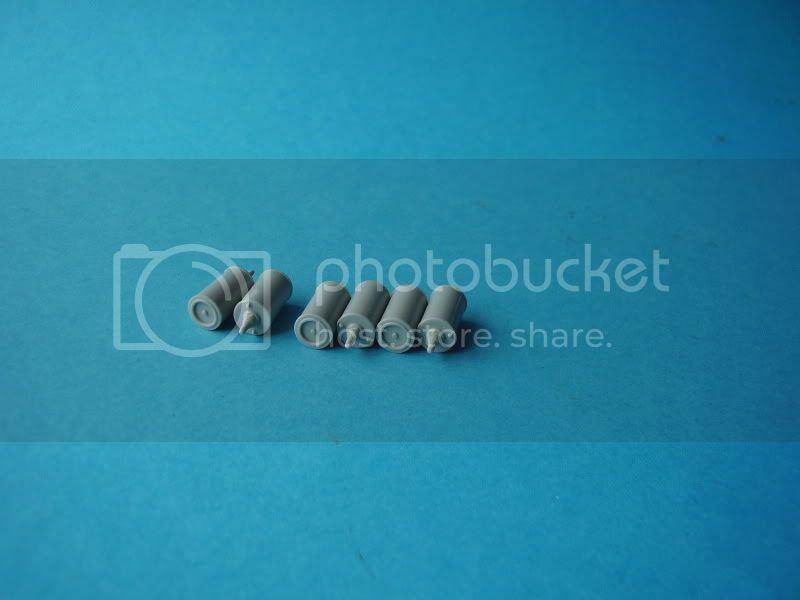
Then I cleaned up the hydrophones (?) and the torpeados.

The front hatches can be modelled open hence my question about what lies below. Open hatches alwasy draw you into a model so I'm tempted to add some detail underneath if I can find a walkabout of the layout. This also leads me to another question as to wat lies under the central section behind the wheel house?
Al
Christmas Post lol, lol.
OK, I couldn't hold off any longer
.Interesting all my pics disappeared!
Try again
First the stand, this has some ejection marks on the inside that you might like to sand down and some seem lined to file off. A little filler will be needed here and there.
That's better things seem to be working again.
Next I looked at the cabin top. This has some ejection marks and manufactuers marks on the underside of the roof and I scrapped these off. Be careful here as the window braces are quite fragile and are easily snapped lol, lol.
Then I cleaned up some of the other main cockpit fittings. The joint between the part and the spure is quite thick so again be careful you don't twist the part when cutting it off if you know what I mean. The sliding hatch also has some ejection marks to clean off underneath.
Then a dry fit.
The rear plate fits nicely with only two small joint spikes to remove.
Then I cleaned up the hydrophones (?) and the torpeados.
The front hatches can be modelled open hence my question about what lies below. Open hatches alwasy draw you into a model so I'm tempted to add some detail underneath if I can find a walkabout of the layout. This also leads me to another question as to wat lies under the central section behind the wheel house?
Al
AlanL
Joined: August 12, 2005
KitMaker: 14,499 posts
Model Shipwrights: 1,919 posts
Posted: Sunday, January 23, 2011 - 01:07 AM UTC
A note on the torpedos.
Page 15 Step 26. Reverse parts 40 and 41 or part 42 won't fit.
Al
Page 15 Step 26. Reverse parts 40 and 41 or part 42 won't fit.
Al

RedDuster

Joined: March 01, 2010
KitMaker: 7,078 posts
Model Shipwrights: 6,649 posts

Posted: Sunday, January 23, 2011 - 10:12 PM UTC
Hi Al
Good looking start. Picked mine up last week. Itching to clear some space & get going.
Shall be watching with much interest.
Si
Good looking start. Picked mine up last week. Itching to clear some space & get going.
Shall be watching with much interest.
Si
AlanL
Joined: August 12, 2005
KitMaker: 14,499 posts
Model Shipwrights: 1,919 posts
Posted: Monday, January 24, 2011 - 08:46 AM UTC
Hi Simon,
Thnaks.
Build note. When you add parts 2e and 3e the sides of the cabin, leave them to set fast over night, otherwise when you add part 4e which takes a bit of pressure to push into the curve you might move the previous 2 parts slightly.
Al
Thnaks.
Build note. When you add parts 2e and 3e the sides of the cabin, leave them to set fast over night, otherwise when you add part 4e which takes a bit of pressure to push into the curve you might move the previous 2 parts slightly.
Al
AlanL
Joined: August 12, 2005
KitMaker: 14,499 posts
Model Shipwrights: 1,919 posts
Posted: Tuesday, January 25, 2011 - 05:07 AM UTC
Hi Guys,
Work continues, fitting the life belt supports and small brass fitting on the outer cabin.
Question? On either side of the cabin are what I assume are pilot lights. I don't have a really good picture of these but there appears to be slightly different fittings depending on the boat. My question is I can see some wiring coming from them, well at least I think it is, but I am not sure where it leads too, ie at what point does it disappear inside?
Anyone any thoughts.
Thanks
Al
alross2
Joined: May 18, 2006
KitMaker: 317 posts
Model Shipwrights: 308 posts
Posted: Tuesday, January 25, 2011 - 07:09 AM UTC
Al,
Look at the photo of the cockpit on page 2 of this thread.
Al
Look at the photo of the cockpit on page 2 of this thread.
Al
AlanL
Joined: August 12, 2005
KitMaker: 14,499 posts
Model Shipwrights: 1,919 posts
Posted: Tuesday, January 25, 2011 - 08:22 AM UTC
 Thanks Al.
Alan
alross2
Joined: May 18, 2006
KitMaker: 317 posts
Model Shipwrights: 308 posts
Posted: Tuesday, January 25, 2011 - 10:00 AM UTC
Here's another shot, identified as MAS 530 in 1941. Not sure this gives any more detail of the light, though.

Al
Al
AlanL
Joined: August 12, 2005
KitMaker: 14,499 posts
Model Shipwrights: 1,919 posts
Posted: Tuesday, January 25, 2011 - 06:45 PM UTC
Thanks Al.
I like the picture of the crewman. Would I be correct in thinking that's an open window? Interesting.
Alan
I like the picture of the crewman. Would I be correct in thinking that's an open window? Interesting.
Alan
alross2
Joined: May 18, 2006
KitMaker: 317 posts
Model Shipwrights: 308 posts
Posted: Tuesday, January 25, 2011 - 10:51 PM UTC
Yup, it's open. Looks like the same one on the other side is, too. Makes sense in a Mediterannean climate. If you look at the other photo on page 2, you'll see that the same window is just slightly opened. They are hinged on the aft end and fold back.
Al
Al
AlanL
Joined: August 12, 2005
KitMaker: 14,499 posts
Model Shipwrights: 1,919 posts
Posted: Wednesday, January 26, 2011 - 03:48 AM UTC
Thanks Al, open hatches, open widows, you can't beat em with a big stick
We shall try one of those.
The lights are positioned much further back in the two pics than on the kit. Looking at what references I have there are some clear different placemnets,
Many thanks
Alan
We shall try one of those.
The lights are positioned much further back in the two pics than on the kit. Looking at what references I have there are some clear different placemnets,
Many thanks
Alan
alross2
Joined: May 18, 2006
KitMaker: 317 posts
Model Shipwrights: 308 posts
Posted: Wednesday, January 26, 2011 - 05:22 AM UTC
When I get home tonight, I'll look through MAS E MEZZI... and see if it was a series thing or a builder thing. I have the Baglietto drawings for one of the series (not sure which) and recall seeing some photos in which the sidelights were about halfway back on the cockpit.
Al
Al
AlanL
Joined: August 12, 2005
KitMaker: 14,499 posts
Model Shipwrights: 1,919 posts
Posted: Wednesday, January 26, 2011 - 06:06 AM UTC
Thanks, I can't get a pic at the moment the light is too poor by the time I get home.
Al
Al
alross2
Joined: May 18, 2006
KitMaker: 317 posts
Model Shipwrights: 308 posts
Posted: Wednesday, January 26, 2011 - 09:56 AM UTC
Based on photos in MAS E MEZZI... and the Baglietto drawings, the sidelights on the third, fourth, and projected fifth series boats were on the windshield:


(MAS 555)

Thus, for the wooden boats actually built, this would be MAS 555 - 576.
Al
(MAS 555)
Thus, for the wooden boats actually built, this would be MAS 555 - 576.
Al
AlanL
Joined: August 12, 2005
KitMaker: 14,499 posts
Model Shipwrights: 1,919 posts
Posted: Wednesday, January 26, 2011 - 05:54 PM UTC
Thanks Al. That looks spot on for the kit. Don't see any external wiring on these either.
Alan
Alan
AlanL
Joined: August 12, 2005
KitMaker: 14,499 posts
Model Shipwrights: 1,919 posts
Posted: Friday, January 28, 2011 - 10:59 PM UTC
Hi Guys,
Following on form Al's excellent pics of the cabin here are some where I'm at now pics.
As you will see I had already added some wiring to the pilot lights which will need removed but that's simple. There are 3 contact points on the underside of the cabin roof and sides you may wish to fill in also.
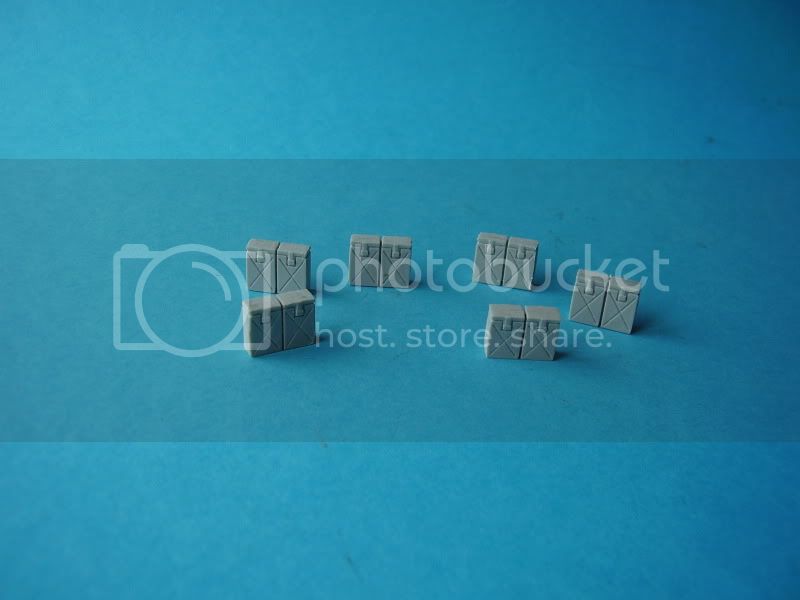
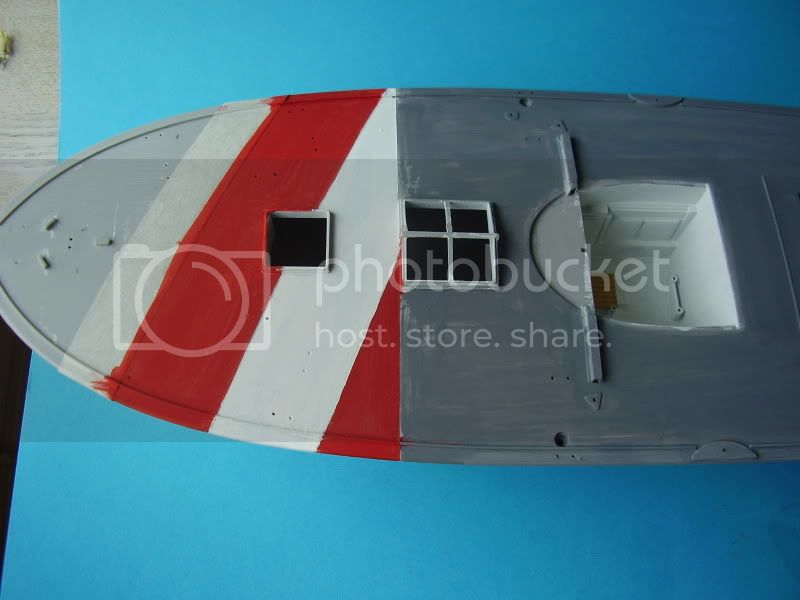
I've joined a few of the larger fittings together, depth charges, Breda ammo bins and having thought about it I decided it would be much easier to paint the the deck free from fitttings. I did experiment with doing the whole foredeck red/white but thought that might be too much so clean it off and started again opting for the alternative as outlined in the instructions.
Step 9 of the instruction show where to drill the fixture holes and there are quite a lot of them but these are indicated underneath the deck, although looking at the layout not all will be needed so don't just drill away. I've done most of the ones on the fore deck but will open them up again when I've done painting the air recognition markings.
You get a nice little jig to bend the PE fitting for the life belts on.
Things might look a bit untidy at the moment but there is a plan ?
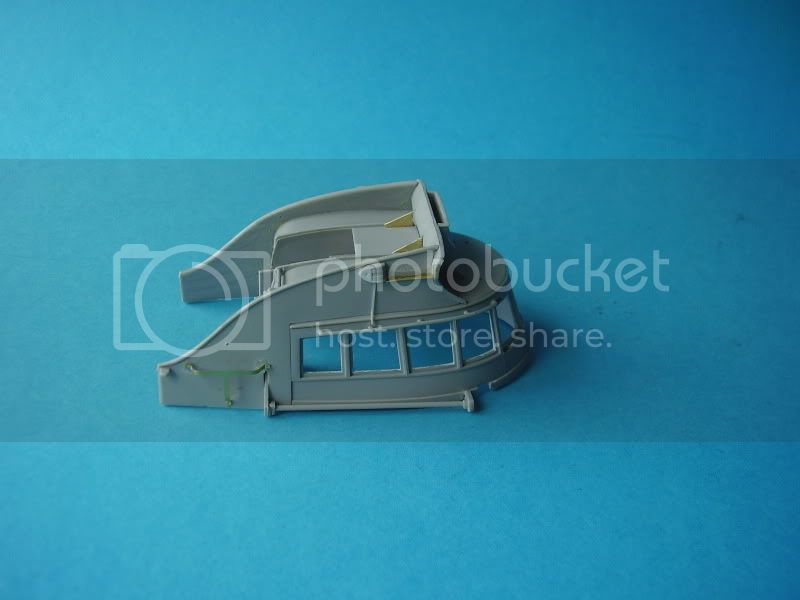
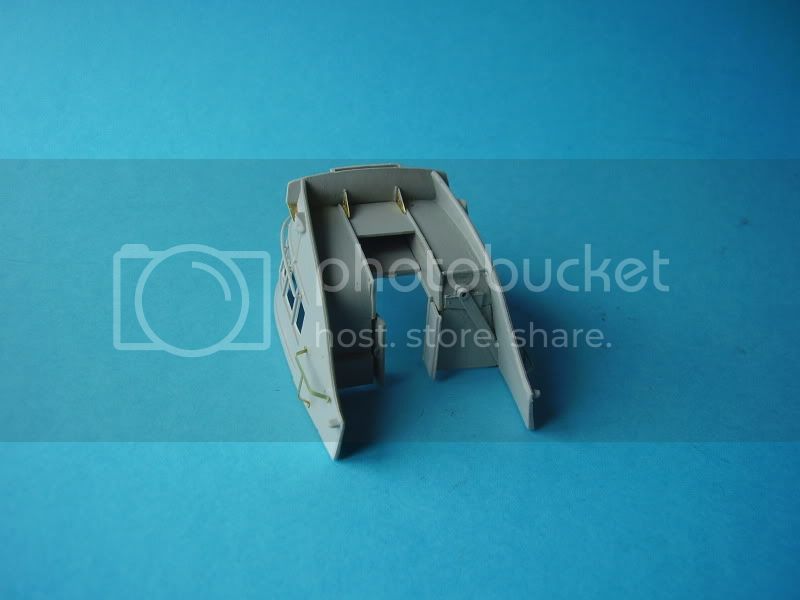
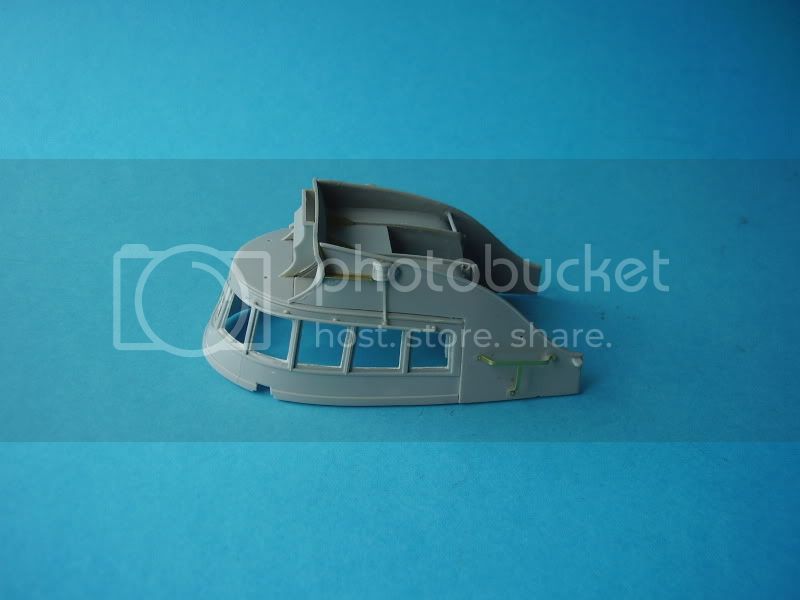


If your leaving the cabin doors open then shave off the ejection marks, this also helps thin them down a bt.
Al
Following on form Al's excellent pics of the cabin here are some where I'm at now pics.
As you will see I had already added some wiring to the pilot lights
which will need removed but that's simple. There are 3 contact points on the underside of the cabin roof and sides you may wish to fill in also.I've joined a few of the larger fittings together, depth charges, Breda ammo bins and having thought about it I decided it would be much easier to paint the the deck free from fitttings. I did experiment with doing the whole foredeck red/white but thought that might be too much so clean it off and started again opting for the alternative as outlined in the instructions.
Step 9 of the instruction show where to drill the fixture holes and there are quite a lot of them but these are indicated underneath the deck, although looking at the layout not all will be needed so don't just drill away. I've done most of the ones on the fore deck but will open them up again when I've done painting the air recognition markings.
You get a nice little jig to bend the PE fitting for the life belts on.
Things might look a bit untidy at the moment but there is a plan
?If your leaving the cabin doors open then shave off the ejection marks, this also helps thin them down a bt.
Al
alross2
Joined: May 18, 2006
KitMaker: 317 posts
Model Shipwrights: 308 posts
Posted: Saturday, January 29, 2011 - 05:57 AM UTC
Yay! My kit finally arrived (shipped six weeks ago). Not sure if I'm going to build it as a fourth series boat or backfit it to MT 540, one of the motor gunboat versions. If I go that route, I'll have to pick up a couple 20/65 BREDAs. Where did you get your BREDA kits, Al?
Al Ross
Al Ross
 |

WEB HOSTING BY


Copyright ©2021 Model Shipwrights and Kitmaker Network, a subsidiary of Silver Star Enterprises
All Rights Reserved. Please read our Conditions of Use and Privacy Policy.
All Rights Reserved. Please read our Conditions of Use and Privacy Policy.