_GOTOBOTTOM
General Ship Modeling
Discuss modeling techniques, experiences, and ship modeling in general.
Hull painting advice needed
rtread
Visit this Community
Texas, United States
Joined: February 23, 2011
KitMaker: 31 posts
Model Shipwrights: 31 posts
Posted: Saturday, February 26, 2011 - 02:09 AM UTC
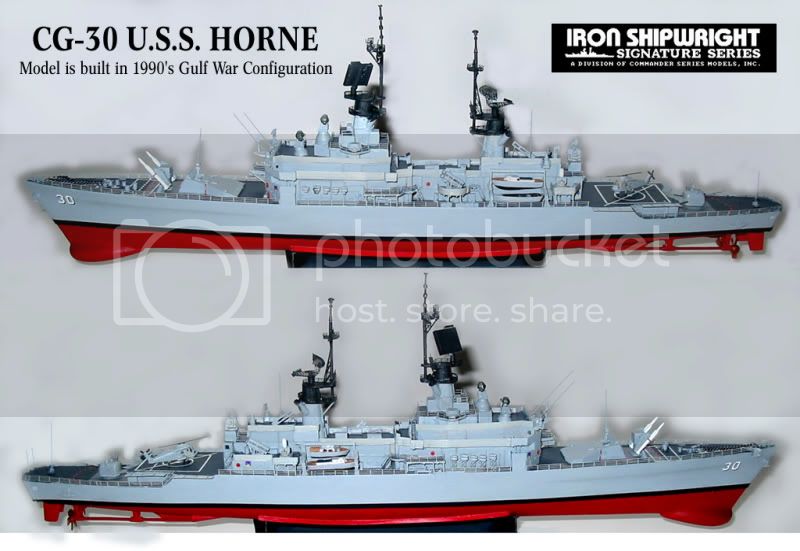
At a point in the future I will be painting the hull of this resin kit....


and I have a question concerning the sequence of painting the three colors. Mainly I am concerned about the black "boot topping" strip at the waterline....masking it off and painting. Should I do the red bottom first or the haze gray of the upper hull first?

Being new to this, I have to ask some pretty elementary questions. Thanks for your help.
CaptSonghouse
Visit this Community
California, United States
Joined: August 08, 2008
KitMaker: 1,274 posts
Model Shipwrights: 1,236 posts
Posted: Saturday, February 26, 2011 - 07:12 AM UTC
Hi Ray!

Since it's a resin kit, you will first need to seal the surfaces with a uniform coat of primer, preferably a light colored one.

As for the markings, as a rule I always start with the lightest shades and work my way to the darkest. That way if there is an overlap in your color application, you will need fewer re-paints to get the colors to set.

To avoid any hard raised edges that may occur with paint overlaps, I also try to plan my maskings so that the final colors rest right up against one another, instead of one over the other. The good news is, the black boot topping (which I usually apply last because of its dark shade) has such a drastic shade difference, that firm masking will hide or eliminate any apparent raised edges.

Have fun!

--Karl
rtread
Visit this Community
Texas, United States
Joined: February 23, 2011
KitMaker: 31 posts
Model Shipwrights: 31 posts
Posted: Saturday, February 26, 2011 - 07:27 AM UTC
Thanks Karl! That is exactly what I was looking for!
smithrp
Visit this Community
Alberta, Canada
Joined: November 28, 2009
KitMaker: 79 posts
Model Shipwrights: 56 posts
Posted: Saturday, February 26, 2011 - 03:58 PM UTC
I have a simple method of doing this. First wash the resin real well in hot soapy water. Then wash it with lacquer thinner to remove all residue. Now prime the hull with a gray lacquer primer. Now in the area where the black will be - Air brush a band of black larger than the black stripe will be in the end. I usually spray about a 1 inch wide band in the area where the black stripe will be. Let it dry over night. Now cut a piece of masking tape the width of the stripe and a few inches longer than the ship. I do this on a piece of glass. Carefully tape off the area of the stripe over the black that you airbrushed. Now you have covered up the black stripe. Do not remove this tape until the very end. Now mask from the black line up, and cover the top portion of the hull. This exposes the bottom of the hull. You can now paint that area with the correct red oxide. I use red oxide primer. It is the correct color. You can buy it in a spray bomb and decant it into a small jar and air-brush it. Let that dry over night. Now unmask the top, and mask the bottom. Now you can paint the top portion of the hull the correct color. Let that dry over night. Now you can peel off all your masking, the black line last and you will have the perfect paint job with a perfectly straight even black line. Good luck.
rtread
Visit this Community
Texas, United States
Joined: February 23, 2011
KitMaker: 31 posts
Model Shipwrights: 31 posts
Posted: Saturday, February 26, 2011 - 05:44 PM UTC
Thanks Robert! This looks like a very good method.
After doing some research, I've found that for the 1/350 scale, the boot topping needs to be 1/4' wide which is equivalent to 6MM. I am ordering some Tamiya 6MM tape.

Do youy prefer acrylic or enamel for hull painting a resin model? I will be using an air brush. Thanks!
smithrp
Visit this Community
Alberta, Canada
Joined: November 28, 2009
KitMaker: 79 posts
Model Shipwrights: 56 posts
Posted: Sunday, February 27, 2011 - 04:44 AM UTC
Hi: I use Lacquer spray bomb oxide red (decanted) for the bottom and Tamiya thinned with lacquer thinner, for most other colors. This way the paint will dry fast and it dries very thin as not to leave much of an edge, compared with enamels. The Lacquer thinner to use is paint grade from an automotive paint store. The lacquer thinner from a hardware store is to mild and will not let the paint bite in and stick properly.
rtread
Visit this Community
Texas, United States
Joined: February 23, 2011
KitMaker: 31 posts
Model Shipwrights: 31 posts
Posted: Sunday, February 27, 2011 - 06:06 AM UTC
Thanks, Robert! I'm realizing I don't know near enough about the type of paint to use with my airbrush. I sent you a message.....
TracyWhite
Visit this Community
Washington, United States
Joined: January 18, 2005
KitMaker: 527 posts
Model Shipwrights: 464 posts
Posted: Tuesday, March 01, 2011 - 05:32 AM UTC
Robert's method only works if you have a relatively straight hull, with no flare. If there's any curve to it the tape will ripple and even if the hull has a relatively gradual transformation from vertical to angled, the angled surface means that the strip needs to be wider to compensate.

I would expect that on the stern of your model near the trailing edge of the rudders, if not a bit forward of it. With that little amount of length through you should be able to cut some 2mm strips or so and freehand the rest (outer two lines, then fill in the center)

I usually paint from the bottom up on the hull because of the shape. I do hull red, then black, then gray/dazzle (depending on the camouflage). I find that this causes the steps in the paint to be steps "down," minimizing their appearance. Karl's point about black being so contrasty as to hide the steps is largely correct, unless you layer the paint on so thick that you have a noticeable step. Keep the paint thin and do multiple thin coats and this won't be a problem.
rtread
Visit this Community
Texas, United States
Joined: February 23, 2011
KitMaker: 31 posts
Model Shipwrights: 31 posts
Posted: Tuesday, March 01, 2011 - 03:02 PM UTC

Quoted Text

I usually paint from the bottom up on the hull because of the shape. I do hull red, then black, then gray/dazzle (depending on the camouflage)


Thanks for your reply, Tracy. What type paint do you prefer for full hull painting? (acrylic/enamel?) Anyone?
Dangeroo
#023
Visit this Community
Zurich, Switzerland
Joined: March 13, 2009
KitMaker: 2,058 posts
Model Shipwrights: 163 posts
Posted: Tuesday, March 01, 2011 - 07:42 PM UTC

Quoted Text

I usually paint from the bottom up on the hull because of the shape. I do hull red, then black, then gray/dazzle (depending on the camouflage). I find that this causes the steps in the paint to be steps "down," minimizing their appearance. Karl's point about black being so contrasty as to hide the steps is largely correct, unless you layer the paint on so thick that you have a noticeable step. Keep the paint thin and do multiple thin coats and this won't be a problem.


Not that I'm an expert on the subject, but I usually go with Tracy's method. start with red, no masking, then mask the first line for black, then the second line for grey. And then any camo etc.

I use Tamiya acryllics but am considering the Lifecolor Acrylic sets.

Cheers!
Stefan
TracyWhite
Visit this Community
Washington, United States
Joined: January 18, 2005
KitMaker: 527 posts
Model Shipwrights: 464 posts
Posted: Wednesday, March 02, 2011 - 11:06 AM UTC
I've used White Ensign paints in the past because they're color-matched to the Navies' ship colors, but they've been having severe production problems over the last year and I can't really say that I'm all that positive about recommending them until they've put that behind them for a bit. Otherwise I've been very happy with them.

Another option would be contacting Randy Short of ShipCamouflage.com (which is a very handy site, if you haven't been there before), who is working on selling custom-mixed Model Masters paints to match USN colors. He's planning both Acrylic and enamels, I just don't know his time frame for starting.
blaster76
Visit this Community
Texas, United States
Joined: September 15, 2002
KitMaker: 8,985 posts
Model Shipwrights: 3,509 posts
Posted: Sunday, March 06, 2011 - 08:18 AM UTC
I kind do both Tracys and karl's methods. If the gray is light, then it goes first. If a dark gray...then the red. I do the black usually with a permanent sharpie. Weird ??? It works for me and I have better control. My self, I use Model Master enamel by choice. Easy to get, easy to arbrush. I may mix to get a closer shade to achieve better accuaracy. White ensign is tough to find in Texas so you have to mail order which adds to the price, and if you need it NOW.......
rtread
Visit this Community
Texas, United States
Joined: February 23, 2011
KitMaker: 31 posts
Model Shipwrights: 31 posts
Posted: Sunday, March 06, 2011 - 09:07 AM UTC

Quoted Text

I do the black usually with a permanent sharpie. Weird ??? It works for me and I have better control.


Steve, this is interesting. Do you use the black Sharpie over a primer coat?. How do you mask for the boot topping (sequence)?

Thanks for your reply!
JMartine
Visit this Community
New Jersey, United States
Joined: October 18, 2007
KitMaker: 1,698 posts
Model Shipwrights: 1,514 posts
Posted: Tuesday, March 08, 2011 - 11:51 AM UTC
just be careful mixing sharpie "ink" and future, you can end up with a nasty run-off "been there done that!". Some black sharpie markings end up looking more dark purple than black... I got a "high end" sharpie-type marker at Michaels craft store (i think used usually for calligraphy), works much better than the office sharpies

good luck!
 _GOTOTOP