South Australia, Australia
Joined: August 14, 2007
KitMaker: 5,926 posts
Model Shipwrights: 2,624 posts
Posted: Monday, May 09, 2011 - 01:13 PM UTC
Greetings one and all.
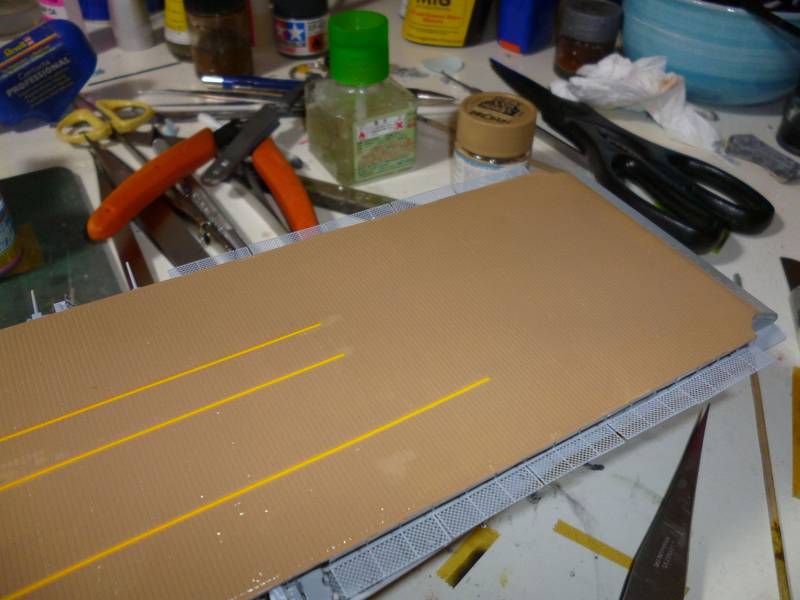
I have now been building the Sara for about 2 weeks and thought I would post a progress pic.
It is the Trumpeter kit but I am also using the Tom's Modelworks PE set. The safety nets look much better when they actually look like nets..

The instructions for the PE set could be clearer and a bit more detailed, but in the absence of much reference data I keep plugging on
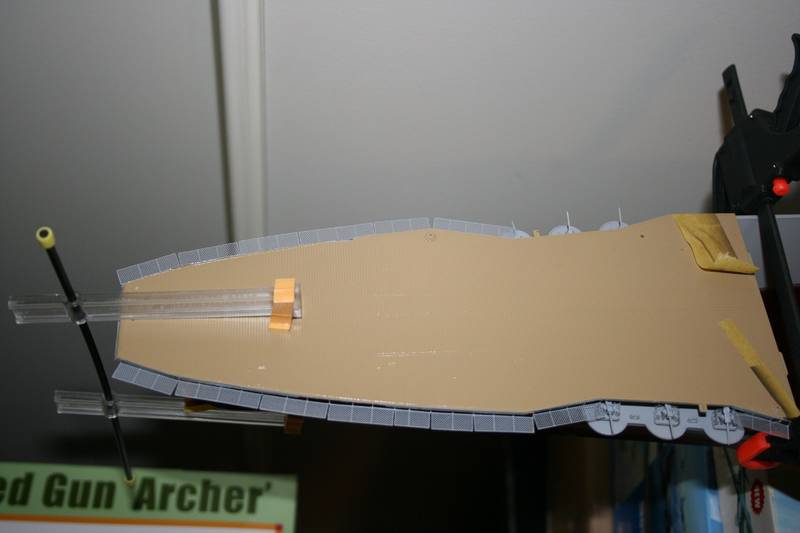
As you can see the flight deck has its base coat on and the forward part of it has been glued onto the hull. Just the usual fit issues and it needs a bit more finessing as the PE safety nets sit a bit lower than the moulded on ones.
I think the base colour I have used on the flight deck is a bit light, but a few dark washes should fix that I hope.
Cheers
Warren
You may be right, I may be crazy.
Texas, United States
Joined: September 15, 2002
KitMaker: 8,985 posts
Model Shipwrights: 3,509 posts
Posted: Tuesday, May 10, 2011 - 07:42 AM UTC
I did the Lady Lex a few years back. I backdated her to May 1940 because i wanted to use the silver/yellow aircraft colors and didn't want to do biplanes. I used White Ensign mahogany stain for the deck, but a reddish brown color will work just about as well. The light gray color you have looks pretty good to me.
Those who don't learn from history are doomed to repeat it
VMI "76
Order of the Red Nose Plug
Blue Volute Bumper Spring Award
South Australia, Australia
Joined: August 14, 2007
KitMaker: 5,926 posts
Model Shipwrights: 2,624 posts
Posted: Tuesday, May 10, 2011 - 08:14 AM UTC
Thanks Steve. I have found it hard to obtain any colour pictures showing the colour of the deck but will go with your suggestion a bit later when I finally get the three deck pieces afixed.. One piece would be so much better..
You may be right, I may be crazy.
South Australia, Australia
Joined: August 14, 2007
KitMaker: 5,926 posts
Model Shipwrights: 2,624 posts
Posted: Wednesday, May 11, 2011 - 09:11 PM UTC
Hello again
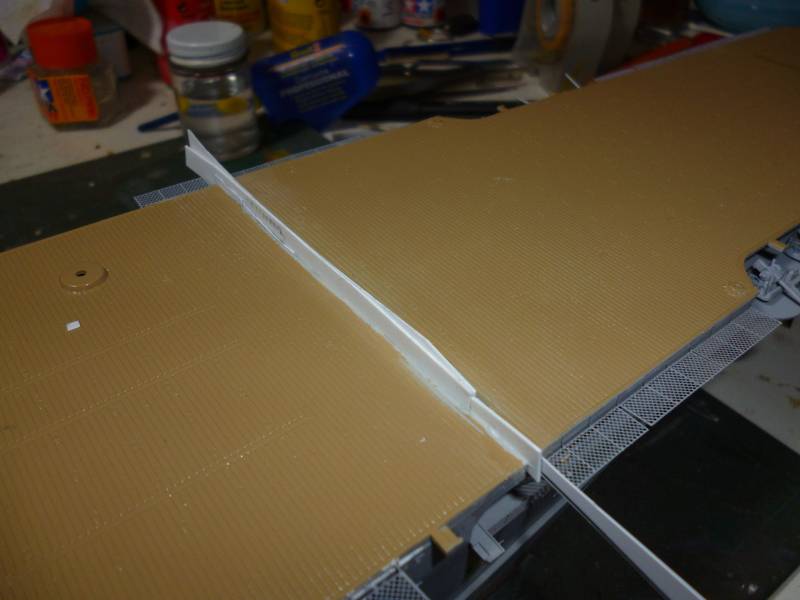
A little more progress on Stripe Stack Sara...

After part og the flight deck on and curing. Didn't put up too much of a fight after I threatened it.
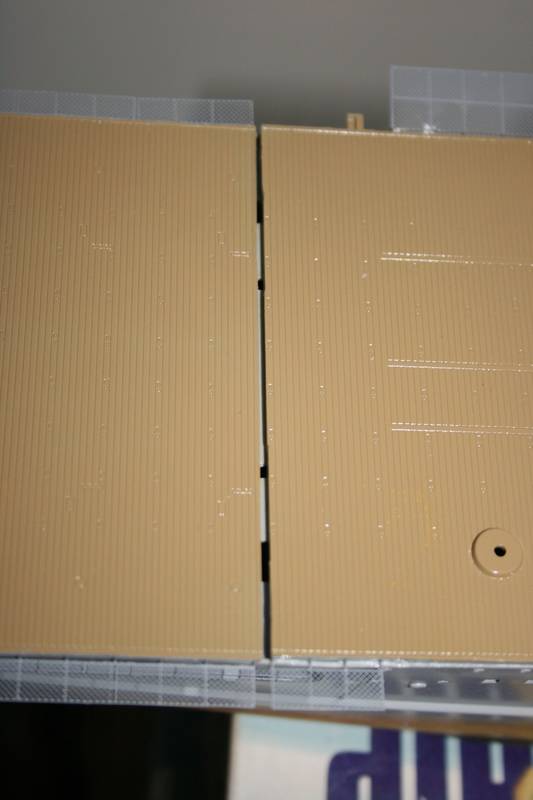
But I don't know yet which method I am going to use to fix the slight gap in the flight deck.. Someone could fall in that crack it is so big,,
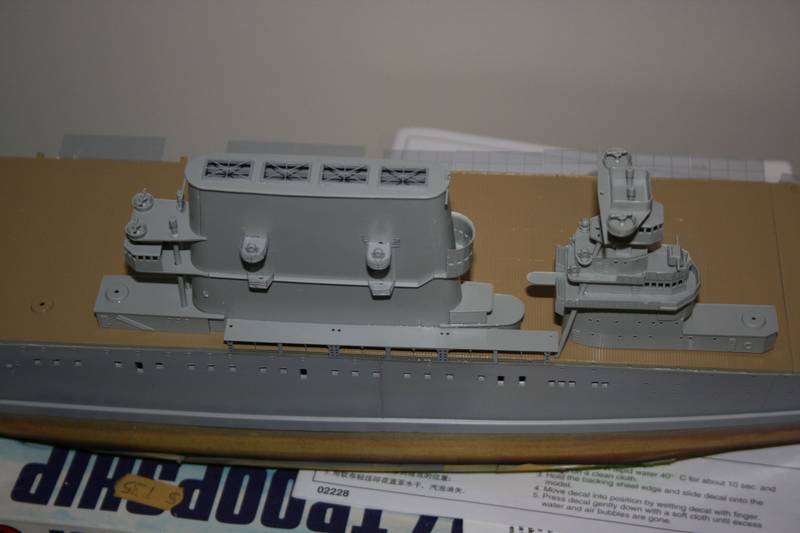
And here are the finished parts of the island ,, well as finished as I want them to be before I glue them to the flight deck.. which I am sure will also be fun..
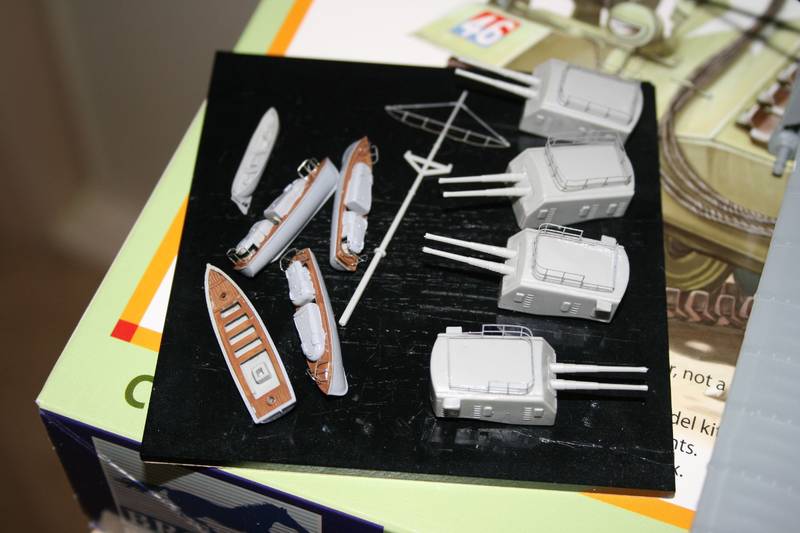
And the bits and bobs before installation.
More progress pics as it is made...

You may be right, I may be crazy.

#068
Zuid-Holland, Netherlands
Joined: April 09, 2003
KitMaker: 1,144 posts
Model Shipwrights: 172 posts
Posted: Thursday, May 12, 2011 - 05:14 AM UTC
Warren,
it looks good... major gap there indeed...
In the naked-eye-judges-the-photograph interpretation it looks like a single long stip of plastic might be the best solution, since the gap looks pretty much deck-plank width...
Cheers,
Harm
South Australia, Australia
Joined: August 14, 2007
KitMaker: 5,926 posts
Model Shipwrights: 2,624 posts
Posted: Thursday, May 12, 2011 - 07:38 AM UTC
Thanks Harm. My thoughts exactly about the width etc. Would have been good if Trumpeter had made the deck in one piece.
You may be right, I may be crazy.
#023
Zurich, Switzerland
Joined: March 13, 2009
KitMaker: 2,058 posts
Model Shipwrights: 163 posts
Posted: Thursday, May 12, 2011 - 07:42 AM UTC
Quoted Text
...it looks like a single long stip of plastic might be the best solution, since the gap looks pretty much deck-plank width...
I agree, I would probably try the same. Nice work so far! Looking forward to some aircraft. What time period are you building her?
Cheers!
Stefan
Too many models - too little time...
South Australia, Australia
Joined: August 14, 2007
KitMaker: 5,926 posts
Model Shipwrights: 2,624 posts
Posted: Thursday, May 12, 2011 - 07:53 AM UTC
Hi Stefan..
Pre-war yellow wings aircraft period. I have many drab WW2 carriers to build so a splash of colour with Sara will be good.
I did not realise that Sara was so much bigger than the fleet carriers of WW2.
Cheers
Warren
You may be right, I may be crazy.
Arizona, United States
Joined: December 12, 2008
KitMaker: 1,423 posts
Model Shipwrights: 99 posts
Posted: Friday, May 13, 2011 - 07:28 AM UTC
Hi Warren: I noticed you were working on this ship and thought I would stop by and see how you are doing. I have this kit as well, and when I take a break from WWI subjects I will probably tackle it and the Arizona. One thing you could do is run a bead of white glue in that crack. The surface tension should keep it from falling in the hull. You can build it up, paint it, and if it is in a convenient spot, you can line some planes up on it. Just a thought. The move "Dive Bomber" with Fred MacMurry and Errol Flynn has some great color footage of a/c landing on the Enterprise. The movie was made in 1939-1940 time frame and has some great color footage of pre-war marked a/c. One of the pilots is Butch Ohare, shows to good effect the color of the wooden flight deck.
Good Luck
Best
Mark
Now back to that Albatros that has been sitting idly on my workbench since 20 April.
We few, we happy few........
#068
Zuid-Holland, Netherlands
Joined: April 09, 2003
KitMaker: 1,144 posts
Model Shipwrights: 172 posts
Posted: Friday, May 13, 2011 - 08:34 PM UTC
Quoted Text
Thanks Harm. My thoughts exactly about the width etc. Would have been good if Trumpeter had made the deck in one piece.
Presumably the hull was cast full length? Then I find it hard to imagine that there is a technical obstacle to casting the deck full length - Revell has done so with their Bismarck for instance.
Cheers,
Harm
South Australia, Australia
Joined: August 14, 2007
KitMaker: 5,926 posts
Model Shipwrights: 2,624 posts
Posted: Sunday, May 15, 2011 - 03:38 PM UTC
Hi Mark.
I will be trying one of many methods tomorrow. Will let everyone know how it came out.
Cheers til then
You may be right, I may be crazy.
South Australia, Australia
Joined: August 14, 2007
KitMaker: 5,926 posts
Model Shipwrights: 2,624 posts
Posted: Sunday, May 15, 2011 - 06:46 PM UTC
I bought my attempt forward and used the white (PVA) glue method. Once I have positioned a few aircraft to hide the problem all will be well!
It is about one plank wide so it should not be too noticeable on such a big deck.
You may be right, I may be crazy.
Texas, United States
Joined: September 15, 2002
KitMaker: 8,985 posts
Model Shipwrights: 3,509 posts
Posted: Monday, May 16, 2011 - 06:29 AM UTC
On my Lex, i pushed the deck pieces in close so the gap was in the rear joining. I filled gap with glue as well. Then, I put one of my yellow cross stripes over it to sort of disguise the joint
Those who don't learn from history are doomed to repeat it
VMI "76
Order of the Red Nose Plug
Blue Volute Bumper Spring Award
South Australia, Australia
Joined: August 14, 2007
KitMaker: 5,926 posts
Model Shipwrights: 2,624 posts
Posted: Monday, May 16, 2011 - 09:34 AM UTC
I filled it with PVA glue yesterday and I am just waiting for it to dry. It has got cold here over the last few day (low of 12 degrees celcius) so it is taking a while to cure.
Luckily the join wasn't under the island or it would have made that a dodgy fit as well..
You may be right, I may be crazy.
South Australia, Australia
Joined: August 14, 2007
KitMaker: 5,926 posts
Model Shipwrights: 2,624 posts
Posted: Thursday, May 19, 2011 - 04:28 PM UTC
Greetings to all!
Hope you are all well on this Friday afternoon, well here it is anyway..
After fiddling around filling the flight deck gap with PVA glue then some Mr Surfacer to smooth it off I have forgotten what I did but I pushed on the joint for some reason and the PVA just went into the join..

I didn't expect that and changed my mind on the spot.
After digging out the PVA etc, which was pretty easy, I decided to use an old method I have used for gaps in wing to fuselage joints using sheet styrene. I got out my two thicknesses of styrene sheet and filled the gap as much as I could which only left small gaps here and there.
Always leave a bit extra to work with.
I let the glue dry then cut off most of the excess with my sprue cutters. After that I used my chisel tipped knife blade to slowly remove the remaining excess until I got this..
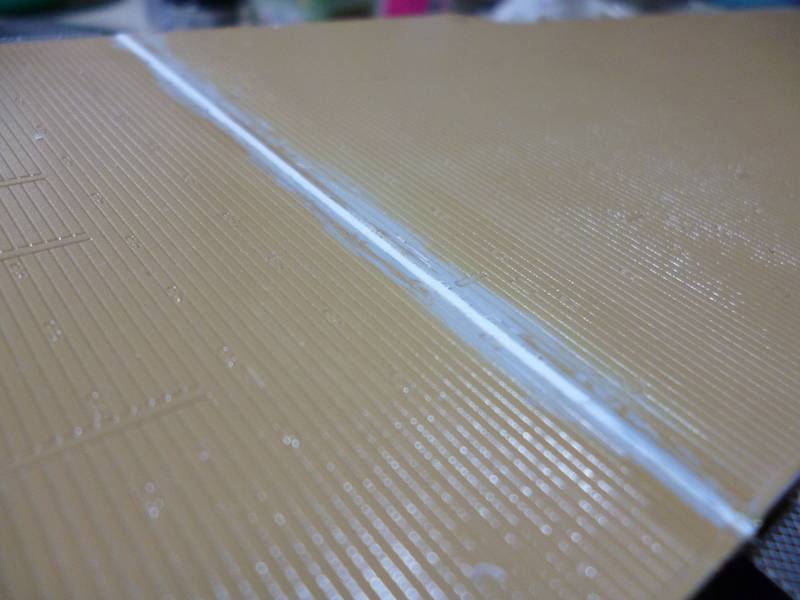
Yep.. No more gap.. Should have done it that way in the first place. Next step is touch up the paint then give the whole flight deck a darker wash to highlight the gaps in the planks just a little. Don't want them to look like massive gaps between the planks when I am sure they would have been very small in real life.
You may be right, I may be crazy.
California, United States
Joined: September 02, 2008
KitMaker: 200 posts
Model Shipwrights: 95 posts
Posted: Thursday, May 19, 2011 - 06:39 PM UTC
That is very slick! Looks great......that is thinking outside of the box.
Sam
Sam M.
Retired USN Seabees
EO1(SCW/AW)
NMCB 62,40,5
SERE Inst 89-95
South Australia, Australia
Joined: August 14, 2007
KitMaker: 5,926 posts
Model Shipwrights: 2,624 posts
Posted: Thursday, May 19, 2011 - 08:22 PM UTC
Thanks for that Sam. I have used it numerous times when building aircraft, but never on a ship.
Now I have to work out how to darken the flight deck without having to repaint the whole thing.
You may be right, I may be crazy.
Arizona, United States
Joined: December 12, 2008
KitMaker: 1,423 posts
Model Shipwrights: 99 posts
Posted: Friday, May 20, 2011 - 05:02 AM UTC
Looks like a good fix Warren. You could try Tamiya smoke with some Tamiya Clear Orange. The flight decks were stained with a redish type stain which gave the deck that patina. Naturally, experiment on a piece of plastic.
Best
Mark
We few, we happy few........
New Jersey, United States
Joined: January 19, 2005
KitMaker: 574 posts
Model Shipwrights: 530 posts
Posted: Friday, May 20, 2011 - 09:28 AM UTC
Warren,
I built Saratoga about 5 1/2 years ago. She was converted her from the Lex kit (it was before Sara was released as a kit). You can see pictures of the build
here.
As you can see, the flight deck is a lot darker - and redder - than yours. The stains was a Mahogany color - you may want to consider repainting, I don't think a wash will darken your flight deck enough.
South Australia, Australia
Joined: August 14, 2007
KitMaker: 5,926 posts
Model Shipwrights: 2,624 posts
Posted: Friday, May 20, 2011 - 10:02 AM UTC
Hi guys.
@ Martin, as you can see I have repainted the deck but not quite as dark as your sources might suggest. I read your build and am lucky that Trumpeter bought out the early version for me..
@ Mark, you might be right about the clear orange, although I thought clear red might be even better. But for now I think I am happy with the old girl as I am sure the color of the deck varied greatly after exposure to weather etc.
You may be right, I may be crazy.
South Australia, Australia
Joined: August 14, 2007
KitMaker: 5,926 posts
Model Shipwrights: 2,624 posts
Posted: Friday, May 20, 2011 - 11:34 AM UTC
Martin, the only color photo I have seen of CV-3 shows a deck that is a bit lighter than mahogany, and just like the color I painted my deck.
I have a funny feeling that the interpretation of the deck colour may be very wide..
You may be right, I may be crazy.
South Australia, Australia
Joined: August 14, 2007
KitMaker: 5,926 posts
Model Shipwrights: 2,624 posts
Posted: Saturday, May 21, 2011 - 01:09 PM UTC
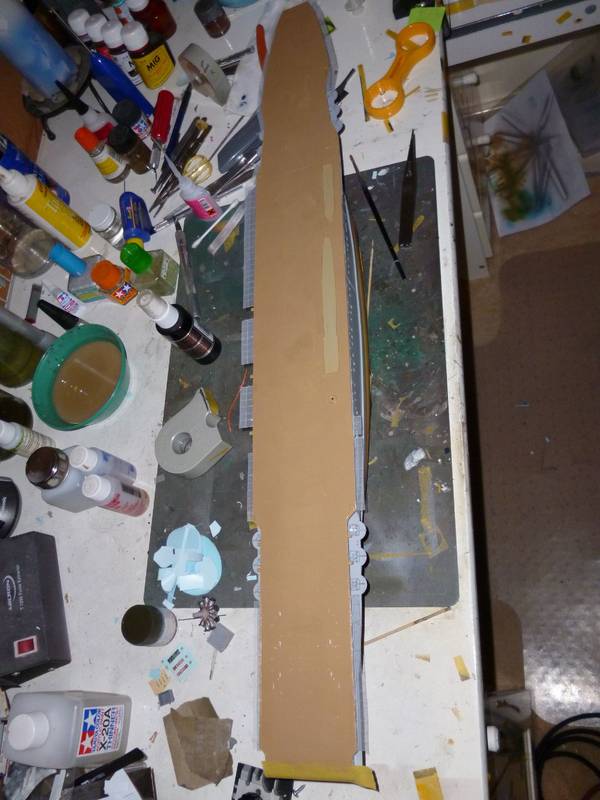
Well Sara is getting very close to finished, but I have come up against an all-together unexpected problem...
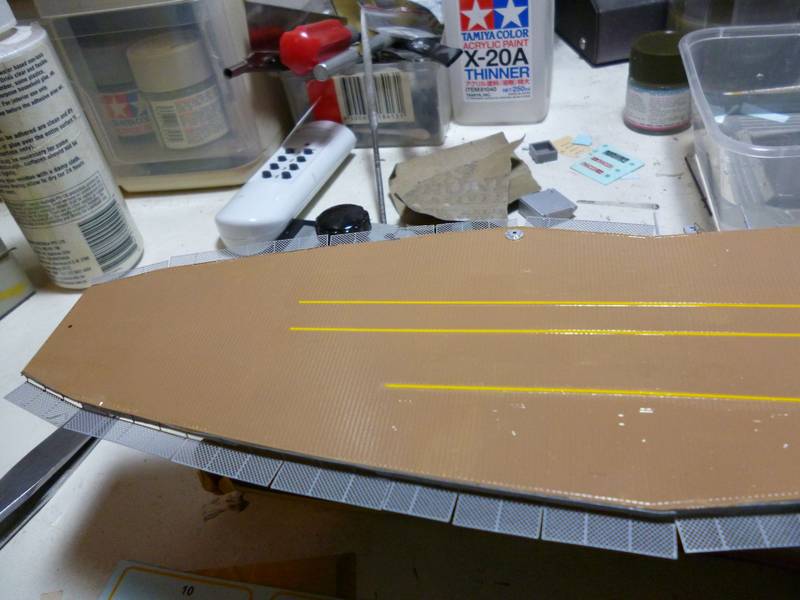
Now according to the painting guide the yellow stripes are supposed to extend the length of the flight deck.. but Mr Trumpeter they go nowhere near that length..
This is the forward flight deck.. three different sizes but one is chamfered so it goes over the edge properly, but is no where near long enough to go over the edge..
Same with the back.. different lengths.. and no that is not a used tissue, well only used for blotting water or paint..
So the yellow stripes are not the right length, then it gets even weirder..
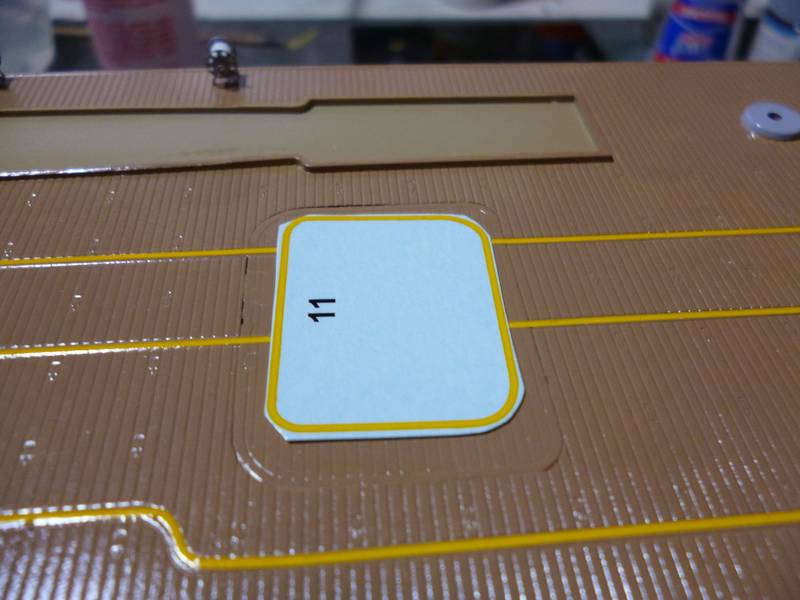
None of the elevator outline decals are anywhere near big enough.. SO what happened Mr Trumpeter? Did you mix up your decal sizes and put 1/500 end stripes on the sheet with 1/350 centre stripes? The curves in the centre stripes are perfect by the way.
Are you looking Mr Trumpeter? Can I have an extra set of stripes please?

You may be right, I may be crazy.
Texas, United States
Joined: September 15, 2002
KitMaker: 8,985 posts
Model Shipwrights: 3,509 posts
Posted: Sunday, May 22, 2011 - 07:26 AM UTC
I think the stripes were suppossed to be wider too
Those who don't learn from history are doomed to repeat it
VMI "76
Order of the Red Nose Plug
Blue Volute Bumper Spring Award
South Australia, Australia
Joined: August 14, 2007
KitMaker: 5,926 posts
Model Shipwrights: 2,624 posts
Posted: Sunday, May 22, 2011 - 07:39 AM UTC
Quoted Text
I think the stripes were suppossed to be wider too
I think they changed the size etc lots of times over the years Steve. Trying new idea etc.
You may be right, I may be crazy.
Kentucky, United States
Joined: October 05, 2010
KitMaker: 205 posts
Model Shipwrights: 163 posts
Posted: Monday, May 23, 2011 - 07:38 AM UTC
Warren, great job on Sara's flight deck. Outstanding work on the repair job. In the after photos I can't even tell that the gap was ever there. Keep up the great work and I'll look forward to watching her come together.
One question, I was looking at your Buchannan over on the Friends of the Fleet group build. It looks like you paint your railings after you attach them, is that correct? I have always painted mine on the fret and then attached. What technique do you use to attach then paint?
Bob
Building: Revell 1/72 S-100 Schnelboot
Dragon 1/350 U.S.S. Laffey
Just Launched: Hasegawa IJN Yakakuze (1940)