

Greetings all,
This is quite a departure for me to do a ship, my usual genre being , military dioramas (see armorama). I have always like the Titanic mystique and enjoy doing something different from time to time for interest sake and to develope new skills.
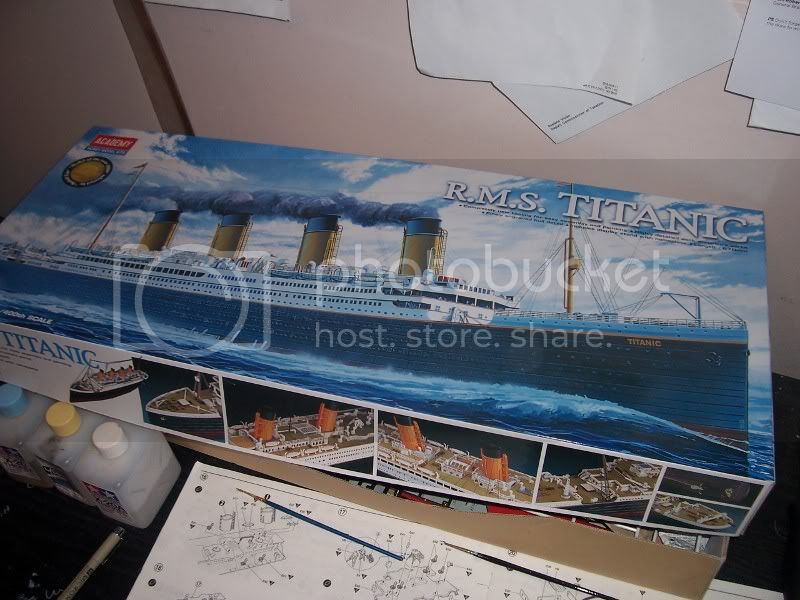
I am in the preliminary stages of preparation for this build. I have the kit on the way (thanks ebay), and have several of Toms photoetch sets for the Academy 1/400 Titanic. Other purchases I am making in preparation is the thread for the rigging (fly tie) and various paints.
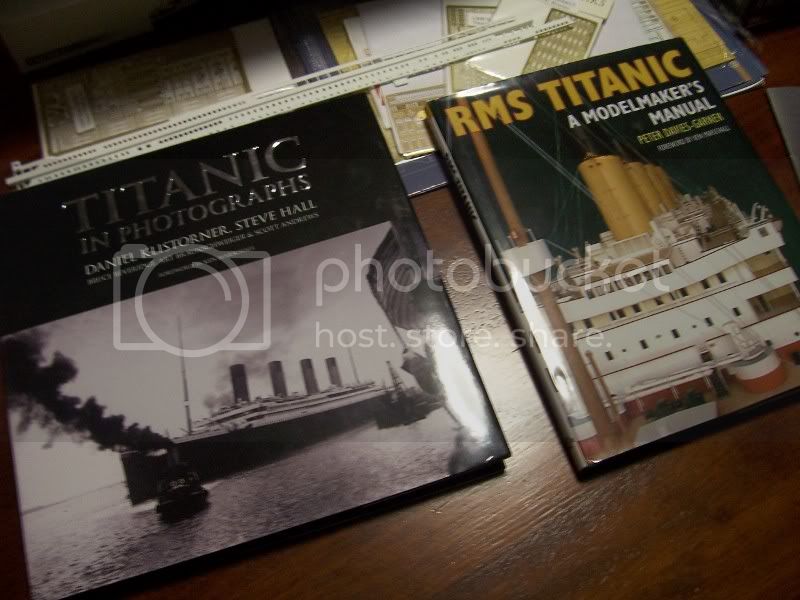
What I do lack is good reference material. Of course the net has much, probably too much, and sites such as TRMA have fantstic reference, I still like a good book to read in bed or during breaks at work. Researching a topic before building is of course paramount - especially so when there is alot of misinformation out there as well. Titanic suffers alot from this particularly when using Olympic as a comparison for photos or details or colours.
So at this early stage - about 6 weeks before starting construction, I would like anyone who has several Titanic books to give me their list of top 2 or so as a reccomendation - ie the "must haves" for any Titanic collection.
I already have a book by Robert Ballard called simply Titanic, who is the fella that discovered the wreck back in 1985, great back story and pictures, but more about the science of research and the like.
I also have the "RMS Titanic a model buidlers guide" which is the photo essay of the amazing 18 foot long accurate Titanic model and accompanied by many reference scale pictures.
So what else is there that you could reccomend for me ? Even model building ship books might be helpfull.
Also any websites you think are paramount to any serious research about Titanic.
Lastly I should point out that while I want to be accurate as much as possible technically, I would rather be more accurate moel wise if that makes sense. in other words I see alot of corrected model kits with photo etch and accurized parts on them - but the model basics are terrible with glue drops, paint spills, overspray, misalignment, gaps, etc and I acknowledge early on that building a ship with consistency from front to back will have its own challenges- unlike say a tank. So I will be keeping a focus on having a good looking well executed model when finished albeit with perhaps some missed corrections, rather than a perfect replica that is poorly executed. The final audience of the model of which 99% would never know where the deck seats were or what colour the stays are, will appreciate the execution moreso anyways.
Your thoughts gents?
Adam


Go to modelshipwrights.com for the current dynamic site!
Hosted by Jim Starkweather
1/400 Academy anniversary Titanic build

Adamskii

Joined: November 06, 2010
KitMaker: 537 posts
Model Shipwrights: 23 posts

Posted: Thursday, February 09, 2012 - 02:27 AM UTC

warreni
Joined: August 14, 2007
KitMaker: 5,926 posts
Model Shipwrights: 2,624 posts

Posted: Thursday, February 09, 2012 - 05:33 PM UTC
Just use the normal techniques you use with your AFVs and the Titanic will come out fine.

oneslim

Joined: December 17, 2008
KitMaker: 2 posts
Model Shipwrights: 1 posts

Posted: Friday, February 10, 2012 - 03:48 PM UTC
Adam,
Here are a few must see sites.
https://titanic-model.com/
https://rivetcounter.txc.net.au/Tutorial/tutorial_index.html
https://olympicclassliners.proboards.com/index.cgi?
https://www.encyclopedia-titanica.org/
This is more than You want to know, You are about to launch a huge project.
Bob Wescott
Here are a few must see sites.
https://titanic-model.com/
https://rivetcounter.txc.net.au/Tutorial/tutorial_index.html
https://olympicclassliners.proboards.com/index.cgi?
https://www.encyclopedia-titanica.org/
This is more than You want to know, You are about to launch a huge project.
Bob Wescott
Adamskii
Joined: November 06, 2010
KitMaker: 537 posts
Model Shipwrights: 23 posts
Posted: Friday, March 09, 2012 - 02:11 AM UTC
Thanks for the commenst above folks. much appreciated.
A few things - I type very fast but also very innacurate and often mispell and have poor grammar so apologies in advance. I am aware of it and try to proof read but, still miss some things. Also I am an accomplished diorama builder and armour models ar emy speciality, so a ship is very foreign to me right down to the terminology, so for all intensive purposes, I am a boat Noobie. So If I use the wrong terms or refernce, please correct me as I am always eager to use the correct terminolgy where possible.
Lastly, I build for competition, not for 'personal" satifgaction so my standard is always one which I hope will be competitive at my local annual competition, and if succesful, at the national comp the follwoing year. hence my desire to adhere to reality type references.
So thats said, i started proper tonight. well a bit of back story, I started over 3 years ago, building the Academy 1/400 titanic kit 1458. I bought it as It was biggest one I had seen, was good price, and had no knowledge of accuracy, but had experience with Academy kits in the past was ok with their standard.
So I started building it , and as usual, advanced modellers syndrome kicked in and I began lookiing for photo etch - railings at first but then othe stuff came up like the chairs. Next thing I knew i was in over my head and basically started to make mistakes due to lack of planning with construction ( I followed instructions and was stuck trying to paint assembled decks and walls) and also lack of awareness of what was required in deviating from the build sequence. I could see I was stuffing up so I parked it as so many of us do with troublesome kits.
Move forward 3 years and this christmas saw on back of local model magazine the academy 100 year anniversary kit(14202) with timber decks and photo etch and other goodies. I knew I had to have it.
So I bought one on ebay for under $140 delivered! (Australian) so very cheap when some people want 200 plus postage !. Anyways, I had collected a bit of PE and have all 4 of Toms 1/400 photo etch sets for superdetailing, and, coupled with the kit supplied PE in the ANiiversary Edition (AE) kit I was short of proper reference and have now aquired what I believe to be sufficient hardcover to start the project properly. I have read several books and studied alot of pics - and its obvuious there are some serious challenges i am going to face.
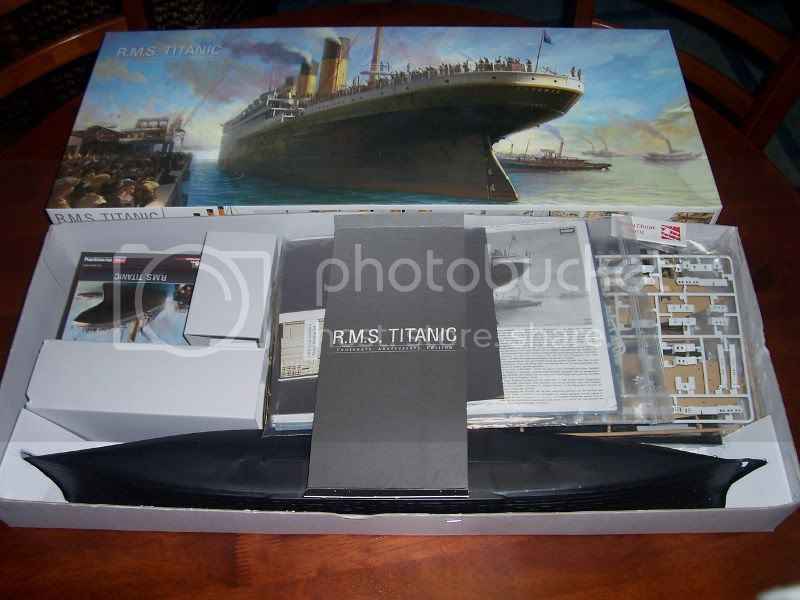

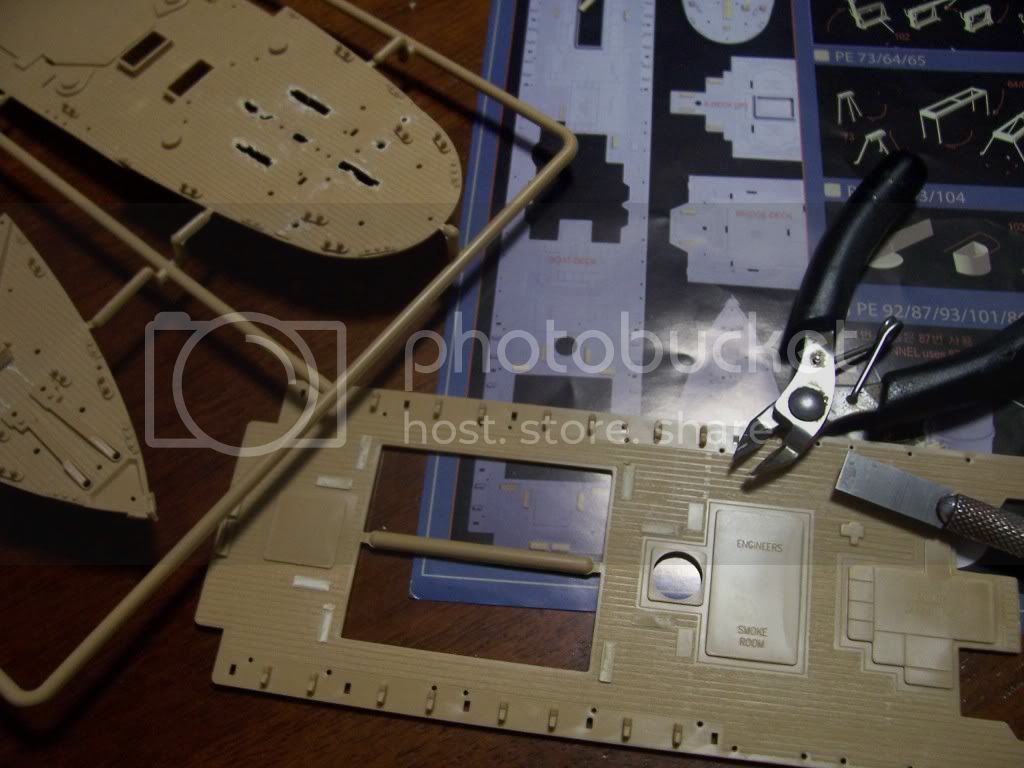
So the new kit . Anniversary edition, is the same kit I had before (so I have spare or practice kit to use.. nice) with lots of goodies. That is covered in other news threads on this site, but basically as mentioned comes with a real wood deck, 2 sheets photo etch - some pre primed- a jigsaw and a "book" that really should be called a leaflet with pictures. The biggest issue is they have used the same instructions and just added two a3 sized blueprints with lots of little diagrams saying where to replace the kit bits with the new PE or what to remove in order for the decks to fit. Thats the next big issue - the same old decks are in the kit so you have to sand off or remove most ffitting to make the deck fit ! more on that later.
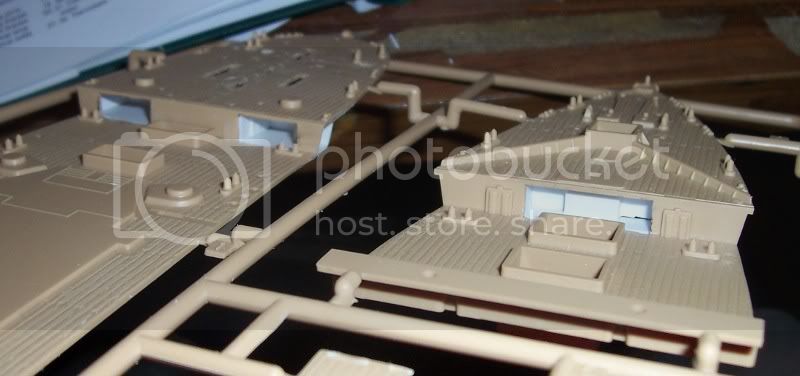
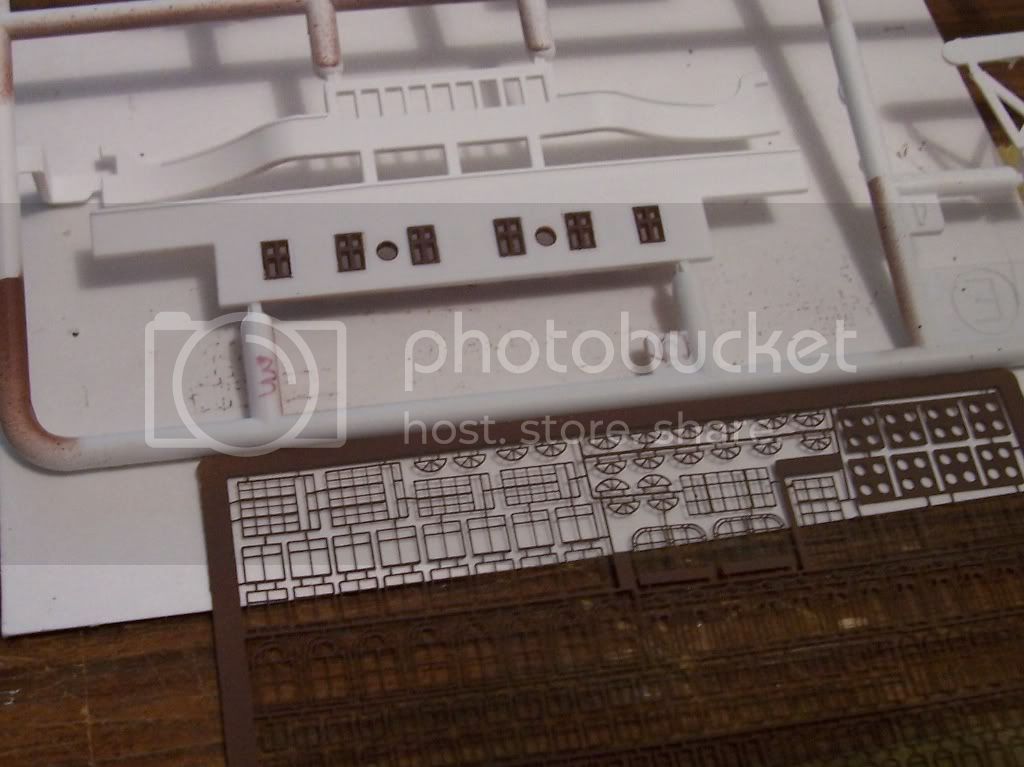
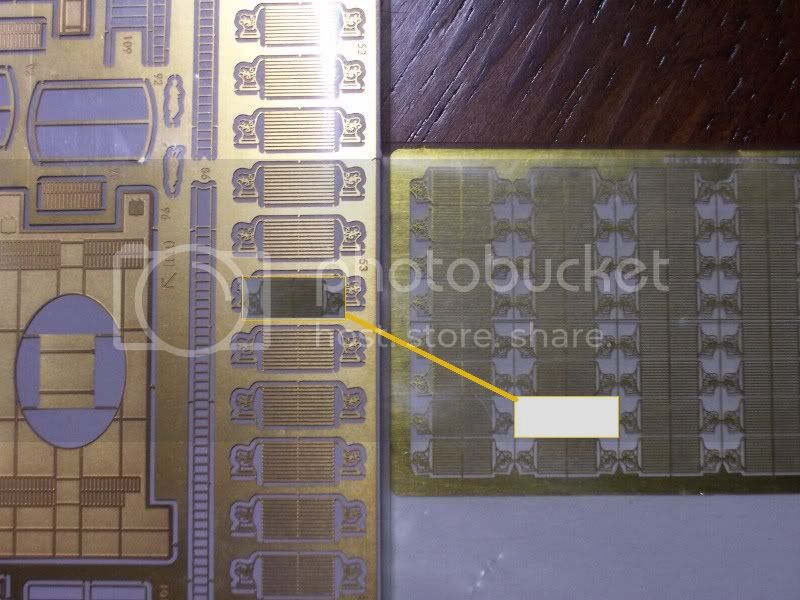
For interest see the scale difference between Toms 1:400 benches and the Academy kit PE ones - there is a noticerable difference and the two benches could not be displayed side by side...
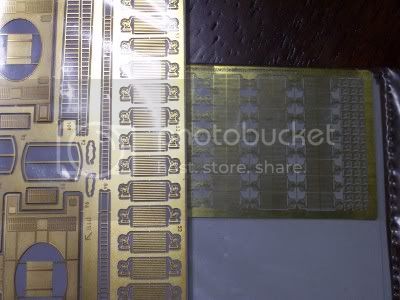
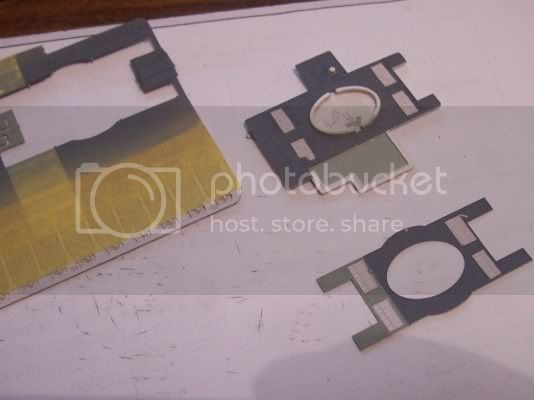
close up of some of the kits PE - the white screens are brilliant as it was one of the things I was worried about painting...
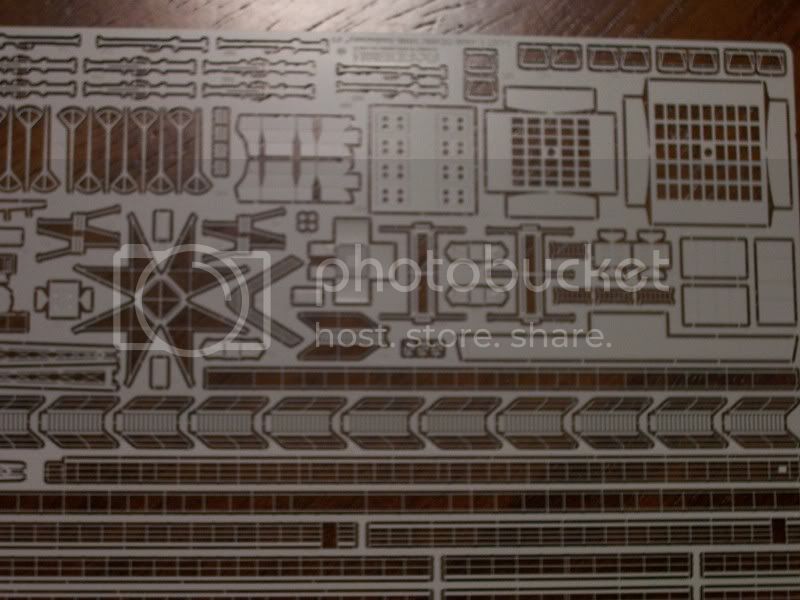
note the unpainted clear plastic deck house. (trial kit)
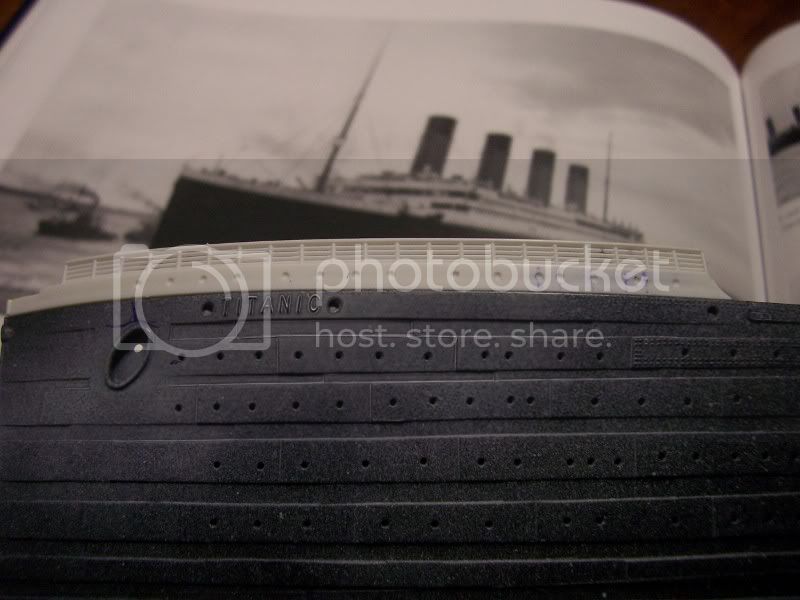
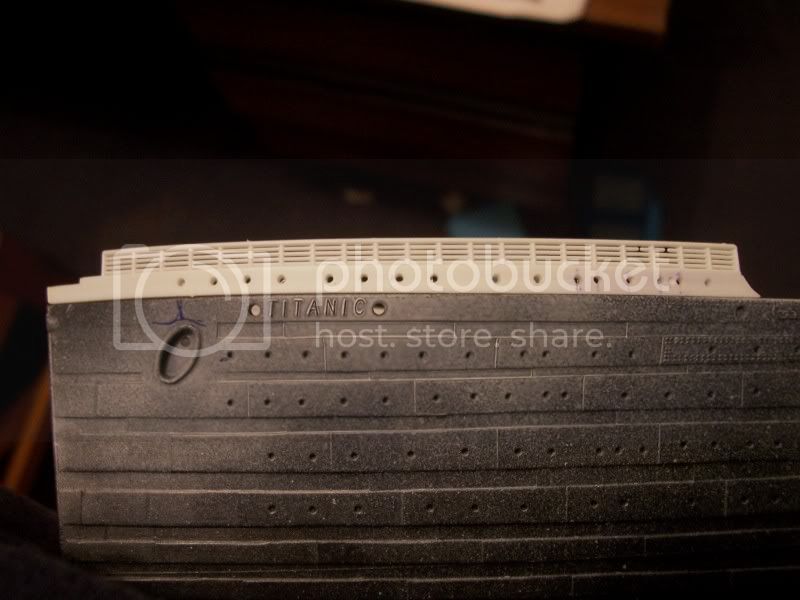
So I picked up the old kit and I was happy with the hull so tinkered with that and looked at corrections. the academy kit has many errors I can see almost immeadiately. but I will stick with it as best as I can.
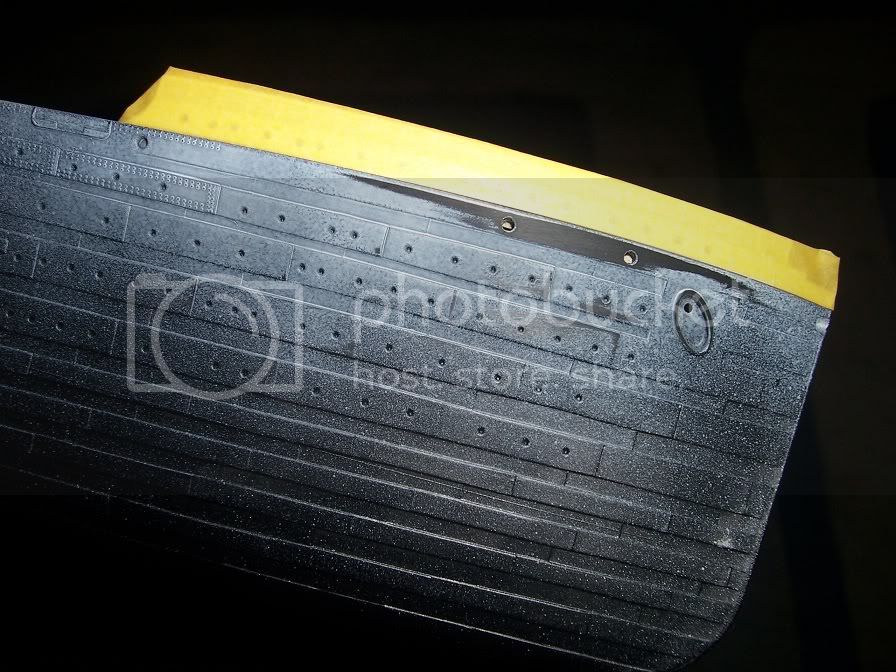
firstly the portholes in the foc'sle - the references pics show there are 16 from bow to fore well deck in the white zone above the yellow line. the kit has 15 moulded - so I drilled 16, correcting the obvious wrong holes (2 close portholes )
while I was at it I drilled some portholes from the curtain walls (one side done for comparison)

then the stern of the ship portholes. the stern was missing at least 8 so I located and drilled them out aswell

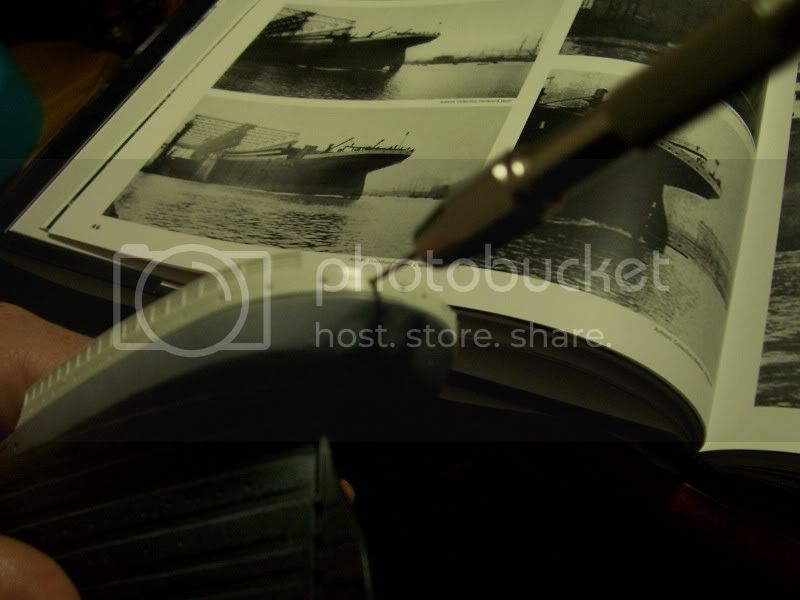
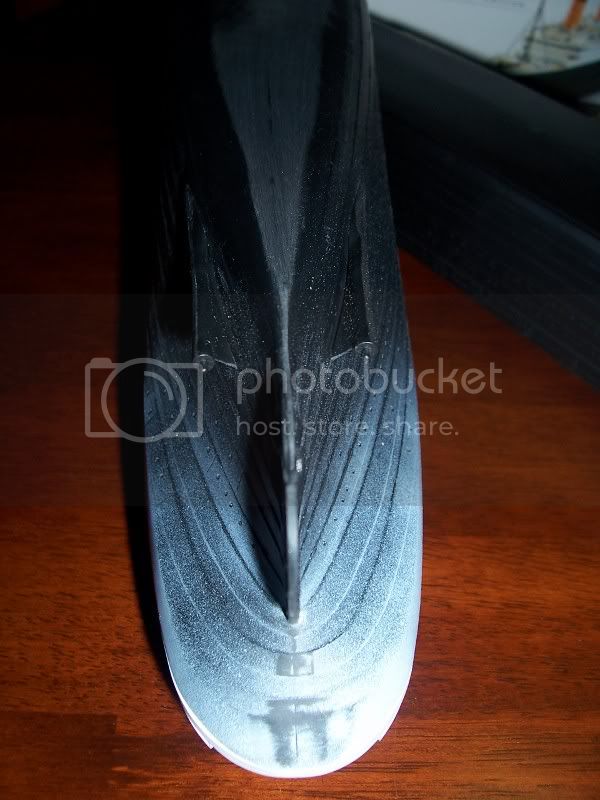
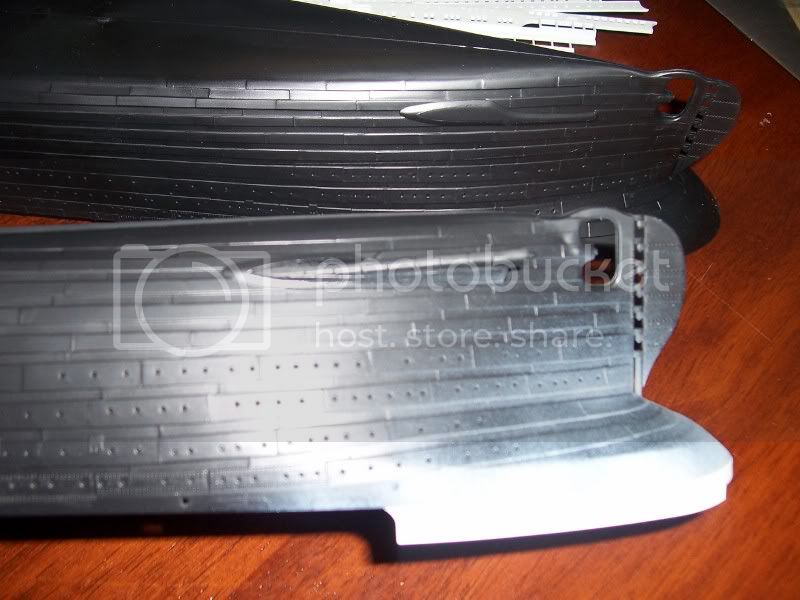
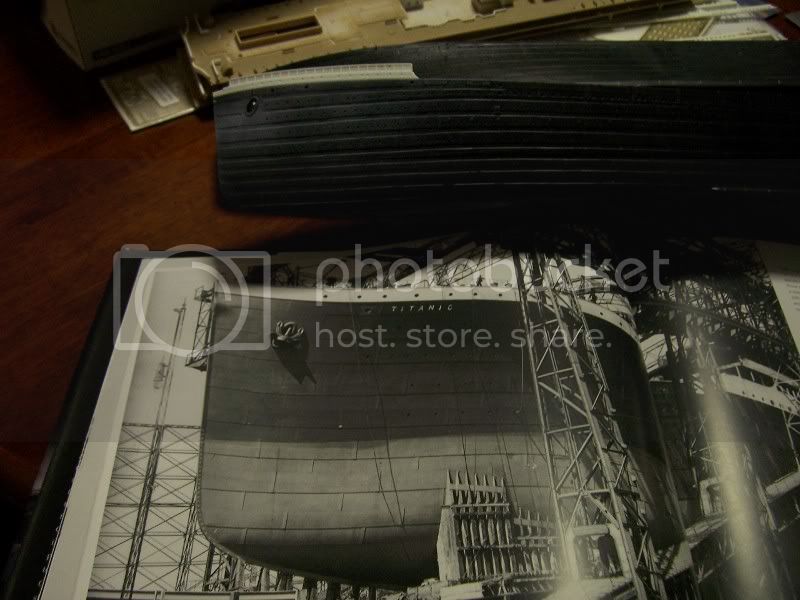
The hull plating pattern is quite bizzare and academy have most definitely got it wrong. The anchors are stowed too far back from the bow - should be much closer, and the shape of the keel at the bow is not right either . there are a number of portholes that are obviousdly not in the right spot and I will cosider fixing those issues one by one. the keel will be hardest to fix. then the anchor docks will also be very hard to move. another issue is the plating does not go under the ship and it is modelled with a flat hull without detail. I will be setting mine in water later (diorama) so thats not an issue yet, but the plating at the stern is missing also aswell as being incorrect pattern
bow problems
Couple of other issues - The colour of the timber deck compared to the colour suggested on one of the more knowledgable Titanic websites . either the paint is wrong or the wood is too light - I painted those decks 3 years ago.

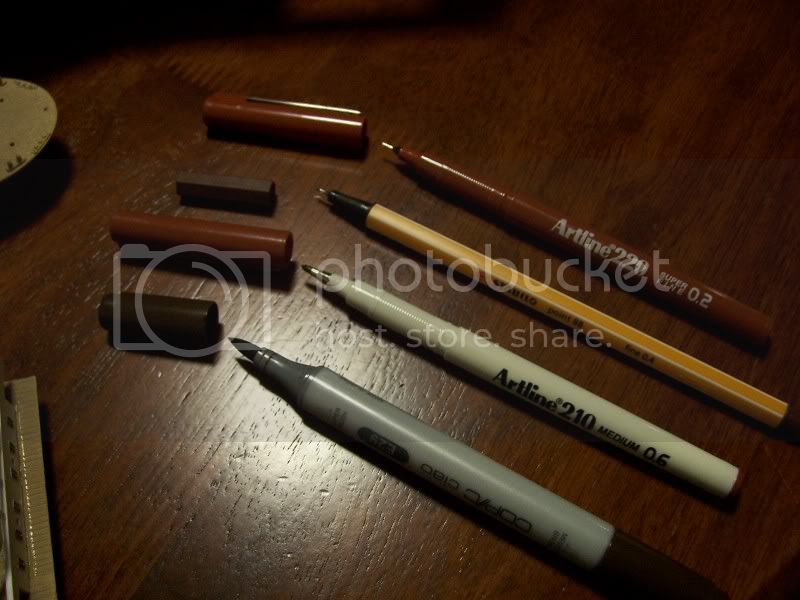
I was glad to get Tom's window frames in PE - I started painting the ones on the kit but I totally botched it - I used technical drawing pens of different sizes, but invariably slipped and the ink stained the white walls and won't wash off or paint over - the stain grows. So be glad to pre paint the woindows on the sprue, and stick on. lesson learned here !


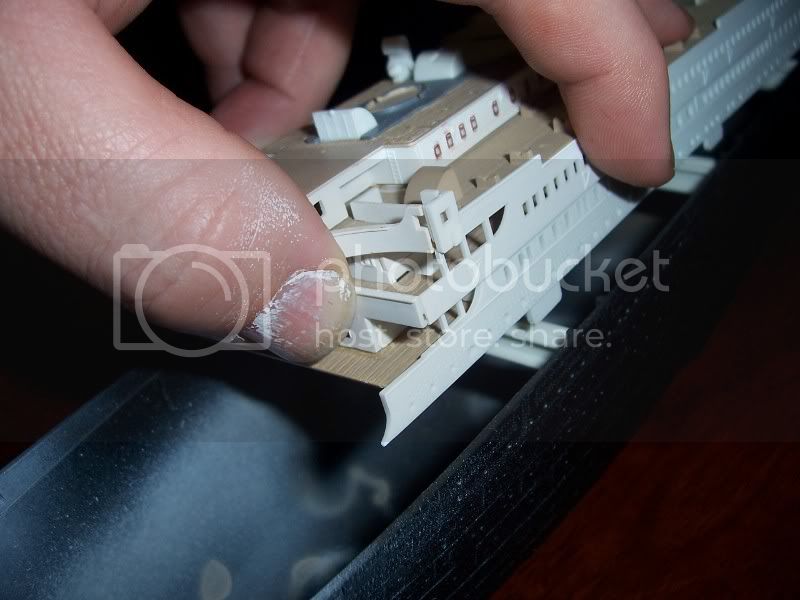
Also while test fitting the trial kit, I notice what will require alot of sanding and filling to correct what is essentially a poor design.. the two little cabins on the port and starport side of the bridge have a major join in them. misalignment will be very apparent!
And ther last reason I stopped the trial kit 3 years ago was the sanding of the details just got to be too big an issue - check out the kit standard bench seats - horrible!
sorry its all such a mish mash tonight and not very sequential - I have lots to add and untiil I get good momentum it may be confusing at first . next step is pre painting as much as possible so once assembled I dont have the problem of masking etc!
Adam
A few things - I type very fast but also very innacurate and often mispell and have poor grammar so apologies in advance. I am aware of it and try to proof read but, still miss some things. Also I am an accomplished diorama builder and armour models ar emy speciality, so a ship is very foreign to me right down to the terminology, so for all intensive purposes, I am a boat Noobie. So If I use the wrong terms or refernce, please correct me as I am always eager to use the correct terminolgy where possible.
Lastly, I build for competition, not for 'personal" satifgaction so my standard is always one which I hope will be competitive at my local annual competition, and if succesful, at the national comp the follwoing year. hence my desire to adhere to reality type references.
So thats said, i started proper tonight. well a bit of back story, I started over 3 years ago, building the Academy 1/400 titanic kit 1458. I bought it as It was biggest one I had seen, was good price, and had no knowledge of accuracy, but had experience with Academy kits in the past was ok with their standard.
So I started building it , and as usual, advanced modellers syndrome kicked in and I began lookiing for photo etch - railings at first but then othe stuff came up like the chairs. Next thing I knew i was in over my head and basically started to make mistakes due to lack of planning with construction ( I followed instructions and was stuck trying to paint assembled decks and walls) and also lack of awareness of what was required in deviating from the build sequence. I could see I was stuffing up so I parked it as so many of us do with troublesome kits.
Move forward 3 years and this christmas saw on back of local model magazine the academy 100 year anniversary kit(14202) with timber decks and photo etch and other goodies. I knew I had to have it.
So I bought one on ebay for under $140 delivered! (Australian) so very cheap when some people want 200 plus postage !. Anyways, I had collected a bit of PE and have all 4 of Toms 1/400 photo etch sets for superdetailing, and, coupled with the kit supplied PE in the ANiiversary Edition (AE) kit I was short of proper reference and have now aquired what I believe to be sufficient hardcover to start the project properly. I have read several books and studied alot of pics - and its obvuious there are some serious challenges i am going to face.
So the new kit . Anniversary edition, is the same kit I had before (so I have spare or practice kit to use.. nice) with lots of goodies. That is covered in other news threads on this site, but basically as mentioned comes with a real wood deck, 2 sheets photo etch - some pre primed- a jigsaw and a "book" that really should be called a leaflet with pictures. The biggest issue is they have used the same instructions and just added two a3 sized blueprints with lots of little diagrams saying where to replace the kit bits with the new PE or what to remove in order for the decks to fit. Thats the next big issue - the same old decks are in the kit so you have to sand off or remove most ffitting to make the deck fit ! more on that later.
For interest see the scale difference between Toms 1:400 benches and the Academy kit PE ones - there is a noticerable difference and the two benches could not be displayed side by side...
close up of some of the kits PE - the white screens are brilliant as it was one of the things I was worried about painting...
note the unpainted clear plastic deck house. (trial kit)
So I picked up the old kit and I was happy with the hull so tinkered with that and looked at corrections. the academy kit has many errors I can see almost immeadiately. but I will stick with it as best as I can.
firstly the portholes in the foc'sle - the references pics show there are 16 from bow to fore well deck in the white zone above the yellow line. the kit has 15 moulded - so I drilled 16, correcting the obvious wrong holes (2 close portholes )
while I was at it I drilled some portholes from the curtain walls (one side done for comparison)
then the stern of the ship portholes. the stern was missing at least 8 so I located and drilled them out aswell
The hull plating pattern is quite bizzare and academy have most definitely got it wrong. The anchors are stowed too far back from the bow - should be much closer, and the shape of the keel at the bow is not right either . there are a number of portholes that are obviousdly not in the right spot and I will cosider fixing those issues one by one. the keel will be hardest to fix. then the anchor docks will also be very hard to move. another issue is the plating does not go under the ship and it is modelled with a flat hull without detail. I will be setting mine in water later (diorama) so thats not an issue yet, but the plating at the stern is missing also aswell as being incorrect pattern
bow problems
Couple of other issues - The colour of the timber deck compared to the colour suggested on one of the more knowledgable Titanic websites . either the paint is wrong or the wood is too light - I painted those decks 3 years ago.
I was glad to get Tom's window frames in PE - I started painting the ones on the kit but I totally botched it - I used technical drawing pens of different sizes, but invariably slipped and the ink stained the white walls and won't wash off or paint over - the stain grows. So be glad to pre paint the woindows on the sprue, and stick on. lesson learned here !
Also while test fitting the trial kit, I notice what will require alot of sanding and filling to correct what is essentially a poor design.. the two little cabins on the port and starport side of the bridge have a major join in them. misalignment will be very apparent!
And ther last reason I stopped the trial kit 3 years ago was the sanding of the details just got to be too big an issue - check out the kit standard bench seats - horrible!
sorry its all such a mish mash tonight and not very sequential - I have lots to add and untiil I get good momentum it may be confusing at first . next step is pre painting as much as possible so once assembled I dont have the problem of masking etc!
Adam
Adamskii
Joined: November 06, 2010
KitMaker: 537 posts
Model Shipwrights: 23 posts
Posted: Saturday, March 10, 2012 - 02:51 AM UTC
tonight I managed to start the mods to the deck and get some primer on the photo etch.
firstly I shaved off the "titanic" from the bow - its raised leters were wrong in that the real ones were recessed into the hull, the AE kit has gold plated letters to stick on.
next I primed with tamiya white primer the photo etch parts, and also all the white plastic parts - its surprising how many shades of white there are...
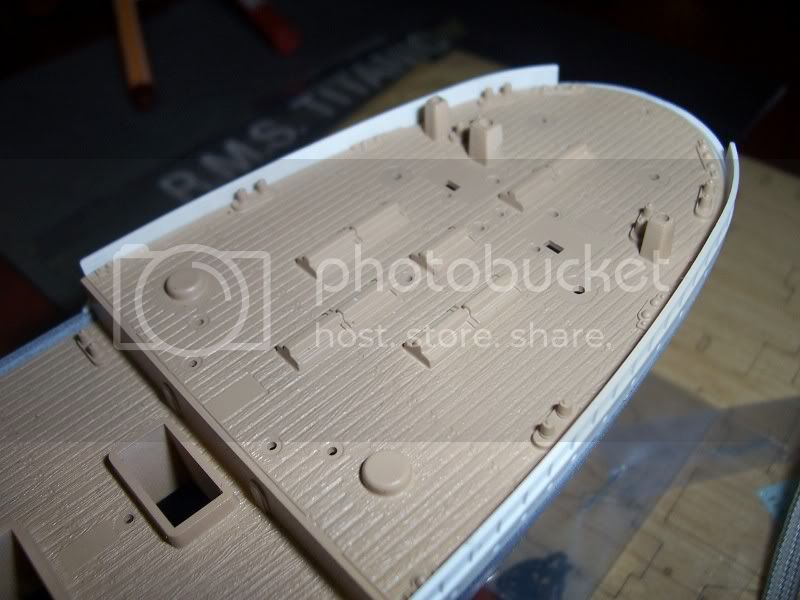
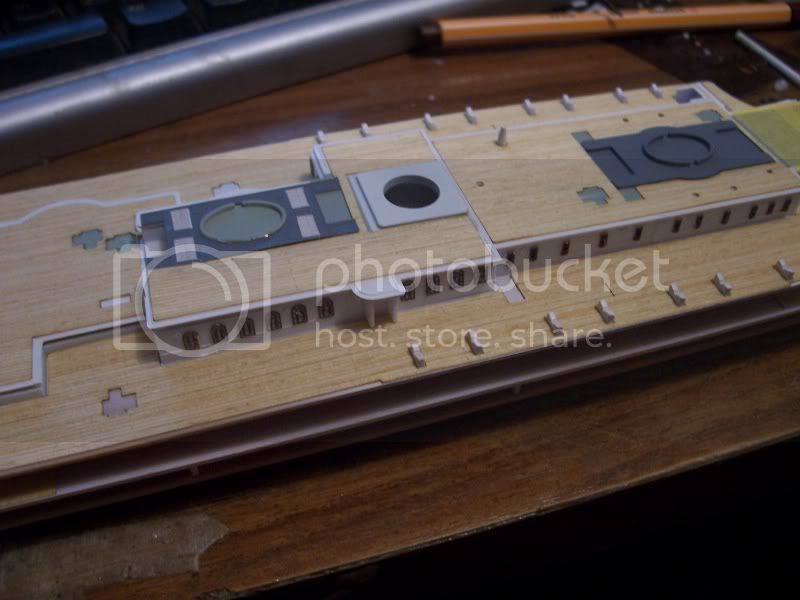
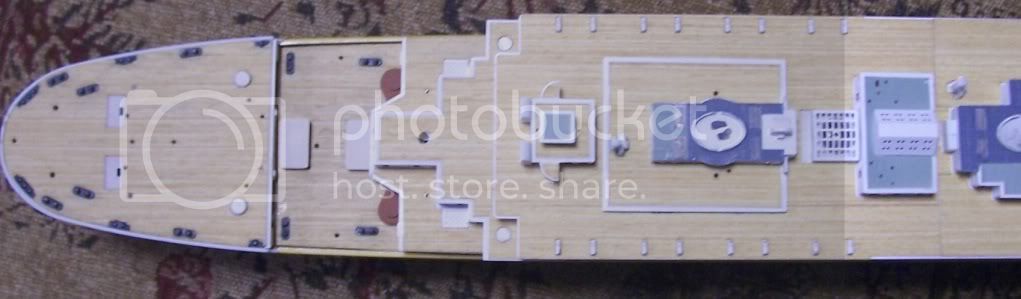
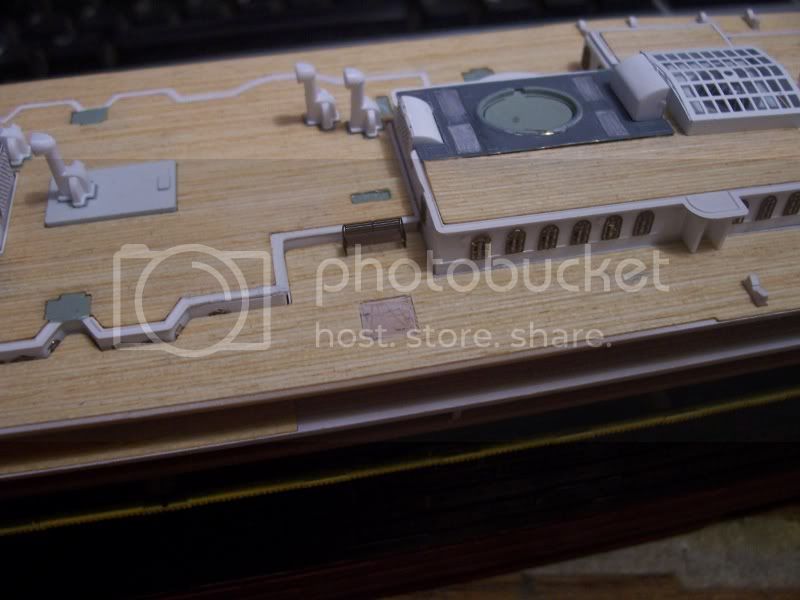
next i started to shave off / remove the surface details of the deck that the timber would be laid over. rough work but all will be concealed under the veneer wood later
you can see the spaces where the benches were.

and thats taken most of the evening,, here are the decks, all the details removed as required

the underside of the decks have some unusual strengthening ribs - thankfully from my test fitting I know these actually fowl their fitting with the walls below, so will be shaving the offending lines tomorrow night...

thats pretty much it for tonight!
Not a talkative bunch I see.. lol..
Adamskii
firstly I shaved off the "titanic" from the bow - its raised leters were wrong in that the real ones were recessed into the hull, the AE kit has gold plated letters to stick on.
next I primed with tamiya white primer the photo etch parts, and also all the white plastic parts - its surprising how many shades of white there are...
next i started to shave off / remove the surface details of the deck that the timber would be laid over. rough work but all will be concealed under the veneer wood later
you can see the spaces where the benches were.
and thats taken most of the evening,, here are the decks, all the details removed as required
the underside of the decks have some unusual strengthening ribs - thankfully from my test fitting I know these actually fowl their fitting with the walls below, so will be shaving the offending lines tomorrow night...
thats pretty much it for tonight!
Not a talkative bunch I see.. lol..
Adamskii

Gremlin56
Joined: October 30, 2005
KitMaker: 3,897 posts
Model Shipwrights: 3,301 posts
KitMaker: 3,897 posts
Model Shipwrights: 3,301 posts

Posted: Saturday, March 10, 2012 - 03:36 AM UTC
We do talk Adam  Not a case of being like the Belgian Trappist monks here, (brew beer all day and don't say a word).
Nice Titanic build you have going there, nice to be able to take a peek inside the anniversary edition and even nicer to hear your comments on it.
Great photos as well, keep 'em coming and don't abandon ship
cheers,
Julian
Not a case of being like the Belgian Trappist monks here, (brew beer all day and don't say a word). Nice Titanic build you have going there, nice to be able to take a peek inside the anniversary edition and even nicer to hear your comments on it.
Great photos as well, keep 'em coming and don't abandon ship
cheers,
Julian

surfsup
Joined: May 20, 2010
KitMaker: 1,230 posts
Model Shipwrights: 1,212 posts

Posted: Saturday, March 10, 2012 - 02:50 PM UTC
Very nice start Adam. Looking forward to watching your work on this one......Cheers mark
Adamskii
Joined: November 06, 2010
KitMaker: 537 posts
Model Shipwrights: 23 posts
Posted: Sunday, March 11, 2012 - 03:28 AM UTC
hullo folks. not too much to add for today. been more of a theory than practical type of day.
research is order of the day. some things that been bugging me is accurate colour descriptions of the well decks. it appears that the walls inside the well decks are a brown colour but there are some pictures that it looks black and others that it looks white! the magnuificent model by Peter Davies-Garner that is widely considered to be the most accurate ever built sheds some light, but I want to muster the balls to challenge what he has done as it looks like it doesnt match the pictures. Im sure the rivett counters will correct me.
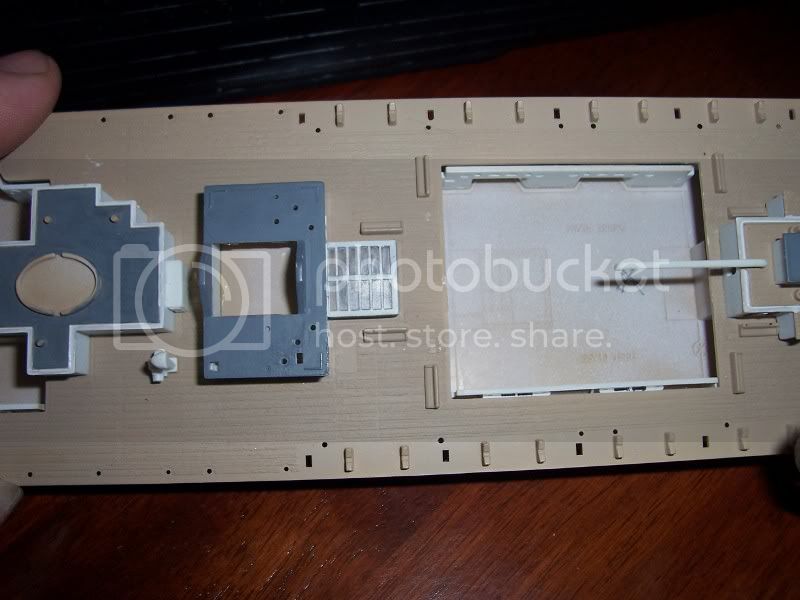
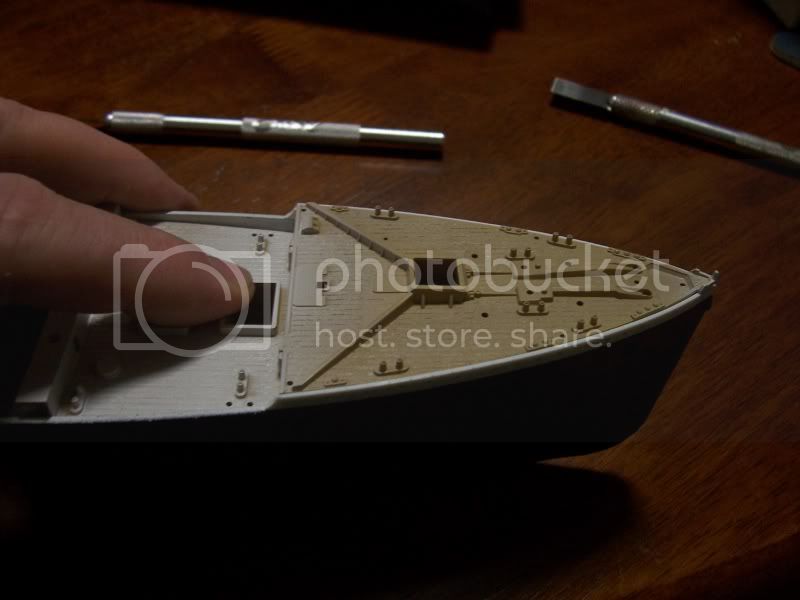
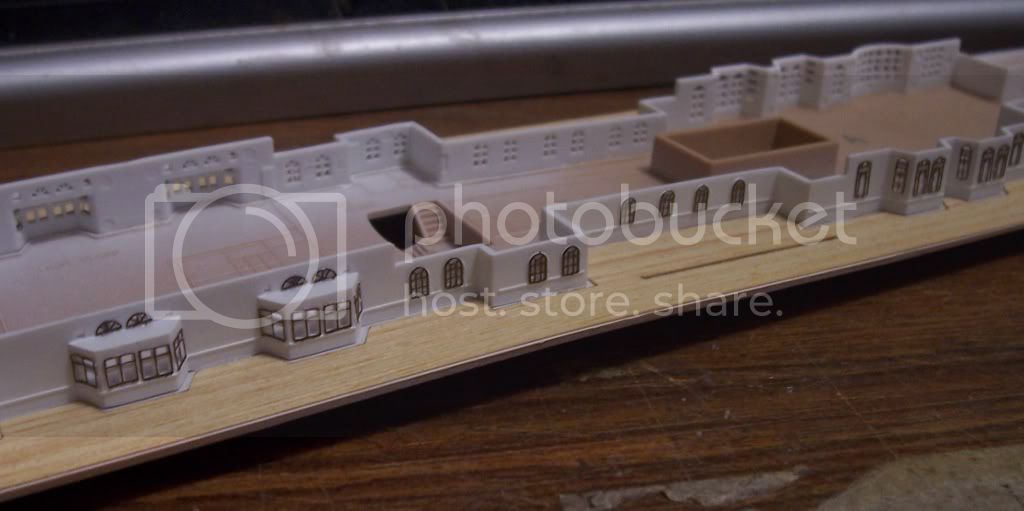
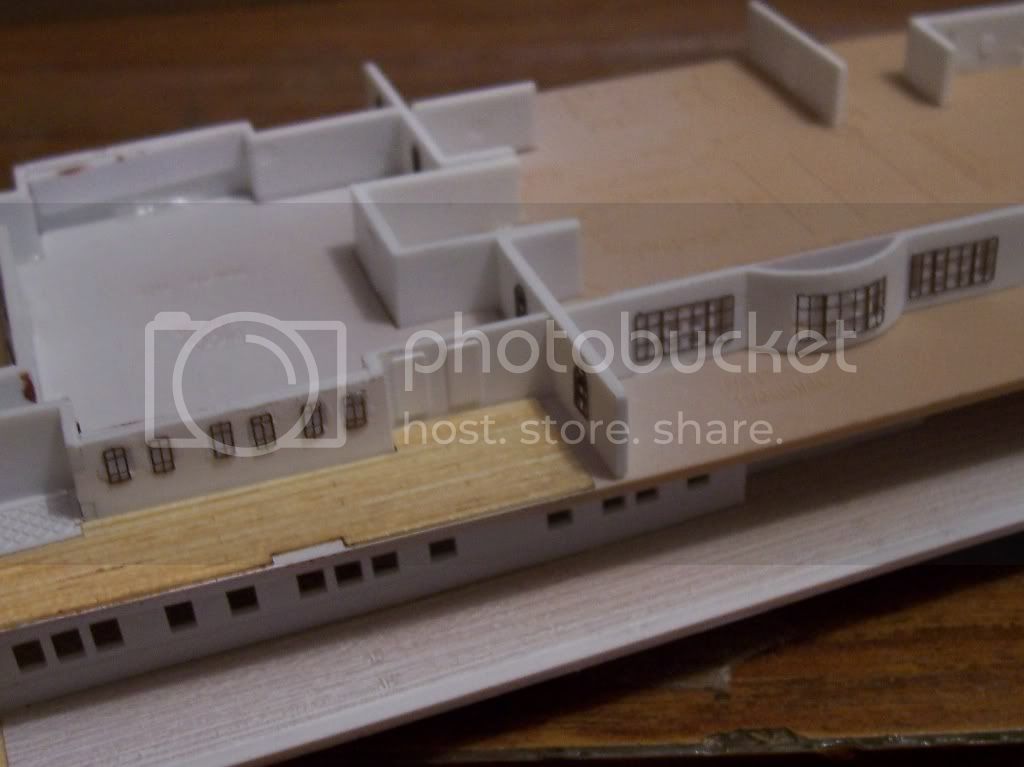
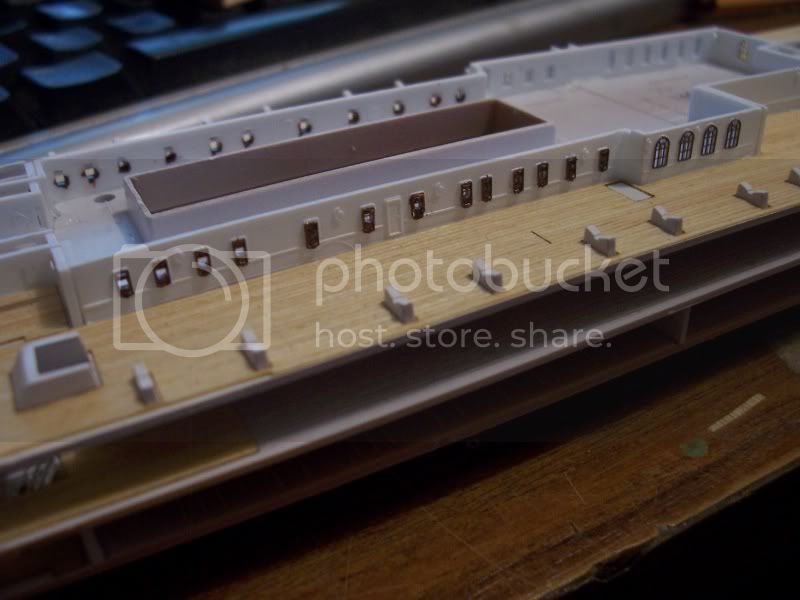
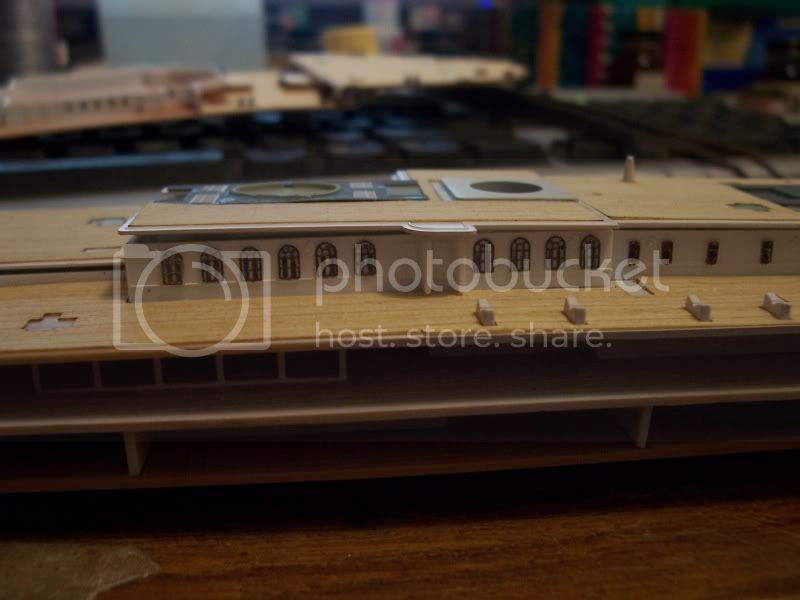
Anyways, while researching, i discovered another problem with the academy kit. It is a big one that will have to be corrected and will add much work to this project. The insides of the well deck walls are cast and miss some big details. recessed into the walls are recesses large enough to park a car! that are totally missing - the rear well deck wall looks like a complete fabricatoion and resembles in no way the walls. they should be under the poop deck and fo'c'sle deck.
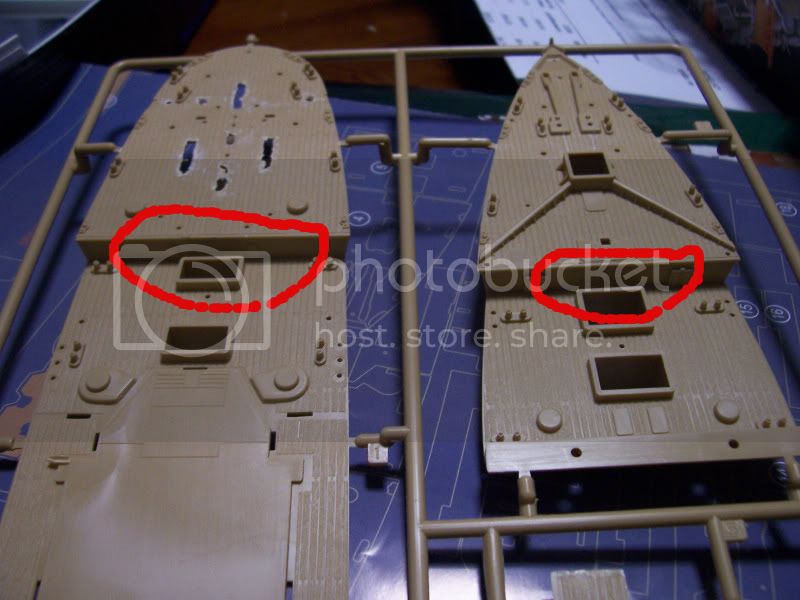
the flat wall in questions

Also on test fitting the deck I notice the deck and gated wall are not parralel, although I do not know if they are supposed to be, my gut instinct ois there is a problem here, but mostly unfixable if thats so ..
A bit more practicle work though, I had to cut the rails off the bow and aft sections, as they will be replaced with photo etch ones.
sanded the cut of stumps flat .. tested with a steel rule for flush fit
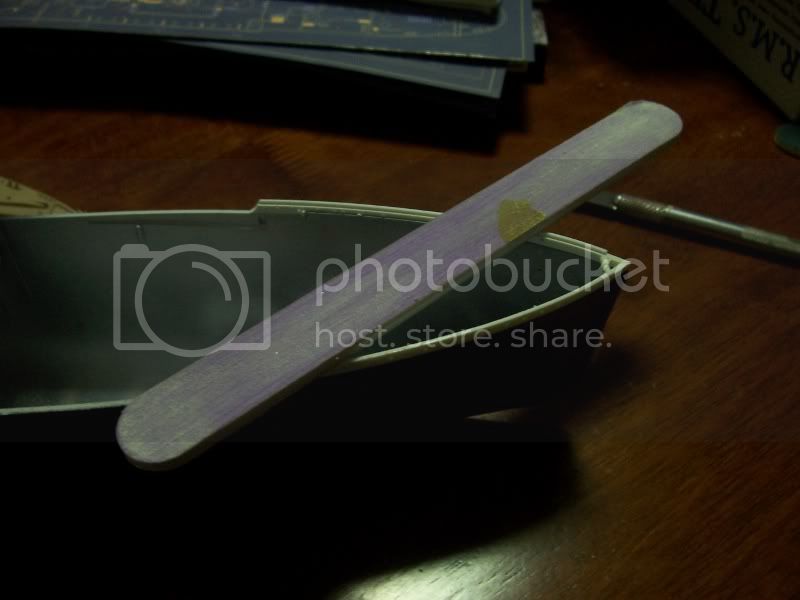
test fitting the deck,

Thats it for tonight - burying myself in books and web pages on those lost rooms under the fo'c'sle and poop decks.
Adam
research is order of the day. some things that been bugging me is accurate colour descriptions of the well decks. it appears that the walls inside the well decks are a brown colour but there are some pictures that it looks black and others that it looks white! the magnuificent model by Peter Davies-Garner that is widely considered to be the most accurate ever built sheds some light, but I want to muster the balls to challenge what he has done as it looks like it doesnt match the pictures. Im sure the rivett counters will correct me.
Anyways, while researching, i discovered another problem with the academy kit. It is a big one that will have to be corrected and will add much work to this project. The insides of the well deck walls are cast and miss some big details. recessed into the walls are recesses large enough to park a car! that are totally missing - the rear well deck wall looks like a complete fabricatoion and resembles in no way the walls. they should be under the poop deck and fo'c'sle deck.
the flat wall in questions
Also on test fitting the deck I notice the deck and gated wall are not parralel, although I do not know if they are supposed to be, my gut instinct ois there is a problem here, but mostly unfixable if thats so ..
A bit more practicle work though, I had to cut the rails off the bow and aft sections, as they will be replaced with photo etch ones.
sanded the cut of stumps flat .. tested with a steel rule for flush fit
test fitting the deck,
Thats it for tonight - burying myself in books and web pages on those lost rooms under the fo'c'sle and poop decks.
Adam
Adamskii
Joined: November 06, 2010
KitMaker: 537 posts
Model Shipwrights: 23 posts
Posted: Monday, March 12, 2012 - 01:53 AM UTC
quick update again for today,
more reseacrh and found a really good shapter in the titanic model builders guide on well decks.
Firstly let me correctly identify the parts - gated wall I referred to before is called a "balwark" and the walls which have to be modified are called "bulkheads"( I knew that ).
The well decks were for access by the 3rd class passengers, and apparently have a harder version of the timber in those areas (more reference needed on that though). not for the passengers but due to that area being used as a cargo loading area.
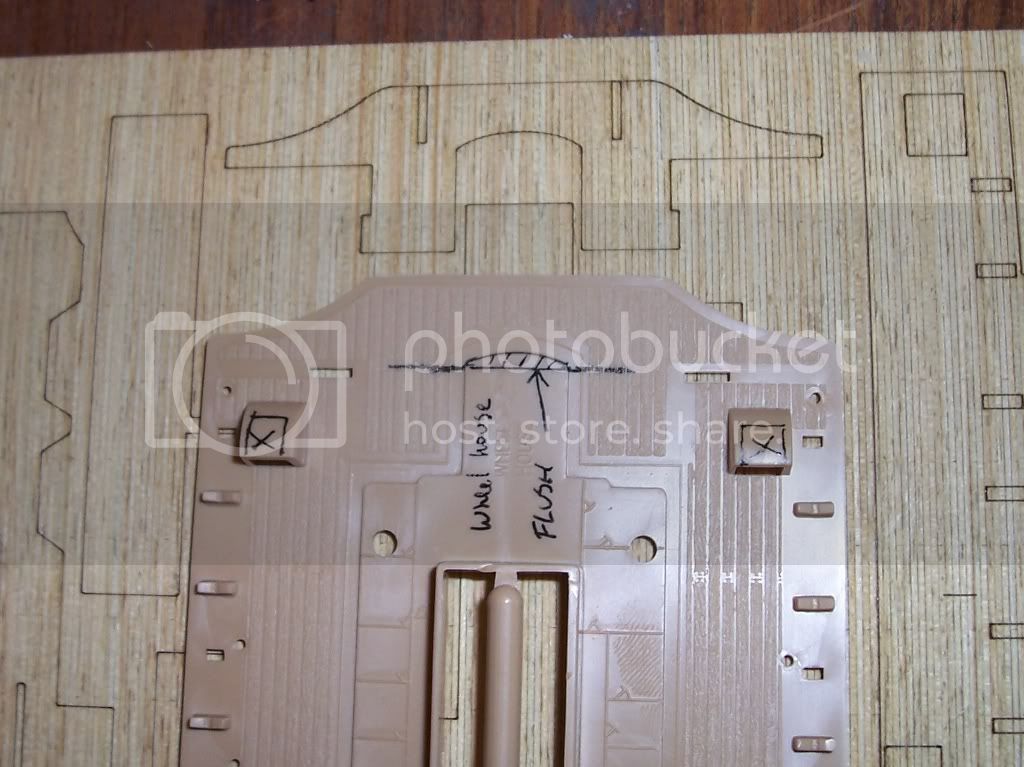
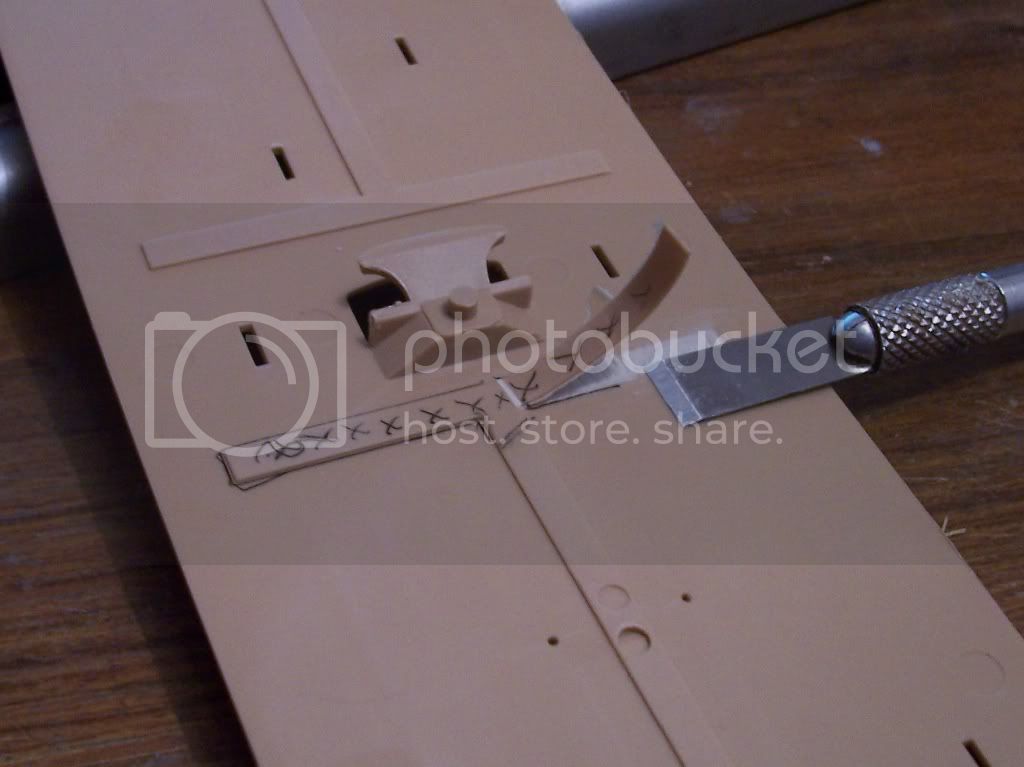
So here is the plans im using for the well deck corrections.
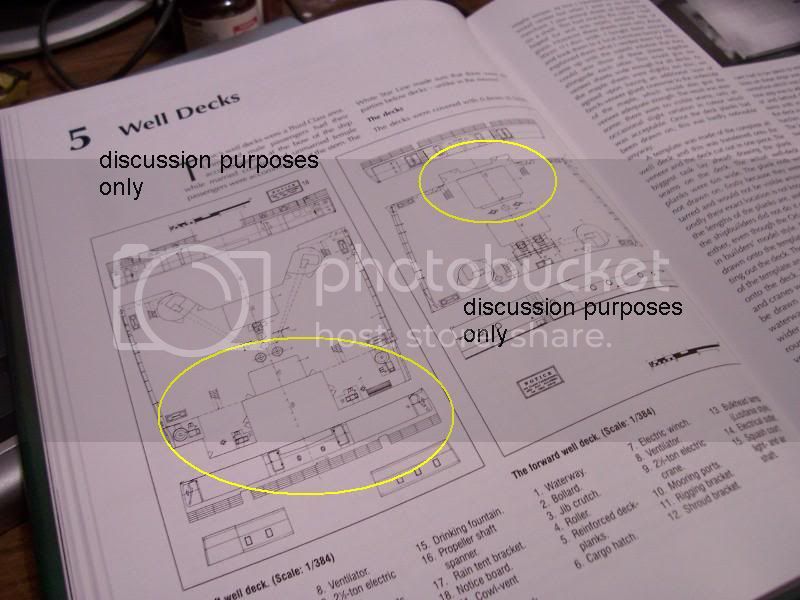
I have drawn in black pen the areas to be removed. rebuilding will be a simple matter of styrene strip and sheet, the doors and details are simple enough to correct aswell. the timber deck will be extended using spares from the matrix around the kit supplied parts.

I have already cut one out but havent photgraphed it yet - will do that when both are done.
Adam
more reseacrh and found a really good shapter in the titanic model builders guide on well decks.
Firstly let me correctly identify the parts - gated wall I referred to before is called a "balwark" and the walls which have to be modified are called "bulkheads"( I knew that ).
The well decks were for access by the 3rd class passengers, and apparently have a harder version of the timber in those areas (more reference needed on that though). not for the passengers but due to that area being used as a cargo loading area.
So here is the plans im using for the well deck corrections.
I have drawn in black pen the areas to be removed. rebuilding will be a simple matter of styrene strip and sheet, the doors and details are simple enough to correct aswell. the timber deck will be extended using spares from the matrix around the kit supplied parts.
I have already cut one out but havent photgraphed it yet - will do that when both are done.
Adam

ejhammer
Joined: June 10, 2008
KitMaker: 230 posts
Model Shipwrights: 136 posts

Posted: Monday, March 12, 2012 - 03:38 AM UTC
Nice progress and research. I have the older Academy kit #1458. Been in the stash for a while now. As a couple guys in our model club had issues with this kit, and shelved them, I have not even opened the box until I started following your build. I did get Tom's rail, benches and widows sets.
I really look forward to your posts, especially the pics, and have begun a folder to save the info to assist in my build (when I get the courage to start).
I'm mostly an aircraft carrier builder, but dabble with other ships and boats occasionally. I am building right now - Hasegawa 1/700 USS ESSEX, Revell 1/249 ? scale USS Buckley, Trumpy 1/700 USS Yorktown, and a wood kit, the Artesania Latina 1/35 RMS Titanic lifeboat. I like to jump around a bit when I get stuck on one kit, I move to another.
Thanks much for your posts
EJ
Adamskii
Joined: November 06, 2010
KitMaker: 537 posts
Model Shipwrights: 23 posts
Posted: Monday, March 19, 2012 - 12:03 PM UTC
hey folks - very large update with pictures. Its abit all over the place but hope these offer some progess
firstly those well deck annex's = scratchbuilt


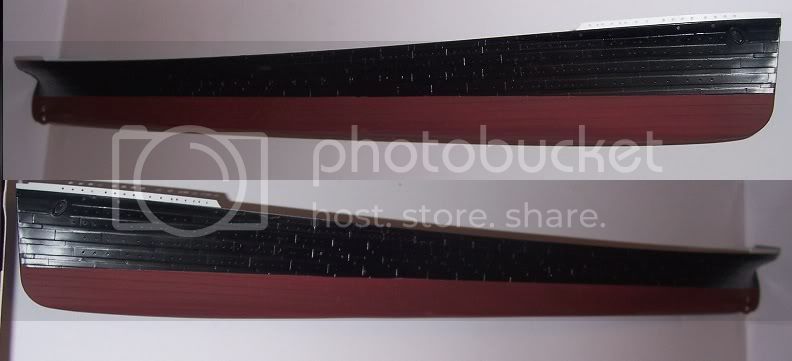
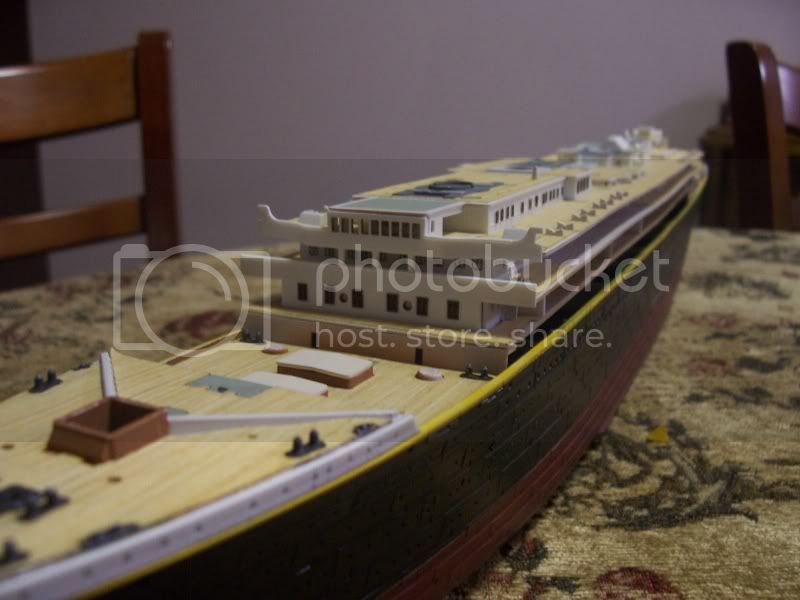
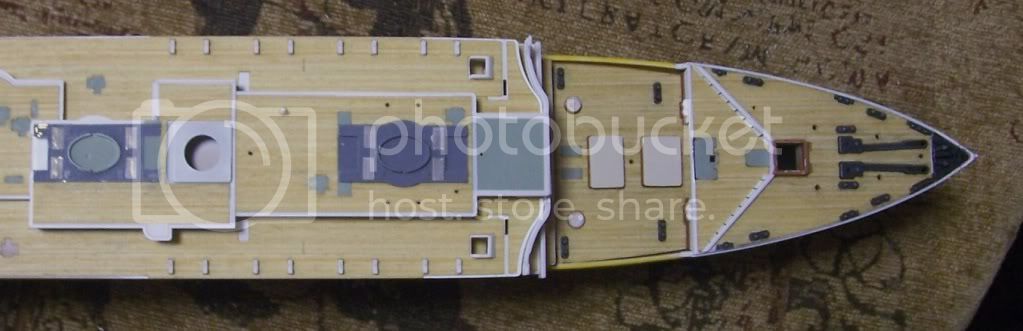
I have painted the hull and the hull line (yellow). hull line was masked and airbrushed with the appropriate yellow. the antifouling also masked. all have received a matt varnish to dull it down.


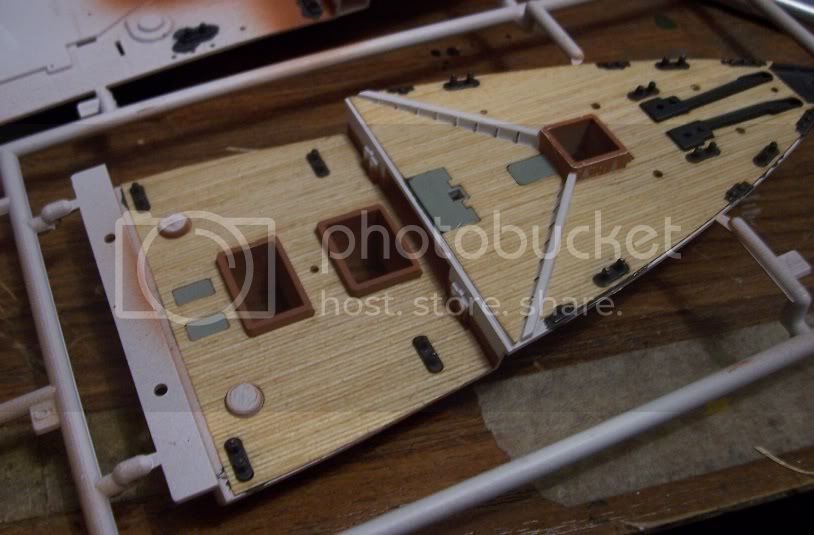
the well decks start getting painted and the veneer added !

comparison of timber paint and the real stuff.. nice..

a correction that needs to be looked at later is the wheel house bulkhead in the kit is curved and should be straight. Also the stairwells should not be covered and will have to be opened up
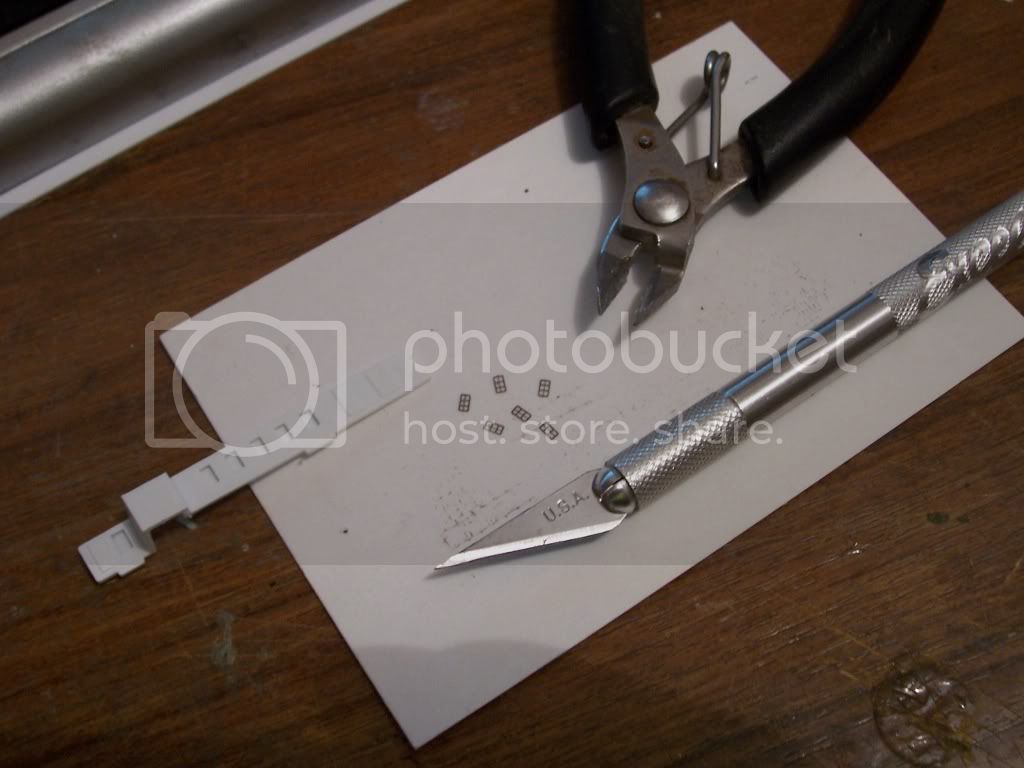
Also I started to play with the photo etch window frames from "Tom's" workshop - incredible pieces of photo etch ! but very very small..
so thats a few pics for now - will add more detail shortly
thanks for reading
Adam
firstly those well deck annex's = scratchbuilt
I have painted the hull and the hull line (yellow). hull line was masked and airbrushed with the appropriate yellow. the antifouling also masked. all have received a matt varnish to dull it down.
the well decks start getting painted and the veneer added !
comparison of timber paint and the real stuff.. nice..
a correction that needs to be looked at later is the wheel house bulkhead in the kit is curved and should be straight. Also the stairwells should not be covered and will have to be opened up
Also I started to play with the photo etch window frames from "Tom's" workshop - incredible pieces of photo etch ! but very very small..
so thats a few pics for now - will add more detail shortly
thanks for reading
Adam
warreni
Joined: August 14, 2007
KitMaker: 5,926 posts
Model Shipwrights: 2,624 posts
Posted: Monday, March 19, 2012 - 12:20 PM UTC
I wouldn't be dulling it down too much mate. Remember, It only had one voyage and I think it would have still been pretty shiny even when she disappeared beneath the waves.
The deck looks like it fits well.. Males painting much easier..
The deck looks like it fits well.. Males painting much easier..
surfsup
Joined: May 20, 2010
KitMaker: 1,230 posts
Model Shipwrights: 1,212 posts
Posted: Tuesday, March 20, 2012 - 06:48 PM UTC
The work you are doing is great Adam. Will keep watching with interest.....Cheers mark

gator
Vendor

#027
Joined: April 13, 2005
KitMaker: 5,422 posts
Model Shipwrights: 5,079 posts

Posted: Wednesday, March 21, 2012 - 04:19 AM UTC
Great work Adam. To get rid of the brown stain on the white, try a clear coat and then apply your white.

Adamskii
Joined: November 06, 2010
KitMaker: 537 posts
Model Shipwrights: 23 posts
Posted: Wednesday, March 21, 2012 - 12:29 PM UTC
Thanks for the comments and feedback folks.
@ Warren: I think that scale consideration looses all evidence of any gloss and at beest a low sheen is appreciable. There are some good articles on scale appreciation and weathering at scale on the Titanic and other vessels on various websites which have me convinced quite solidly! but your right she was only about 3 or 4 months old when sank but did u know she already had rust visible in some areas of the white? interesting topic that and could go on for ages. perhaps worthy of its own thread in painting (scale effect and weathering for scale)
@Kenny : marvelous idea that with the clear coat - if I decide to build the backl up kit , the one thats stained, that technique will come in very handy!
another update,
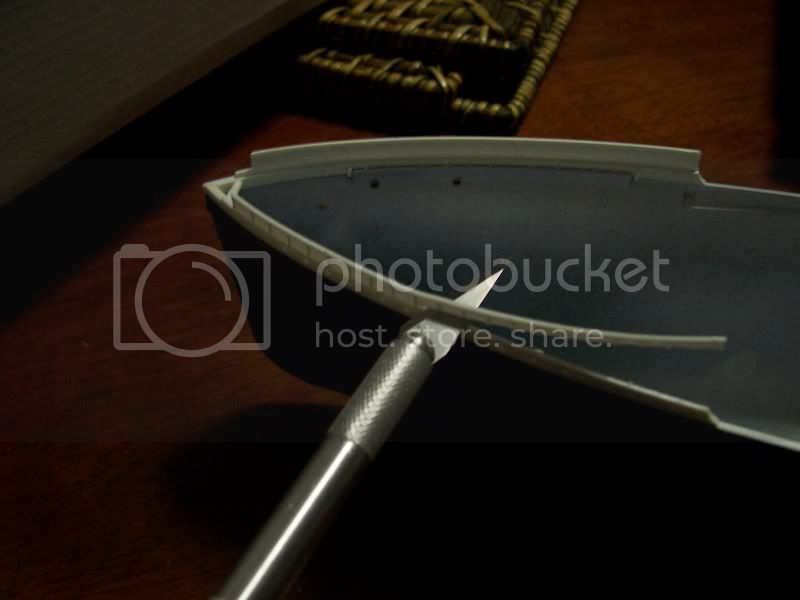
as mentioned earlier I think, Had to remove some of the ribbing under the A deck as it foulded the fit with the wall underneath, just that single rib needed removeing (carefull with that knife!)
Also been doing more with Tom's photo etch windows - these are a massive challenge as they are so small AND they are made to be as accurate as possible so the kit needs to modified to have them fit! the kit has many errors


comparison of the hand drawn window frames with phot etch ones - drawn using a tech drawing pen as mentioned up above,,

I still masked some areas though - the forward bulkhead of B deck - the seame one I showed earlier with the stain (well same piece from the other kit.. ) this was painted band not use PE because its a hard piece to scratchbuild due to the purpose of tying all the decks together - something that needs strength and continuity.

the painted parts are abviously more heavy than the superfine photo etch!
more to follow - I try to do anhour or two every day - but sometimes I start reading reference books and then its bedtime!
Adam
@ Warren: I think that scale consideration looses all evidence of any gloss and at beest a low sheen is appreciable. There are some good articles on scale appreciation and weathering at scale on the Titanic and other vessels on various websites which have me convinced quite solidly! but your right she was only about 3 or 4 months old when sank but did u know she already had rust visible in some areas of the white? interesting topic that and could go on for ages. perhaps worthy of its own thread in painting (scale effect and weathering for scale)
@Kenny : marvelous idea that with the clear coat - if I decide to build the backl up kit , the one thats stained, that technique will come in very handy!
another update,
as mentioned earlier I think, Had to remove some of the ribbing under the A deck as it foulded the fit with the wall underneath, just that single rib needed removeing (carefull with that knife!)
Also been doing more with Tom's photo etch windows - these are a massive challenge as they are so small AND they are made to be as accurate as possible so the kit needs to modified to have them fit! the kit has many errors
comparison of the hand drawn window frames with phot etch ones - drawn using a tech drawing pen as mentioned up above,,
I still masked some areas though - the forward bulkhead of B deck - the seame one I showed earlier with the stain (well same piece from the other kit.. ) this was painted band not use PE because its a hard piece to scratchbuild due to the purpose of tying all the decks together - something that needs strength and continuity.
the painted parts are abviously more heavy than the superfine photo etch!
more to follow - I try to do anhour or two every day - but sometimes I start reading reference books and then its bedtime!
Adam

RedDuster

Joined: March 01, 2010
KitMaker: 7,078 posts
Model Shipwrights: 6,649 posts
Posted: Wednesday, March 21, 2012 - 09:27 PM UTC
Hi Adam, great looking build, following with interest.
Just a thought, with the much finer windoW frames, how much of the interior of those decks is going to be visible when closed up, found this issue with the 1/400th QM2, large windows showing an empty hull, ended up glazing them with clear & coating with Tamiya X19 smoke to hide up the lack of detail.
Si

monkybutt
Joined: November 28, 2007
KitMaker: 381 posts
Model Shipwrights: 20 posts

Posted: Thursday, March 22, 2012 - 11:32 AM UTC
Adam,
I have a question; are all the plastic parts in the 100th Anniversary kit the same as the regular kit?
Thanks very much,
Andrew
I have a question; are all the plastic parts in the 100th Anniversary kit the same as the regular kit?
Thanks very much,
Andrew
Adamskii
Joined: November 06, 2010
KitMaker: 537 posts
Model Shipwrights: 23 posts
Posted: Sunday, March 25, 2012 - 12:35 AM UTC
Hello folks
firstly,
@Andrew. Yes absolutely it is the same kit but with extras. And annoyingly the same instructions plus an extra set that you need to read in unicent as the oild ones dont tell you where to add the PE parts!
@Simon. Not much is visible, but when scrutinised by a judge with possibly a penlight and magnifying glass, need to at least have a resemblance of a window !
Anyways reasonable sized update. Have'nt done so for a few days now and have been working very hard at getting the "shell" ready for all that deck Acne.
Painted the canvas covers of the cargo hatches. WIll fabricate the fordeck cargo hatch very soon.

put the two thermo tanks in the annex under the aft welldeck

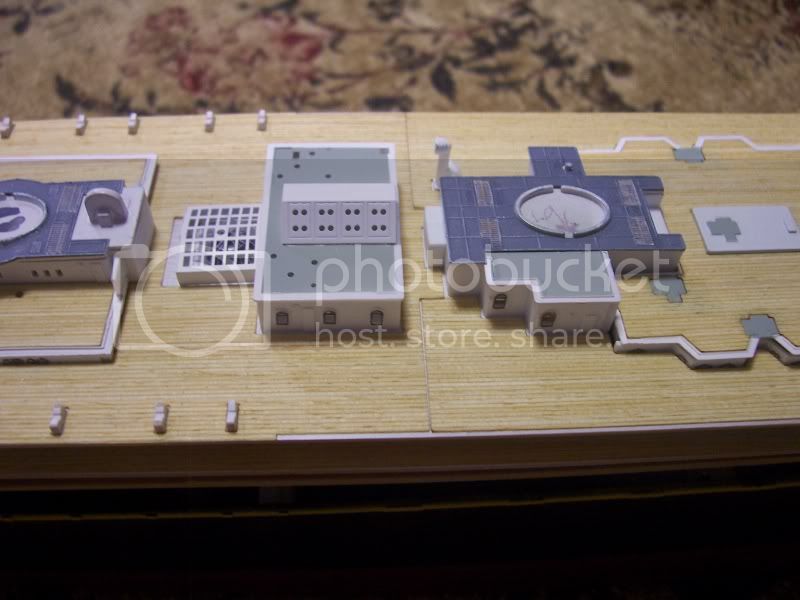
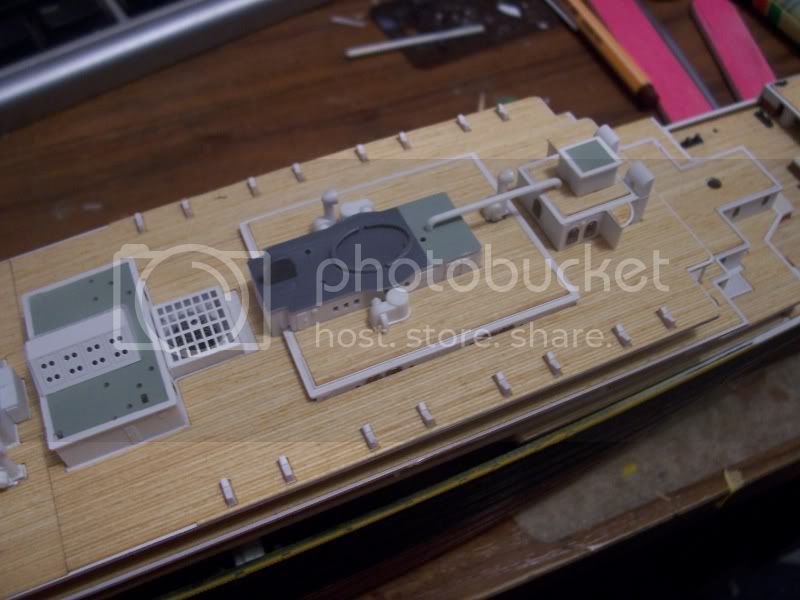
started on the upper decks. ALOT of photo etch with the windows and alot of modifying to get them to fit. However one of the best things about the Academy kits update is the photo etch sheet includes the boiler casing roof tops for the deck houses. These PE pieces include the ribbing detail, but most importantly the stokehold vents and the Fidley vents. Also they make painting a bit simpler. Justr alot of work masking. I have started weathering for light scale (shadow and highlight)
here are two of the boiler casing roofs
and installed
As mentioned in previous post, scratchbuilt the A deck bulkhead here are the windows.

some of the other photo etch windows installed.
Also have managed to install 99% of the timber decking - the two expansion joints nee to be installed yet. The Academy anniversary kit is missing the timber for the rearmost deckhouse with the very small cubic room above it , and the two 1/4 round wings on it. (I have no idea what this is called). Either way Academy beiev its roof to be white, as do some other modellers, but the more "researched" models have it timbered so I planked it aswell. I also planked the wheel house with the straight wall instead of the curved one (scratchbuilt).
Anyways some pics.

alot of tidying up work to be done here

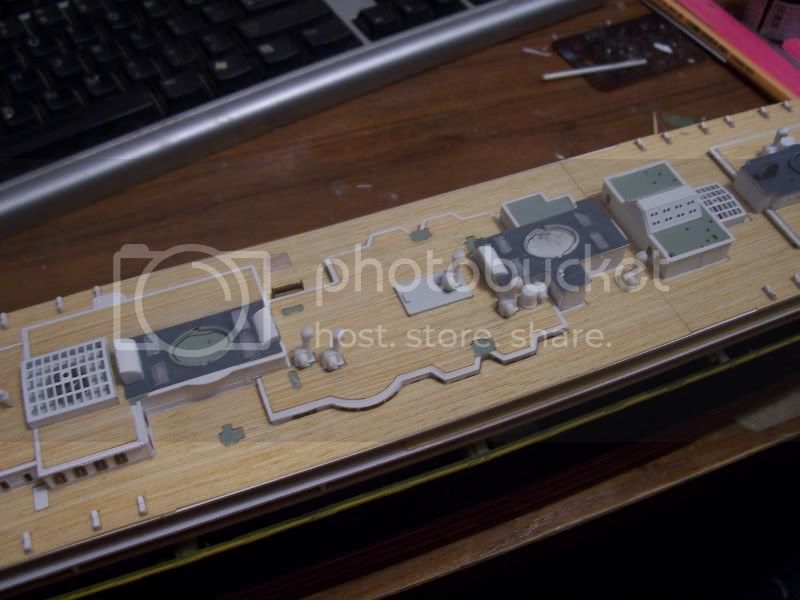
Painting the boiler casing rooftops is a detective puzzle for sure! the Titanic Research Modelling Association (TRMA) guide is simply brilliant and solves much. However funnel no 4 has a 2 part colour and where the line goes between them is hard to tell in plan. Also the 1/48 Peter Davies-Garner model has funnel no 3 rooftop with timber decking. The TRMA diagram has light grey on the starport wing. I went with the light grey. Another problem with either me, the Academy kit, or the information is the fidley vents. As mentioned above the Academy kit has those wonderfull PE boiler casing tops, but, only 3.. there are 4 funnels, so which one misses out? according to the instructions the are installed on funnel 2 3 and 4. Problem is, If I understanbd correctly, that because number 4 was a dummy, it probably shouldnt have fidley vents or stokehold vents. PLEASE correct me if I have that wrong - it is difficult to find exactly what I want and everyone is doing different stuff on theoir models. Once again Peter's 1/48 has no evidence of fidley vents on no.4 as shown in the colour pics of his book. That makes sense in no 4 is a dummy. But then Academy provide individual vents for funnel no.1. I think someone messed up the Academy instructions and you should install the no. 4 photo etch part on funnel no.1 and not install any fidley vents on No.4 casing.
Here's the pics anyways..
note the beautiful PE glass dome cover..
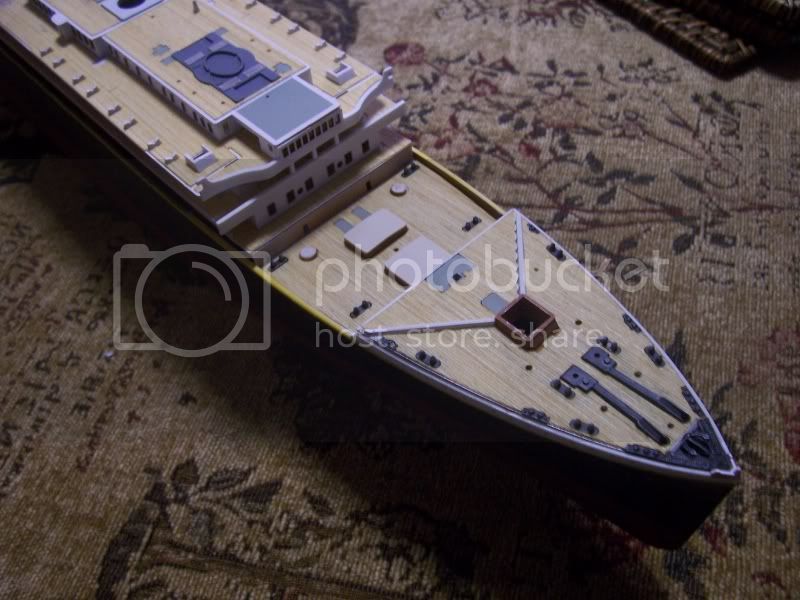
A close up of the 3rd anchor. I like the photo etch deck grills.

And I am very happy because i finally had my limited edition print framed and is hung on the Family room wall. It is by Barry Spicer, and is limited to 1523 - the number of people who died (at the time of the painting - I know that number changes often!) I have number 145. It is massive - about 120cm wide by 90cm high! not including the frame or matt.

Adam
firstly,
@Andrew. Yes absolutely it is the same kit but with extras. And annoyingly the same instructions plus an extra set that you need to read in unicent as the oild ones dont tell you where to add the PE parts!
@Simon. Not much is visible, but when scrutinised by a judge with possibly a penlight and magnifying glass, need to at least have a resemblance of a window !
Anyways reasonable sized update. Have'nt done so for a few days now and have been working very hard at getting the "shell" ready for all that deck Acne.
Painted the canvas covers of the cargo hatches. WIll fabricate the fordeck cargo hatch very soon.
put the two thermo tanks in the annex under the aft welldeck
started on the upper decks. ALOT of photo etch with the windows and alot of modifying to get them to fit. However one of the best things about the Academy kits update is the photo etch sheet includes the boiler casing roof tops for the deck houses. These PE pieces include the ribbing detail, but most importantly the stokehold vents and the Fidley vents. Also they make painting a bit simpler. Justr alot of work masking. I have started weathering for light scale (shadow and highlight)
here are two of the boiler casing roofs
and installed
As mentioned in previous post, scratchbuilt the A deck bulkhead here are the windows.
some of the other photo etch windows installed.
Also have managed to install 99% of the timber decking - the two expansion joints nee to be installed yet. The Academy anniversary kit is missing the timber for the rearmost deckhouse with the very small cubic room above it , and the two 1/4 round wings on it. (I have no idea what this is called). Either way Academy beiev its roof to be white, as do some other modellers, but the more "researched" models have it timbered so I planked it aswell. I also planked the wheel house with the straight wall instead of the curved one (scratchbuilt).
Anyways some pics.
alot of tidying up work to be done here
Painting the boiler casing rooftops is a detective puzzle for sure! the Titanic Research Modelling Association (TRMA) guide is simply brilliant and solves much. However funnel no 4 has a 2 part colour and where the line goes between them is hard to tell in plan. Also the 1/48 Peter Davies-Garner model has funnel no 3 rooftop with timber decking. The TRMA diagram has light grey on the starport wing. I went with the light grey. Another problem with either me, the Academy kit, or the information is the fidley vents. As mentioned above the Academy kit has those wonderfull PE boiler casing tops, but, only 3.. there are 4 funnels, so which one misses out? according to the instructions the are installed on funnel 2 3 and 4. Problem is, If I understanbd correctly, that because number 4 was a dummy, it probably shouldnt have fidley vents or stokehold vents. PLEASE correct me if I have that wrong - it is difficult to find exactly what I want and everyone is doing different stuff on theoir models. Once again Peter's 1/48 has no evidence of fidley vents on no.4 as shown in the colour pics of his book. That makes sense in no 4 is a dummy. But then Academy provide individual vents for funnel no.1. I think someone messed up the Academy instructions and you should install the no. 4 photo etch part on funnel no.1 and not install any fidley vents on No.4 casing.
Here's the pics anyways..
note the beautiful PE glass dome cover..
A close up of the 3rd anchor. I like the photo etch deck grills.
And I am very happy because i finally had my limited edition print framed and is hung on the Family room wall. It is by Barry Spicer, and is limited to 1523 - the number of people who died (at the time of the painting - I know that number changes often!) I have number 145. It is massive - about 120cm wide by 90cm high! not including the frame or matt.
Adam
Gremlin56
Joined: October 30, 2005
KitMaker: 3,897 posts
Model Shipwrights: 3,301 posts
KitMaker: 3,897 posts
Model Shipwrights: 3,301 posts
Posted: Sunday, March 25, 2012 - 07:15 PM UTC
Beautiful work Adam,
the wooden deck does the trick. I am severely tempted to buy one of these while they are still nicely priced.
Cheers,
Julian
the wooden deck does the trick. I am severely tempted to buy one of these while they are still nicely priced.
Cheers,
Julian
surfsup
Joined: May 20, 2010
KitMaker: 1,230 posts
Model Shipwrights: 1,212 posts
Posted: Sunday, March 25, 2012 - 07:28 PM UTC
Agree with you Julien. You are doing a beautiful job Adam.....Cheers mark
monkybutt
Joined: November 28, 2007
KitMaker: 381 posts
Model Shipwrights: 20 posts
Posted: Monday, March 26, 2012 - 11:59 AM UTC
Adam,
Thank you for the insight! I've been trying to figure that one out for a while. I have the Premium Edition kit, 14201 i believe it is, that came in the while box. Unfortunately, I melted the hull with acetone while trying to repove some rattle can spray paint I used as primer. I tried ordering a new hull from MRC, but it's been over a year now, so I think I'm just going to ahead and buy the older base kit as a replacement.
Anyway, thanks again and keep posting pictures!
-Andrew
Adamskii
Joined: November 06, 2010
KitMaker: 537 posts
Model Shipwrights: 23 posts
Posted: Thursday, March 29, 2012 - 05:01 PM UTC
Hi again, been a while since updating. I prefer to do it daily but low traffic might as well do it less frequent with larger info packets.
So I switched the abovementioned photo etch funnel housing issues around. SImple fix but annoying. I have also started adding some deck acne and problem solving some other issues.
I like to build tanks and armoured vehicles primarily, and this is very different - usually I build the box/hull and then add the details. THEN paint at the very end. Here is paint as you go and no solid box to build upon. I guess thats why I want the hull and decks glued together sooner than later so I can add my details to the solid box that is the hull. ALso I dont like how flexible the top deck is and if I add the rigging, and it flex's it might adjust rigging tensions..
So Im out of sequence.
BY the way of anyone has a spare copy of Toms Titanic detail set instruction I be much obliged if they could email them to me - I have lost mine and am guessing much with some of the parts..
So some pics.
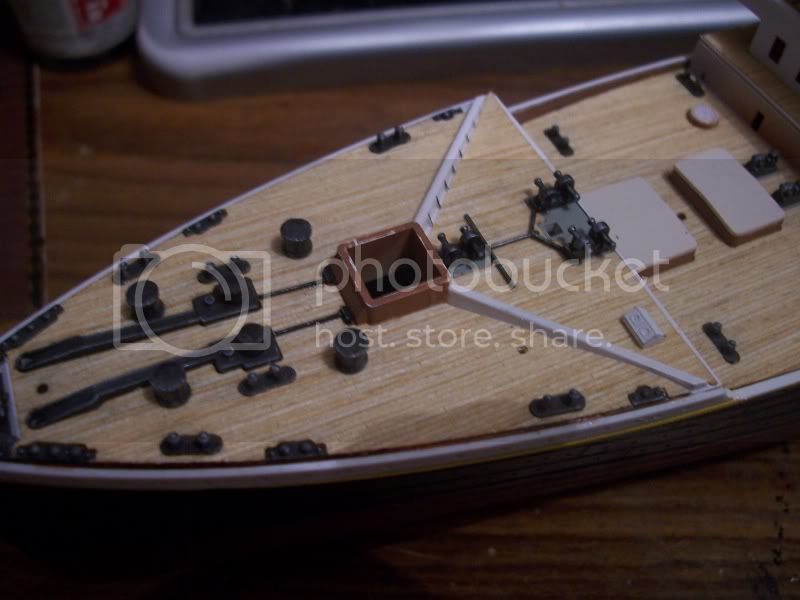
an attempt at one of the benches - and the hole in the deck where the machinery was positioned incorrectly (yet to be patched)
note the size difference between Toms benches and Academy ones at apparently the same scale...
Some cranes...

and the foredeck. I scratched the steam lines, have yet to add the valve handles, and paint the capstains etc etc... lots work yet and lots missing details to be scratched...

Thats all for now , more to follow later.,
PS i bought the Titanic owners workshop manual from haynes - OMG its brilliant - had more valuable information in it than pretty much any other book I own so far (until I get TTSM pt 1 and 2) I also goit the 101 fact you thought you knew about Titanic, and am currently losing much sleep reading that fascinating book - excellent value for money!
Adam
So I switched the abovementioned photo etch funnel housing issues around. SImple fix but annoying. I have also started adding some deck acne and problem solving some other issues.
I like to build tanks and armoured vehicles primarily, and this is very different - usually I build the box/hull and then add the details. THEN paint at the very end. Here is paint as you go and no solid box to build upon. I guess thats why I want the hull and decks glued together sooner than later so I can add my details to the solid box that is the hull. ALso I dont like how flexible the top deck is and if I add the rigging, and it flex's it might adjust rigging tensions..
So Im out of sequence.
BY the way of anyone has a spare copy of Toms Titanic detail set instruction I be much obliged if they could email them to me - I have lost mine and am guessing much with some of the parts..
So some pics.
an attempt at one of the benches - and the hole in the deck where the machinery was positioned incorrectly (yet to be patched)
note the size difference between Toms benches and Academy ones at apparently the same scale...
Some cranes...
and the foredeck. I scratched the steam lines, have yet to add the valve handles, and paint the capstains etc etc... lots work yet and lots missing details to be scratched...
Thats all for now , more to follow later.,
PS i bought the Titanic owners workshop manual from haynes - OMG its brilliant - had more valuable information in it than pretty much any other book I own so far (until I get TTSM pt 1 and 2) I also goit the 101 fact you thought you knew about Titanic, and am currently losing much sleep reading that fascinating book - excellent value for money!
Adam
Locknut
Joined: March 30, 2012
KitMaker: 5 posts
Model Shipwrights: 4 posts
Posted: Friday, March 30, 2012 - 02:06 AM UTC
Adam,
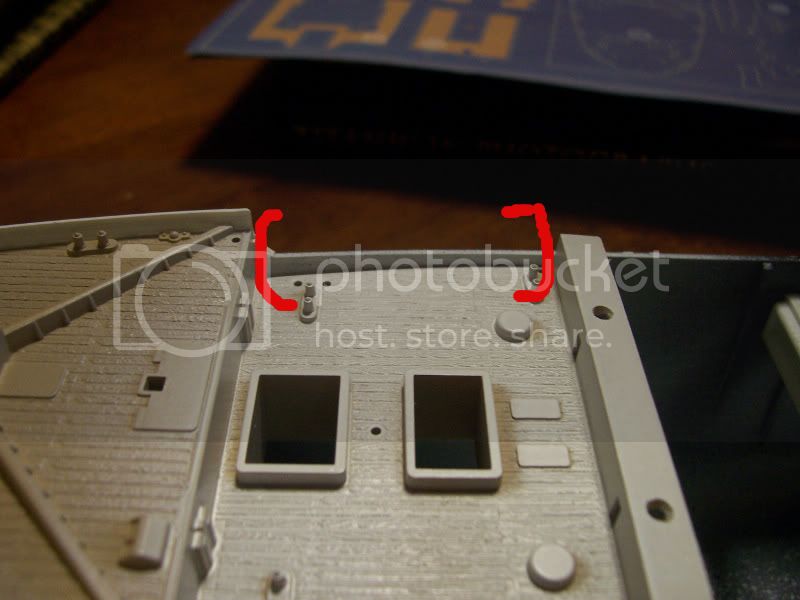
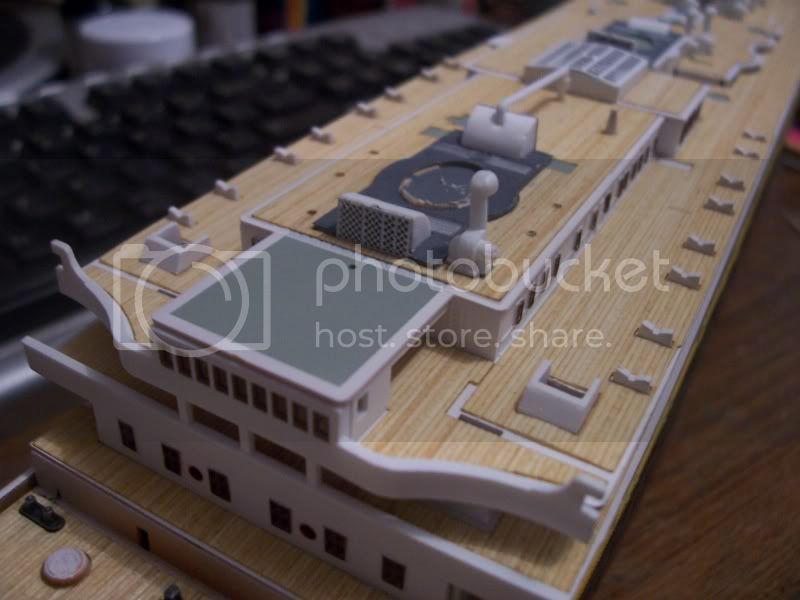
Loving your build so far. Therefore, I am hoping you can help me with mine. Just realized a glaring mistake by Academy. I think. Maybe it's just me. The instructions show NO walls between parts B2, B5 and the boat deck. These would be vertical walls between these 2 small decks and the boat deck. This is the top deck and is a glaring mistake since it is wide open to viewing. I see in the pictures in your last post that you have these walls in place. The instructions do not show these 2 steps and I screwed up big time by gluing B5 flush to the boat deck. I realized my mistake and had to cut the part out, almost ruining both parts. What gives in these 2 areas. Obviously, you found a solution. Can you help please? Did I miss a step? I have been over the instructions many times and they show no side walls except in the actual photos. I am stuck at this point.
Loving your build so far. Therefore, I am hoping you can help me with mine. Just realized a glaring mistake by Academy. I think. Maybe it's just me. The instructions show NO walls between parts B2, B5 and the boat deck. These would be vertical walls between these 2 small decks and the boat deck. This is the top deck and is a glaring mistake since it is wide open to viewing. I see in the pictures in your last post that you have these walls in place. The instructions do not show these 2 steps and I screwed up big time by gluing B5 flush to the boat deck. I realized my mistake and had to cut the part out, almost ruining both parts. What gives in these 2 areas. Obviously, you found a solution. Can you help please? Did I miss a step? I have been over the instructions many times and they show no side walls except in the actual photos. I am stuck at this point.
ejhammer
Joined: June 10, 2008
KitMaker: 230 posts
Model Shipwrights: 136 posts
Posted: Friday, March 30, 2012 - 09:26 AM UTC
Adam, check your Private messages re PE instructions.
EJ
EJ
Adamskii
Joined: November 06, 2010
KitMaker: 537 posts
Model Shipwrights: 23 posts
Posted: Friday, March 30, 2012 - 12:04 PM UTC
Quoted Text
Adam,
Loving your build so far. Therefore, I am hoping you can help me with mine. Just realized a glaring mistake by Academy. I think. Maybe it's just me. The instructions show NO walls between parts B2, B5 and the boat deck. These would be vertical walls between these 2 small decks and the boat deck. This is the top deck and is a glaring mistake since it is wide open to viewing. I see in the pictures in your last post that you have these walls in place. The instructions do not show these 2 steps and I screwed up big time by gluing B5 flush to the boat deck. I realized my mistake and had to cut the part out, almost ruining both parts. What gives in these 2 areas. Obviously, you found a solution. Can you help please? Did I miss a step? I have been over the instructions many times and they show no side walls except in the actual photos. I am stuck at this point.
I have struggled to work this out but the penny dropped eventually.
Essentially the missing walls are added later in step 32 when you mate A deck and the boat deck. The walls of A deck (assembled in step 10) have higher and lower walls, the higher ones insert through the holes in the boat deck just enough to support parts B2 and B5. You can see how difficult it willbe to guess how far this will be and only using the steps/stairs of those two parts to guide in height relies alot on academy's fit design.. ( I wouldnt). I have my walls early because I dont follow the instruction sequence. I assembled all my decks as soon as each ones walls were built, and then added the roofs last. in other words made the roofs fit the walls not the other way round. even then you will still get gaps that had to be filled - each corner of part b2 has a hole that even I cannot explain at this stage and if you look real close in some of my pics you can see styrene strip has been used to fill the corners under the "eaves" (about 2mm hole each corner).
I hope that makes sense. Trust me the walls are there - just academy has made it quite challenging. PS if you assemble decks out of sequence then you will have to piant windows before assembly, etc etc and doing the funnel stays rigging will also be a challenge created by going out of sequence ( I have yet to deal with this self created issue)
Regards
Adam
oh can we see some progress shots ?
 |

WEB HOSTING BY


Copyright ©2021 Model Shipwrights and Kitmaker Network, a subsidiary of Silver Star Enterprises
All Rights Reserved. Please read our Conditions of Use and Privacy Policy.
All Rights Reserved. Please read our Conditions of Use and Privacy Policy.