_GOTOBOTTOM
Ships by Class/Type: Military Small Craft
For topics on PT boats, landing craft, Vietnam riverine, etc.
Tiny Flowers
Shanghaied
Visit this Community
Schleswig-Holstein, Germany
Joined: June 30, 2011
KitMaker: 189 posts
Model Shipwrights: 106 posts
Posted: Thursday, July 11, 2013 - 05:29 PM UTC
Thanks Naseby

It is buildable, don't worry. Some surfaces have marks from the milling of the molds , and the aft deckhouse(engine room casing) is trapezoid in cross-section, which causes the problems with the deck above.
But nothing which cannot be solved with a bit of sandpaper or styrene sheet.
Its not shake-and-bake and you need some references, but then you can build nearly every corvette you like.
Ask me if you have a special question.

Greetings from Shanghai
Shanghaied
Visit this Community
Schleswig-Holstein, Germany
Joined: June 30, 2011
KitMaker: 189 posts
Model Shipwrights: 106 posts
Posted: Sunday, August 04, 2013 - 07:27 PM UTC
Update was delayed by holiday and a broken camera .

However, work was anyway slow, I had to build the bridge structure from scratch.
I have a very detailed drawings for HMCS Agassiz and some nice photos from HMCS Brandon (which differ considerably). The angles not seenon the photos I reconstructed from other photos from HMCS's Battleford and Saskatoon. Required a lot of measuring, cutting and sanding.

The most difficult part were actually the stanchions and support girders for the bridge wing.
The lower stanchions are angle-beams in reality. I tried to replicate them with thin wire, but i simply does not look right. t the end I used very thin strips(0.4mm) of plastic and glued them in recesses in the deck above (a bit overkill, but the only way to get it looking straight),then sanded everything smooth. The strips are much deeper than they should be , but you cannot see it.

The upper girders I had to to with 0.3mm brass round material (anybody knows a source for 0.3mm profiles? )
Bridge compass house and boat decks are covered with real wood. The bridge windows are covered with Microscale transparent glue.

Colors for the Western Approaches Camouflage are off-white, light blue and a special mix of light bluish green, underwater German grey (a tank color) for the scale effect instead of black, all Mr Color from Gunze.


The mast is made of 2 different diameters of brass tube glued together be a fitting wire inside (Luckily the inside diameter of both tubes were the same and i had a fitting wire)
Yard is wire, crows nest and lights cut off from the kit mast (not yet installed here. Actually very easy when you have the right brass tubes. Will never use soft plastic masts again.
Lost the -gunshield, so have to scratch this too, together with the depth charge ramps which i really dread...

More to come

Greetings from Shanghai
surfsup
Visit this Community
Queensland, Australia
Joined: May 20, 2010
KitMaker: 1,230 posts
Model Shipwrights: 1,212 posts
Posted: Monday, August 05, 2013 - 07:02 PM UTC
You are doing some very nice work on her Sir.....Cheers mark
Shanghaied
Visit this Community
Schleswig-Holstein, Germany
Joined: June 30, 2011
KitMaker: 189 posts
Model Shipwrights: 106 posts
Posted: Monday, August 05, 2013 - 09:15 PM UTC
Thanks Mark

Its a slow process, but its fun and you can avoid all the mistakes of the first ship here.

Just wish I can get 2 more. In the moment they run out of kits here. Still like to make a standard open bridge and an improved Flower...

Greetings from Shanghai
TAFFY3
Visit this Community
New York, United States
Joined: January 21, 2008
KitMaker: 2,531 posts
Model Shipwrights: 1,244 posts
Posted: Monday, August 05, 2013 - 10:48 PM UTC
Very nice Tom, those tiny bridge supports are really impressive. Al
Shanghaied
Visit this Community
Schleswig-Holstein, Germany
Joined: June 30, 2011
KitMaker: 189 posts
Model Shipwrights: 106 posts
Posted: Tuesday, August 06, 2013 - 05:28 PM UTC
Thanks Al, they are really a PITA.
Would be perfect to have them in PE, but they are different for each ship (Even the Saskatoon and Battleford with quite similar bridges have different girders)

Maybe one day I make my own PE

Greetings from Shanghai
Longshanks8
Visit this Community
England - South West, United Kingdom
Joined: July 04, 2013
KitMaker: 430 posts
Model Shipwrights: 390 posts
Posted: Sunday, August 11, 2013 - 01:47 AM UTC
Nice work Tom,

Don't know if either of these would be any help

KS metals http://www.squirestools.com/12-19a.pdf

or

http://www.albionalloys.co.uk/metal-for-model-makers

Hope it helps

Shanghaied
Visit this Community
Schleswig-Holstein, Germany
Joined: June 30, 2011
KitMaker: 189 posts
Model Shipwrights: 106 posts
Posted: Sunday, August 11, 2013 - 05:45 PM UTC
Thanks very much Kev

I will study the brochures in detail, just saw on a first look that they have very small angle beams
Problem for me is sometimes, even if I know what i nee I cannot get it locally. Some do not exist here, sometimes the translation is the problem (even with a translator)
If I cannot get it in the internet I have to go to a street with hundreds of tiny shops, each selling nearly everything, except what you need. It like a bazaar.
But your catalogue will definitely help

Greetings from Shanghai
Shanghaied
Visit this Community
Schleswig-Holstein, Germany
Joined: June 30, 2011
KitMaker: 189 posts
Model Shipwrights: 106 posts
Posted: Monday, August 19, 2013 - 06:19 PM UTC
HMCS Brandon is nearing completion.


Most of the small parts are installed: depthcharge ramp, throwers, minesweeping gear (had to scratch 2 small A-frames on the side) lot of small boxes, winches, spare depthcharges, davits, liferafts etc. I have no real good on-deck picture of Brandon, so I followed the arrangement of HMCS Agassiz.

After I lost the main gun shield I tried something new. Instead of thin sheet plastic I used paper, cut out, glued together with paper clue (its just a box) and then coating it with thin quickglue.


Looks good, and is simple, but has some disadvantages. Its difficult to get really flat sides because the paper bends when drying. Fiddled this to an acceptable shape. The surface is quite rough, quickglue is not easy to sand and after puttying the complete shield wobbles when sanding due to the thin material. Definitely useful for structural reinforcement but with the surface i need more tests.
I made the shield a tiny bit larger, as I feel the original one is looking a bit small compared to the bridge.

Need to fit the boats, some small rails and ladders, built 2 searchlights the radar and probably 100 small repairs.

Longshanks8
Visit this Community
England - South West, United Kingdom
Joined: July 04, 2013
KitMaker: 430 posts
Model Shipwrights: 390 posts
Posted: Monday, August 19, 2013 - 07:22 PM UTC
Hi Tom,

A couple of great corvettes you have there.

May be a help to you or others looking the following links are full of information,

http://theflowerclasscorvetteforums.yuku.com/

http://www.cbrnp.com/RNP/Flower/contents.htm

Your question on radar covers. From the pictures I've seen it seems to be covers outside

Enjoying your build

Cheers Kev
Shanghaied
Visit this Community
Schleswig-Holstein, Germany
Joined: June 30, 2011
KitMaker: 189 posts
Model Shipwrights: 106 posts
Posted: Monday, August 19, 2013 - 08:10 PM UTC
Thanks Kev!

I am using both websites plus the great book about Agassiz (Anatomy of the ship series) and the Ensign No3 booklet)
My pics of HMCS Brandon are from several Canadian Websites.

I show Brandon with the SW2CQ radar int he mast top, not the type 271 lantern. She had both together later, but I like the profile without the lantern more and have 2 photos of this version

Greetings from Shanghai

Shanghaied
Visit this Community
Schleswig-Holstein, Germany
Joined: June 30, 2011
KitMaker: 189 posts
Model Shipwrights: 106 posts
Posted: Tuesday, August 20, 2013 - 07:42 PM UTC
I need a bit of help.
Probably has been asked a hundred times already.
My Gallery is full, but I do not want to delete pics from the previous building reports. What can I do?

Thanks in advance!

Greetings from Shanghai
Shanghaied
Visit this Community
Schleswig-Holstein, Germany
Joined: June 30, 2011
KitMaker: 189 posts
Model Shipwrights: 106 posts
Posted: Friday, August 30, 2013 - 10:09 PM UTC
HMCS Brandon is ready to weigh anchor!


Was a fight, but real fun. I learnt a lot of it not afraid of scratching superstructures anymore. Next step is a complete hull.
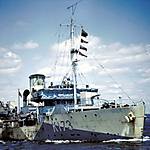
Here you can see her in front of the real ship. The photo shows actually very nicely the camouflage, bit difficult to see here. Have a few more, but not two show the ship at the same time, all have slight difference in the equipment.


I really like the Flower class. they are incredibly busy on deck and so many variations. I will make at least two more, but in the moment run out of kits here.
Will later make a list what I converted, in case someody like to make another HMCS Brandon. HMS Alisma is very similar, only without the canadian "specials"

Hope you like it

Greetings from Shanghai
Longshanks8
Visit this Community
England - South West, United Kingdom
Joined: July 04, 2013
KitMaker: 430 posts
Model Shipwrights: 390 posts
Posted: Saturday, August 31, 2013 - 05:03 AM UTC
Tom, I think you have done a fantastic job!

Am I right in thinking the length of your model is 180mm (7").

Like you I love the character of the Flower Class Corvettes but there is no way I could work in this scale.

Best regards Kev
surfsup
Visit this Community
Queensland, Australia
Joined: May 20, 2010
KitMaker: 1,230 posts
Model Shipwrights: 1,212 posts
Posted: Saturday, August 31, 2013 - 03:16 PM UTC
You have done a really beautiful job on her. Very well done indeed.....Cheers mark
Shanghaied
Visit this Community
Schleswig-Holstein, Germany
Joined: June 30, 2011
KitMaker: 189 posts
Model Shipwrights: 106 posts
Posted: Saturday, August 31, 2013 - 05:01 PM UTC
Thands Mark, thanks Kev,

Yes, its 7", but its 1/350, so you can actually see your parts.
Its just a small ship.
But honestly I have to use a visor all the time. Very helpful.

Greetings from Shanghai
Shanghaied
Visit this Community
Schleswig-Holstein, Germany
Joined: June 30, 2011
KitMaker: 189 posts
Model Shipwrights: 106 posts
Posted: Sunday, September 01, 2013 - 08:07 PM UTC
For the flower-lovers a few more information:

Differences between a British and a Canadian Flower


- The Canadian Flower has the 2 pdr. much more aft. Same with the shields below the gun platform. The reason is, that they originally all should have a mainmast. That was however only installed in the earlier ships and removed later anyway later.
- The Canadian ships have their galley behind the bridge on the main deck. Thats the reason for the kitchen funnel. The British ships had the galley at the aft end of the engine room casing, which is therefore slightly longer
-many Canadian ships kept their SW2CQ antenna even after they got their type 271 lantern.
This is not complete and there are exceptions (ships built for the RN in Canada e.g.) but sums it up roughly.

Conversions for HMCS Brandon from the Zinnia kit:

- shortened foc'sle, including lengthened main deck
- corrected stern openings for depth charges and minsweeping gear
- complete new bridge structure
- shortened engine room casing as per Canadian standard
- new depth charge rails
- repositioned 2 pdr gun platform and shields
- new boat deck
- new raft platforms
- longer mast with SW2K antenna
- many small things like stairs, rails, AA guns, funnel grating etc

If you want to make HMS Alisma (there are some really good pictures in the net) in her short foc'sle version, you can follow my conversion with the following differences:

- do not do the Canadian conversions (gun position, galley position, mast antenna)
-add the 271 radar lantern behind the bridge

Hope the info will help someone.

So that's it. Will be continued, when I can get my hands on more kits.

Greetings from Shanghai


Grauwolf
#084
Visit this Community
Quebec, Canada
Joined: September 14, 2005
KitMaker: 2,485 posts
Model Shipwrights: 1,157 posts
Posted: Monday, September 02, 2013 - 11:56 AM UTC
Tom,

Excellent work!

Cheers.
Joe
 _GOTOTOP