_GOTOBOTTOM
Ships by Class/Type: Destroyers
This forum covers all types of destroyers from all eras.
1/350 Tamiya Fletcher
BillGorm
Visit this Community
New Jersey, United States
Joined: November 02, 2009
KitMaker: 609 posts
Model Shipwrights: 40 posts
Posted: Sunday, November 24, 2013 - 10:57 AM UTC
I've finally reached the main point of this build - the weathering. As I mentioned at the start I struggle with this area and chose to focus on it with this build (along with improving my rigging). So with that in mind, all suggestions are welcome.

I started by adding a brown pin wash all over the model. I didn't like the look over the blue paint but couldn't think of a better color to use. What do folks normally use for a blue-painted ship?

Next I went to work on the starboard side with oils to create staining along the boot topping, rust streaks, etc. I also added some random areas of blue to try to add life to the paint. For those who have used the AK Interactive products for ships, what do you think of them? I've held off on buying them because I have zero experience with enamels.

Finally, I couldn't resist getting started on weathering the deck. I've only done a small area at the bow using a combination of grey oil paint and MIG pigments. I think my general approach is fine but I need shades of paint and pigments more suited to naval subjects.

At any rate, here are some photos … all input is welcome.


Gremlin56
Joined: October 30, 2005
KitMaker: 3,897 posts
Model Shipwrights: 3,301 posts
Posted: Sunday, November 24, 2013 - 05:30 PM UTC
On my Fletcher build I used a brown oil wash too Bill, works fine.
Are you going to do any weathering under the waterline?
Julian
RedDuster
Visit this Community
England - South East, United Kingdom
Joined: March 01, 2010
KitMaker: 7,078 posts
Model Shipwrights: 6,649 posts
Posted: Sunday, November 24, 2013 - 08:48 PM UTC
Hi Bill,

Love the weathering above the waterline, very subtle and effective.

just keep up the good work,

Si
RussellE
#306
Visit this Community
Victoria, Australia
Joined: June 27, 2010
KitMaker: 3,959 posts
Model Shipwrights: 2,777 posts
Posted: Sunday, November 24, 2013 - 09:12 PM UTC
Coming along nicely, Bill
BillGorm
Visit this Community
New Jersey, United States
Joined: November 02, 2009
KitMaker: 609 posts
Model Shipwrights: 40 posts
Posted: Monday, November 25, 2013 - 03:34 AM UTC
Thanks for the comments, gents. I'm generally happy with how it's coming along but I appear to have made the same mistake I always do - using too dark a shade of paint that only gets darker with weathering. The photos conceal this fact because they were taken under good lighting but viewed from 3-4 feet away under "average" light conditions I'm sure it will appear too dark. Does anyone else struggle with this - modeling for the camera versus modeling for the shelf?

Julian - I'm thinking about it but I'm not entirely sure how to go about it. Streaking from grime, salt stains, fuel leaks, etc. doesn't seem like it would carry below the waterline. Ditto for the sort of stains and discoloration commonly found at the waterline. Basically, I had hoped to address below the waterline with chipping earlier on ... didn't happen and I had to keep moving.
Fordboy
Visit this Community
Auckland, New Zealand
Joined: July 13, 2004
KitMaker: 2,169 posts
Model Shipwrights: 1,597 posts
Posted: Monday, November 25, 2013 - 07:16 AM UTC
Ahoy Bill

You are not alone.

I also have this issue with photos versus reality.

I put my experience down to failing eyesight! But what I see and what the camera see and my big computer screen displays appear different to me.

I also believe many other modellers have a similar challenge like Michael Rinaldi who sprays his models with lighter colours to I believe minimise the affect. These modellers are also constantly photographing and reanalysing their work as they progress through a build.

Cheers


Sean
BillGorm
Visit this Community
New Jersey, United States
Joined: November 02, 2009
KitMaker: 609 posts
Model Shipwrights: 40 posts
Posted: Saturday, January 04, 2014 - 11:09 AM UTC
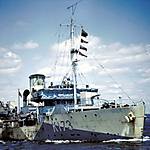
Wow, it's been more than a month since my last post. You know you're slacking when you have to search for your own build log. I had hoped to put up more progress photos but I guess DD-448 developed a mind of her own. Finished photos are below (all input is welcome) but here are my parting thoughts:

1 - The Tamiya kit is a great starting point for modeling an early Fletcher. It goes together easily, it's nicely engineered, and the instructions are near idiot-proof. Add an after-market detail set and you've got a really nice model. I just wish Tamiya produce a square bridge version.

2 - I challenged myself to weather this model more aggressively and I'm mostly happy with what I achieved. I'd appreciate input in this area. I was aiming for more discoloration, chipping, etc. below the waterline but that was my initial area of experimentation. When it didn't work out I kept moving. I received the AK Interactive DVD for Christmas so I'll be looking to that for ideas as well.

3 - I attempted a replacement mast out of brass rod and tube but I don't think it was worth the effort. First off, since I used sprue (which didn't put any load on the mast) the brass was overkill. Second, going with brass meant that I had to cut off and reattach all of the small mast details. I ended up with a slightly wonky mast for no real gain. Ugh.

4 - I had a tougher time than expected with the railings. In part this might be because I attached the deckhouses to the model first (normally I don't). I also found the Alliance Modelworks PE to be very fragile. I'm not ham handed and I had a tough time handling it without deforming it. My main problem was dealing with a generic railing set. Maybe I need to go back to school but I struggle to measure and cut railings to length accurately.


Grauwolf
#084
Visit this Community
Quebec, Canada
Joined: September 14, 2005
KitMaker: 2,485 posts
Model Shipwrights: 1,157 posts
Posted: Saturday, January 04, 2014 - 02:21 PM UTC
WOW! .....Just beautiful!

I love the painting and the subtle weathering.

And of note: The photography is excellent!

Cheers,
Joe
BillGorm
Visit this Community
New Jersey, United States
Joined: November 02, 2009
KitMaker: 609 posts
Model Shipwrights: 40 posts
Posted: Tuesday, January 07, 2014 - 12:43 AM UTC
Hi Joe, thanks for the nice feedback. The photos were fairly easy with a basic DSLR and a couple of photo lamps. The help I got with my photos came from a software program called Helicon Focus. Basically, it stitches individual photos that you load into it together to create crisper composite images. It isn't free but it isn't expensive either (or hard to use).

On a related note, I got the AK Interactive DVD "Weathering German Ships" for Christmas and watched it over the weekend. I was looking for ideas because I'm always disappointed when I put my models on the shelf and the weathering disappears in normal lighting. Well, I cringed watching Mig Jimenez apply the various effects. Many seemed way overdone as if he had simply applied the techniques popular in the armor world (e.g. extensive chipping) to a 1/350 ship. The results seemed way overdone, but maybe going too far means just right once you put it on the shelf.

Gremlin56
Joined: October 30, 2005
KitMaker: 3,897 posts
Model Shipwrights: 3,301 posts
Posted: Thursday, January 09, 2014 - 07:59 AM UTC
Couldn't agree more with Joe Bill, its an excellent build and the presentation and photography is top class too.
Julian
Shanghaied
Visit this Community
Schleswig-Holstein, Germany
Joined: June 30, 2011
KitMaker: 189 posts
Model Shipwrights: 106 posts
Posted: Thursday, January 09, 2014 - 06:02 PM UTC
Hi Bill,

When you want to do some overdone weathering you could try it on one of the Flower corvettes. There are some pics of really heavy rusted and stained vessels.
I really like your use of the hairspray technique. Never managed such a good weathering.Will definitely try it on my next project.
Just some ideas from my personal experience with ships weathering and corrosion: The chipping in the WW2 ships occurred mostly in the bow area (up to the second turret in this case) due the water and wave pressure at high speeds.. In other areas the pain comes off due to touch of boats or when moored. in the most areas you have vertical streaks form grime, salt and rust, especially heavy under anchors.
In the waterline you have potentially horizontal oil streaks and underwater patches of barnacles and other growth which looks brown grey from a distance. You can look at Navsource for docked ships they have some colored pics.
Just my personal opinion, not criticism of your really nice work

Best regards from Shanghai
RussellE
#306
Visit this Community
Victoria, Australia
Joined: June 27, 2010
KitMaker: 3,959 posts
Model Shipwrights: 2,777 posts
Posted: Friday, January 10, 2014 - 07:07 PM UTC
This is a really impressive build Bill! She looks great!

As for the weathering, go with what makes you happy, as it's a purely personal choice as to how much you apply...
Fordboy
Visit this Community
Auckland, New Zealand
Joined: July 13, 2004
KitMaker: 2,169 posts
Model Shipwrights: 1,597 posts
Posted: Wednesday, January 15, 2014 - 09:22 AM UTC
Ahoy Bill

Truly inspirational work.

I think the weathering is spot on - balanced, subtle etc.

Great result.


Cheers


Sean
Aurora-7
#360
Visit this Community
Connecticut, United States
Joined: June 18, 2003
KitMaker: 1,020 posts
Model Shipwrights: 630 posts
Posted: Friday, January 17, 2014 - 07:16 AM UTC
The perfect amount of weathering. It came out great and looks beautiful on it's base.
 _GOTOTOP