New Jersey, United States
Joined: November 02, 2009
KitMaker: 609 posts
Model Shipwrights: 40 posts
Posted: Friday, August 23, 2013 - 02:16 PM UTC
After spending my first few modeling years on the armor side of the house, I've gravitated to ship modeling. I like to think it's because ships are unique subjects; my wife says I've evolved.
I have two ships under my belt - Dragon's 1/350 USS Laffey and Trumpeter's 1/350 Admiral Graf Spee - and while I improved from the first to the second, I still haven't got the hang of weathering and rigging with stretched sprue. To try and get over these hurdles I decided to dial back the complexity on my next build in order to focus on them.
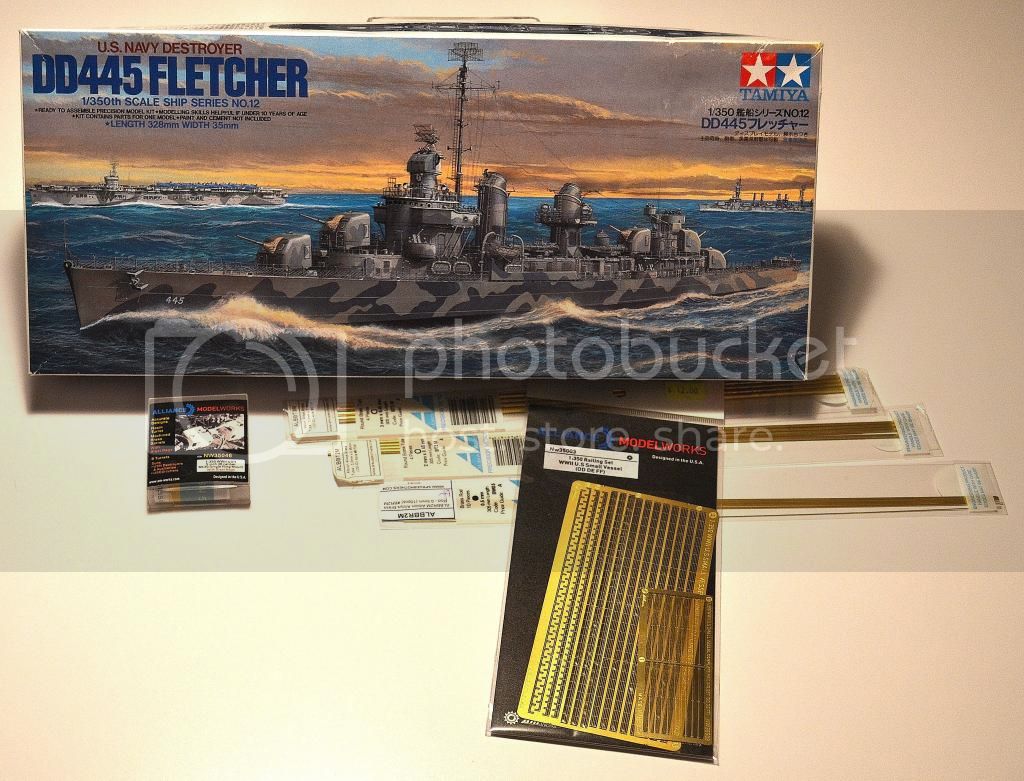
So here's my victim - Tamiya's 1/350 Fletcher. I'll be adding Alliance Modelworks railings (ya gotta have railings) and Alliance Modelworks turrets. The brass rod and tubing will be to attempt my own mast.
New Jersey, United States
Joined: November 02, 2009
KitMaker: 609 posts
Model Shipwrights: 40 posts
Posted: Friday, August 23, 2013 - 02:20 PM UTC
I'm already confused and replying to my own posts. I forgot to mention one thing ... this will NOT be about historical accuracy. My understanding is the kit built out of the box in Ms-21 is pretty darn close to the USS Fletcher as she appeared after shakedown. For this build ... close enough.
South Australia, Australia
Joined: August 14, 2007
KitMaker: 5,926 posts
Model Shipwrights: 2,624 posts
Posted: Friday, August 23, 2013 - 04:02 PM UTC
You may be right, I may be crazy.
Joined: October 30, 2005
KitMaker: 3,897 posts
Model Shipwrights: 3,301 posts
Posted: Saturday, August 24, 2013 - 06:40 AM UTC
It's a nice subject and a nice model Bill, you can also find a slightly less intimidating camouflage for the Fletcher class if you shop around. Good luck and keep us posted

Julian

Queensland, Australia
Joined: May 20, 2010
KitMaker: 1,230 posts
Model Shipwrights: 1,212 posts
Posted: Saturday, August 24, 2013 - 07:59 PM UTC
Ditto. Very nice subject. Will be watching on with interest.....Cheers mark
If I was your Wife I would Poison your Tea
If I was your Husband, I would drink it.

#023
Zurich, Switzerland
Joined: March 13, 2009
KitMaker: 2,058 posts
Model Shipwrights: 163 posts
Posted: Saturday, August 24, 2013 - 11:09 PM UTC
Bill, have fun with this one, it's a great little kit.
Tip for the Ms 21: the paimting sheet in the kit is 1/350 scale. For my build I simply cut outthecamo pattern and used it as a mask.
Cheers,
Stefan
Too many models - too little time...
New Jersey, United States
Joined: November 02, 2009
KitMaker: 609 posts
Model Shipwrights: 40 posts
Posted: Monday, August 26, 2013 - 01:16 AM UTC
Stefan - I believe the camouflage shown on the box top is MS 12 mod. I'll be doing MS 21 which is much easier.
My understanding is the USS Fletcher was originally painted in MS 12 mod but repainted in MS 21 prior to being sent to the Pacific. At some point a single 20mm was added to the pilot house but I'm not going to worry about it. Likewise, I'm going to ignore the SC-2 radar, which should be an SC-1 radar (for the USS Fletcher anyway).
New Jersey, United States
Joined: November 02, 2009
KitMaker: 609 posts
Model Shipwrights: 40 posts
Posted: Sunday, September 01, 2013 - 12:06 PM UTC
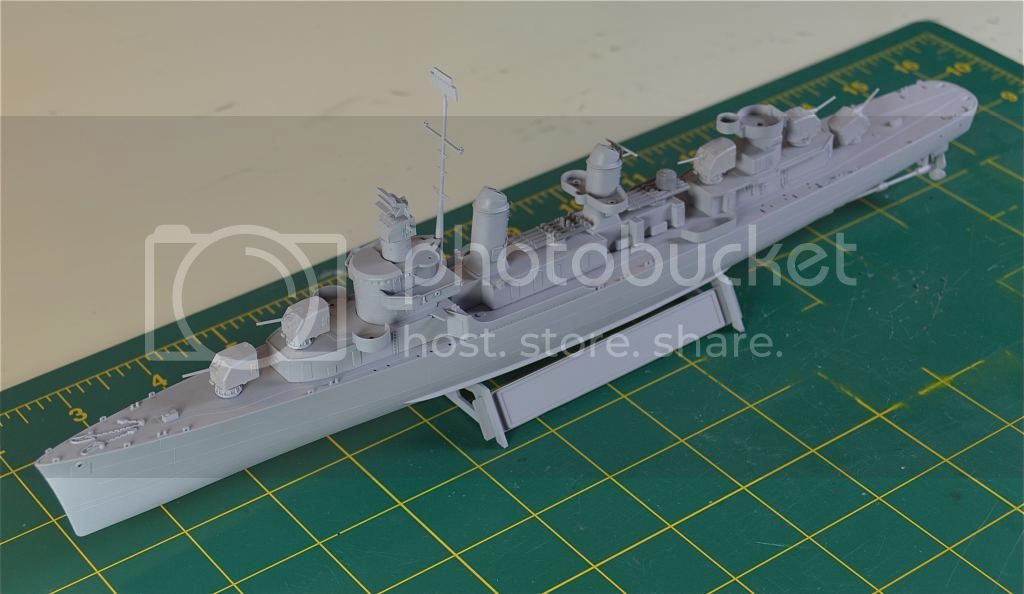
Well, so far this kit has been exactly what I expected ... easy to assemble but a bit soft on detail. I'm building Cyber Hobby's 1/700 USS Arkansas in parallel and doing so has really underscored the difference in the two companies' approaches.
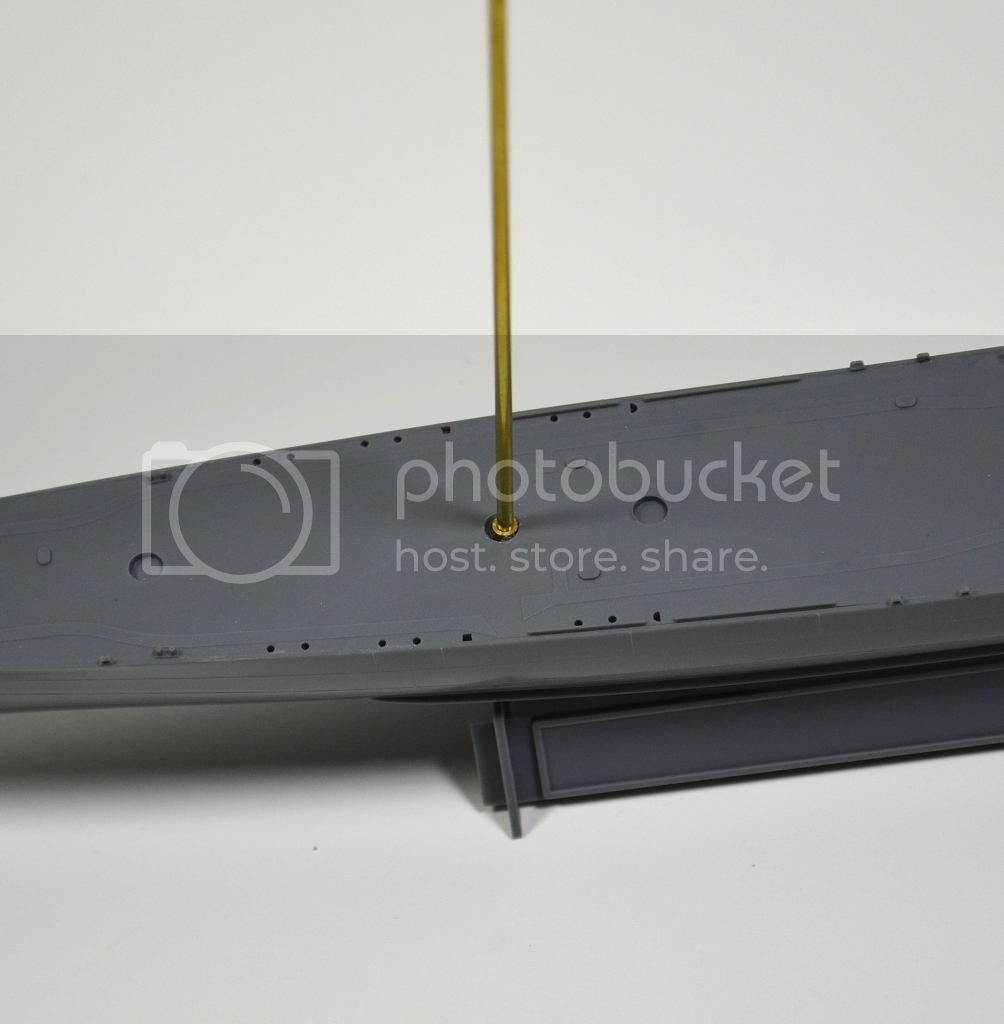
This first shot shows the hole in the main deck where the kit would have you insert a poly cap for the mast. I drilled out the hole and ran a length of 3.0mm brass tube down to the bottom of the hull to serve as a sleeve for the mast.
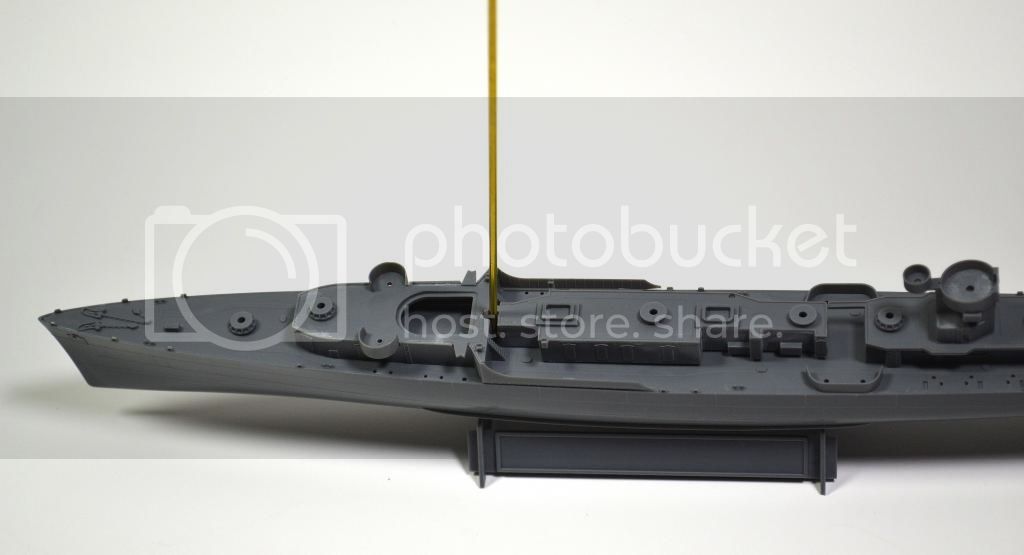
This photo shows the long length of 2.0mm brass tube inserted into the 3.0mm collar. I used it to adjust the 3.0mm sleeve as the epoxy dried so that the mast would sit straight. (Many thanks to Tim Reynaga for sharing this approach.)
This last one shows the resin turrets from Alliance Modelworks. They were easier and faster to assemble than the kit parts and are more accurate to boot.
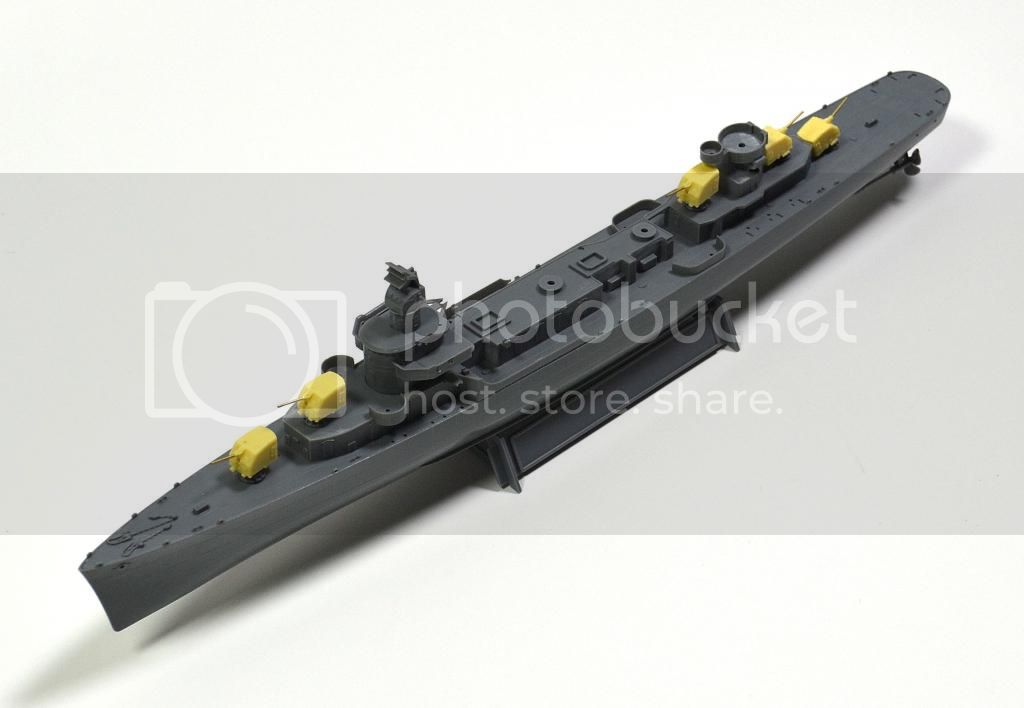
Next step is to assemble the funnels and clean up and set aside all the small parts for the main deck. Once that's done I'll get to the fun part ... painting and weathering.
Queensland, Australia
Joined: May 20, 2010
KitMaker: 1,230 posts
Model Shipwrights: 1,212 posts
Posted: Sunday, September 01, 2013 - 06:42 PM UTC
Off to a very nice start my friend.....Cheers mark
If I was your Wife I would Poison your Tea
If I was your Husband, I would drink it.
Auckland, New Zealand
Joined: July 13, 2004
KitMaker: 2,169 posts
Model Shipwrights: 1,597 posts
Posted: Monday, September 02, 2013 - 11:57 AM UTC
Really nice work Bill.
I am following it with real interest.
Which Alliance Modelworks turret set & railing set are you using?
The turrets look real good.
Cheers
Sean
New Jersey, United States
Joined: November 02, 2009
KitMaker: 609 posts
Model Shipwrights: 40 posts
Posted: Tuesday, September 03, 2013 - 01:33 AM UTC
Hi Sean - The turrets are set #NW35046 "WWII USN 5" 38 Caliber Mk30 Single Ring Mount w/BlastBag" and the railings are set #NW35003 "Railing: WWII U.S. Small Vessels." This is my first time using Alliance Modelworks accessories but the turrets were beautiful - zero clean-up, the barrels fit perfectly, and there are more than enough ladders in case a few go twanging off into space.
New Jersey, United States
Joined: November 02, 2009
KitMaker: 609 posts
Model Shipwrights: 40 posts
Posted: Tuesday, September 03, 2013 - 01:40 AM UTC
I always hit the "Yes" button too soon. I was going to add that I wish someone would come out with a set of 5" turrets that poses the barrels at different angles of elevation. That's no knock on the Alliance Modelworks set ... I just find it interesting that no one has filled this gap yet.
And one last comment. In my first photo above showing the 3.0mm sleeve of brass tube it appears to be very loose in the hole the kit provides for the poly cap. I just wanted to clarify that that hole is stuffed epoxy such that the tube is rock solid.
Quebec, Canada
Joined: January 01, 2004
KitMaker: 7,600 posts
Model Shipwrights: 833 posts
Posted: Tuesday, September 03, 2013 - 03:27 AM UTC
Posable guns on ships' turrets with blast bags are the same problem as tank turrets that are supposed to have mantlet covers - you can't have it both ways. Half the modeling community will consider it a great omission not to have the blast bag/mantlet cover (Dragon's recent M60, Bronco Comet, etc), and if the turret does come with blast bag/mantlet cover, the gun barrel is, through necessity, unposable, displeasing the other half of the modeling community.

If Alliance Model Works produce the same turrets without blast bags you could glue the barrels at whatever angle you want and then make your own blast bags (putty, clay, tissue/white glue, whatever), but then they cease to be poseable.
New Jersey, United States
Joined: November 02, 2009
KitMaker: 609 posts
Model Shipwrights: 40 posts
Posted: Tuesday, September 03, 2013 - 03:50 AM UTC
I meant a set that is molded with the guns at various angles of elevation, not one that allows you to move the barrels as you wish. Kind of like neopolitan ice cream ... a little chocolate, a little vanilla, and a little strawberry.
Alliance Modelworks does produce a set without blast bags but I don't know how easy they would be to alter. I may give it a try since the Alliance Modelworks set provides a spare turret.
South Australia, Australia
Joined: August 14, 2007
KitMaker: 5,926 posts
Model Shipwrights: 2,624 posts
Posted: Tuesday, September 03, 2013 - 08:06 AM UTC
Hi Bill.
If you are worried about getting the camo just right I am sure Kenny at Gator Masks might be able to help you out.
On another subject compared to the other sets available out there this seems to be a bit expensive to me. I have the Flyhawk and Eduard sets and they do not have any resin in them but they are a lot cheaper than the Alliance set. I have a Gearing and a Chevalier and I cannot see what is so bad about the turrets on them. I am no expert of course but in 1/350 scale they look fine to me.
My 2c worth.
Regards
Warren
You may be right, I may be crazy.
Auckland, New Zealand
Joined: July 13, 2004
KitMaker: 2,169 posts
Model Shipwrights: 1,597 posts
Posted: Tuesday, September 03, 2013 - 09:18 AM UTC
Thanks very much for that inforamtion Bill appreciate it.
I am following this build/discussion with interest indeed.
Cheers
Sean
New Jersey, United States
Joined: November 02, 2009
KitMaker: 609 posts
Model Shipwrights: 40 posts
Posted: Tuesday, September 03, 2013 - 01:00 PM UTC
Quoted Text
On another subject compared to the other sets available out there this seems to be a bit expensive to me. I have the Flyhawk and Eduard sets and they do not have any resin in them but they are a lot cheaper than the Alliance set. I have a Gearing and a Chevalier and I cannot see what is so bad about the turrets on them. I am no expert of course but in 1/350 scale they look fine to me.
At $20 the turrets aren't cheap compared to the cost of the kit, but in addition to being easier, faster, and more accurate, they were also a way for me to dip my toe in the water with resin. Also, I keep virtually no stash, so don't worry much about cost.
I've seen the Dragon Gearing kit and I would agree the turrets are perfectly fine as is. Don't distract me ...

South Australia, Australia
Joined: August 14, 2007
KitMaker: 5,926 posts
Model Shipwrights: 2,624 posts
Posted: Tuesday, September 03, 2013 - 09:03 PM UTC

I wrote that reply in the wee-small hours of the morning when I was up to take some pain-killers and wait for them to take effect. I am not sure why I went off about the Gearing sets but there you go..
I think it was because I had been reading about the Gearing set elsewhere. I am going to blame sleep deprivation..
Cheers Bill and keep up the good work.
Regards
Warren
You may be right, I may be crazy.
Quebec, Canada
Joined: January 01, 2004
KitMaker: 7,600 posts
Model Shipwrights: 833 posts
Posted: Wednesday, September 04, 2013 - 02:04 AM UTC
Quoted Text
Alliance Modelworks does produce a set without blast bags but I don't know how easy they would be to alter.
There's really nothing to alter. Just drill a new hole at the angle you want the gun barrel to point, glue it in, and make a blast bag to cover the gun aperture and hide the original hole.
Texas, United States
Joined: September 15, 2002
KitMaker: 8,985 posts
Model Shipwrights: 3,509 posts
Posted: Wednesday, September 04, 2013 - 05:49 PM UTC
Just one thought about rigging...you might try some fishing line. I use 8 pound. Streched sprue can be rather uneven. It does glue better though.....lol super glue fingers and Gator glue take to long to set when you are trymng to get some tension by glueing one end down waiting for a while then glueing down the other side
Those who don't learn from history are doomed to repeat it
VMI "76
Order of the Red Nose Plug
Blue Volute Bumper Spring Award
New Jersey, United States
Joined: November 02, 2009
KitMaker: 609 posts
Model Shipwrights: 40 posts
Posted: Saturday, September 28, 2013 - 02:02 AM UTC
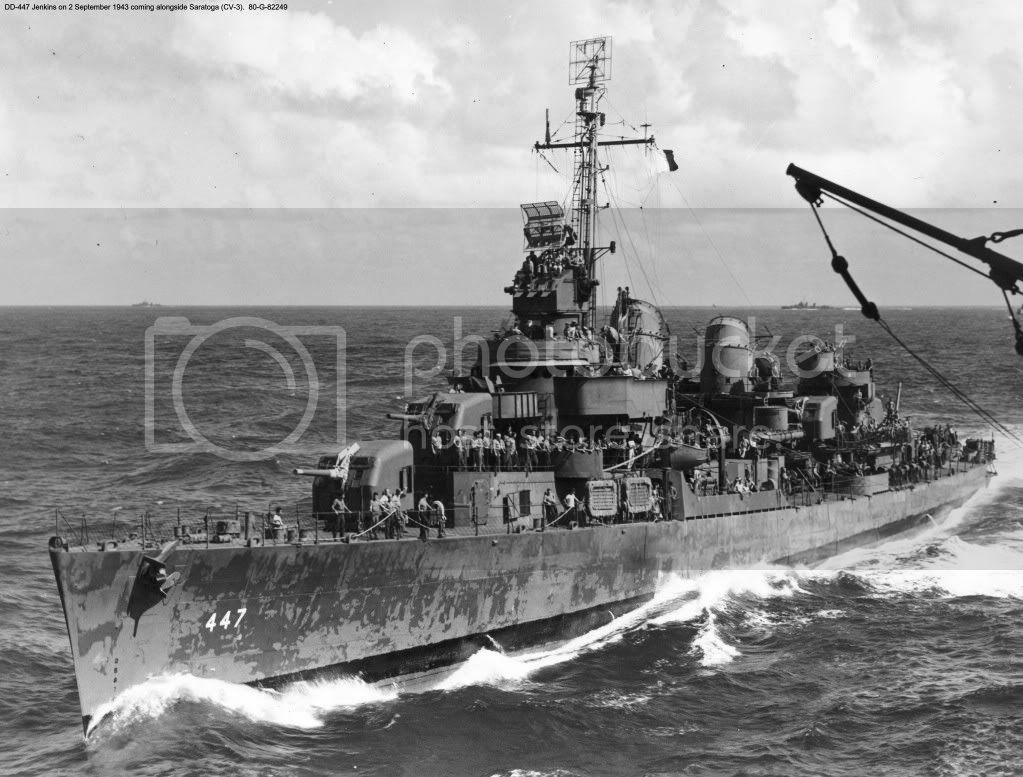
I've been thinking about how I want to paint and weather my generic Fletcher and I've decided I want to try out the hairspray and chipping techniques popular on the armor side of the house. I've got Mike Rinaldi's excellent book "TankArt" as a guide so if I fail it won't be for lack of good information.
This photo of USS Jenkins showing badly peeled and faded 5-N Navy Blue paint is my primary inspiration:
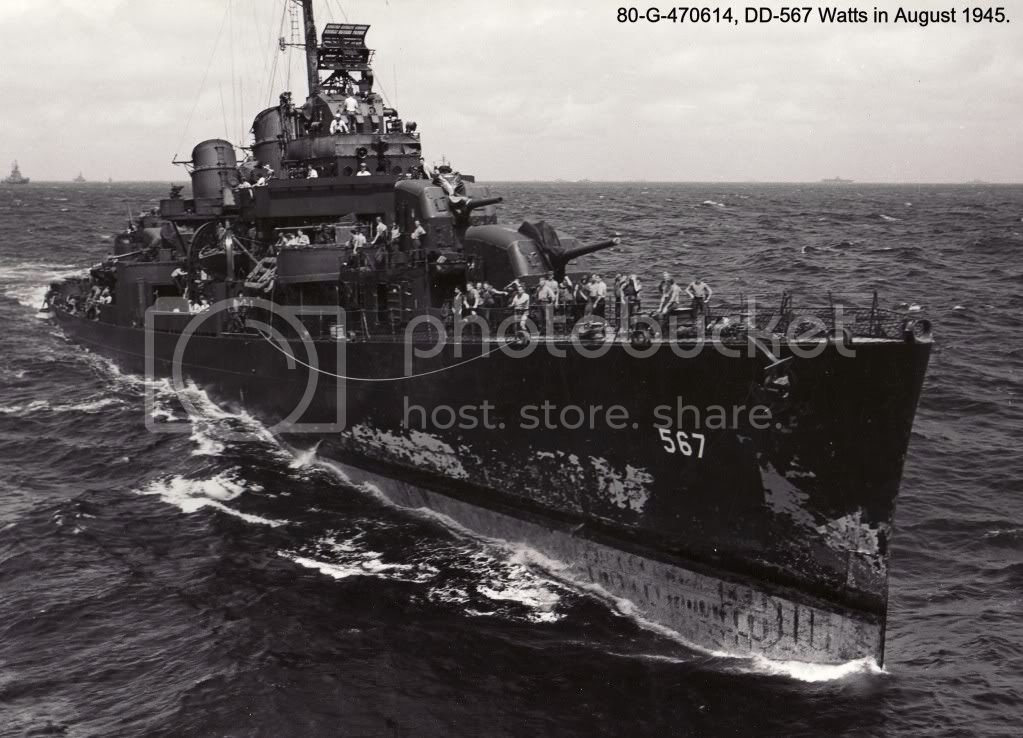
This photo of USS Watts is useful as well for its view of the wear that could occur beneath the boot topping:
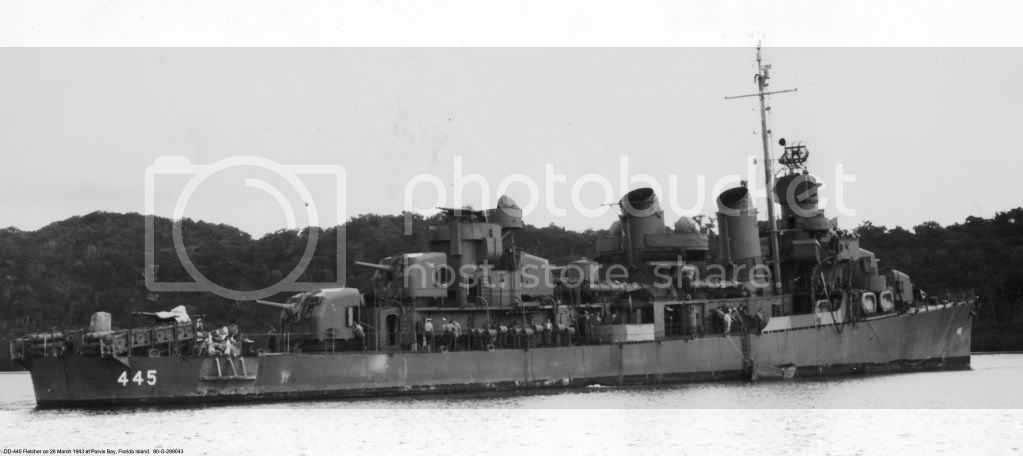
And here's the USS Fletcher herself showing some general wear:
Here's my model showing the major components primed and dry fitted. Everything else is cleaned up and ready to go in a bin off to the side. The mast is a bit wonky when viewed head on but it's good enough for a first attempt. For those who regularly scratch their own masts, how do you handle the small protrusions, yards, lights, etc.? Do you reuse the kit parts as I have done or do you scratch them as well?
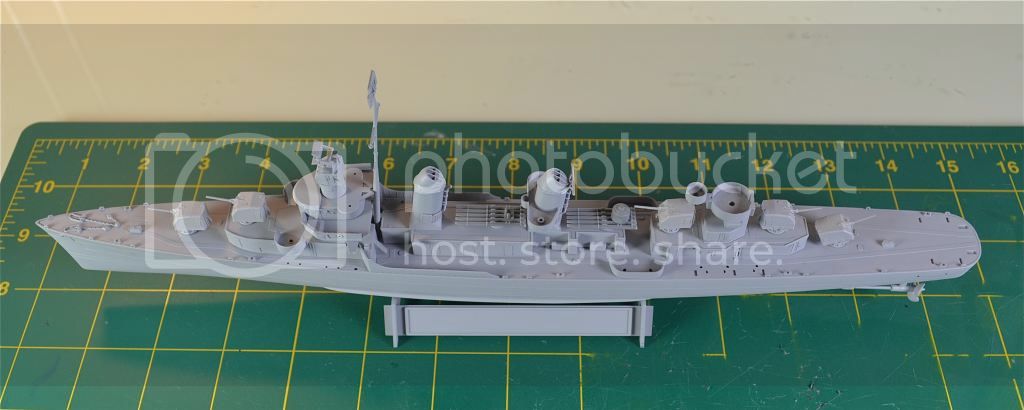
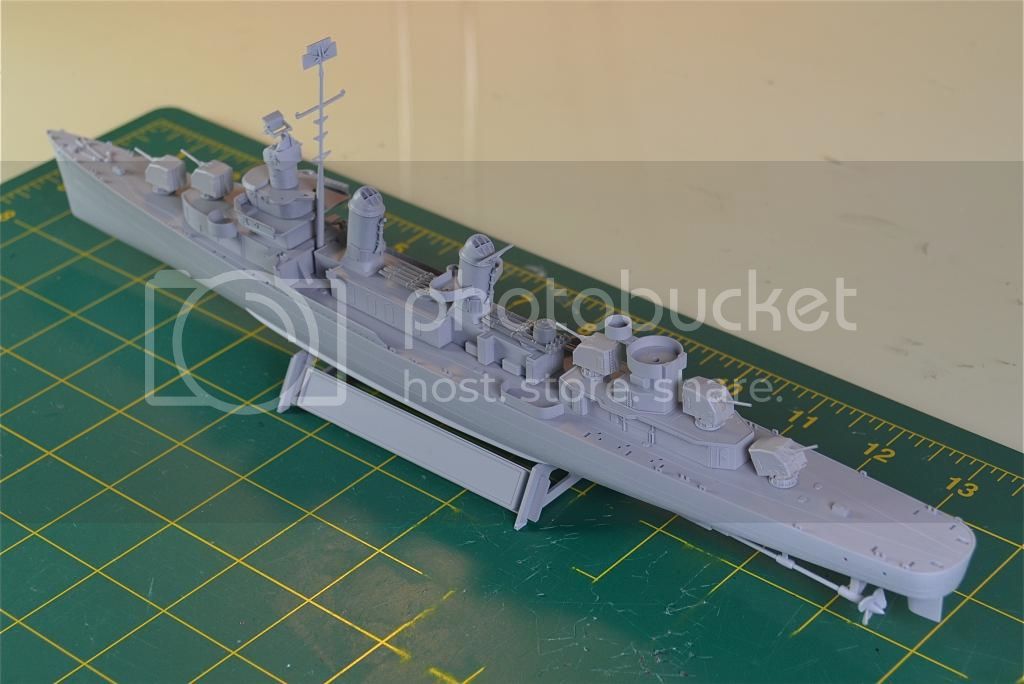
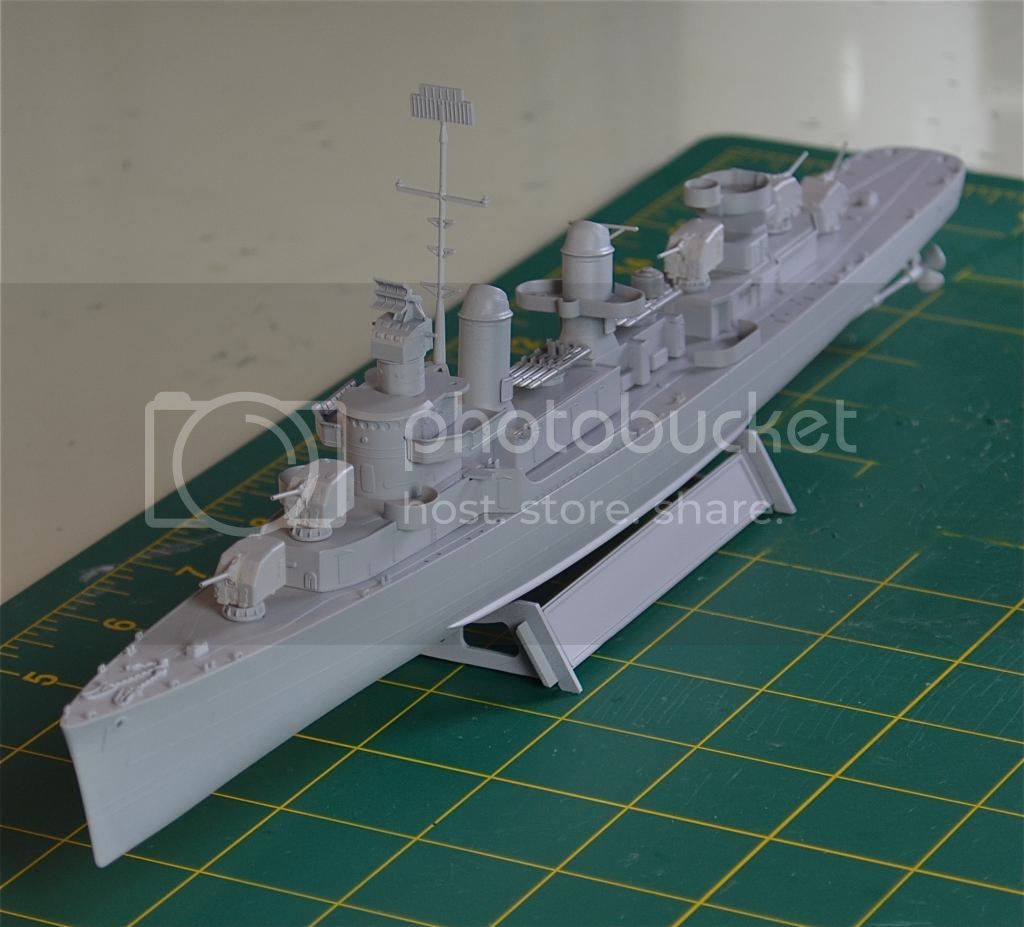
All comments welcome!
Quebec, Canada
Joined: January 01, 2004
KitMaker: 7,600 posts
Model Shipwrights: 833 posts
Posted: Sunday, September 29, 2013 - 05:52 AM UTC
You might want to drill out the bridge windows and fill them with Crystal Clear after painting.
New Jersey, United States
Joined: November 02, 2009
KitMaker: 609 posts
Model Shipwrights: 40 posts
Posted: Sunday, October 13, 2013 - 09:56 AM UTC
Good call, Biggles. I usually drill out the bridge windows but forgot in my focus on painting and weathering.
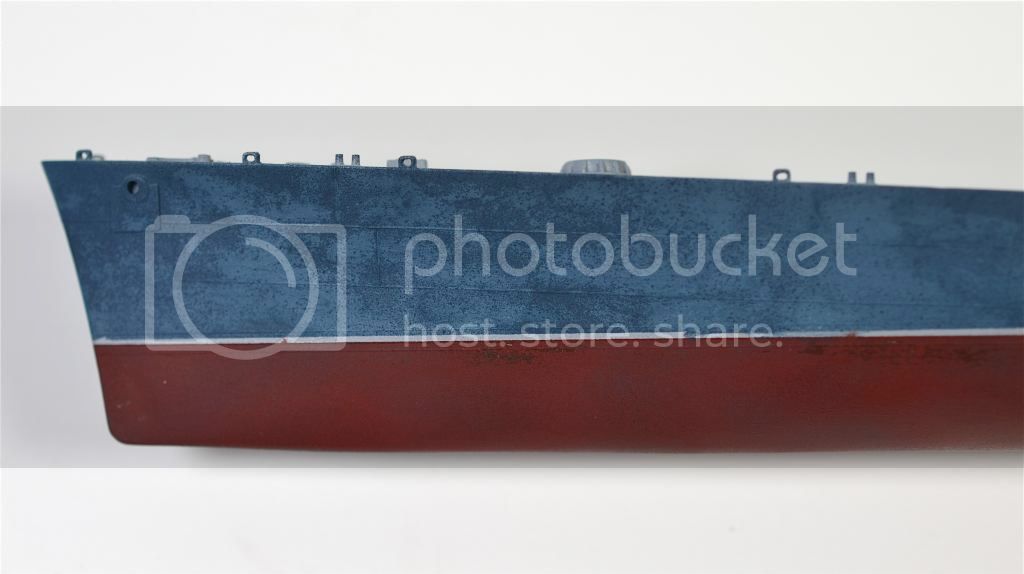
So more progress ... I sprayed the hull starting beneath the waterline because I figured that was the safest place to experiment with the hairspray technique. The first two times I made a variety of mistakes: Too much hairspray, too much water, and too much opacity in the top coat. On the third go round I still didn't get it right but settled for modest chips along the waterline. My primary self-criticism would be the lack of chips at the bow, but oh well, it's an experiment.
From there I moved on to the hull sides. Tamiya suggests the following colors for 5-N Navy Blue in a 1:1:1 ratio:
Royal Blue (X-3)
Medium Blue (XF-18)
Flat Base (X-21)
I'm not a fan of Flat Base so I decided to try my own formula. After a lot of testing the following colors in a 1:1:2 ratio are a close match:
Sea Blue (XF-17)
Flat Blue (XF-8)
Medium Blue (XF-18)
To replicate the faded 5-N Navy Blue in my guide photo I added Sky Grey (XF-19) for an overall ratio of 1:1:2:12.
The effect isn't exactly the same as in the photo of USS Jenkins, but additional streaking and fading with oils will blend the colors together. Also, I expect the effect will be very different when viewed on a shelf from 2-3 feet away. So here are a few photos:


New Jersey, United States
Joined: November 02, 2009
KitMaker: 609 posts
Model Shipwrights: 40 posts
Posted: Friday, November 08, 2013 - 11:08 AM UTC
Auckland, New Zealand
Joined: July 13, 2004
KitMaker: 2,169 posts
Model Shipwrights: 1,597 posts
Posted: Sunday, November 10, 2013 - 06:25 AM UTC
It looks real good Bill.
I really like it.
Keep up the good work.
Cheers
Sean


