


Go to modelshipwrights.com for the current dynamic site!
General Ship Modeling
Discuss modeling techniques, experiences, and ship modeling in general.
Discuss modeling techniques, experiences, and ship modeling in general.
Hosted by Jim Starkweather
Trumpeter 1/350 HMS Roberts Monitor

TRM5150

Joined: January 03, 2010
KitMaker: 2,159 posts
Model Shipwrights: 1,400 posts

Posted: Monday, June 09, 2014 - 05:52 AM UTC
Thank you Kev!

JJ1973

#345

Joined: August 22, 2011
KitMaker: 1,835 posts
Model Shipwrights: 1,832 posts

Posted: Monday, June 09, 2014 - 06:43 PM UTC
Hi Todd,
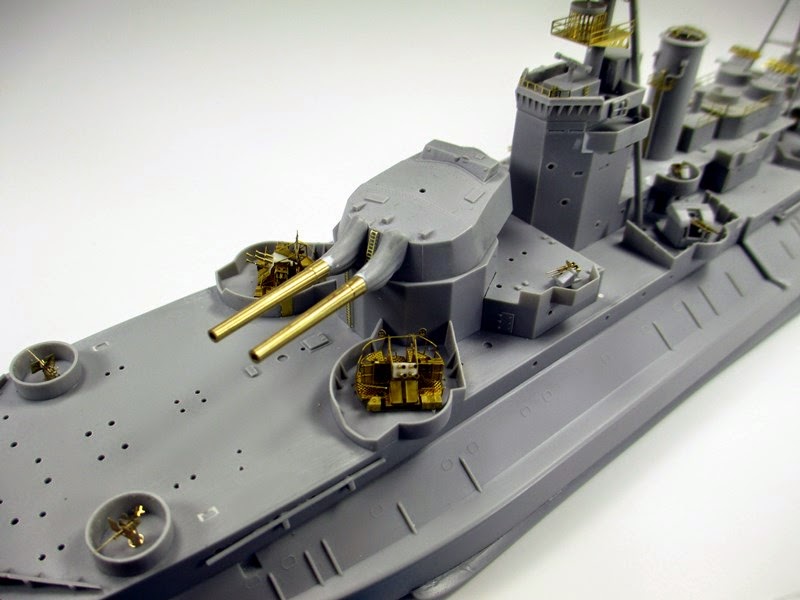
great work, I particularly like the way you use the Oerlikons for the double 20 mm - I think I will copy that, once I will come across one of those
For the deck, armor and plating - Si apparently has some evidence that the upper deck was plain painted steel - then that will be correct, I was only guessing at the wood planking.
For plating of the superstructure, my source says (pp 45 - 46, same book as above):
The armor protection consisted of a sloped side belt from deep WL to main deck, 200 lb abreast the magazines and 160 lb forward and aft.
The barbette armor was 320 lb and 60 lb was fitted to the deck and sides of the 15 in magazine and 160 lb on the crown of the magazine.
Conning tower 80 lb on front, rear and crown, 120 lb on the sides and 60 lb on the deck with an 80 lb cast steel communication tube.
Hope that helps a little, looking forward to your progress! Very nice build!
Cheers,
Jan
TRM5150
Joined: January 03, 2010
KitMaker: 2,159 posts
Model Shipwrights: 1,400 posts
Posted: Monday, June 09, 2014 - 09:15 PM UTC
Thanks Jan! Everything helps!  More or less the curiosity of what was used factors in rather than the accuracy Though, the information is excellent when the options present themselves...right time and place sort of thing!
  I may consider panel lines on the deck, but not sure yet.
Thanks btw on the 20mm. I think they will pass just fine. A bit more detail than the kit supplied, not too much more work to drive me nuts at this point.
More or less the curiosity of what was used factors in rather than the accuracy Though, the information is excellent when the options present themselves...right time and place sort of thing! I may consider panel lines on the deck, but not sure yet. Thanks btw on the 20mm. I think they will pass just fine. A bit more detail than the kit supplied, not too much more work to drive me nuts at this point.

RedDuster

Joined: March 01, 2010
KitMaker: 7,078 posts
Model Shipwrights: 6,649 posts

Posted: Tuesday, June 10, 2014 - 06:48 AM UTC
Hi Todd,
The steel deck I would leave unadorned, there would be raised weld seams, but in this scales I doubt they would be noticeable.
Nice job on the twin 20mm, no kit I have seen that comes with those, Resin or IM comes close to getting them right, maybe one of the aftermarket boys could help.
How does the trumpy etch handle? I ask because I used some on my build of HMS Kent and it was incredibly fragile, nowhere near as robust as WEM or Eduard or GMM that I am used to.
Keep up the good work
Si
TRM5150
Joined: January 03, 2010
KitMaker: 2,159 posts
Model Shipwrights: 1,400 posts
Posted: Tuesday, June 10, 2014 - 03:51 PM UTC
Thanks Simon! Yeah, I was going to hold back on the seams of the plating I think. The seams would be welded but most likely ground down smooth on the deck and with paint...pretty much nonexistent I feel.
It would be nice to see one of the PE Co.'s pick up some interest in the MK V's...maybe even Master as they already have the 20mm, they just need to design the shield and platform!
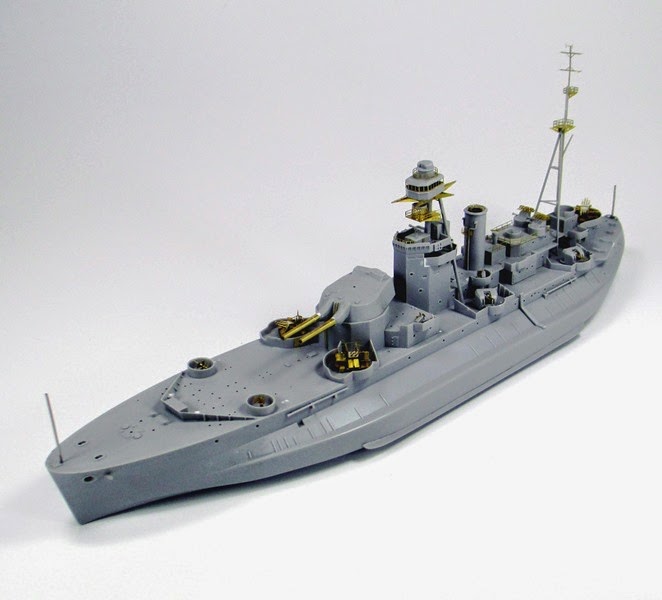
The etch feels like GMM, to me anyway. A bit thin but workable. The radars need extra special care. The railing are nice as there is a relief etch at the bends, most bends can be done with just the fingers.
I am still cleaning up tiny pieces and a little construction on the superstructures but things are moving along! I might tray and get the hull into the booth to lay down some paint!! I am not in any sort of a hurry so just goign to roll with it!!
It would be nice to see one of the PE Co.'s pick up some interest in the MK V's...maybe even Master as they already have the 20mm, they just need to design the shield and platform!
The etch feels like GMM, to me anyway. A bit thin but workable. The radars need extra special care. The railing are nice as there is a relief etch at the bends, most bends can be done with just the fingers.
I am still cleaning up tiny pieces and a little construction on the superstructures but things are moving along! I might tray and get the hull into the booth to lay down some paint!! I am not in any sort of a hurry so just goign to roll with it!!
TRM5150
Joined: January 03, 2010
KitMaker: 2,159 posts
Model Shipwrights: 1,400 posts
Posted: Friday, July 04, 2014 - 07:54 AM UTC
Well this is not the biggest update in the world but then again, the parts aren't the biggest I suppose! Not much has changed from the last time except the pile of tiny pieces that are cleaned up is growing then the pages in the instruction booklet is dwindling as I check parts of the prep list. Not wanting to bore you too much at the moment, I will get right to this.
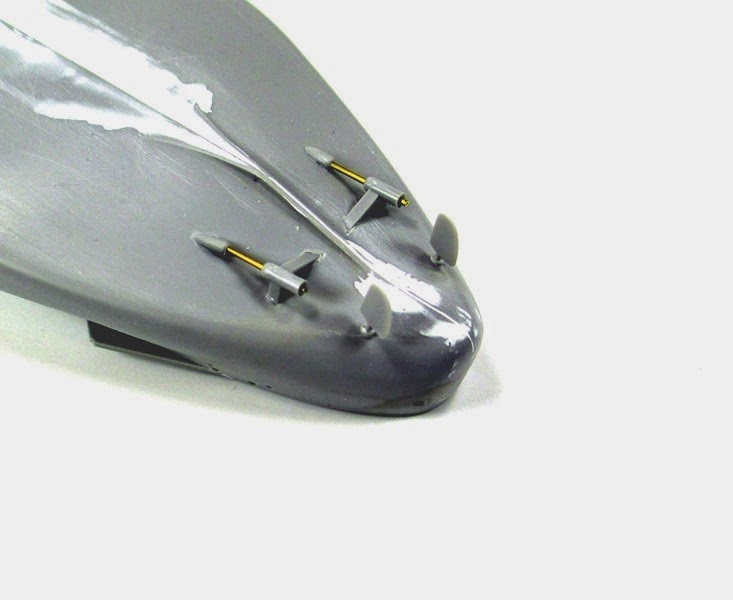
I cleaned and test fit the rudders as well as drilled out the prop shaft brackets to receive some some brass tubing. This was not required really as the kit parts were not too bad at all, just something I like to do I guess!
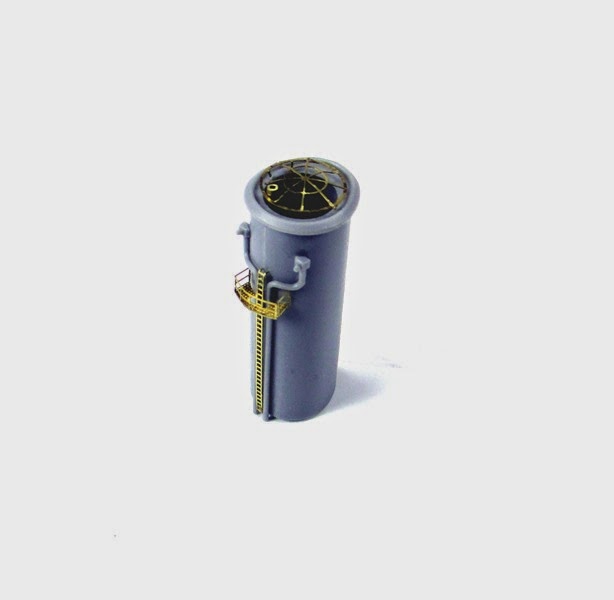
The time had to come at some point where I was playing with more PE than plastic...the funnel.
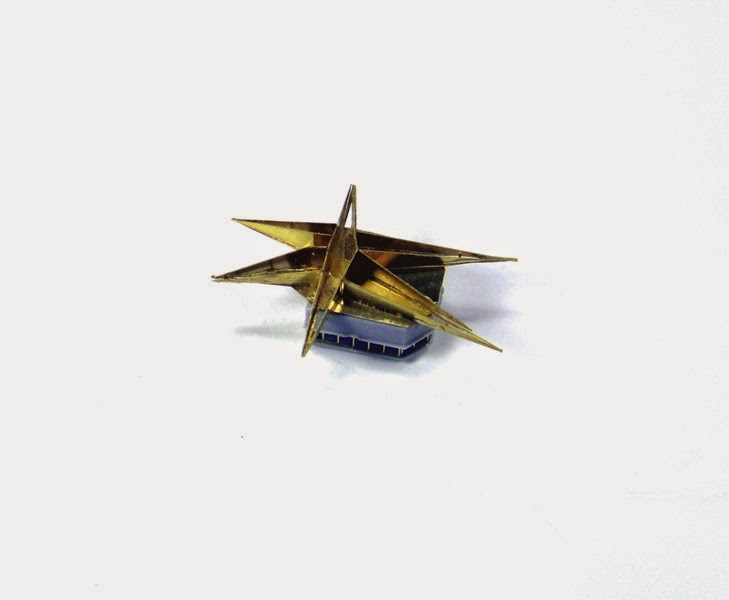
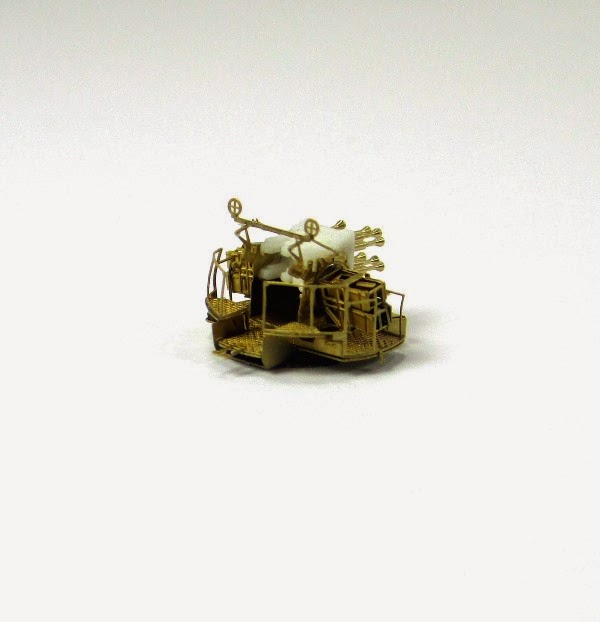
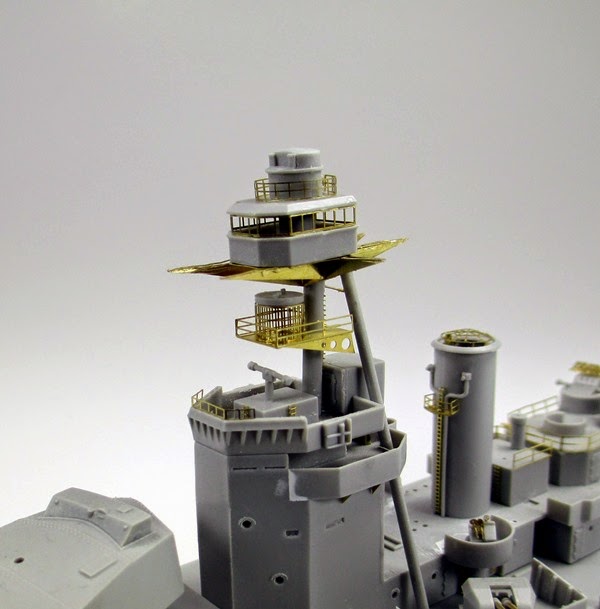
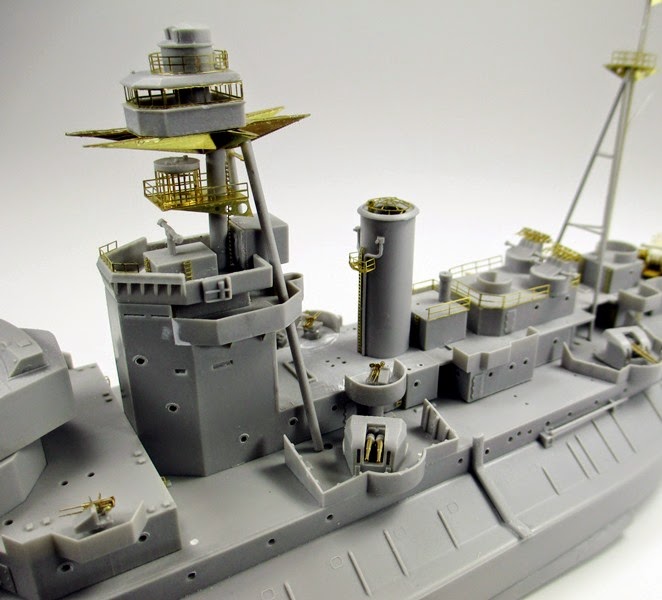
The starfish platform for the bridge. An interesting piece to say the least.
There are 11 PE parts to the platform.
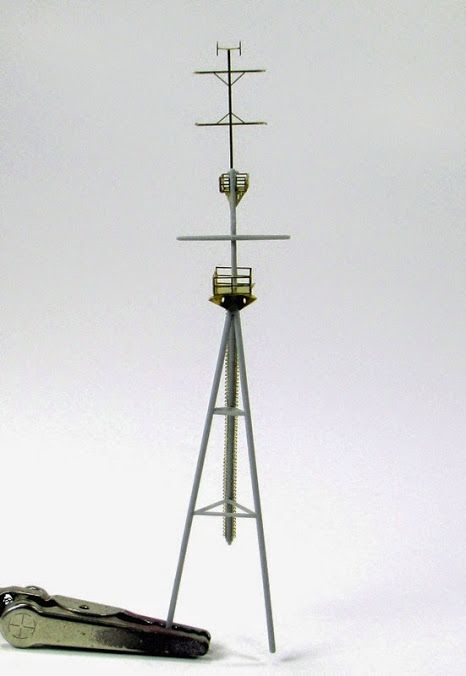
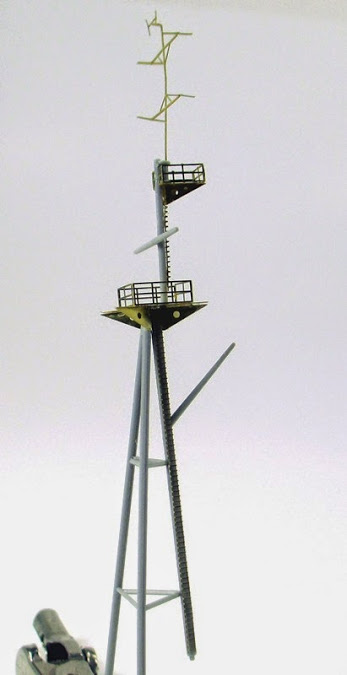
I was able to bang out one of the masts so far. The only thing here that was close to being an issue, was handling the long sections of ladder without crushing or bending.
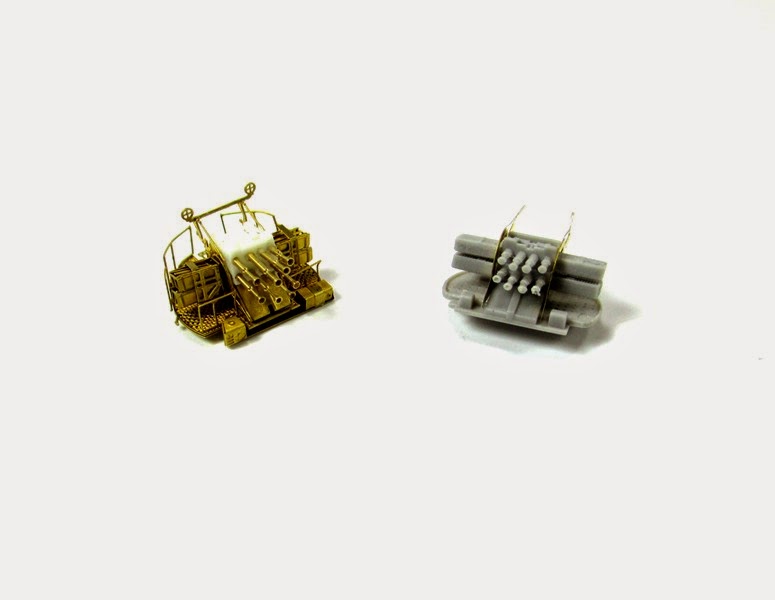
I did get the chance to play around with the POM POM's. The kit I purchased from Flyhawk has four full, 8 barrel setups in the kit. I actually only need one full and oddly enough, two 4 barrel setups which is essentially half of the 8...yeah, of course that makes sense. Anyway, I slapped only one together to see how it looked. Not bad I think. Huge improvement from the kit parts and saved me the trouble of drilling out the barrels. I will attempt the two half POM POM's next and if everything works out well, I will make the last one for the final version of the 8 barrel setup.
Well it is just about time to hit the bench for a bit!! Thanks for stopping in!!!
I cleaned and test fit the rudders as well as drilled out the prop shaft brackets to receive some some brass tubing. This was not required really as the kit parts were not too bad at all, just something I like to do I guess!
The time had to come at some point where I was playing with more PE than plastic...the funnel.
The starfish platform for the bridge. An interesting piece to say the least.
There are 11 PE parts to the platform.
I was able to bang out one of the masts so far. The only thing here that was close to being an issue, was handling the long sections of ladder without crushing or bending.
I did get the chance to play around with the POM POM's. The kit I purchased from Flyhawk has four full, 8 barrel setups in the kit. I actually only need one full and oddly enough, two 4 barrel setups which is essentially half of the 8...yeah, of course that makes sense. Anyway, I slapped only one together to see how it looked. Not bad I think. Huge improvement from the kit parts and saved me the trouble of drilling out the barrels. I will attempt the two half POM POM's next and if everything works out well, I will make the last one for the final version of the 8 barrel setup.
Well it is just about time to hit the bench for a bit!! Thanks for stopping in!!!

Longshanks8

Joined: July 04, 2013
KitMaker: 430 posts
Model Shipwrights: 390 posts

Posted: Saturday, July 05, 2014 - 07:35 PM UTC
Nice attention to detail, coming along very nicely
Cheers Kev
Cheers Kev

Rugbyhead

Joined: November 23, 2013
KitMaker: 39 posts
Model Shipwrights: 36 posts

Posted: Saturday, July 05, 2014 - 10:35 PM UTC
Todd - thank god!! I was going through monitor withdrawal!! Those pom poms look the business. Any tips/hints to the mast?

RussellE
#306
Joined: June 27, 2010
KitMaker: 3,959 posts
Model Shipwrights: 2,777 posts
Posted: Saturday, July 05, 2014 - 11:29 PM UTC
Very nice work Todd. 
It looks like the Trumpeter hull requires the usual plaster job to match the seems???
It looks like the Trumpeter hull requires the usual plaster job to match the seems???

TRM5150
Joined: January 03, 2010
KitMaker: 2,159 posts
Model Shipwrights: 1,400 posts
Posted: Sunday, July 06, 2014 - 05:23 AM UTC
Kev - Thank you sir! Slow and steady!
Andrew - Thanks buddy! Hope the small "fix" keeps you going for a bit! Any tips on the mast? Well patience is needed with the long ladder sections. They fold up easy but they are long and can bend just as easy. Although I used CA (thin) to attach the ladder, if you use PVA (white school glue) you will have more working time, it dries clear and the end result is just as strong. The starfish platforms need the same attention with patience. I thought of replacing the supports with brass rods, which would be easy, but the molds are clean and went together well.
Thanks Russell!! There was a couple of small parts that were out on the hull. The picture is a little deceiving in that I have not given a final sanding to the large part of the belly. More of the white will come off for sure!!
RedDuster
Joined: March 01, 2010
KitMaker: 7,078 posts
Model Shipwrights: 6,649 posts
Posted: Monday, July 07, 2014 - 07:57 AM UTC
Looking good Todd,
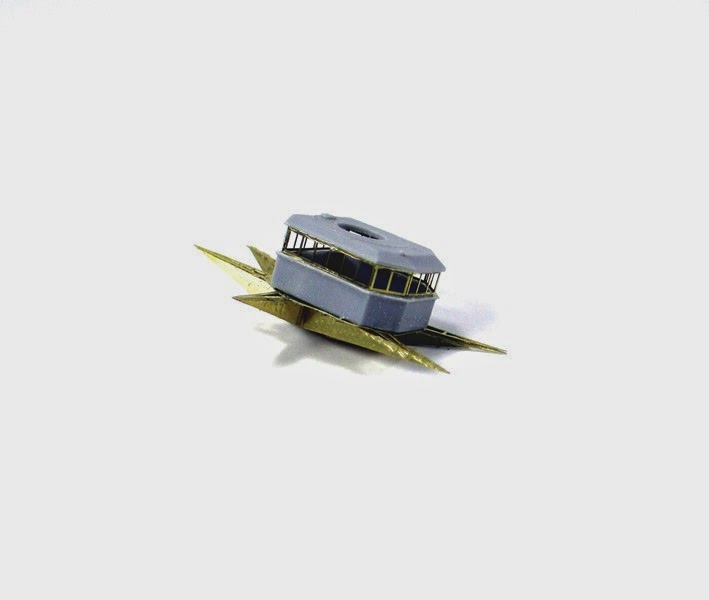
The control top windows work well.
Glad to hear the etch is useful, The etch that comes in the type 23 frigate kit is very thin and fragile.
Keep up the good work.
Si
The control top windows work well.
Glad to hear the etch is useful, The etch that comes in the type 23 frigate kit is very thin and fragile.
Keep up the good work.
Si
TRM5150
Joined: January 03, 2010
KitMaker: 2,159 posts
Model Shipwrights: 1,400 posts
Posted: Tuesday, July 08, 2014 - 09:51 PM UTC
Thanks a bunch Simon! The PE is not too bad to work with at all...as you would figure the antenna was a back and forth adjustment to get lined up and fragile but things all come together with a little patience!
TRM5150
Joined: January 03, 2010
KitMaker: 2,159 posts
Model Shipwrights: 1,400 posts
Posted: Saturday, July 19, 2014 - 03:17 PM UTC
Well, this might be the last update before I start slinging some primers around! I left most of the deck items off for the painting stage and most of the items seen in place are only mocked up. Mail railing will be going in after the painting.
I still need to make up 6 more of these litter buggers. Not the easiest to make up, but get easier the more you do.
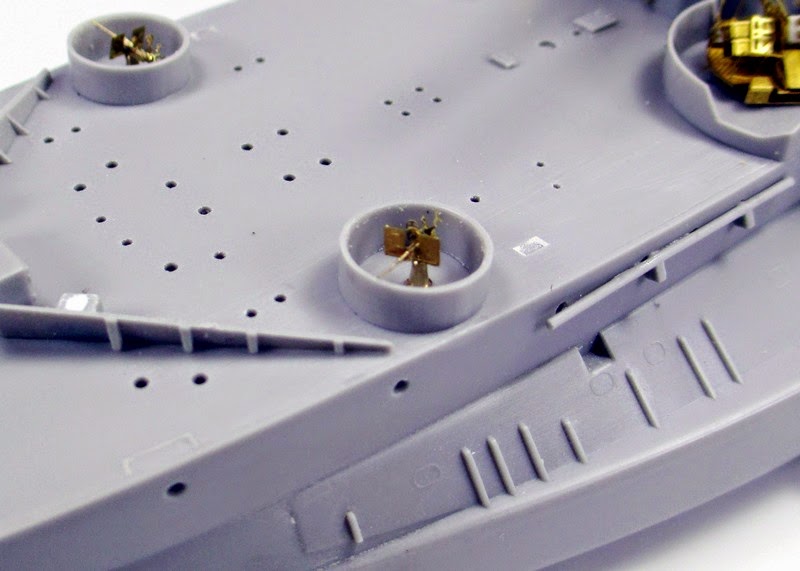
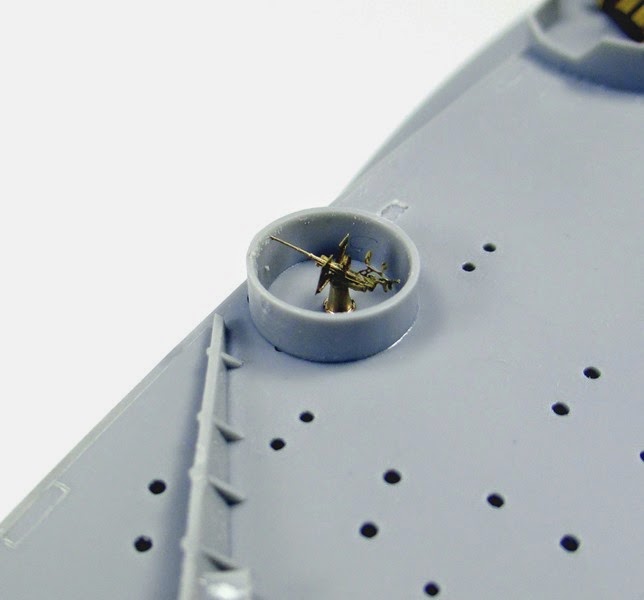
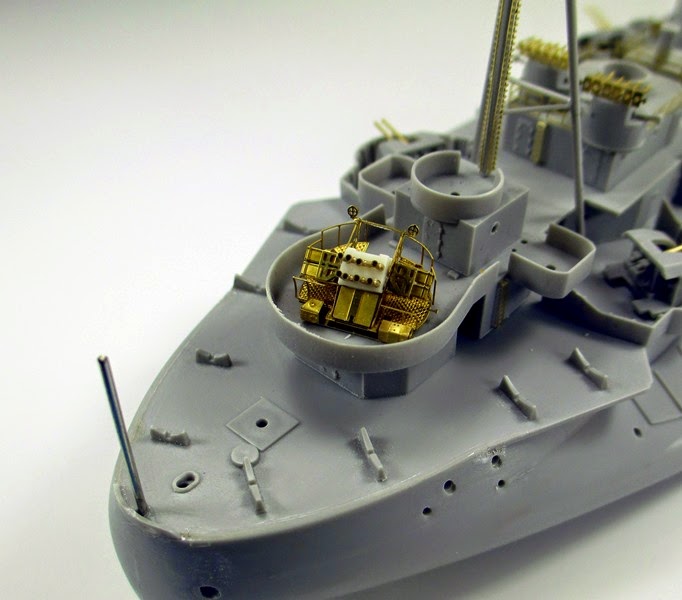
I managed to make up the two, 2-pdr. Mark VII Quad Mountings. This was easier than I thought. I only needed to chop one of the resin Quads to make up the two of them.
There is a top mast that is made up. I left this out of the mock up due to the fitting is not the easiest and knowing my finger, things might get mashed!!
I decided to scrap the first "Chicago Piano" and use the remaining setup to get things a little cleaner.
Well that is that for the moment. I will get to the priming in the next day or so. I am waiting on a little bit of a helping hand...after speaking with Kenny from Gator Studios, he is making up a Gator Mask for the Camouflage for this ugly duckling! Looks like I have some painting to be done soon!!
Thanks for tuning in!!
I still need to make up 6 more of these litter buggers. Not the easiest to make up, but get easier the more you do.
I managed to make up the two, 2-pdr. Mark VII Quad Mountings. This was easier than I thought. I only needed to chop one of the resin Quads to make up the two of them.
There is a top mast that is made up. I left this out of the mock up due to the fitting is not the easiest and knowing my finger, things might get mashed!!
I decided to scrap the first "Chicago Piano" and use the remaining setup to get things a little cleaner.
Well that is that for the moment. I will get to the priming in the next day or so. I am waiting on a little bit of a helping hand...after speaking with Kenny from Gator Studios, he is making up a Gator Mask for the Camouflage for this ugly duckling! Looks like I have some painting to be done soon!!
Thanks for tuning in!!
Rugbyhead
Joined: November 23, 2013
KitMaker: 39 posts
Model Shipwrights: 36 posts
Posted: Saturday, July 19, 2014 - 08:21 PM UTC
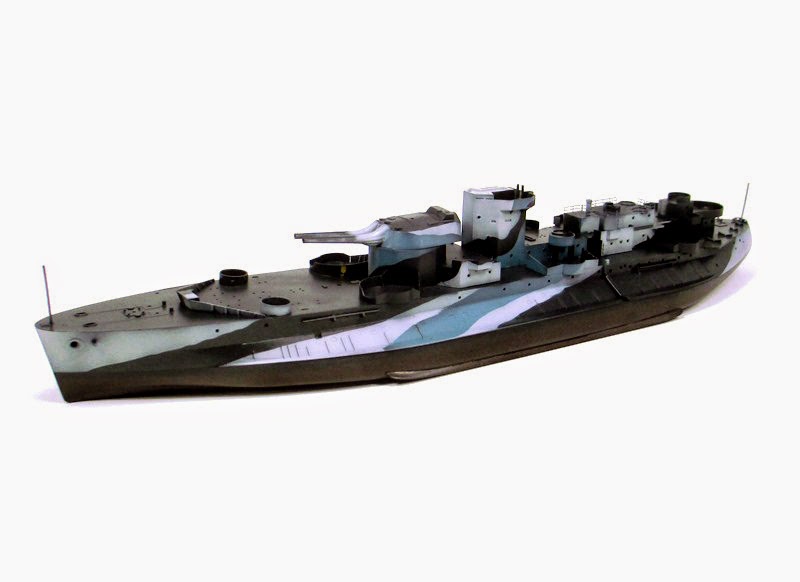
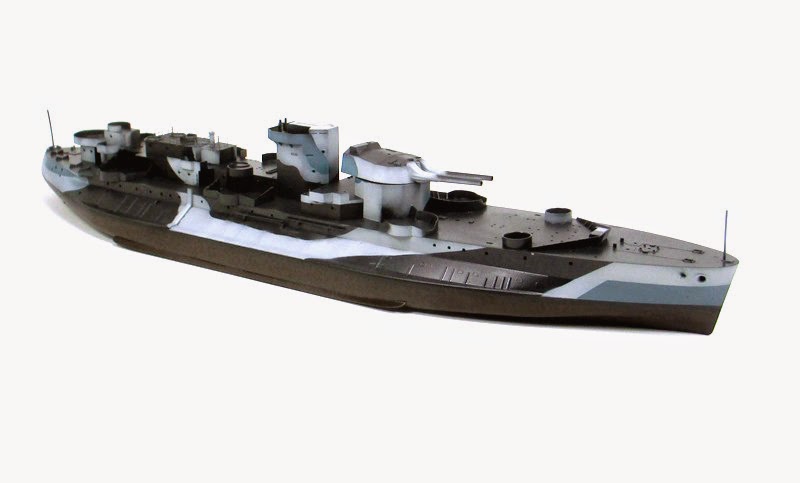
Todd, what an ugly beast (sorry functional) - all muscle, no trim or graceful lines, something only its designer could love!! Your PE work looks fantastic in place and i'll be interested in how the masks come out. I found an old book from the early 70's that shows Royal Navy Capital ship camoflauge schemes through the war years. Sure enough HMS Roberts gets a mention and a double page spread. If you're interested let me know and i'll scan the pages for you and email them.
TRM5150
Joined: January 03, 2010
KitMaker: 2,159 posts
Model Shipwrights: 1,400 posts
Posted: Sunday, July 20, 2014 - 01:31 AM UTC
Thank you very much for the kind word there Andrew. LOL...she is ugly, but had a purpose I suppose. That shallow drought, as you know, allowed her into places the bigger capital could go and with the same punch of the 15's.
I am fairly confident that the masks will come out great. I am certainly interested in the scans though. they would help in the areas where the mask might not cover or help and check to see how close Trumpy was with their pattern they supplied in the kit. You can find my email in my profile if you want to try and scan the pics and send them, it would be greatly appreciated ...Thanks!
I am fairly confident that the masks will come out great. I am certainly interested in the scans though. they would help in the areas where the mask might not cover or help and check to see how close Trumpy was with their pattern they supplied in the kit. You can find my email in my profile if you want to try and scan the pics and send them, it would be greatly appreciated ...Thanks!
RussellE
#306
Joined: June 27, 2010
KitMaker: 3,959 posts
Model Shipwrights: 2,777 posts
Posted: Sunday, July 20, 2014 - 09:23 AM UTC
She is a bit of a 'tub' isn't she, Tod?
But, very nice work though! Looking forward to seeing some paint go on!
But, very nice work though! Looking forward to seeing some paint go on!
TRM5150
Joined: January 03, 2010
KitMaker: 2,159 posts
Model Shipwrights: 1,400 posts
Posted: Sunday, July 20, 2014 - 09:35 AM UTC
That she is Russell!! Thanks for the kind words!!
JJ1973
#345
Joined: August 22, 2011
KitMaker: 1,835 posts
Model Shipwrights: 1,832 posts
Posted: Sunday, July 20, 2014 - 04:28 PM UTC
Very nice progress here lately, she is coming along really nice. Your PE looks superb, fantastic job on the Oerlikons - I know they are quite a challenge.
Jan
Jan
TRM5150
Joined: January 03, 2010
KitMaker: 2,159 posts
Model Shipwrights: 1,400 posts
Posted: Monday, July 21, 2014 - 02:02 AM UTC
Thanks a lot Jan!! Yeah, the 20mm's can be a bit tricky to say the least! Getting things disassembled now and preparing to sling some primer around this week. This should give Kenny from Gator Studios enough time to get the masks situated and then I can give things a go!!
Getting things disassembled now and preparing to sling some primer around this week. This should give Kenny from Gator Studios enough time to get the masks situated and then I can give things a go!! Rugbyhead
Joined: November 23, 2013
KitMaker: 39 posts
Model Shipwrights: 36 posts
Posted: Wednesday, July 30, 2014 - 09:31 PM UTC
Todd, hope the illustrations were of some use? My Roberts "docked" in Newcastle yesterday for in my opinion a value price of $79 AUD less 10% discount!! Just waiting on Australia Post to deliver the brass goodies and I hope to start ASAP, given my recent form sometime in the next 4 - 5 years!
TRM5150
Joined: January 03, 2010
KitMaker: 2,159 posts
Model Shipwrights: 1,400 posts
Posted: Wednesday, July 30, 2014 - 10:11 PM UTC
Hello Andrew,
Thank you very much for those pics! Great references! I will actually match them up to the masks when they arrive. I have to assume they will be here today sometime. Kenny from Gator does some fine research before he makes a mask...I am just not sure to which source he might have used but things looked really close in his preliminary line drawings!
Glad to hear your arrived! You should enjoy!! There are many parts that need cleaning along the way. Start cleaning! By the time the brass arrives, you will be ready to go!! Good luck!!
RedDuster
Joined: March 01, 2010
KitMaker: 7,078 posts
Model Shipwrights: 6,649 posts
Posted: Thursday, July 31, 2014 - 09:18 AM UTC
Nice work Todd,
The open maintop really adds depth.
Great job, really getting tempted to drag mine out of the loft and crack on with it.
Great stuff, following with interest.
Si
The open maintop really adds depth.
Great job, really getting tempted to drag mine out of the loft and crack on with it.
Great stuff, following with interest.
Si
TRM5150
Joined: January 03, 2010
KitMaker: 2,159 posts
Model Shipwrights: 1,400 posts
Posted: Thursday, July 31, 2014 - 11:13 AM UTC
Thank you very much Simon!! Glad to have you along for the ride!! With any luck the mask will show up tomorrow...I might start some priming and getting ready to give this some color!!!
With any luck the mask will show up tomorrow...I might start some priming and getting ready to give this some color!!! TRM5150
Joined: January 03, 2010
KitMaker: 2,159 posts
Model Shipwrights: 1,400 posts
Posted: Tuesday, August 19, 2014 - 09:55 AM UTC
Just a little update whilst I get the painting underway on this one!
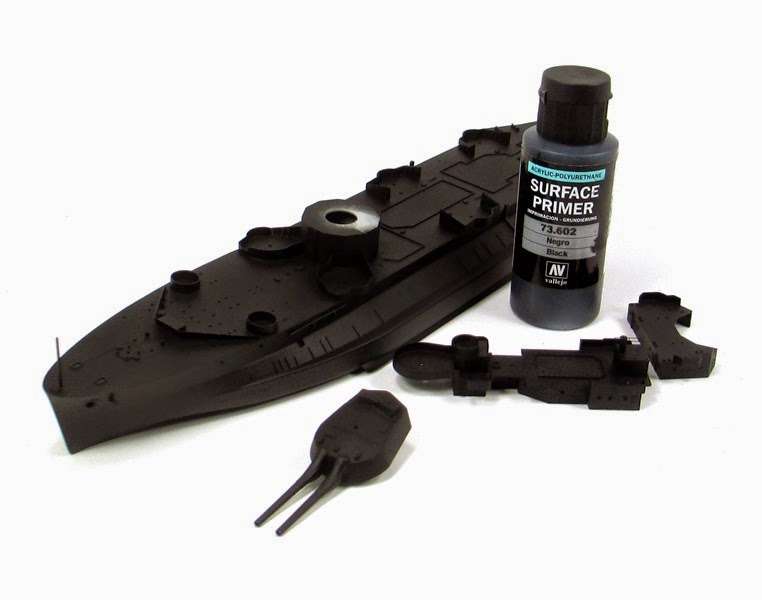
The black has a duel purpose, first is a great base for shading moving forward and the second is the boot-stripe. With a simple mask things will be moving right along!!
Thanks for stopping by!!
The black has a duel purpose, first is a great base for shading moving forward and the second is the boot-stripe. With a simple mask things will be moving right along!!
Thanks for stopping by!!
TRM5150
Joined: January 03, 2010
KitMaker: 2,159 posts
Model Shipwrights: 1,400 posts
Posted: Wednesday, August 27, 2014 - 01:58 PM UTC
Well it is tough to see in the light as the Hull Red is dark and the odd shape to the hull does not help too much...not to mention the tape...LOL!!

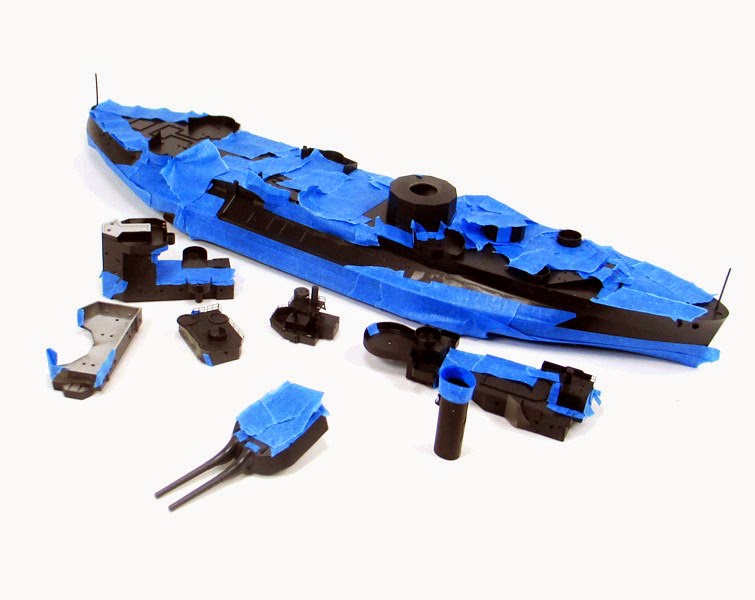
Then of course the first round of coloring. I will be fading some things a bit as I get the superstructure parts together.
This is actually not black (even though it looks it here) but rather the dark color but a somewhat close match to the 507A Dark Grey/Sea Blue or something or other...lol!!! I still have to touch a few things up before the fading but things are moving along!!
Thanks for stopping in for a bit!!
 |

WEB HOSTING BY


Copyright ©2021 Model Shipwrights and Kitmaker Network, a subsidiary of Silver Star Enterprises
All Rights Reserved. Please read our Conditions of Use and Privacy Policy.
All Rights Reserved. Please read our Conditions of Use and Privacy Policy.