


Go to modelshipwrights.com for the current dynamic site!
General Ship Modeling
Discuss modeling techniques, experiences, and ship modeling in general.
Discuss modeling techniques, experiences, and ship modeling in general.
Hosted by Jim Starkweather
Trumpeter 1/350 HMS Roberts Monitor

LionsDen

Joined: June 28, 2013
KitMaker: 102 posts
Model Shipwrights: 38 posts

Posted: Thursday, August 28, 2014 - 01:37 AM UTC
Outstanding work Todd! The ability to make a ship this ugly look so darn pretty is a testament to your mad skills. Keep the mojo going

TRM5150
Joined: January 03, 2010
KitMaker: 2,159 posts
Model Shipwrights: 1,400 posts

Posted: Thursday, August 28, 2014 - 02:30 AM UTC
Thank you for the kind words Troy! Most appreciated!! 

Rugbyhead

Joined: November 23, 2013
KitMaker: 39 posts
Model Shipwrights: 36 posts

Posted: Saturday, August 30, 2014 - 10:19 PM UTC
Hang On, Hang on, what happened to the Gator Masks?

TRM5150
Joined: January 03, 2010
KitMaker: 2,159 posts
Model Shipwrights: 1,400 posts
Posted: Sunday, August 31, 2014 - 01:43 AM UTC
Quoted Text
Hang On, Hang on, what happened to the Gator Masks?
LOL...I was waiting to see who would ask first!
 I had received the masks from Gator Studios and let me start by saying they are great. Kenny did a fine job at making theses up. The problem I ran into, specifically with this ship (DOES NOT apply to his other masks) is that the belly bulge of the HMS Roberts comes out at an approximate 45 degree angle as it slopes down the armor belt. This add surface area that is not figured in 2D renderings. Whereas an Iowa Class Battleship's hull transitions smoothly from the weather deck to the boot stripe. This means the mask came up a bit short reaching the boot stripe....then add the molded surface details on the hull....
What does this all mean?
I did in fact use many pieces from the masking set. Mostly as the leading edges of the camo. This covered the hard to reach areas well and I just covered the rest over with blue tape as it was just close by. There was plenty of extra masking materials provided; however I chose to save this for future usages (to play around with. The masking worked excellent on the super structure parts. There are some areas not covered by the masks which are on the front and rear of the structures which are easily covered with the extra masking or tape.
The product is pretty cool! Sticky, but not sticky in a way to remove the finish of the model. Pliable with a bit of stretching quality that makes it easy to position. I will be liking into picking up the Missouri Masking set he has and giving this a go in the future. This was an odd case of a very odd-shaped ship was all. I will make recommendations to Kenny to possible increase the scale of the lower hull part to maybe 1/200 to compensate for the angled hull more while leaving the upper sections untouched as they were fine.


RedDuster

Joined: March 01, 2010
KitMaker: 7,078 posts
Model Shipwrights: 6,649 posts

Posted: Monday, September 01, 2014 - 06:59 AM UTC
Cracking job on the camo Todd,
Coming on very well.
Si
Coming on very well.
Si
TRM5150
Joined: January 03, 2010
KitMaker: 2,159 posts
Model Shipwrights: 1,400 posts
Posted: Monday, September 01, 2014 - 07:03 AM UTC
Thank you very much Simon!! Looking to push this forward this week!! 
Looking to push this forward this week!! 
JJ1973

#345

Joined: August 22, 2011
KitMaker: 1,835 posts
Model Shipwrights: 1,832 posts

Posted: Monday, September 01, 2014 - 04:07 PM UTC
I've been busy for some time and did miss some steps on your Roberts - fantastic how she's coming along!! Great work on the camouflage, that looks awesome! Very nice work overall, looking forward to your next updates!
Cheers,
Jan
Cheers,
Jan
TRM5150
Joined: January 03, 2010
KitMaker: 2,159 posts
Model Shipwrights: 1,400 posts
Posted: Monday, September 01, 2014 - 04:21 PM UTC
Thank you very much Jan! ...been a bit busy myself...LOL!! Hope to have another update soon

doppelganger
Joined: March 09, 2010
KitMaker: 557 posts
Model Shipwrights: 81 posts

Posted: Friday, September 05, 2014 - 07:53 PM UTC
A fascinating subject  I am quite interested in building this model.Great work so far.I see you take as long to build a model as I do I guess we have full time jobs and other responsibilities.Stay on course my man
I am quite interested in building this model.Great work so far.I see you take as long to build a model as I do I guess we have full time jobs and other responsibilities.Stay on course my man 
TRM5150
Joined: January 03, 2010
KitMaker: 2,159 posts
Model Shipwrights: 1,400 posts
Posted: Saturday, September 06, 2014 - 01:05 AM UTC
Thank for joining in David! This is a decent kit to slide across the bench...you should enjoy!! Timing? Right now its a case of too many things on the bench rather than work getting in the way of building...but things are clearing up I think!
TRM5150
Joined: January 03, 2010
KitMaker: 2,159 posts
Model Shipwrights: 1,400 posts
Posted: Tuesday, September 09, 2014 - 01:52 PM UTC
Trying to keep things going here...
I began putting some of the parts back together and in doing so, I started on some rigging. Thought I would share it with you!
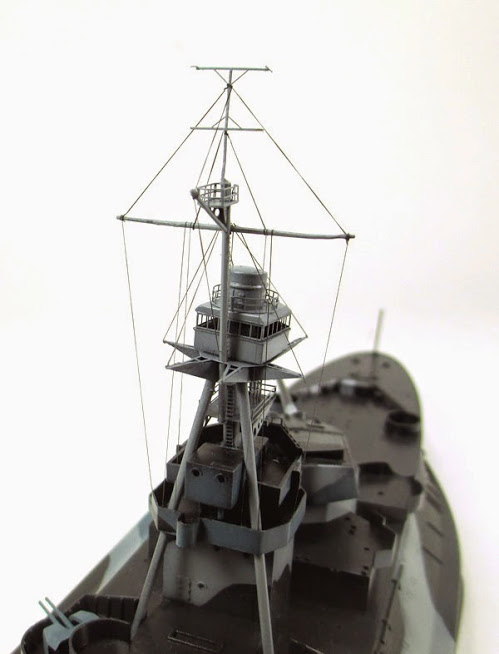
I'll keep plugging away on it!!
I began putting some of the parts back together and in doing so, I started on some rigging. Thought I would share it with you!
I'll keep plugging away on it!!
RedDuster
Joined: March 01, 2010
KitMaker: 7,078 posts
Model Shipwrights: 6,649 posts
Posted: Friday, September 12, 2014 - 09:09 PM UTC
Good start on the rigging Todd.
following with interest.
Si
following with interest.
Si
Rugbyhead
Joined: November 23, 2013
KitMaker: 39 posts
Model Shipwrights: 36 posts
Posted: Saturday, September 13, 2014 - 03:38 PM UTC
Todd, Ezy - Line for the rigging?
GastonMarty

Joined: April 19, 2008
KitMaker: 595 posts
Model Shipwrights: 14 posts

Posted: Saturday, September 13, 2014 - 05:24 PM UTC
Lovely work!
Any accuracy/dimensional issues on the overall look?
Gaston

RussellE
#306
Joined: June 27, 2010
KitMaker: 3,959 posts
Model Shipwrights: 2,777 posts
Posted: Saturday, September 13, 2014 - 10:49 PM UTC
Great work, Todd!

JJ1973
#345
Joined: August 22, 2011
KitMaker: 1,835 posts
Model Shipwrights: 1,832 posts
Posted: Sunday, September 14, 2014 - 06:16 AM UTC
Definitely nice work on the rigging, she is coming along very nicely!
Rugbyhead
Joined: November 23, 2013
KitMaker: 39 posts
Model Shipwrights: 36 posts
Posted: Saturday, October 11, 2014 - 08:39 PM UTC
Todd, what's happening with my monitor?
TRM5150
Joined: January 03, 2010
KitMaker: 2,159 posts
Model Shipwrights: 1,400 posts
Posted: Saturday, October 11, 2014 - 11:10 PM UTC
Hey fellas! Sorry I missed a few comments back through September there. Some other pressing matters jumped on the bench as well as some local show items that needed tending too. I appreciate the kind words!!
Andrew, she is making here way back to center bench very soon I promise!! I just need to clean up the mess on the bench and make some room!! LOL!! To answer your question, the rigging material is Uschi van der Rosten Easy Rigging. He has 3 different thicknesses. They work out to about $10US each and there is 150 ft or so on each spool...more than enough for multiple ships.
Okay...now where did I put that bench?
Andrew, she is making here way back to center bench very soon I promise!! I just need to clean up the mess on the bench and make some room!! LOL!!
To answer your question, the rigging material is Uschi van der Rosten Easy Rigging. He has 3 different thicknesses. They work out to about $10US each and there is 150 ft or so on each spool...more than enough for multiple ships. Okay...now where did I put that bench?

gator
Vendor

#027
Joined: April 13, 2005
KitMaker: 5,422 posts
Model Shipwrights: 5,079 posts
Posted: Monday, October 13, 2014 - 02:10 AM UTC
Looking great Todd!

TRM5150
Joined: January 03, 2010
KitMaker: 2,159 posts
Model Shipwrights: 1,400 posts
Posted: Monday, October 13, 2014 - 06:20 AM UTC
Thank you Kenny!!
 |

WEB HOSTING BY


Copyright ©2021 Model Shipwrights and Kitmaker Network, a subsidiary of Silver Star Enterprises
All Rights Reserved. Please read our Conditions of Use and Privacy Policy.
All Rights Reserved. Please read our Conditions of Use and Privacy Policy.