

Tim,
I've been using oils in combination with Tamiya, Gunze and Model Master paints for several years now. After I apply a thin coat of oils to the painted surface of the model (as you have), I let it sit for a day or two, then shoot it with Testors Dullcoat, which fixes the oil paint to the painted surface below. I usually decant the Dullcoat for airbrush use, but on occasion I've used it right out of the can. Dullcoat is a lacquer based product, so as it evaporates, it has a tendency to dry the oils underneath. Just don't put it on too heavy, or it will cause runs in the oil paint under it. I start with a very light "mist" coat, then a second coat misted on. after the Dullcoat dries overnight, you can gently handle the painted surfaces easily. I've tried Grumbacher and Windsor & Newton Japan drier, which speeds the drying time, but it still takes quite a while to dry. VR, Russ


Go to modelshipwrights.com for the current dynamic site!
Ships by Class/Type: Sailing Vessels
This forum is for sailing ships both civilian and military of any era.
This forum is for sailing ships both civilian and military of any era.
Hosted by Jim Starkweather
Pyro Niña build

Kevlar06

Joined: March 15, 2009
KitMaker: 3,670 posts
Model Shipwrights: 173 posts

Posted: Saturday, January 31, 2015 - 07:45 AM UTC

TimReynaga
Joined: May 03, 2006
KitMaker: 2,500 posts
Model Shipwrights: 1,830 posts

Posted: Saturday, January 31, 2015 - 07:37 PM UTC
Thanks for the tip Russ, Ill keep it in mind!
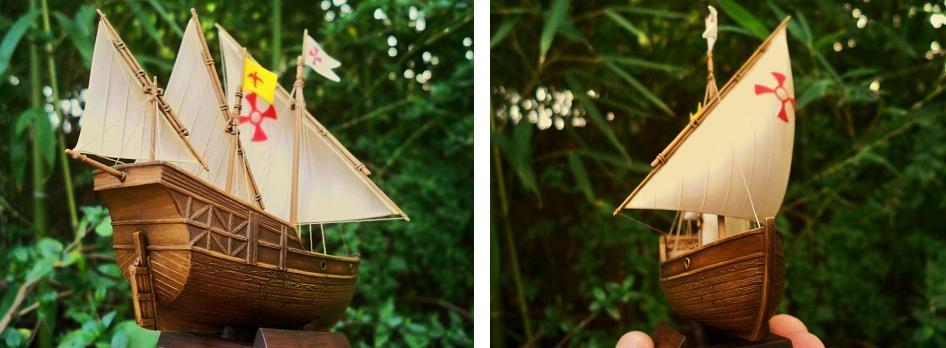
Heres how she looks thus far with the masts test fitted:
I used a different wood color over the Tamiya Desert Yellow base coat on the stand, Winsor & Newton Burnt Umber artists oil. The slightly darker tone makes a nice contrast with the hull.
Heres how she looks thus far with the masts test fitted:
I used a different wood color over the Tamiya Desert Yellow base coat on the stand, Winsor & Newton Burnt Umber artists oil. The slightly darker tone makes a nice contrast with the hull.


TRM5150
Joined: January 03, 2010
KitMaker: 2,159 posts
Model Shipwrights: 1,400 posts

Posted: Saturday, January 31, 2015 - 08:08 PM UTC
Really looking good there Tim!! You are making a little gem out of this one!! 
TimReynaga
Joined: May 03, 2006
KitMaker: 2,500 posts
Model Shipwrights: 1,830 posts
Posted: Sunday, February 01, 2015 - 04:47 PM UTC
Thanks Todd (especially since I'm mostly letting this old gem shine on its own!)
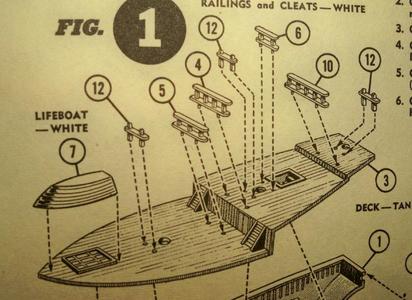
Before attaching the masts and rigging it makes sense to sort out Niñas deck hardware. These small Pyro kits are pretty basic affairs, with most of the deck detail simply molded into the single deck piece, but there are some separate parts too. I had previously attached the rails and cleats and painted them up along with the hull. There are also anchors, cannons, and a launch.
The kit anchors are decent, but they seem too big for the Niña. According to the Libro de Armadas in the Archivo General de las Indias in Seville, Niña received new 200 pound anchors for the voyage. These small fittings probably resembled those of the larger Santa Maria, whose anchor has survived and is on display in Haiti at the Museé du Pantheon National Haitien:
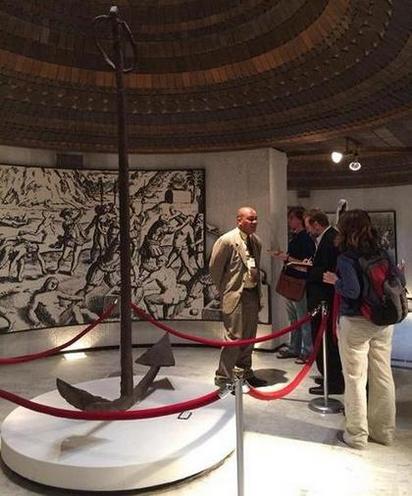
Niñas anchors were smaller than that, perhaps small enough to be stowed on deck or even below decks rather than alongside the hull as the Pyro boxtop illustrates. I can either go ahead and use the oversized kit parts or maybe scratch some new ones...Ill figure this out later.
The four cannons provided in the kit look good, but they seem more appropriate for a 19th Century Ship of the Line than a 15th Century caravel:
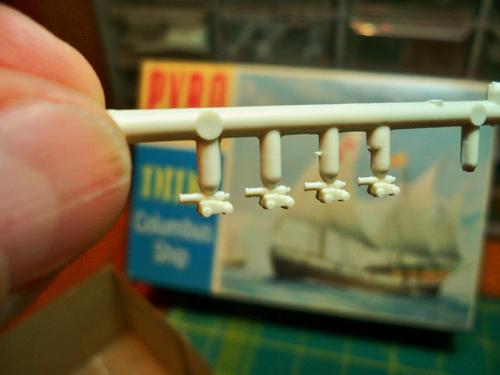
The Libro de Armadas documents that Niña had aboard ten breech loading bombardas, or swivel guns. These smaller weapons were mounted to the gunwales rather than on the heavy deck mounts as depicted by Pyro. Since they were stowable when not in use, Ill just put the kit parts in the spares box and call it a day.
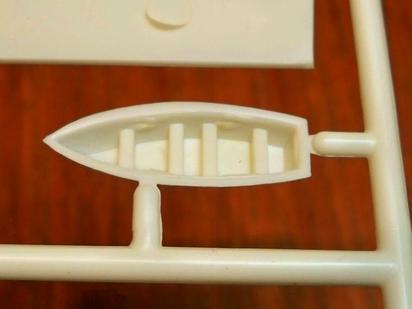
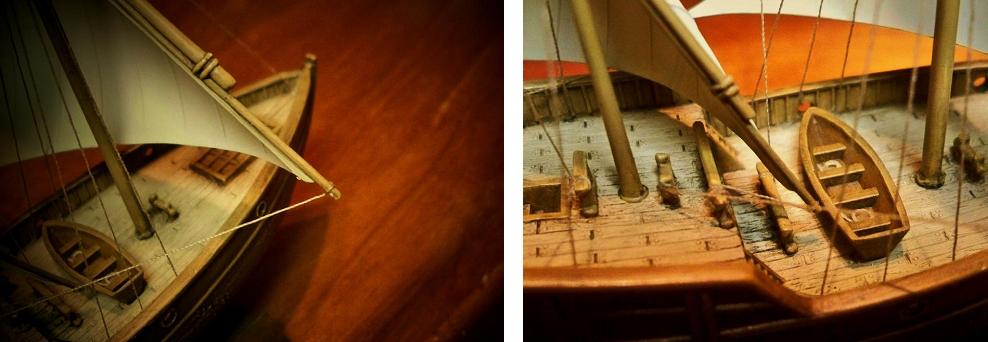
As for the launch, the part provided in the kit doesnt look much like the drawings in my main reference, Xavier Pastors The Ships of Christopher Columbus (Anatomy of the Ship), but it looked reasonable to me so I painted it up along with the other wood parts. Pyro would have it attached over the main hatch forward, but this doesnt seem logical to me; to deploy it, the crew would have had to manhandle it aft past the mainmast to the lowest part of the deck amidships to get it over the side. I set this decision aside too, but Ill probably install it in the open area amidships aft of the mast instead.
Now for the rigging!
Before attaching the masts and rigging it makes sense to sort out Niñas deck hardware. These small Pyro kits are pretty basic affairs, with most of the deck detail simply molded into the single deck piece, but there are some separate parts too. I had previously attached the rails and cleats and painted them up along with the hull. There are also anchors, cannons, and a launch.
The kit anchors are decent, but they seem too big for the Niña. According to the Libro de Armadas in the Archivo General de las Indias in Seville, Niña received new 200 pound anchors for the voyage. These small fittings probably resembled those of the larger Santa Maria, whose anchor has survived and is on display in Haiti at the Museé du Pantheon National Haitien:
Niñas anchors were smaller than that, perhaps small enough to be stowed on deck or even below decks rather than alongside the hull as the Pyro boxtop illustrates. I can either go ahead and use the oversized kit parts or maybe scratch some new ones...Ill figure this out later.
The four cannons provided in the kit look good, but they seem more appropriate for a 19th Century Ship of the Line than a 15th Century caravel:
The Libro de Armadas documents that Niña had aboard ten breech loading bombardas, or swivel guns. These smaller weapons were mounted to the gunwales rather than on the heavy deck mounts as depicted by Pyro. Since they were stowable when not in use, Ill just put the kit parts in the spares box and call it a day.
As for the launch, the part provided in the kit doesnt look much like the drawings in my main reference, Xavier Pastors The Ships of Christopher Columbus (Anatomy of the Ship), but it looked reasonable to me so I painted it up along with the other wood parts. Pyro would have it attached over the main hatch forward, but this doesnt seem logical to me; to deploy it, the crew would have had to manhandle it aft past the mainmast to the lowest part of the deck amidships to get it over the side. I set this decision aside too, but Ill probably install it in the open area amidships aft of the mast instead.
Now for the rigging!

JPTRR

#051
Joined: December 21, 2002
KitMaker: 7,772 posts
Model Shipwrights: 476 posts

Posted: Sunday, February 01, 2015 - 06:40 PM UTC
Quoted Text
I always loved that about Pyro!
Me too!


DaveCox

Joined: January 11, 2003
KitMaker: 4,307 posts
Model Shipwrights: 85 posts

Posted: Sunday, February 01, 2015 - 11:49 PM UTC
Tim
I'd think that Pyro may actually be correct in the placing of the launch! The crew wouldn't manhandle the boat anywhere - even as late as Nelson's time they used a 'whip' or line attached to one of the yards to lift boats into and out of the water. That would be even easier with the lateen rig.
Derricks or cranes weren't permanently fitted to many ships until steam became commonplace as there just wasn't room.

TimReynaga
Joined: May 03, 2006
KitMaker: 2,500 posts
Model Shipwrights: 1,830 posts
Posted: Monday, February 02, 2015 - 01:24 AM UTC
Hey Dave,
I hadn't thought of that. You have a point, Pyro may have been right after all. Doing a quick online search of Niña models, I see the launch placed variously upright, upside down, forward, amidships, even athwartships! On the replica I visited the launch was mounted upright amidships but I guess since there are no photos or plans of the original, we cant really know.
I hadn't thought of that. You have a point, Pyro may have been right after all. Doing a quick online search of Niña models, I see the launch placed variously upright, upside down, forward, amidships, even athwartships! On the replica I visited the launch was mounted upright amidships but I guess since there are no photos or plans of the original, we cant really know.
DaveCox
Joined: January 11, 2003
KitMaker: 4,307 posts
Model Shipwrights: 85 posts
Posted: Monday, February 02, 2015 - 03:18 AM UTC
Where it's placed in the photo, in the mainchains, was certainly impractical as the shrouds are in the way of launching it. With the lateen rig of the Nina, the focs'le seems the best place for it. Apart from the forestay there would appear to be nothing in the way.
TimReynaga
Joined: May 03, 2006
KitMaker: 2,500 posts
Model Shipwrights: 1,830 posts
Posted: Tuesday, February 03, 2015 - 06:53 PM UTC
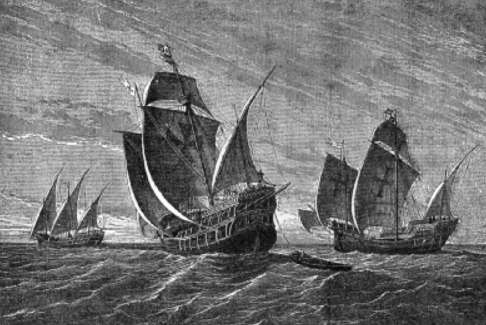
When Columbus left Spain on the voyage of discovery on 3 August 1492, the Niña sported the lateen rig with those angled yards and graceful triangular sails we have all come to associate with her. I was surprised to learn that she actually looked completely different by the time she reached America! Columbus noted in his log that the fleet stopped at the Canary Islands on 9 August to take on provisions and to address some rudder problems on the Pinta. By the time they proceeded across the Atlantic on 6 September, The Niña, which had been lateen rigged, was fitted with square sails. I guess the square rig must have been more efficient at capturing the ocean trade winds than the lateen arrangement, which I understand was more useful for tacking and beating against the variable winds more typically found inshore.
Pyro depicted the ship in her initial lateen configuration, which is fine with me. I like the square arrangement of the Pinta and Santa Maria well enough, but I always thought the Niñas angled rig was so much more elegant!
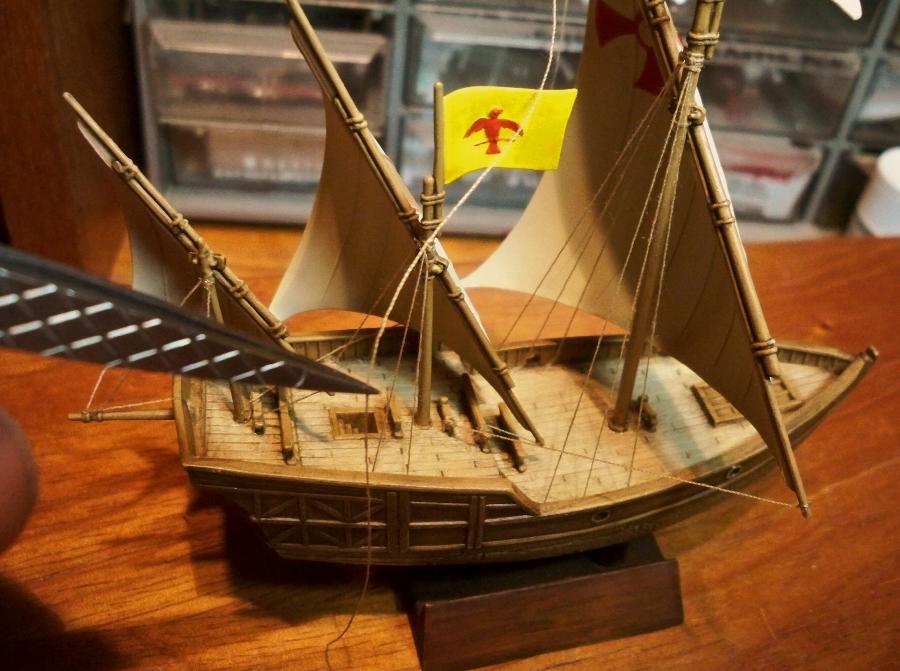
Anyway, now that the paint is finally dry (after nearly a week!), Im able to attach the masts and get to the rigging. Given the simplified nature of the kit and my desire to keep this a quick build, I decided to keep the rig simple as well. Ill make no attempt to reproduce a complete rig plan with accurate blocks, parrels, pulleys, and such. Rather, my goal is to provide the Niña with a basic set of lines that convey a credible impression without bogging down the build too much.
I started with the standing rigging that is, the fixed lines that hold the masts in place. The kit provides molded shrouds with ratlines for each of the two larger masts:
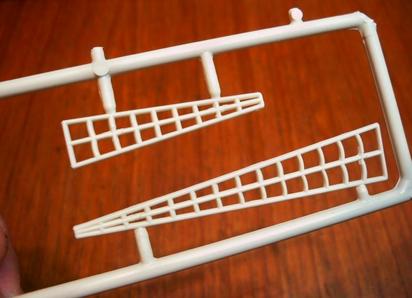
In addition to being way too thick, these parts also appear to be inaccurate since only one side is provided per mast, and lateen rigged vessels dont typically have ratlines (the horizontal bits used for climbing). I opted to replace these kit parts with black sewing thread. Each shroud was first tied to the mast, then the ends were attached to the deck edges on either side below. There really should be complex tightening tackle with deadeyes and attachment fittings at the base of each one, but for simplicity I just super glued them down at the deck/gunwale join. There also should probably be more of them; the full-sized Columbus Foundation Niña replica has six per side, the model in the Museo Maritím de Barcelona has four, but Ive also seen other reconstructions with as few as three. I went with three.
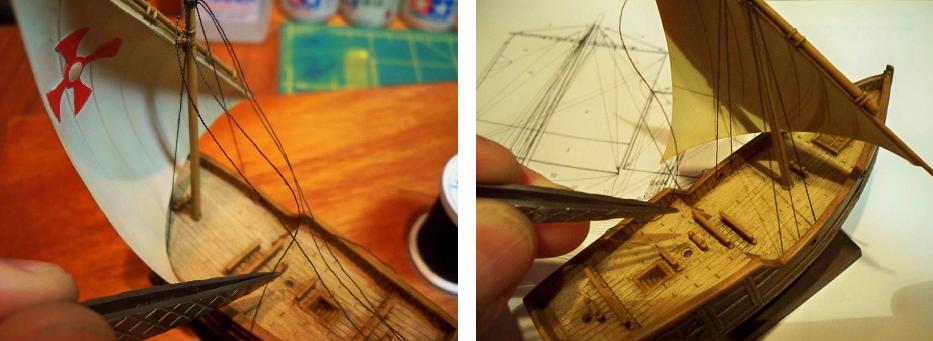
Although they look good in the picture, in person the black shrouds I installed looked too stark and seemed to overwhelm the little model. Looking again at images of the Columbus Foundation replica Niña and at the Barcelona museum model, I could see that these shrouds arent black but are actually the same tan as the rest of the rigging. So even though I hate redoing work, I took off the offending lines and replaced them with tan polyester sewing thread:
Much better!
Pyro depicted the ship in her initial lateen configuration, which is fine with me. I like the square arrangement of the Pinta and Santa Maria well enough, but I always thought the Niñas angled rig was so much more elegant!
Anyway, now that the paint is finally dry (after nearly a week!), Im able to attach the masts and get to the rigging. Given the simplified nature of the kit and my desire to keep this a quick build, I decided to keep the rig simple as well. Ill make no attempt to reproduce a complete rig plan with accurate blocks, parrels, pulleys, and such. Rather, my goal is to provide the Niña with a basic set of lines that convey a credible impression without bogging down the build too much.
I started with the standing rigging that is, the fixed lines that hold the masts in place. The kit provides molded shrouds with ratlines for each of the two larger masts:
In addition to being way too thick, these parts also appear to be inaccurate since only one side is provided per mast, and lateen rigged vessels dont typically have ratlines (the horizontal bits used for climbing). I opted to replace these kit parts with black sewing thread. Each shroud was first tied to the mast, then the ends were attached to the deck edges on either side below. There really should be complex tightening tackle with deadeyes and attachment fittings at the base of each one, but for simplicity I just super glued them down at the deck/gunwale join. There also should probably be more of them; the full-sized Columbus Foundation Niña replica has six per side, the model in the Museo Maritím de Barcelona has four, but Ive also seen other reconstructions with as few as three. I went with three.
Although they look good in the picture, in person the black shrouds I installed looked too stark and seemed to overwhelm the little model. Looking again at images of the Columbus Foundation replica Niña and at the Barcelona museum model, I could see that these shrouds arent black but are actually the same tan as the rest of the rigging. So even though I hate redoing work, I took off the offending lines and replaced them with tan polyester sewing thread:
Much better!
TRM5150
Joined: January 03, 2010
KitMaker: 2,159 posts
Model Shipwrights: 1,400 posts
Posted: Tuesday, February 03, 2015 - 08:22 PM UTC
The tan lines do look much better!! Well done! Amazing what a little rigging can bring to a build!! 
TimReynaga
Joined: May 03, 2006
KitMaker: 2,500 posts
Model Shipwrights: 1,830 posts
Posted: Thursday, February 05, 2015 - 08:03 AM UTC
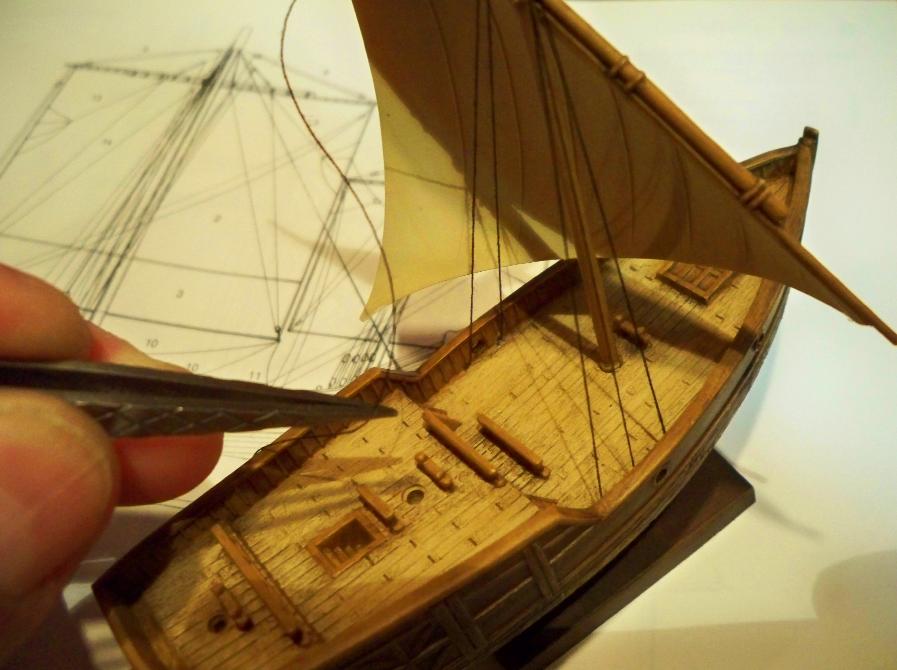
The running rigging to control the sails comes next.
I started with the mizzen sheet line to the boomkin. The kit sails came with little holes to tie these lines on (which I had filled in), so I attached the line to the sail with super glue. Then the line was tied to the boomkin along with a mizzen clew line.
The abbreviated rig consists of just tacks (lines at the ends of the yards), sheets (lines at the ends of the sails), vangs (lines from the gaff peaks to the rail, used to steady the gaff), and the mizzen clew. These were looped around the cleats on deck and tied off. I had a heck of a time tying clove hitches that small, but the model is only 4½ inches long, so I could get away with just a few representative lines. Full respect to the guys who take on those big, complex sailing ship models!
The simplified rigging completes what was for me a lightning fast build start to finish in just under two weeks!
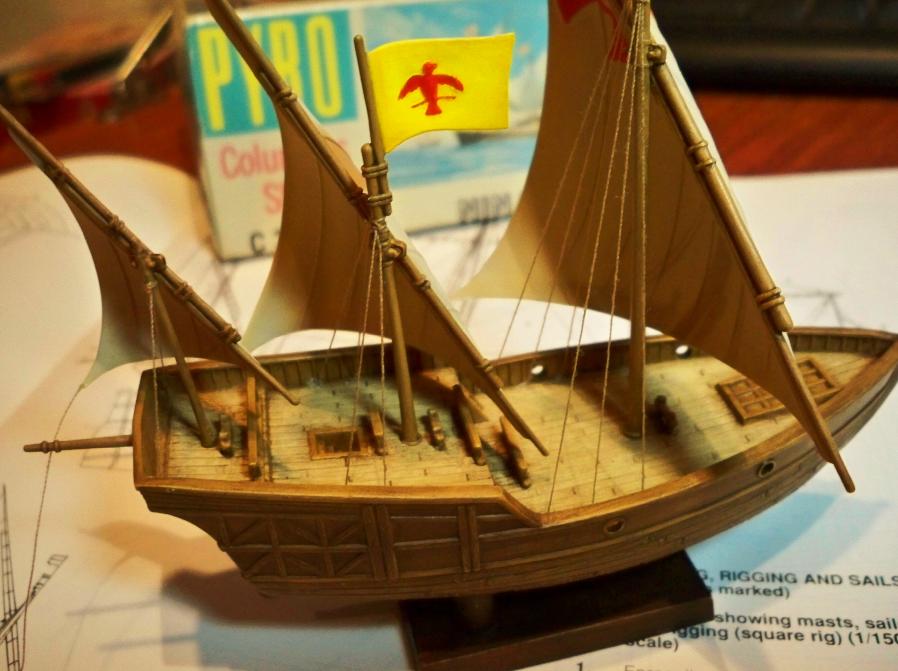
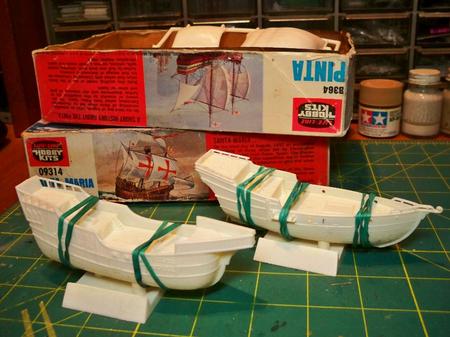
These little Pyro beauties might not be the best detailed or most accurate models out there, but they can still be a lot of fun. In fact, I enjoyed this one so much that I bought a couple more last week while waiting for the Niñas paint to dry:
but that is another story...
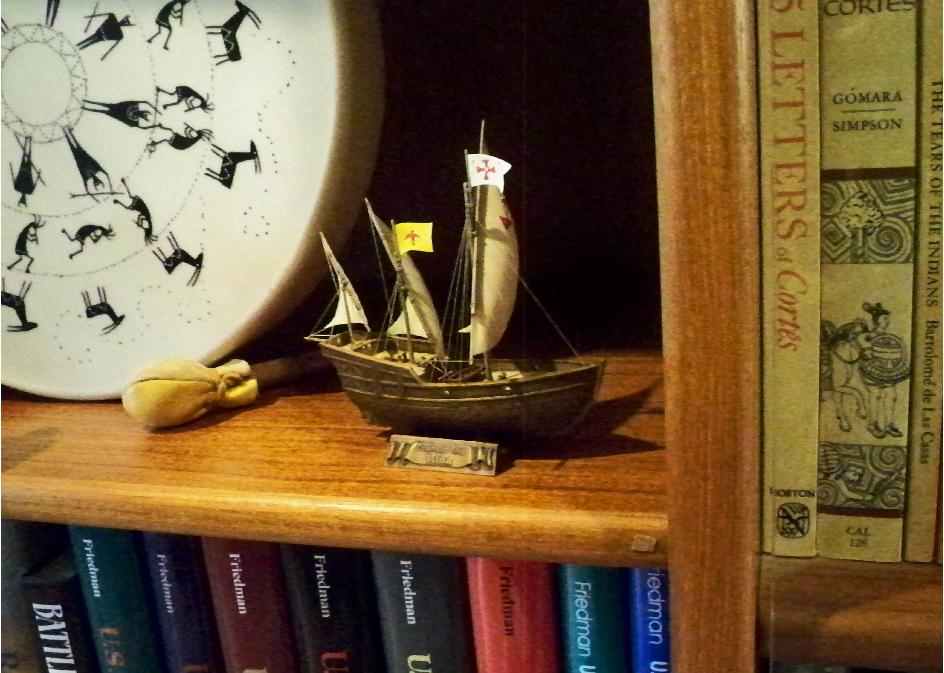
For now, my little 1966 Pyro Niña, after patiently waiting in the kit box for nearly 50 years, proudly takes her place on my bookshelf.
I started with the mizzen sheet line to the boomkin. The kit sails came with little holes to tie these lines on (which I had filled in), so I attached the line to the sail with super glue. Then the line was tied to the boomkin along with a mizzen clew line.
The abbreviated rig consists of just tacks (lines at the ends of the yards), sheets (lines at the ends of the sails), vangs (lines from the gaff peaks to the rail, used to steady the gaff), and the mizzen clew. These were looped around the cleats on deck and tied off. I had a heck of a time tying clove hitches that small, but the model is only 4½ inches long, so I could get away with just a few representative lines. Full respect to the guys who take on those big, complex sailing ship models!
The simplified rigging completes what was for me a lightning fast build start to finish in just under two weeks!
These little Pyro beauties might not be the best detailed or most accurate models out there, but they can still be a lot of fun. In fact, I enjoyed this one so much that I bought a couple more last week while waiting for the Niñas paint to dry:
but that is another story...
For now, my little 1966 Pyro Niña, after patiently waiting in the kit box for nearly 50 years, proudly takes her place on my bookshelf.
TRM5150
Joined: January 03, 2010
KitMaker: 2,159 posts
Model Shipwrights: 1,400 posts
Posted: Thursday, February 05, 2015 - 08:12 AM UTC
LOL...Well done!! The chuckle was for the buying of a couple more!! Nothing wrong with that at all!! Fun is the name of the game!! She looks great on the shelf!!

Aurora-7

#360
Joined: June 18, 2003
KitMaker: 1,020 posts
Model Shipwrights: 630 posts

Posted: Thursday, February 05, 2015 - 04:23 PM UTC
Great work, Tim. You've really shown how even these simple kits can really be brought to life.


Blespooky

Joined: June 03, 2014
KitMaker: 277 posts
Model Shipwrights: 171 posts

Posted: Thursday, February 05, 2015 - 05:24 PM UTC
Tim it turned out great. Fun build log as well,
Thanks and good work,
Bryan
Thanks and good work,
Bryan

JClapp
#259
Joined: October 23, 2011
KitMaker: 2,265 posts
Model Shipwrights: 104 posts
Posted: Thursday, February 05, 2015 - 06:54 PM UTC
That it a little treausure.


JJ1973
#345

Joined: August 22, 2011
KitMaker: 1,835 posts
Model Shipwrights: 1,832 posts
Posted: Friday, February 06, 2015 - 09:32 PM UTC
Tim,
you turned that one into a real jewel!! Are you doing a build log on her two companions as well? I would love to see this
Great work!
Jan
you turned that one into a real jewel!! Are you doing a build log on her two companions as well? I would love to see this
Great work!
Jan
TimReynaga
Joined: May 03, 2006
KitMaker: 2,500 posts
Model Shipwrights: 1,830 posts
Posted: Saturday, February 07, 2015 - 02:10 AM UTC
Todd, Michael, Bryan, Jonathan, and Jan - thank you all for your kind comments!
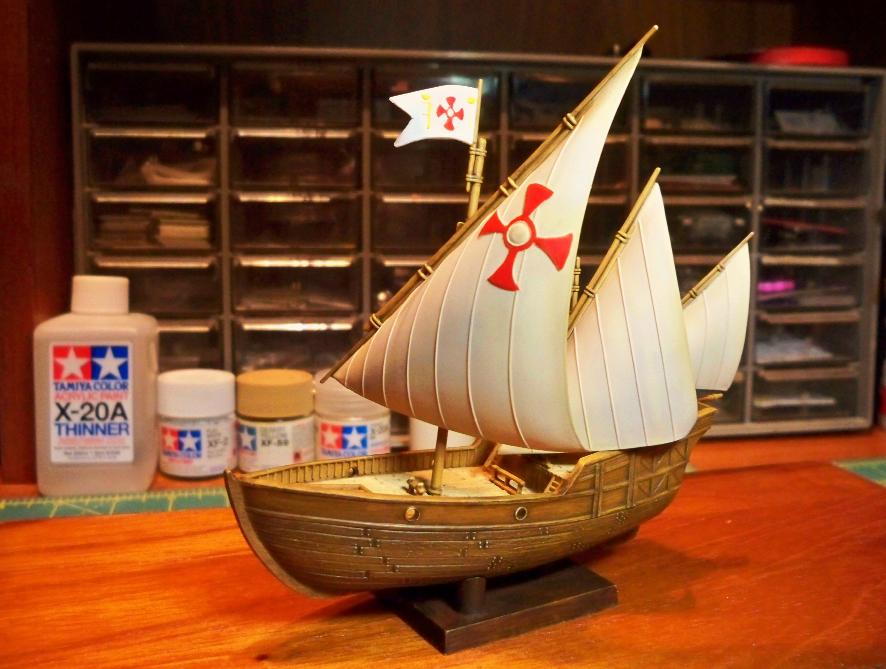
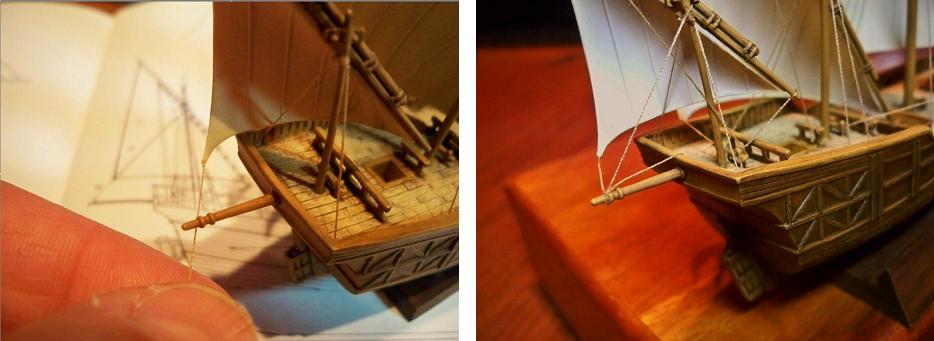
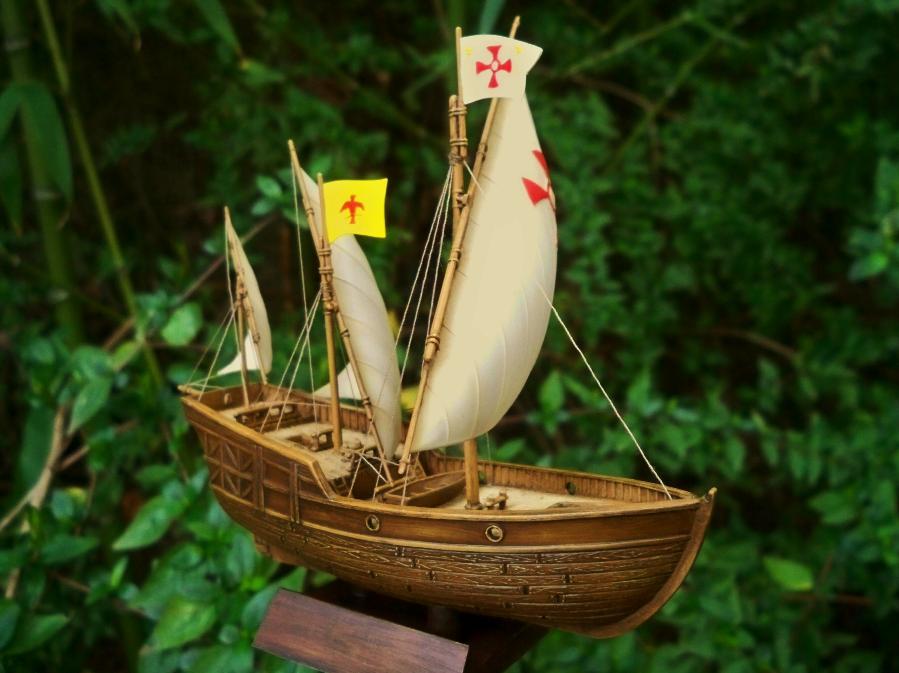
Here are some better pictures of the completed Niña:

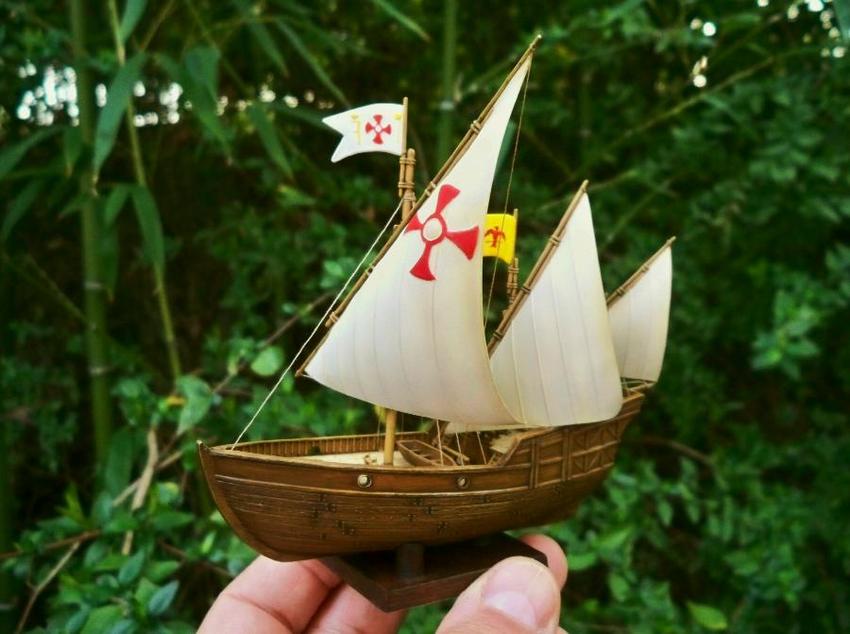
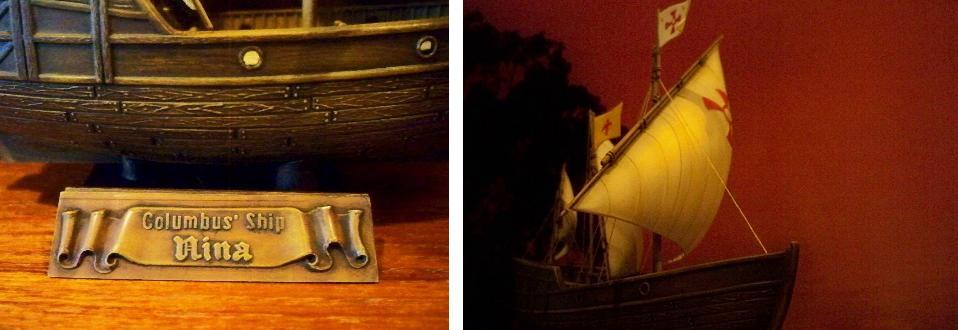
After taking the pictures, I also added the Niña kit nameplate. Pronounced neen-ya rather than nee-na, the n should really have a tilde (that little squiggle) on top, but hey, the fancy lettering is still appealing!
Hmmmm... I do have both the Santa Maria and Pinta on my desk now...
Here are some better pictures of the completed Niña:
After taking the pictures, I also added the Niña kit nameplate. Pronounced neen-ya rather than nee-na, the n should really have a tilde (that little squiggle) on top, but hey, the fancy lettering is still appealing!
Quoted Text
Tim,
you turned that one into a real jewel!! Are you doing a build log on her two companions as well? I would love to see this
Great work!
Jan
Hmmmm... I do have both the Santa Maria and Pinta on my desk now...
TRM5150
Joined: January 03, 2010
KitMaker: 2,159 posts
Model Shipwrights: 1,400 posts
Posted: Saturday, February 07, 2015 - 07:28 AM UTC
She looks even better in the real light!! Again, well done!! Love the shot with your fingers in the pic...great shot to show the scaling!!
BTW, it's a bit too green in the background there....I'm sending some snow out to you...I have plenty of extra for ya!!
BTW, it's a bit too green in the background there....I'm sending some snow out to you...I have plenty of extra for ya!!
TimReynaga
Joined: May 03, 2006
KitMaker: 2,500 posts
Model Shipwrights: 1,830 posts
Posted: Sunday, February 08, 2015 - 05:01 AM UTC
Quoted Text
...it's a bit too green in the background there....I'm sending some snow out to you...I have plenty of extra for ya!!
LOL! right now an "atmospheric river" is passing over Northern California and dumping a ton of warm rain on us here... don't think your snow would survive for very long!

TRM5150
Joined: January 03, 2010
KitMaker: 2,159 posts
Model Shipwrights: 1,400 posts
Posted: Sunday, February 08, 2015 - 06:56 AM UTC
LOL...well enjoy the warm rain!! We have the same but it's coming down much whiter right now!!  In the middle of the third storm in two weeks!! The price we pay for living in the Nor'East!!
In the middle of the third storm in two weeks!! The price we pay for living in the Nor'East!! TimReynaga
Joined: May 03, 2006
KitMaker: 2,500 posts
Model Shipwrights: 1,830 posts
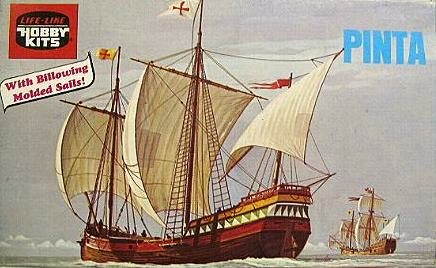
Posted: Sunday, February 22, 2015 - 07:03 PM UTC
next up:
TRM5150
Joined: January 03, 2010
KitMaker: 2,159 posts
Model Shipwrights: 1,400 posts
Posted: Sunday, February 22, 2015 - 10:07 PM UTC
Nice!! Looking forward to it Tim!!
JClapp
#259
Joined: October 23, 2011
KitMaker: 2,265 posts
Model Shipwrights: 104 posts
Posted: Monday, February 23, 2015 - 01:33 AM UTC
I look forward to seeing that as well.
this picture you posted earlier
would be lovely to see it reproduced in 3D.
this picture you posted earlier
would be lovely to see it reproduced in 3D.
DaGreatQueeg

Joined: August 01, 2005
KitMaker: 1,049 posts
Model Shipwrights: 8 posts

Posted: Monday, February 23, 2015 - 02:41 AM UTC
That's a beautiful looking model made from a deceptively simple base - love it! And really looking fwd to watching your next build ......
cheers
Brent
cheers
Brent

phantom_phanatic309
#372

Joined: March 10, 2010
KitMaker: 2,568 posts
Model Shipwrights: 220 posts

Posted: Monday, February 23, 2015 - 03:22 AM UTC
Lovely build Tim. It's amazing what can be done with older kits. Looking forward to seeing the next build.

 |

WEB HOSTING BY


Copyright ©2021 Model Shipwrights and Kitmaker Network, a subsidiary of Silver Star Enterprises
All Rights Reserved. Please read our Conditions of Use and Privacy Policy.
All Rights Reserved. Please read our Conditions of Use and Privacy Policy.