

Go to modelshipwrights.com for the current dynamic site!


General Ship Modeling
Discuss modeling techniques, experiences, and ship modeling in general.
Discuss modeling techniques, experiences, and ship modeling in general.
Hosted by Jim Starkweather
PE/Scratch question for the ship model expert

fhvn4d

#159

Joined: April 07, 2008
KitMaker: 803 posts
Model Shipwrights: 51 posts

Posted: Monday, November 16, 2015 - 06:20 AM UTC
I have a question for the experts and experienced, and the brave enough to try!. I have purchased a 1/131 scale Ashville class Patrol boat model. I want to jazz it up a little with more details, such as PE doors and fire stations, railings and fittings if I can. I havent found anything out there in that scale, but I have found scales close.... the question is.... do I go for 1/120th scale, or 1/144 scale parts..... which one do you think would be best, anyone tried over and undersized parts and what results came of it ? Any help and advice is appreciated!

fhvn4d
#159
Joined: April 07, 2008
KitMaker: 803 posts
Model Shipwrights: 51 posts
Posted: Monday, November 16, 2015 - 03:49 PM UTC
Anybody????

RLlockie

Joined: September 06, 2013
KitMaker: 1,112 posts
Model Shipwrights: 23 posts
Posted: Monday, November 16, 2015 - 04:18 PM UTC
Well I certainly wouldn't profess expertise in this or most other fields but arguably it requires expertise in neither scratchbuilding or etched metal, so I can risk an opinion😀
A few quick calculations reveal that 1m is around 7mm in 1/144, 7.6mm in 1/131 and 8.3mm in 1/120. Thus your scale is just about in the middle. Unless you envisage designing and having your own custom parts made, then I'd probably go with 1/144 as details that are over scale tend to look worse in my opinion. This is particularly the case if they are too big to fit (like w/t doors) as even a non-expert will spot that.
A few quick calculations reveal that 1m is around 7mm in 1/144, 7.6mm in 1/131 and 8.3mm in 1/120. Thus your scale is just about in the middle. Unless you envisage designing and having your own custom parts made, then I'd probably go with 1/144 as details that are over scale tend to look worse in my opinion. This is particularly the case if they are too big to fit (like w/t doors) as even a non-expert will spot that.

TRM5150
Joined: January 03, 2010
KitMaker: 2,159 posts
Model Shipwrights: 1,400 posts

Posted: Monday, November 16, 2015 - 05:34 PM UTC
Hey Brian!! Guessing the 1/144 sounds about right. I assume you might have seen my answer over at the 'house'. Pretty much the same as what Robert mentioned, if you are replacing all of the doors and such, the scale difference is so minute, it will not be noticed! 
fhvn4d
#159
Joined: April 07, 2008
KitMaker: 803 posts
Model Shipwrights: 51 posts
Posted: Monday, November 16, 2015 - 08:04 PM UTC
Thank you both@@ Todd I have not seen it YET... thats my next stop.. but those sites you gave me the other day gave me the scales I could realistically work with !
and fortuately 144 is more common!
and fortuately 144 is more common!

YellowHammer

#513
Joined: March 28, 2006
KitMaker: 554 posts
Model Shipwrights: 219 posts

Posted: Tuesday, November 17, 2015 - 09:09 AM UTC
Hey Brian,
I am in the same boat, pun intended. I got an old USS Tacoma kit a few months back. I got some 5mm clear LED bulbs at our local Radio Shack just before it closed. I'm going to replace the turret dome and I got some clear styrene to replace the front glass on the turret. I am still trying to find some pictures that show the gun mounting in the turret. I sourced some N scale handrails which are a little shorter than the molded stanchions but will look in scale with crew figures. The N scale figures I obtained for next to nothing from China look a little short (about 1/160 scale) so now I'm looking for true 1/144 scale figures in appropriate poses. Not a lot of luck so far. Gaming figures I've tried look too bulky as they are made to be handled and they all seem to carry long arms which would be inappropriate for navy crew.
Todd,
Could you or Brian send those links my way as I would like to do the water tight doors as well as other fixtures. Also the single 40mm aft is pretty basic. I would love to replace that as well. The detail on the 50 cals look okay to me.
Thanks guys, and good luck with your builds.
John

Biggles2

Joined: January 01, 2004
KitMaker: 7,600 posts
Model Shipwrights: 833 posts

Posted: Tuesday, November 17, 2015 - 09:04 PM UTC
I've ordered these figures for 1/144 models: http://www.scalelink.co.uk/acatalog/Preiser_figures_1_144_scale.html
Only the NATO pilot and crew set and the civilian passengers set are available. Figures from the panzer crew set would have been ideal for my 1/144 U-boat, but unfortunately are not available, and probably OOP, as no one has them in stock. The available figures can be converted to naval use, as not much work is required due to their small size. In some cases N scale figures are acceptable, especially if they're bending or kneeling, but even the tall-ish ones couldn't see over the edge of the conning tower.
Only the NATO pilot and crew set and the civilian passengers set are available. Figures from the panzer crew set would have been ideal for my 1/144 U-boat, but unfortunately are not available, and probably OOP, as no one has them in stock. The available figures can be converted to naval use, as not much work is required due to their small size. In some cases N scale figures are acceptable, especially if they're bending or kneeling, but even the tall-ish ones couldn't see over the edge of the conning tower.

TimReynaga
Joined: May 03, 2006
KitMaker: 2,500 posts
Model Shipwrights: 1,830 posts

Posted: Wednesday, November 18, 2015 - 06:44 AM UTC
This set for the old Shell Welder by Atlantic Models might be of use:
 http://atlanticmodels.net/photo-etched%20details/index.html
The scale is pretty close at 1/130.
 http://atlanticmodels.net/photo-etched%20details/index.html
 The scale is pretty close at 1/130.

YellowHammer
#513
Joined: March 28, 2006
KitMaker: 554 posts
Model Shipwrights: 219 posts
Posted: Wednesday, November 18, 2015 - 07:39 AM UTC
Hey Guys,
After posting last night I searched the web again last night and found several US sailor sets by Shapeways.com in 1/144 scale. They are 3D printed. There were sets in WWII dungarees with Dixie cup hats (set 1), combat poses in life jackets and helmets (set 2), and modern uniforms (set 3). There are 30 different poses in each set. I've ordered a set of the combat poses. The pictures show poses for seated 40mm gunners as well as 20mm and 50 cal gunners, loaders, ammo handlers and many other standing poses. I don't consider myself qualified to do a formal review but I'll give you my thoughts when I receive them.
Thanks
John
TRM5150
Joined: January 03, 2010
KitMaker: 2,159 posts
Model Shipwrights: 1,400 posts
Posted: Wednesday, November 18, 2015 - 07:45 AM UTC
Thanks for that info John! Nice find! Please let us know what you think about them! 
fhvn4d
#159
Joined: April 07, 2008
KitMaker: 803 posts
Model Shipwrights: 51 posts
Posted: Wednesday, November 18, 2015 - 06:12 PM UTC
Quoted Text
This set for the old Shell Welder by Atlantic Models might be of use:
The scale is pretty close at 1/130.
TIM THAT IS AWESOME..... I might pick some of that up if the two sets of PE that I ordered yesterday dont pan out. Im also looking for fire stations and hoses, but I havent had ANY luck there. I emailed Bluejacket, and their scales are off by too much to be realistic. Might have to try SCRATCHBUILDING a 1/131 fire hose station....hose will be easy... aluminum foil ought to do... the nozzle and couplings, not so in that scale LOL.... although....imagine a 1/131 scale navy nozzle with a gooseneck IN OPERATION.... im way over my head LOL
John, i sent you a link to my pictures last night hope they help and definitly keep me updated on those figures

RedDuster

Joined: March 01, 2010
KitMaker: 7,078 posts
Model Shipwrights: 6,649 posts

Posted: Thursday, November 19, 2015 - 02:18 AM UTC
Hi Brian,
Quick thought, have you tried contacting the 3D printing guys, Like 3D Modelparts, Model Monkey etc they claim be able to produce the products in any scale.
Don't know if they can help, or the cost, but no harm in contacting them.
Cheers.
Si
Quick thought, have you tried contacting the 3D printing guys, Like 3D Modelparts, Model Monkey etc they claim be able to produce the products in any scale.
Don't know if they can help, or the cost, but no harm in contacting them.
Cheers.
Si
YellowHammer
#513
Joined: March 28, 2006
KitMaker: 554 posts
Model Shipwrights: 219 posts
Posted: Thursday, November 19, 2015 - 08:22 AM UTC
Hey Brian,
Thanks for sending me the links. I'll check them out tonight. Greatly appreciated.
John
Thanks for sending me the links. I'll check them out tonight. Greatly appreciated.
John
fhvn4d
#159
Joined: April 07, 2008
KitMaker: 803 posts
Model Shipwrights: 51 posts
Posted: Friday, November 20, 2015 - 02:14 AM UTC
TOMS MODELWORKS COMES THROUGH IN FLYING COLORS!!!! Thank you too to Todd and those of you who said the 1/144 would be close enough. I ordered parts tuesday night and they arrived in the mail TODAY!!! frets are open and on the bench... give you a couple pics to compare scale in an hour or so!
TRM5150
Joined: January 03, 2010
KitMaker: 2,159 posts
Model Shipwrights: 1,400 posts
Posted: Friday, November 20, 2015 - 06:51 AM UTC
Great news Brian! Glad to hear they will work out for you!! Start slinging the shiny stuff!! 
fhvn4d
#159
Joined: April 07, 2008
KitMaker: 803 posts
Model Shipwrights: 51 posts
Posted: Friday, November 20, 2015 - 10:43 PM UTC
Here are the photos that show the scale and the difference between the 131 and the 144 when placed on the kit.... this is gonna be a winner of an upgrade!
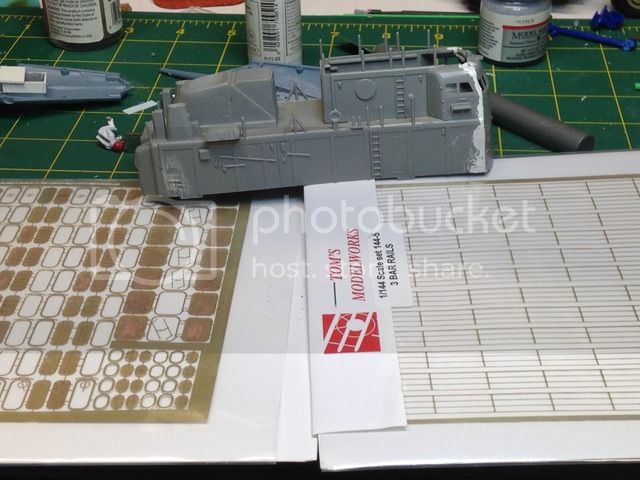
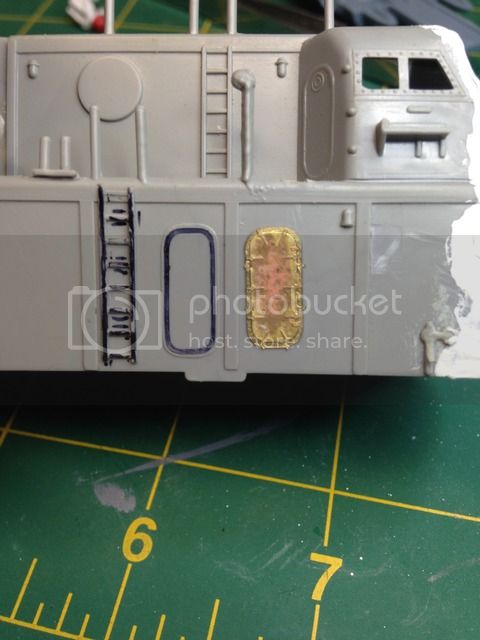
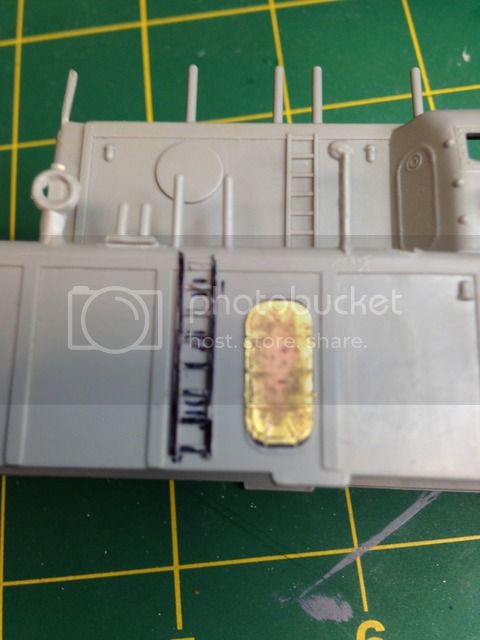
in the last picture, you can see that I literally just put the doorway and hatch right over the kits raised detail.... I think it will be fine for some extra relief. The ladders, I have cut most of the middle out and left a bit at the top middle and bottom to provide someplace for the glue to grab. More pictures as things progress.


in the last picture, you can see that I literally just put the doorway and hatch right over the kits raised detail.... I think it will be fine for some extra relief. The ladders, I have cut most of the middle out and left a bit at the top middle and bottom to provide someplace for the glue to grab. More pictures as things progress.
TRM5150
Joined: January 03, 2010
KitMaker: 2,159 posts
Model Shipwrights: 1,400 posts
Posted: Saturday, November 21, 2015 - 02:00 AM UTC
Looks like a spot on match if you ask me!! Time to start flinging the tiny parts around the bench now!!
fhvn4d
#159
Joined: April 07, 2008
KitMaker: 803 posts
Model Shipwrights: 51 posts
Posted: Saturday, November 21, 2015 - 03:30 AM UTC
LOL already done... THOUGHT I had the first ladder glued down and found out the hard way I was not correct... this is where the learning curve is going to be wide.. not used to using metal parts on plastic kits.... got me some gorilla glue gel today and hopefully that will get me results I need
TRM5150
Joined: January 03, 2010
KitMaker: 2,159 posts
Model Shipwrights: 1,400 posts
Posted: Saturday, November 21, 2015 - 05:13 AM UTC
LOL...there is a learning process with everything unfortunately! The Gorillas glue? I assume their brand of CA, correct? Not sure how the standard GG will work. know with wood it tends to expand. The CA should be fine! I buy the 10-packs of the small tubes of thin and Gel CA. Couple bucks and they last a long time. Also, you can toss then in the fridge to last longer.
One of the best stuff I have used is Gator Grip Glue - http://www.gatorsmask.com/gatorglueorder1.html Fries quick and is water soluble. There is thick and thin versions...I have them both and both work excellent. Kenny (owner) sell direct, you can drop him and email and give him your address so he can figure shipping costs. They are negligible...he does this to protect him from mostly international costs.
White Glue (PVA) works great too. Easy clean up and once dry the parts are secured very well. it's the drying time that holds you up. Flat stuff like doors, won't matter...ladders and such, you have to wait 10 to fifteen minutes before thinking about touching it.
YellowHammer
#513
Joined: March 28, 2006
KitMaker: 554 posts
Model Shipwrights: 219 posts
Posted: Saturday, November 21, 2015 - 10:32 AM UTC
Hi Brian,
Those doors do look good. I may pick up a set. I would like to try some ladders too but I'm concerned the two dimensional brass handrails would not look right. I would appreciate your thoughts on this since you have the brass in hand.
I'm still waiting on my laptop repairs so I can't post my pics yet. Some of the pics I have show deck details including different handrails. Welded tube 2 or 3 rail handrails on top of the deck house and 2 or 3 taught wire rope stanchions on the main deck with chains between some stanchions in locations used for boarding.
In doing research for my build I noticed a difference between the Asheville class and Tacoma class gunboats is that the Tacomas have a hawse hole for the anchor in the starboard bow while the Ashevilles did not. The kit has the hawse hole depicted very basically and includes molded on anchor chains on the fore deck. I will be removing the chains. My question is if the chains are released through a hawse hole in the side of the ship, would the chains necessarily have to come to the fore deck? The only pictures I've been able to find on the internet showing the foredeck in any detail are of Asheville class boats where the anchor is released from the prow and stored on deck when at sea. I have some miniature chain which will work but don't know if it is appropriate in this case. Any info you may have would be greatly appreciated.
Ill try to post some of my reference pics when I get my laptop back.
Todd,
I'm a newbie working with brass as well. I appreciate your advice on glues. Can you tell me how to get paint to stick to the brass? Paints and primers I have tried just bead up on the metal surface.
Thanks
John
TRM5150
Joined: January 03, 2010
KitMaker: 2,159 posts
Model Shipwrights: 1,400 posts
Posted: Saturday, November 21, 2015 - 07:25 PM UTC
Hi John, not to hijack Brian's thread here, but all this stuff does go to the benefit of one thing,..building
Painting of photo etch can always be a source of contentment for some. It is quite common to have the beading, chipping and peeling. There are some preventative approaches you can use to counteract it though.
1 - Either prior too, or after you remove the parts, scuff thee surface. This will help any paint bit the surface of the metal. It does not need to be much. A fine sanding stick...300, 450,even 600 (fine grade sandpaper will work too but the stick gives a level of soft material between you finger and the part). Once the sanding is done...
2 - Clean the parts well. With or without scuffing the surface, the remnants of enchants form manufacturing and dirt and oil from our own hands needs to come off. The scuffing does some of this but best to use a cleaner like denatured alcohol, acetone or possibly lacquer thinner. Depending on your tolerance for the smell of these chemicals...and use a respirator or do it outside with ventilation...you can give then a bath in warm soapy water and dry them. Avoid paper towels or fuzzy clothes as they will deposit fibers...air drying or hairdryer will work.
3 - Prime! Primer is the key to all painting. Primer, no mater the type is designed to bite into the surface and make a base for the paint. Quick and dirty without running on longer than I have...pick up a can of flat primer from the hardware store, hand the parts sheet after going through #1 & #2 and lightly hit both sides. Let dry the recommended amount and dust the surface again.
- Most enamel or lacquer based primers actually bite into the metal surface. If acrylic paints are what you use...there can be some hurtles as by nature, acrylics and metals do not bond well. Scuffing will help, applying the primer in thin coats and waiting a full cure time of 24 to 48 will help. But if handled too much, they will need touch up. I have had limited success with applying a clear coat to the bare metal first, allowing it to cure and then add the primer. Acrylic clear coats are quite resilient and bot the surface pretty good. You could simply primer the surface with the can of auto primer, let dry and go over it with the acrylic and move on!
3 - Lastly would be a burnishing agent. There are some on the market like Uschi van der Rosten's, but there are some other sources like gunsmith shops and online. A burnishing agents do a number of things in a number of colors. There is one that turns the metal black. Sometimes the black will work by itself...but when it does not, the black does not only tarnish the surface, it scarifies it. You can prime over it and paint with any paint and it should stick. Again, acrylics by nature don't like biting to metal...but it will hold!
fhvn4d
#159
Joined: April 07, 2008
KitMaker: 803 posts
Model Shipwrights: 51 posts
Posted: Saturday, November 21, 2015 - 08:54 PM UTC
OPEN FORUM no worries Todd... cause im reading it too!!! Hell I need the advice myself!!!
I know the railing discrepancy you are talking about, and I am on the fence myself as to how to fix it.... because the 3 rail fret of PE is going to look way to flat at this scale.. but what I MIGHT DO... in addition to losing my mind,is to either use the 3 rail stuff as a template to make round railing out of either plastic or (Gulp) soldered brass. I want to see how the flat stuff stacks up against the stanchions on the boat, and when I get to that point, if its smaller, then I can just use the flat stuff as a gluing surface for plastic rod and hopefully it will pass... if not... I have visions of lots of pieces of brass getting soldered together... The chain parts and wire pares you spoke of too are similar in my kit as well, but I am less worried about those because they can be replicated with either jewlers wire or string or something like that.... I think! LOL
Progress on the bridge and doors( I am gonna scratchbuild a bridge inside because theere just too much dead space not to... and portholes becuase they show up)
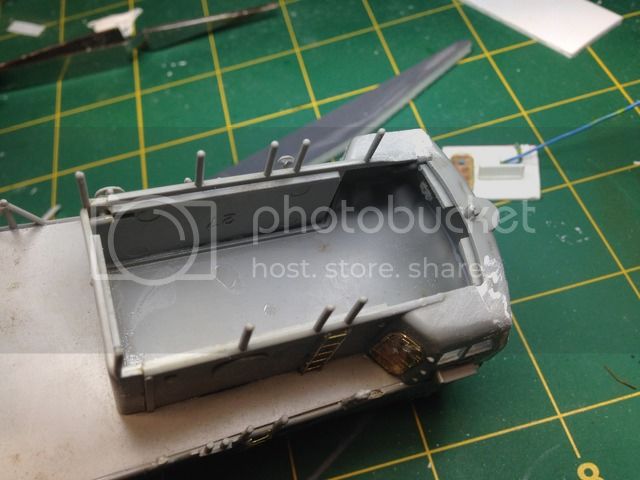


YellowHammer
#513
Joined: March 28, 2006
KitMaker: 554 posts
Model Shipwrights: 219 posts
Posted: Tuesday, November 24, 2015 - 12:21 PM UTC
Brian,
I really like your idea about detailing the bridge. I finally got my laptop back from the geeks and I set up an account on Photobucket. I set up an album at http://s1308.photobucket.com/user/LenitaandJohn_McDaniel/library/?view=recent. It has some close up pictures of the Antelope, Asheville, Tacoma and Defiant. Some of the distance shots also allow zooming with good quality. One in particular of the Tacoma allows you to get right on board. I've also added in a few pages on the 40mm mount. And I have one photo of the bridge control station. Maybe it will give you some ideas. I also have several photos of a 1/35 scale Asheville built by a RC modeler who did an outstanding detail job if you're interested. Anyway, hope these help.
BTW, the crew figures came in from Shapeways. I'll post my comments on the separate thread tomorrow.
John
fhvn4d
#159
Joined: April 07, 2008
KitMaker: 803 posts
Model Shipwrights: 51 posts
Posted: Tuesday, November 24, 2015 - 05:28 PM UTC
Quoted Text
Brian,
I really like your idea about detailing the bridge. I finally got my laptop back from the geeks and I set up an account on Photobucket. I set up an album at http://s1308.photobucket.com/user/LenitaandJohn_McDaniel/library/?view=recent. It has some close up pictures of the Antelope, Asheville, Tacoma and Defiant. Some of the distance shots also allow zooming with good quality. One in particular of the Tacoma allows you to get right on board. I've also added in a few pages on the 40mm mount. And I have one photo of the bridge control station. Maybe it will give you some ideas. I also have several photos of a 1/35 scale Asheville built by a RC modeler who did an outstanding detail job if you're interested. Anyway, hope these help.
BTW, the crew figures came in from Shapeways. I'll post my comments on the separate thread tomorrow.
John
U ROCK JOHN! I grabbed 4 pictures from your bucket if thats ok... Interesting note.... there are 3 pictures in there that show Battleship Cove, in Fall River MA... which is all of 15 minutes away from my home!
YellowHammer
#513
Joined: March 28, 2006
KitMaker: 554 posts
Model Shipwrights: 219 posts
Posted: Tuesday, November 24, 2015 - 07:47 PM UTC
Glad the pics could be of help. I obtained them all from public domain sites on the web so I don't think I'm breaking any copyright rules by posting them here. IIRC it is the Asheville that was in Battleship cove. I think it was the last gunboat left in the US. It used to be open for tours but I think that stopped due to lack of funding for upkeep of the boat. Don't remember if it has been scrapped yet. I think it may have been moved to a river port for storage at one time.
 |

WEB HOSTING BY


Copyright ©2021 Model Shipwrights and Kitmaker Network, a subsidiary of Silver Star Enterprises
All Rights Reserved. Please read our Conditions of Use and Privacy Policy.
All Rights Reserved. Please read our Conditions of Use and Privacy Policy.