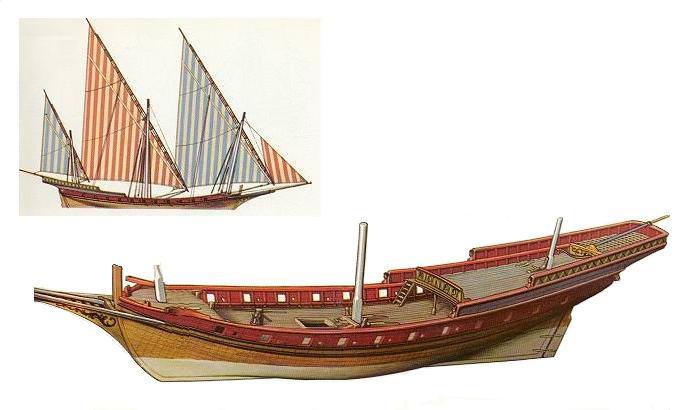
_GOTOBOTTOM
General Ship Modeling
Discuss modeling techniques, experiences, and ship modeling in general.
Pirate Felucca
YellowHammer
#513
Visit this Community
Alabama, United States
Joined: March 28, 2006
KitMaker: 554 posts
Model Shipwrights: 219 posts
Posted: Tuesday, April 10, 2018 - 06:31 AM UTC
Moving this blog to General Ship Modeling.

Hi Folks,
With some encouragement from Tim Reynaga I'm going to attempt a build log of the Lindberg kit of a Pirate Felucca. This is only my second build log. I'm hoping it will drive me to actually complete a build. Something I haven't done in a while. This kit is one of the golden oldies from a couple generations ago that's been re-released by Round 2 Models. The only number on the box I've found is HL205/12 so I assume it is the kit number. The scale is listed as 1/250 and it looks to be fairly accurate from my Mark I eyeball.


I'm having trouble saving photos to this blog. I can't find the properties for the expanded photos in my Kitmaker gallery so I'm having to post thumbnails. I'll try to correct it in future posts.

There aren't a lot of parts to the kit. There is a small amount of flash on some but nothing difficult to remove. I re-purposed the two cannon intended for the quarter-deck for an earlier build. The other cannons do not have wheels molded on so I intend to rig them as carronades.


The oars appear to be grossly out of scale. I'm going to re-purpose some oars from an old Heller 1/450 scale La Reale kit that look like they will do in this scale.

There is wood grain detail on the hull exterior and deck. I'm not sure if you can make out the grain on this close-up of the hull. There is no wood grain detail on the inside walls of the hull. The oar ports are a little low on the hull based on illustrations I've been able to find but I'm going to go with them as provided.


The instructions are 2 pages with exploded views for parts placement. Simplified rigging is also shown.


The decal sheet is colorful and provides a selection of flags, sail markings, and a decal for the stern rail to show decorative scrollwork.


In cleaning up the parts to start construction I noticed the locator peg for mounting the anchor is well back on the starboard side under the #1 gun port and over the oars. This wouldn't be practical so I removed the peg and will mount the anchor on the bow later.

I've started by gluing together the two hull halves and the deck. There are fine locator pins on the hull halves which assists in alignment and do not create any gaps.


The deck fits snugly with only minor gaping that will need some putty to fill. I also need to do some filling and sanding on the stern rail.


Question for our members: There are no parts for a steering wheel or tiller in the kit. The illustrations I've been able to find on the internet for sea-going feluccas don't seem to show a wheel or tiller either. Sail handing equipment and stern guns are shown but no steering. Tillers are used for river-bound feluccas. Would the feluccas have been steered from an aft cabin below the weather deck?

I hope to use some of Tim's techniques he's displayed so well on his Chinese Junk, Nina and Pinta builds he's posted here are Model Shipwrights. I don't have an airbrush so I'll be using rattle cans and brushes when we get to the painting. I'm going to try and paint the ship in a color scheme similar to the box art.

I'm asking for comments and critiques as I progress so we can all benefit from our shared experiences.

Thanks for looking.

John


PS - I meant to post this in the General Ship Modeling Forum. Can one of our moderators move this blog or let me know how to move it? Thanks John


d6mst0
#453
Visit this Community
Texas, United States
Joined: August 28, 2016
KitMaker: 1,925 posts
Model Shipwrights: 1,298 posts
Posted: Tuesday, April 10, 2018 - 04:49 PM UTC
Wow, that is one tiny ship. I don't think my fat hands would be able to work with it without always knocking something off.
oldbean
Visit this Community
Virginia, United States
Joined: July 05, 2004
KitMaker: 769 posts
Model Shipwrights: 25 posts
Posted: Tuesday, April 10, 2018 - 05:02 PM UTC
Hi John,
Good start. For your pictures, when you are copying the link remove the word "Thumbs" from it and the pics will show full size.

Jesse
TimReynaga
Staff MemberAssociate Editor
MODEL SHIPWRIGHTS
Visit this Community
California, United States
Joined: May 03, 2006
KitMaker: 2,500 posts
Model Shipwrights: 1,830 posts
Posted: Tuesday, April 10, 2018 - 05:37 PM UTC
Hi John,

Jesse is right - if you want to post one of your pictures from the Kitmaker Gallery full sized, go to your Member Gallery and click on the thumbnail picture you want. This will to bring it to full size on the screen. Then under Linked Thumbnail below it, copy the entire address and drop it into your message. Before posting the message, delete /thumbs from the middle of the address and the image will appear full sized in your post.


I'm delighted to see that you are going forward with the Felucca - it's always fun to see these ancient Pyro moldings actually getting built.

Great idea replacing those massive oars with the finer parts from the Heller kit, too. I'm ready to watch and learn!
YellowHammer
#513
Visit this Community
Alabama, United States
Joined: March 28, 2006
KitMaker: 554 posts
Model Shipwrights: 219 posts
Posted: Tuesday, April 10, 2018 - 07:14 PM UTC
Thanks guys for the info on posting the photos. There's a lot of open space on deck that I want to busy up some when I get to the detail stage of the build. Maybe some barrels made from sprue, boxes from Evergreen stock, coiled ropes, etc. Maybe add a bow or stern chaser, or even swivel guns on the quarter deck rails. Not having built sailing ships before, if you think of anything that should be there let me know. I'm assuming the steering and windlass are below decks but if you think of something, let me know.

I'm going to try some Z scale railroad figures as crew to see if they're close to scale. Not a lot, maybe a few working on a gun or moving stores, lookouts, etc. Just to add interest. But I've got to finish the ship first. Starting back on her today.
Thanks for your interest.
John
RussellE
#306
Visit this Community
Victoria, Australia
Joined: June 27, 2010
KitMaker: 3,959 posts
Model Shipwrights: 2,777 posts
Posted: Wednesday, April 11, 2018 - 02:27 AM UTC
Looks real tiny John, but a whole lotta fun!

Following with interest!
JClapp
#259
Visit this Community
Massachusetts, United States
Joined: October 23, 2011
KitMaker: 2,265 posts
Model Shipwrights: 104 posts
Posted: Wednesday, April 11, 2018 - 06:19 AM UTC
That will make a lovely ship model. I think the proportions look good. Also, I love the lateen sails.
I have looked at a few finished ones on the internet. I have to agree the sweeps in the kit are huge and hideous, and the sweep ports also look much too large and too low - like, below the water line.
Sweep ports were much smaller than a gun port. in this scale they would be barely recognizable as a hole in the side: an 18 inch square port would be .007". I think you would be justified in filling the kit ports and drilling tiny holes to insert your new oars along a new line higher up under the wales.
but Im really just an armchair sailor, so please carry on with your plan.
TimReynaga
Staff MemberAssociate Editor
MODEL SHIPWRIGHTS
Visit this Community
California, United States
Joined: May 03, 2006
KitMaker: 2,500 posts
Model Shipwrights: 1,830 posts
Posted: Wednesday, April 11, 2018 - 07:07 AM UTC

Quoted Text

...the sweeps in the kit are huge and hideous, and the sweep ports also look much too large and too low - like, below the water line.
Sweep ports were much smaller than a gun port. in this scale they would be barely recognizable as a hole in the side: an 18 inch square port would be .007". I think you would be justified in filling the kit ports and drilling tiny holes to insert your new oars along a new line higher up under the wales...


I agree. Check out this felucca rendering from Björn Landström’s The Ship: An Illustrated History:

Unlike Pyro's interpretation, the sweep ports look to be at the main deck level next to the larger gun ports - near, but definitely above, the water line.
YellowHammer
#513
Visit this Community
Alabama, United States
Joined: March 28, 2006
KitMaker: 554 posts
Model Shipwrights: 219 posts
Posted: Wednesday, April 11, 2018 - 07:16 AM UTC
Jonathan,
I appreciate your comments. Early on I thought about filling the oar ports and storing the oars either inboard or outboard the quarterdeck rails. From what I've read the sweeps were often extended through the gun ports or through oar ports between the guns because the ships sat low in the water similar to a galley. I may go that route. I'm still working on the hull so it wouldn't be a problem. Thanks again.
John
YellowHammer
#513
Visit this Community
Alabama, United States
Joined: March 28, 2006
KitMaker: 554 posts
Model Shipwrights: 219 posts
Posted: Wednesday, April 11, 2018 - 07:25 AM UTC
Tim,
Thanks for those illustrations. I've decided to fill the oar ports and stack the oars along the quarterdeck rails. I like that color scheme too. Interesting that your illustrations show a third mast. I've got some parts from other small scale sailing ships. I may try and add that mizzen mast if I can find another lateen sail. I also will be adding a bowsprit and a mizzen boom if I add the mizzen mast.
Thanks everyone for all the comments so far.
John
YellowHammer
#513
Visit this Community
Alabama, United States
Joined: March 28, 2006
KitMaker: 554 posts
Model Shipwrights: 219 posts
Posted: Saturday, April 14, 2018 - 12:34 AM UTC
Hi guys. Just a short update.
I've filled the oar ports in the hull. I used 2mm disks punched from .010mm plastic card. The hole punch came from the scrapbooking aisle at Hobby Lobby. They have several punch sizes. Its a cheap alternative to a punch and die set.


I used Tamiya white putty on top of the disks.


Sorry for the quality of the photos. Hands shaking a little today.

While waiting for the putty to dry I worked on the ejector pin marks on the back side of the sails. There are three pin marks on each sail near the corners and another pin mark where the spars overlap. The plastic is easy to work with, not brittle at all. Care will be needed as some of the pin marks are on the sail ribs.

After the putty dried I did some sanding and then I hit the hull with Tamiya spray can TS-3 Dark Yellow base coat to look for areas needing additional work.

So now I'm waiting for the paint to dry. This may take a while as its humid in my house from the thunderstorms outside.

Thanks for looking.
John


YellowHammer
#513
Visit this Community
Alabama, United States
Joined: March 28, 2006
KitMaker: 554 posts
Model Shipwrights: 219 posts
Posted: Saturday, April 21, 2018 - 09:51 AM UTC
Hi folks,
Time for an update. After filling the holes in the hull I used some Tamiya rattle can dark yellow as the base coat. I let it dry for a day and then started the detail painting. After looking at a lot of illustrations I decided to go with the yellow on the hull above the water line with white below and red railings. The feluccas often had colorful paint schemes. I used buff for the deck to give a slightly lighter hue. The buff was AV Model Color and the rest were craft acrylics. I decided to go with white for the scroll work. I didn't think the pirates would waste gold for this purpose. It took me several tries and I'm still not really happy with it but I've pushed my eyesight and hand tremors as far as I can go. Here's a few photos:


I apologize again for the quality of the photos. You may have noticed on the poop deck rails I used a kelly green background. Also there are some boxes along the bottom of the rail. In the illustration on the box top these are shown as windows for the main cabin. However due to some measurement error by the mold makers they are above the poop deck, not below. So I painted them black as false gun ports to make the ship look more heavily armed than it is.

I liberated a flag pole from the La Realle kit for the stern and made a bow sprit out of stiff wire. Then I made a wash of raw umber oil paint with paint thinner. I was concerned that this might attack the Tamiya paint as the can lists it as acrylic enamel paint. I tested it on some scrap sheet plastic with the Tamiya paint base coat and had no issues. Its hard to make out in the photos but it bring out the wood grain on the hull and deck. I also used it on the sails but forgot to take a photo of the sails. Here's where I am at the moment.


I'm starting to work on the guns. There's sink marks and mold seams on each one. I liberated a cannon from the La Realle kit to serve as a bow chaser. The ship's boat has planking detail so it got the same treatment as the hull. The poop deck rail was not completely formed in the mold so I'm scrounging in my parts boxes for an alternative. I'm also looking for other deck fittings to help busy the deck. I'm going to put simple rigging on the cannons. This and the standing/running rigging should help camouflage the smooth inner walls of the rails

All comments and constructive criticism appreciated
Thanks for looking.
John


TimReynaga
Staff MemberAssociate Editor
MODEL SHIPWRIGHTS
Visit this Community
California, United States
Joined: May 03, 2006
KitMaker: 2,500 posts
Model Shipwrights: 1,830 posts
Posted: Saturday, April 21, 2018 - 08:09 PM UTC
Hi John,

Looking good so far! I love the vivid colors on your Felucca - most ships are such drab gray or wood, and this makes for a brilliant departure.

Good catch with the cabin windows; on the poorly printed 1967 Pyro boxtop I have they are indistinct blue rectangles which I took to be decorative elements. Painting them up as false gunports neatly solves the problem of their inaccurate positioning!

The Felucca kit I have is a half-assembled mess I picked up at a swap meet, but the poop deck rail part is still on the sprue. Let me know if you can't come up with a replacement for your poorly molded one and I'll send the part to you.
JJ1973
#345
Visit this Community
Niedersachsen, Germany
Joined: August 22, 2011
KitMaker: 1,835 posts
Model Shipwrights: 1,832 posts
Posted: Saturday, April 21, 2018 - 11:19 PM UTC
John,

this looks indeed pretty cool!

Nice start, count me in for your build!

Cheers,
Jan
JClapp
#259
Visit this Community
Massachusetts, United States
Joined: October 23, 2011
KitMaker: 2,265 posts
Model Shipwrights: 104 posts
Posted: Sunday, April 22, 2018 - 03:14 AM UTC
That is delightful! coming along nicely.
Kevlar06
Visit this Community
Washington, United States
Joined: March 15, 2009
KitMaker: 3,670 posts
Model Shipwrights: 173 posts
Posted: Sunday, April 22, 2018 - 03:37 AM UTC
I love these old Pyro ships-- but they are so tiny. An ideal application for them would be to build a whole fleet and put them into a diorama! Barbary Pirates Vs Edward Prebble and the USS Constitution maybe?
VR, Russ
YellowHammer
#513
Visit this Community
Alabama, United States
Joined: March 28, 2006
KitMaker: 554 posts
Model Shipwrights: 219 posts
Posted: Sunday, April 29, 2018 - 07:10 AM UTC
Hi Folks,
Time for another update. I've added some of the items to the deck. Tim, I appreciate your offer of a poop deck rail but I hope to be able to tie off some of the main mast running rigging and I don't think I could get the thread I intend to use through the small openings in the rail. I scrounged an HO scale ladder and cut out a piece to use for the rail. It may be a little over scale but should give me a better anchor point. I've also placed the cutter. It's a little long for the space so I had to sand it to get it to sit flatter and it overhangs the forward hatch to prevent interfering with placing the main mast.

I worked on the masts. The mold seams gave me fits and I still don't know if I got them all. I was originally going to remove the molded flags and just use the decals on metal foil to make the flags; but when I reviewed Tim's Nina and Pinta blogs for rigging tips I saw again how he used the molded flags to advantage so I decided to keep them. My hands trembled a little during the painting and I started losing my depth perception when using my optivisor which slowed my down. It took me three days to paint the flags. They're not perfect but they're the best I can do. I have no idea if the flags (and decals)are historically accurate so I just went with colors shown elsewhere on the kit. I removed the stern post and replaced it with the kit flag staff. However, this flag was smooth so I gave it a base coat of black and then used the black flag w/scimitar decals. I put a cover coat of Future to prevent silvering. That's why it's so shiny in the photos. It's starting to come together but I still have a way to go.


Sorry about the photo quality. I tried a different photo set up but the overhead lighting seems to highlight the yellow colors. Not really sure why the foremast looks off. I may have taken the photo at a slight angle. I know I've got some glue marks visible that I need to address. I also need to stain the masts and cutter. If you see anything else I've screwed up so far let me know. I want to correct what I can before I mount the sails and start the rigging.

All comments welcome. Thanks for looking.
John


TimReynaga
Staff MemberAssociate Editor
MODEL SHIPWRIGHTS
Visit this Community
California, United States
Joined: May 03, 2006
KitMaker: 2,500 posts
Model Shipwrights: 1,830 posts
Posted: Sunday, April 29, 2018 - 05:55 PM UTC
It looks like you nailed those flags, John! Patience and persistence pays off.
YellowHammer
#513
Visit this Community
Alabama, United States
Joined: March 28, 2006
KitMaker: 554 posts
Model Shipwrights: 219 posts
Posted: Wednesday, July 11, 2018 - 03:33 PM UTC
Hi folks,
After taking a hiatus to deal with some medical issues I finally have some progress to report. I ran into some problems with the build. First I tried to put rope lashings on the deck cannon. I made five attempts using various thread and small diameter wire with no success. It was impossible to clamp or hold the thread in position due to the small size of the guns. The wire I used, copper and steel beading wire had to much memory (spring) when I bent them so the would not hold shape. To save the build from fatal frustration I decided to omit the lashings.

My next frustration dealt with the masts and spars. The kit comes with spars with molded sails attached. The spars have two pegs to assist in attaching the spars to the masts. These really look out of place so I removed them prior to mounting on the masts. BIG mistake. Without the pegs there is very little gluing surface for attaching the spars. And the sail/spars were too heavy and oddly shaped to allow clamping or taping to the mast while the glue set. I finally had to carefully removed the masts and clamp the spars to the mast while they were laying flat. Then had to reattach the masts. With the heavy sails on them I had a lot of trouble keeping them near vertical. They aren't perfect but they're good enough for my shelf.

The stand I scrounged from an old Airfix Mayflower kit. I thought it looked better. I used the nameplate decal from the kit.

I've included a few photos below. I'm almost out of storage space on Kitmaker so I'll have to purge my gallery before posting more.


Next up will be some simple rigging and placing the last deck items: ropes, anchor, etc.


As always, comments and suggestions welcome.
John
Cosimodo
#335
Visit this Community
Auckland, New Zealand
Joined: September 03, 2013
KitMaker: 1,808 posts
Model Shipwrights: 871 posts
Posted: Wednesday, July 11, 2018 - 07:41 PM UTC
Great progress John. The sails look excellent. looking forward to see you go with the rigging.

cheers
Michael
TimReynaga
Staff MemberAssociate Editor
MODEL SHIPWRIGHTS
Visit this Community
California, United States
Joined: May 03, 2006
KitMaker: 2,500 posts
Model Shipwrights: 1,830 posts
Posted: Thursday, July 12, 2018 - 01:53 AM UTC

Quoted Text

...My next frustration dealt with the masts and spars. The kit comes with spars with molded sails attached. The spars have two pegs to assist in attaching the spars to the masts. These really look out of place so I removed them prior to mounting on the masts. BIG mistake. Without the pegs there is very little gluing surface for attaching the spars. And the sail/spars were too heavy and oddly shaped to allow clamping or taping to the mast while the glue set. I finally had to carefully removed the masts and clamp the spars to the mast while they were laying flat. Then had to reattach the masts. With the heavy sails on them I had a lot of trouble keeping them near vertical...


Hi John,

I faced the same choice with my Pyro Niña a couple of years back, but I opted to leave those little pegs, thinking they were inconspicuous - and they now annoy me every time I look at the model!


Even though it may have complicated construction, you made the right choice in removing them.

Keep up the good work, your felucca is looking better and better!

RussellE
#306
Visit this Community
Victoria, Australia
Joined: June 27, 2010
KitMaker: 3,959 posts
Model Shipwrights: 2,777 posts
Posted: Thursday, July 12, 2018 - 09:32 AM UTC
John, that's a big improvement on the masts.

If you're having difficulty glueing them together after removing the 'pegs' you could always file some small grooves into each mast at the intersection point so that they sit someway into each other.

Also drilling a hole and adding a brass pin to key their location may also help
YellowHammer
#513
Visit this Community
Alabama, United States
Joined: March 28, 2006
KitMaker: 554 posts
Model Shipwrights: 219 posts
Posted: Thursday, July 12, 2018 - 09:44 AM UTC
Thanks guys for the comments and encouragement. Russ, thanks for those tips. I still have the small scale Ertl Chinese junk (with 5 masts!), a Pyro Pinta, and two Heller Roman Biremes on my near term shelf. I'm refurbishing an old Heller Oseberg Drakkar in parallel to this felucca. I had to replace the mast with brass wire as the plastic one shattered. I'm going to try your notch idea on the spar. Now to purging my gallery.
John
YellowHammer
#513
Visit this Community
Alabama, United States
Joined: March 28, 2006
KitMaker: 554 posts
Model Shipwrights: 219 posts
Posted: Sunday, July 22, 2018 - 11:39 AM UTC
Hey guys,
Just an quick update and request for help. I'm still working on the rigging on the Felucca and I'm having a devil of a time anchoring the clew lines to the deck or hull side with any kind of tension. I haven't been able to find any clamps small enough to hold the thread in place while the glue dries. Do you guys have any suggestions. I was hoping for a look like Tim did with his Nina and Pinta builds.

Another random thought for future builds hit me as I was looking at the Nina and Pinta build logs tonight; since their sails/spars were raised and lowered from the deck could the locator pins on the spars be used as anchor points for gaffs around the mast. It would seem to me something would be in place to keep the spar aligned while raising and lowering.

TIA
John
TimReynaga
Staff MemberAssociate Editor
MODEL SHIPWRIGHTS
Visit this Community
California, United States
Joined: May 03, 2006
KitMaker: 2,500 posts
Model Shipwrights: 1,830 posts
Posted: Monday, July 23, 2018 - 07:16 AM UTC

Quoted Text

Hey guys,
Just an quick update and request for help. I'm still working on the rigging on the Felucca and I'm having a devil of a time anchoring the clew lines to the deck or hull side with any kind of tension. I haven't been able to find any clamps small enough to hold the thread in place while the glue dries. Do you guys have any suggestions. I was hoping for a look like Tim did with his Nina and Pinta builds.

TIA
John


Hi John,

Keeping tension on the lines can definitely be a challenge! On my Niña and Pinta builds I placed tiny dots of super glue with a toothpick, then pressed the lines into them and held them there with very gentle pressure using an X-acto. When they set I just pressed the X-acto to cut them. The secret is to brush on a bit of cyanoacrylate accelerator, which will dry the glue spots instantly and freeze the tension on the lines.
 _GOTOTOP